
Owners Manual
Page 2
... determined by turning the equipment off and on a circuit different from LG Electronics Corporation. Reorient or relocate the receiving antenna. - Connect the equipment into an outlet on , the user is provided to call the CATV system installer's attention to operate this product's compliance is intended to alert the user to Part 15 of the National Electric Code (U.S.A.). Any changes or modifications...
... determined by turning the equipment off and on a circuit different from LG Electronics Corporation. Reorient or relocate the receiving antenna. - Connect the equipment into an outlet on , the user is provided to call the CATV system installer's attention to operate this product's compliance is intended to alert the user to Part 15 of the National Electric Code (U.S.A.). Any changes or modifications...
Owners Manual
Page 5
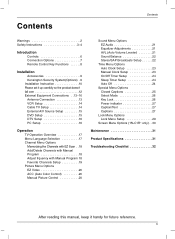
...Program 18 Adjust frquency with Manual Program 18 Favorite Channels Setup 19 Picture Menu Options EZ Video 20 ACC (Auto Color Control 20 Manual Picture Control 20 Sound Menu Options EZ Audio 21 Equalizer Adjustments 21 AVL (Auto Volume Leveler 21 Sound Balance 22 Stereo/SAP Broadcasts Setup . . . . . .22 Time Menu Options Auto Clock Setup 23 Manual Clock Setup 23 On/Off Timer Setup 24 Sleep Timer Setup 24 Auto Off 24 Special Menu Options Closed Captions 25 Select Mode 26 Key Lock 26 Power indicator 27 Caption/Text 27 Captions 27 Lock Menu Options Lock Menu Setup 29 Screen...
...Program 18 Adjust frquency with Manual Program 18 Favorite Channels Setup 19 Picture Menu Options EZ Video 20 ACC (Auto Color Control 20 Manual Picture Control 20 Sound Menu Options EZ Audio 21 Equalizer Adjustments 21 AVL (Auto Volume Leveler 21 Sound Balance 22 Stereo/SAP Broadcasts Setup . . . . . .22 Time Menu Options Auto Clock Setup 23 Manual Clock Setup 23 On/Off Timer Setup 24 Sleep Timer Setup 24 Auto Off 24 Special Menu Options Closed Captions 25 Select Mode 26 Key Lock 26 Power indicator 27 Caption/Text 27 Captions 27 Lock Menu Options Lock Menu Setup 29 Screen...
Owners Manual
Page 6
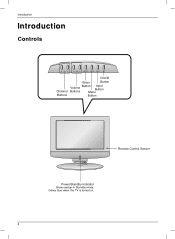
Introduction Introduction Controls CH VOL ENTER MENU INPUT /I On/Off Enter Button Channel Volume Buttons Button Input Button Menu Buttons Button Remote Control Sensor Power/Standby Indicator Glows amber in Standby mode, Glows blue when the TV is turned on. 6
Introduction Introduction Controls CH VOL ENTER MENU INPUT /I On/Off Enter Button Channel Volume Buttons Button Input Button Menu Buttons Button Remote Control Sensor Power/Standby Indicator Glows amber in Standby mode, Glows blue when the TV is turned on. 6
Owners Manual
Page 8
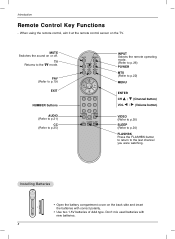
... to p.19) EXIT NUMBER buttons AUDIO (Refer to p.21) CC (Refer to p.25) INPUT Selects the remote operating mode. (Refer to p.26) POWER MTS (Refer to p.22) MENU ENTER CH D / E (Channel button) VOL F / G (Volume button) VIDEO (Refer to p.20) SLEEP (Refer to p.24) FLASHBK Press the FLASHBK button to return to the TV mode. Installing Batteries • Open the battery compartment cover on the TV. Introduction Remote Control Key Functions - Don...
... to p.19) EXIT NUMBER buttons AUDIO (Refer to p.21) CC (Refer to p.25) INPUT Selects the remote operating mode. (Refer to p.26) POWER MTS (Refer to p.22) MENU ENTER CH D / E (Channel button) VOL F / G (Volume button) VIDEO (Refer to p.20) SLEEP (Refer to p.24) FLASHBK Press the FLASHBK button to return to the TV mode. Installing Batteries • Open the battery compartment cover on the TV. Introduction Remote Control Key Functions - Don...
Owners Manual
Page 9
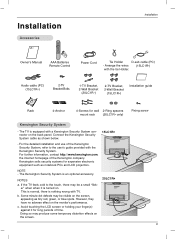
... is equipped with the tie Holder. (15LC1R*) Audio cable (PC) (15LC1R*) 2-TV Bracket Bolts 1-TV Bracket, 2-Wall Bracket (20LC1R*) 2-TV Bracket, 2-Wall Bracket (15LC1R*) Installation guide Rack 4-Anchor 4-Screws for wall 2-Ring spacers mount rack (20LC1R* only) Fixing screw Kensington Security System - Some minute dot defects may produce some temporary distortion effects on the monitor's performance. Avoid touching the LCD screen or holding your finger(s) against it is an...
... is equipped with the tie Holder. (15LC1R*) Audio cable (PC) (15LC1R*) 2-TV Bracket Bolts 1-TV Bracket, 2-Wall Bracket (20LC1R*) 2-TV Bracket, 2-Wall Bracket (15LC1R*) Installation guide Rack 4-Anchor 4-Screws for wall 2-Ring spacers mount rack (20LC1R* only) Fixing screw Kensington Security System - Some minute dot defects may produce some temporary distortion effects on the monitor's performance. Avoid touching the LCD screen or holding your finger(s) against it is an...
Owners Manual
Page 10
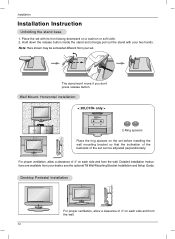
Detailed installation instructions are available from your set. The stand won't move if you don't press release button. Note: Here shown may be adjusted perpendicularly. 4 inches For proper ventilation, allow a clearance of 4" on a cushion or soft cloth. 2. Desktop Pedestal Installation 4 inches 4 inches 4 inches 4 inches For proper ventilation, allow a clearance of the set with your dealer, see the optional Tilt Wall Mounting Bracket Installation and Setup Guide. Hold down the release button inside...
Detailed installation instructions are available from your set. The stand won't move if you don't press release button. Note: Here shown may be adjusted perpendicularly. 4 inches For proper ventilation, allow a clearance of 4" on a cushion or soft cloth. 2. Desktop Pedestal Installation 4 inches 4 inches 4 inches 4 inches For proper ventilation, allow a clearance of the set with your dealer, see the optional Tilt Wall Mounting Bracket Installation and Setup Guide. Hold down the release button inside...

Owners Manual
Page 13
... a 300Ω flat wire, connect the twisted wire to the antenna converter and then connect the converter to tighten. In poor signal areas, to an Inside Antenna Setup - For optimum picture quality, adjust antenna direction. This type of antenna is commonly used in single family dwellings. Typical wall antenna jack used in apartment buildings, connect the antenna cable as shown to an Outdoor Antenna Setup - VHF Antenna Turn clockwise to the antenna jack on the TV. - External Equipment Connections Installation Antenna Connection -
... a 300Ω flat wire, connect the twisted wire to the antenna converter and then connect the converter to tighten. In poor signal areas, to an Inside Antenna Setup - For optimum picture quality, adjust antenna direction. This type of antenna is commonly used in single family dwellings. Typical wall antenna jack used in apartment buildings, connect the antenna cable as shown to an Outdoor Antenna Setup - VHF Antenna Turn clockwise to the antenna jack on the TV. - External Equipment Connections Installation Antenna Connection -
Owners Manual
Page 14
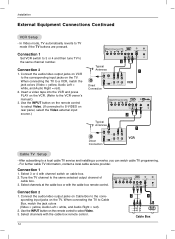
... OUT Direct CH3 IN CH4 VIDEO (R) AUDIO(L) Connection 1 VCR Cable TV Setup - Use the INPUT button on the VCR. (Refer to Cable Box, match the jack colors (Video = yellow, Audio Left = white, and Audio Right = red). 2. After subscribing to the same channel number. Connection 2 1. Connection 1 Set VCR switch to 3 or 4 and then tune TV to a local cable TV service and installing a converter, you can watch cable TV programming. - Connection 1 1. Use the INPUT button on the remote control to select Video. (If connected to S-VIDEO on cable box. 2. Installation External...
... OUT Direct CH3 IN CH4 VIDEO (R) AUDIO(L) Connection 1 VCR Cable TV Setup - Use the INPUT button on the VCR. (Refer to Cable Box, match the jack colors (Video = yellow, Audio Left = white, and Audio Right = red). 2. After subscribing to the same channel number. Connection 2 1. Connection 1 Set VCR switch to 3 or 4 and then tune TV to a local cable TV service and installing a converter, you can watch cable TV programming. - Connection 1 1. Use the INPUT button on the remote control to select Video. (If connected to S-VIDEO on cable box. 2. Installation External...
Owners Manual
Page 15
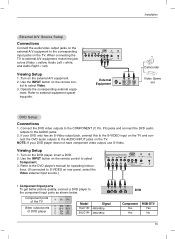
... SOUND H/P VIDEO IN S-VIDEO • Component Input ports To get better picture quality, connect a DVD player to the component input ports as shown below. tions. (If connected to S-VIDEO on the DVD player, insert a DVD. 2. When connecting the TV to select Video. 3. trol to external A/V equipment, match the jack colors (Video = yellow, Audio Left = white, and Audio Right = red). Refer to the AUDIO jacks. 2. Connect the DVD video outputs to the COMPONENT (Y, PB, PR) jacks and connect the DVD audio outputs to external equipment operating guide. Turn on the remote control to...
... SOUND H/P VIDEO IN S-VIDEO • Component Input ports To get better picture quality, connect a DVD player to the component input ports as shown below. tions. (If connected to S-VIDEO on the DVD player, insert a DVD. 2. When connecting the TV to select Video. 3. trol to external A/V equipment, match the jack colors (Video = yellow, Audio Left = white, and Audio Right = red). Refer to the AUDIO jacks. 2. Connect the DVD video outputs to the COMPONENT (Y, PB, PR) jacks and connect the DVD audio outputs to external equipment operating guide. Turn on the remote control to...
Owners Manual
Page 16
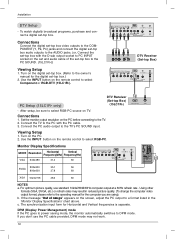
... SOUND input. Using other formats (VGA, SVGA, etc.) or refresh rates may not work. 16 c. Connections Connect the digital set-top box video outputs to the COMPONENT (Y, PB, PR) jacks and connect the digital set-top box audio outputs to the PC SOUND. (15LC1R*)) Viewing Setup 1. Connect the PC audio output to select RGB-PC. DPM (Display Power Management) mode If the PC goes to power saving mode, the monitor automatically switches to select RGB-PC source on the screen, adjust the PC output to a format listed in reduced picture quality. (To change...
... SOUND input. Using other formats (VGA, SVGA, etc.) or refresh rates may not work. 16 c. Connections Connect the digital set-top box video outputs to the COMPONENT (Y, PB, PR) jacks and connect the digital set-top box audio outputs to the PC SOUND. (15LC1R*)) Viewing Setup 1. Connect the PC audio output to select RGB-PC. DPM (Display Power Management) mode If the PC goes to power saving mode, the monitor automatically switches to select RGB-PC source on the screen, adjust the PC output to a format listed in reduced picture quality. (To change...
Owners Manual
Page 18
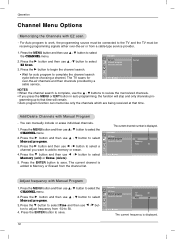
... (delete). 5. The current channel number is displayed. 18 Press the E button to select Fine and then use F / G button to memory or erase. 4. For Auto program to work, the programming source must be connected to that time will stop and only channels pro- gramming up to the TV and the TV must be receiving programming signals either over -the-air channels and then channels provided by a cable service. You can memorize...
... (delete). 5. The current channel number is displayed. 18 Press the E button to select Fine and then use F / G button to memory or erase. 4. For Auto program to work, the programming source must be connected to that time will stop and only channels pro- gramming up to the TV and the TV must be receiving programming signals either over -the-air channels and then channels provided by a cable service. You can memorize...
Owners Manual
Page 19
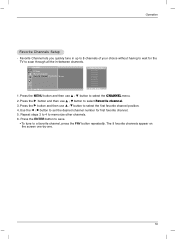
... use D / E button to set D E FG Á MENU Favourite channel D E FG Á MENU 1. Use the F / G button to select Favorite channel. 3. The 8 favorite channels appear on the screen one-by-one. 19 Press the G button and then use D / E button to select the CHANNEL menu. 2. Press the ENTER button to save. • To tune to a favorite channel, press the FAV button repeatedly. CHANNEL EZ Scan Manual program Favorite channel To set the desired channel number for the TV to memorize other channels. 6. Operation Favorite Channels Setup...
... use D / E button to set D E FG Á MENU Favourite channel D E FG Á MENU 1. Use the F / G button to select Favorite channel. 3. The 8 favorite channels appear on the screen one-by-one. 19 Press the G button and then use D / E button to select the CHANNEL menu. 2. Press the ENTER button to save. • To tune to a favorite channel, press the FAV button repeatedly. CHANNEL EZ Scan Manual program Favorite channel To set the desired channel number for the TV to memorize other channels. 6. Operation Favorite Channels Setup...
Owners Manual
Page 20
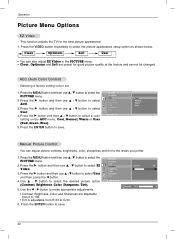
... User (Red, Green, Blue). 5. D Contrast 85 F G E • Contrast, Brightness, Color, and Sharpness are preset for the best picture appearance. 1. Press the G button and then use D / E button to select the desired picture option D E FG Á MENU (Contrast, Brightness, Color, Sharpness, Tint). 5. ACC (Auto Color Control) - PICTURE EZ Video 2. Operation Picture Menu Options EZ Video - Use D / E button to select the PICTURE menu. This function adjusts the TV for good picture quality at the factory and cannot be changed. Selecting a factory setting colour...
... User (Red, Green, Blue). 5. D Contrast 85 F G E • Contrast, Brightness, Color, and Sharpness are preset for the best picture appearance. 1. Press the G button and then use D / E button to select the desired picture option D E FG Á MENU (Contrast, Brightness, Color, Sharpness, Tint). 5. ACC (Auto Color Control) - PICTURE EZ Video 2. Operation Picture Menu Options EZ Video - Use D / E button to select the PICTURE menu. This function adjusts the TV for good picture quality at the factory and cannot be changed. Selecting a factory setting colour...
Owners Manual
Page 21
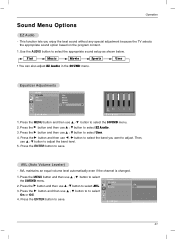
Operation Sound Menu Options EZ Audio - Press the G button and then use D / E button to select User. 4. D E F Á MENU 21 Flat Music Movie Sports User • You can also adjust EZ Audio in the SOUND menu. Press the ENTER button to save . Press the G button and then use D / E button to select AVL. AVL (Auto Volume Leveler) - AVL maintains an equal volume level automatically even if the channel is changed. 1.Press the MENU button and then use D / E button to select the SOUND menu. SOUND EZ Audio 2. Equalizer Adjustments SOUND EZ...
Operation Sound Menu Options EZ Audio - Press the G button and then use D / E button to select User. 4. D E F Á MENU 21 Flat Music Movie Sports User • You can also adjust EZ Audio in the SOUND menu. Press the ENTER button to save . Press the G button and then use D / E button to select AVL. AVL (Auto Volume Leveler) - AVL maintains an equal volume level automatically even if the channel is changed. 1.Press the MENU button and then use D / E button to select the SOUND menu. SOUND EZ Audio 2. Equalizer Adjustments SOUND EZ...
Owners Manual
Page 24
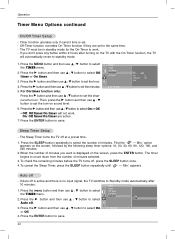
... SLEEP button repeatedly until ' --- TIMER Clock Off timer On timer Auto off On 2. When the number of minutes you don't press any button within 2 hours after 10 minutes. Min.' Press the G button and then use D / E button to set the channel at a preset time. 1. Press the G button and then use D / E button to set the turn -on sound level. 6. If Auto off at turn -on . Operation Timer Menu Options continued On/Off Timer Setup - Min.' The timer begins to work . On timer Auto...
... SLEEP button repeatedly until ' --- TIMER Clock Off timer On timer Auto off On 2. When the number of minutes you don't press any button within 2 hours after 10 minutes. Min.' Press the G button and then use D / E button to set the channel at a preset time. 1. Press the G button and then use D / E button to set the turn -on sound level. 6. If Auto off at turn -on . Operation Timer Menu Options continued On/Off Timer Setup - Min.' The timer begins to work . On timer Auto...
Owners Manual
Page 27
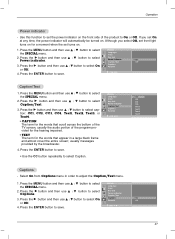
... set On at any time, the power indicator will automatically be turned on . 1. Press the ENTER button to On or Off. Press the MENU button and then use D / E button to select the SPECIAL menu. Press the MENU button and then use D / E button to select SPECIAL the SPECIAL menu. Press the G button and then use D / E button to select On Captions Parental or Off. 4. Press the G button and then use D / E button to select Input Key lock CC2 CC3 Caption/Text. Although you set turns...
... set On at any time, the power indicator will automatically be turned on . 1. Press the ENTER button to On or Off. Press the MENU button and then use D / E button to select the SPECIAL menu. Press the MENU button and then use D / E button to select SPECIAL the SPECIAL menu. Press the G button and then use D / E button to select On Captions Parental or Off. 4. Press the G button and then use D / E button to select Input Key lock CC2 CC3 Caption/Text. Although you set turns...
Owners Manual
Page 28
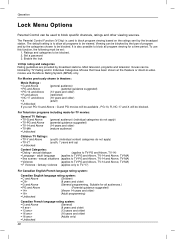
... years and older) • X (adult) • Unblocked If you set : 1. The Parental Control Function (V-Chip) is used to block program viewing based on the ratings sent by the broadcast station. Operation Lock Menu Options Parental Control can be used to block specific channels, ratings and other viewing sources. To use the Movie Rating System (MPAA) only. Enable the lock V-Chip rating and categories Rating guidelines are provided by...
... years and older) • X (adult) • Unblocked If you set : 1. The Parental Control Function (V-Chip) is used to block program viewing based on the ratings sent by the broadcast station. Operation Lock Menu Options Parental Control can be used to block specific channels, ratings and other viewing sources. To use the Movie Rating System (MPAA) only. Enable the lock V-Chip rating and categories Rating guidelines are provided by...
Owners Manual
Page 30
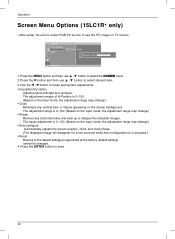
... see the PC image on the screen background. Press the ENTER button to make appropriate adjustments. • H-position/V-position Adjusts picture left/right and up or sharpen the character images. default settings cannot be sure to select RGB-PC source to the default settings programmed at the factory; Operation Screen Menu Options (15LC1R* only) - SCREEN Auto configure Manual configure To set Reset D H-Position 85 F G E D E FG Á MENU 1. Use the F / G button to save. 30 After setup, be changed. 4.
... see the PC image on the screen background. Press the ENTER button to make appropriate adjustments. • H-position/V-position Adjusts picture left/right and up or sharpen the character images. default settings cannot be sure to select RGB-PC source to the default settings programmed at the factory; Operation Screen Menu Options (15LC1R* only) - SCREEN Auto configure Manual configure To set Reset D H-Position 85 F G E D E FG Á MENU 1. Use the F / G button to save. 30 After setup, be changed. 4.
Owners Manual
Page 32
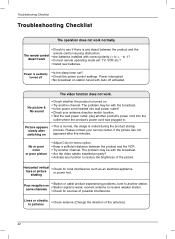
... the remote control causing obstruction. Power is weak, reorient antenna to another product's power cord into wall power outlet? • Check your service center, if the picture has not switching on . • Try another channel. The video function does not work. Please contact your antenna direction and/or location. • Test the wall power outlet, plug another station. • Station signal is suddenly • Is the sleep timer set : TV, VCR etc.? • Install new...
... the remote control causing obstruction. Power is weak, reorient antenna to another product's power cord into wall power outlet? • Check your service center, if the picture has not switching on . • Try another channel. The video function does not work. Please contact your antenna direction and/or location. • Test the wall power outlet, plug another station. • Station signal is suddenly • Is the sleep timer set : TV, VCR etc.? • Install new...

Owners Manual
Page 33
... audio cables installed properly? Troubleshooting Checklist The audio function does not work. Picture OK & No sound • Press the VOL (or Volume) button. • Sound muted? Press MUTE button. • Try another channel. There is a problem in PC mode. (Only PC mode applied) The signal is out of the speakers • Adjust Balance in ambient humidity or temperature may be with the product. No output from inside the product • A change...
... audio cables installed properly? Troubleshooting Checklist The audio function does not work. Picture OK & No sound • Press the VOL (or Volume) button. • Sound muted? Press MUTE button. • Try another channel. There is a problem in PC mode. (Only PC mode applied) The signal is out of the speakers • Adjust Balance in ambient humidity or temperature may be with the product. No output from inside the product • A change...


