

Owner's Manual (English)
Page 4
... reheatings. Do not let cord hang over cook food. b. Remove wire twist-ties from the microwave oven is not designed for examination, repair, or adjustment. 10. c. If materials inside the oven to stand in use . 7. Liquids, such as water, coffee, or tea are placed inside the oven ignite, KEEP OVEN DOOR...
... reheatings. Do not let cord hang over cook food. b. Remove wire twist-ties from the microwave oven is not designed for examination, repair, or adjustment. 10. c. If materials inside the oven to stand in use . 7. Liquids, such as water, coffee, or tea are placed inside the oven ignite, KEEP OVEN DOOR...

Owner's Manual (English)
Page 5
Always attach plug to "off parts, and before serving any control to appliance first, then plug cord into the wall outlet. Do not use appliance for other liquid. 4. Scalding may cause hazards. 8. The glass carafe is .../or injury to reduce the risk of table or counter, or touch hot surface. 18. Do not clean carafe or warming plate with moving parts. 10. Do not pull out the water reservoir while brewing coffee. Read all instructions. 2. COFFEE MAKER IMPORTANT SAFETY INSTRUCTIONS When using electrical appliances, basic safety precautions...
Always attach plug to "off parts, and before serving any control to appliance first, then plug cord into the wall outlet. Do not use appliance for other liquid. 4. Scalding may cause hazards. 8. The glass carafe is .../or injury to reduce the risk of table or counter, or touch hot surface. 18. Do not clean carafe or warming plate with moving parts. 10. Do not pull out the water reservoir while brewing coffee. Read all instructions. 2. COFFEE MAKER IMPORTANT SAFETY INSTRUCTIONS When using electrical appliances, basic safety precautions...

Owner's Manual (English)
Page 8
... this pad to 99 minutes 59 seconds. 6. This pad is used when you time of frozen foods. 8. UNDERSTANDING YOUR COFFEE COMBO CONTROL PANEL MICROWAVE CONTROL AREA 4 68 10 2 13 5 7 9 11 1 12 3 1. The Display includes a clock and indicators that tell you want to brew a small amount (1~4... TOUCH. This pad allows you with the quick defrosting method for 1.0 pound of day, cooking time settings, and cooking functions selected. 2. COFFEE MAKER CONTROL AREA 1 3 5 2 4 6 1. 1-4. This pad is used when you want to stop the oven or clear entries. (microwave oven only)...
... this pad to 99 minutes 59 seconds. 6. This pad is used when you time of frozen foods. 8. UNDERSTANDING YOUR COFFEE COMBO CONTROL PANEL MICROWAVE CONTROL AREA 4 68 10 2 13 5 7 9 11 1 12 3 1. The Display includes a clock and indicators that tell you want to brew a small amount (1~4... TOUCH. This pad allows you with the quick defrosting method for 1.0 pound of day, cooking time settings, and cooking functions selected. 2. COFFEE MAKER CONTROL AREA 1 3 5 2 4 6 1. 1-4. This pad is used when you want to stop the oven or clear entries. (microwave oven only)...

Owner's Manual (English)
Page 10
... longer will finish cooking during standing time. Oven turntable may be turned so that might have been entered accidentally while cleaning the panel. 10 COVERING A cover traps heat and steam and causes the food to break during standing time. To absorb extra moisture, wrap sandwiches and .... SPECIAL CARE For best performance and safety, the inner door panel and the oven front frame should be cleaned regularly. After cleaning the control panel, touch STOP/CLEAR to vent the excess steam. ARRANGEMENT Do not stack food. STANDING TIME IN OVEN Depending on the inside and...
... longer will finish cooking during standing time. Oven turntable may be turned so that might have been entered accidentally while cleaning the panel. 10 COVERING A cover traps heat and steam and causes the food to break during standing time. To absorb extra moisture, wrap sandwiches and .... SPECIAL CARE For best performance and safety, the inner door panel and the oven front frame should be cleaned regularly. After cleaning the control panel, touch STOP/CLEAR to vent the excess steam. ARRANGEMENT Do not stack food. STANDING TIME IN OVEN Depending on the inside and...
Owner's Manual (English)
Page 12
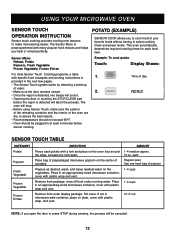
...the vapor is detected will sound. • Opening the door or touching the STOP/CLEAR pad before sensor cooking. AMOUNT 1~4 medium approx. 10 oz. POTATO (EXAMPLE) SENSOR COOK allows you to cook most Sensor Touch Cooking programs, a table with specific food examples and cooking instructions is.... This oven automatically determines required cooking times for each Regular sizes Use one inch apart. Time of popcorn 1~4 cups 1~4 cups 10~21 oz. Remove from outer display package. Remove from package, rinse off frost under running water. Place bag of prepackaged microwave ...
...the vapor is detected will sound. • Opening the door or touching the STOP/CLEAR pad before sensor cooking. AMOUNT 1~4 medium approx. 10 oz. POTATO (EXAMPLE) SENSOR COOK allows you to cook most Sensor Touch Cooking programs, a table with specific food examples and cooking instructions is.... This oven automatically determines required cooking times for each Regular sizes Use one inch apart. Time of popcorn 1~4 cups 1~4 cups 10~21 oz. Remove from outer display package. Remove from package, rinse off frost under running water. Place bag of prepackaged microwave ...
Owner's Manual (English)
Page 15
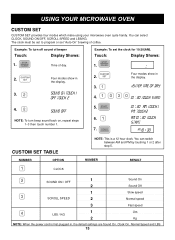
...: When the power cord is a 12 hour clock. Touch: Display Shows: 1. the display. 3. 3. enter time of day 10 : 30 touch start 10 : 30 AM TOUCH 1 PM TOUCH 2 AM 10 : 30 TOUCH START AM 10 : 30 CUSTOM SET TABLE NUMBER OPTION NOTE: This is first plugged in, the default settings are Sound On, Clock...and LBS/KG. Example: To turn beep sound back on touch 1 off touch 2 4. 4. 5. The clock must be set to program or set the clock for 10:30(AM). Time of coffee. Four modes show in 2. sound off sound of beeper Touch: Display Shows: Example: To set "Auto-On" brewing of day...
...: When the power cord is a 12 hour clock. Touch: Display Shows: 1. the display. 3. 3. enter time of day 10 : 30 touch start 10 : 30 AM TOUCH 1 PM TOUCH 2 AM 10 : 30 TOUCH START AM 10 : 30 CUSTOM SET TABLE NUMBER OPTION NOTE: This is first plugged in, the default settings are Sound On, Clock...and LBS/KG. Example: To turn beep sound back on touch 1 off touch 2 4. 4. 5. The clock must be set to program or set the clock for 10:30(AM). Time of coffee. Four modes show in 2. sound off sound of beeper Touch: Display Shows: Example: To set "Auto-On" brewing of day...

Owner's Manual (English)
Page 17
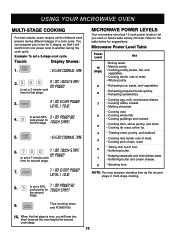
Refer to HIGH power (100%). Example: To cook for 5 minutes, 30 seconds at HIGH (100%) power. ENTER POWER LEVEL 1 TO 10 4. 5 : 30 POWER 80 TOUCH START 5. Rolled roast, Sausage Veal Cutlets (1 lb., 1⁄2-inch thick) POULTRY Poultry Whole (under 4 lbs.), Cut-up, Breasts (boneless) Cornish... not select a power level, the oven will automatically cook at 80% power. Time counting down and POWER 80. 17 For best results, there are 10 power level settings in addition to the "Microwave Power Level Table" on page 18 for stew, Tenderloin steak, Pot roast, Rib roast, Rump roast, ...
Refer to HIGH power (100%). Example: To cook for 5 minutes, 30 seconds at HIGH (100%) power. ENTER POWER LEVEL 1 TO 10 4. 5 : 30 POWER 80 TOUCH START 5. Rolled roast, Sausage Veal Cutlets (1 lb., 1⁄2-inch thick) POULTRY Poultry Whole (under 4 lbs.), Cut-up, Breasts (boneless) Cornish... not select a power level, the oven will automatically cook at 80% power. Time counting down and POWER 80. 17 For best results, there are 10 power level settings in addition to the "Microwave Power Level Table" on page 18 for stew, Tenderloin steak, Pot roast, Rib roast, Rump roast, ...
Owner's Manual (English)
Page 18
...as the oven begins the second cook stage. 18 Time counting down and POWER 80. 10. to set a 7 minute cook time for second stage. 7. 7 : 00 ENTER POWER LEVEL 1 TO 10 MICROWAVE POWER LEVELS Your microwave oven has 10 cook power levels to set a 50% 7 : 00 POWER 50 cook power for ...suggestions: Microwave Power Level Table Power Level Use 10 (High) 9 8 • Boiling water. • Making candy. • Cooking poultry pieces, fish, and vegetables. • Cooking tender cuts of meat. • Whole poultry....
...as the oven begins the second cook stage. 18 Time counting down and POWER 80. 10. to set a 7 minute cook time for second stage. 7. 7 : 00 ENTER POWER LEVEL 1 TO 10 MICROWAVE POWER LEVELS Your microwave oven has 10 cook power levels to set a 50% 7 : 00 POWER 50 cook power for ...suggestions: Microwave Power Level Table Power Level Use 10 (High) 9 8 • Boiling water. • Making candy. • Cooking poultry pieces, fish, and vegetables. • Cooking tender cuts of meat. • Whole poultry....

Owner's Manual (English)
Page 19
... halfway through the cooking time. Season if desired. 2. Turn over halfway through the cooking time. 5. After cook time has finished, allow for 5~10 minutes of the stuffed bird should be used when calculating the cooking time. 19 Whole poultry is completely cooked when the juices run clear from... and wings. Poultry Cooking Table Poultry Microwave Cooking Time Power Per Pound CHICKEN Whole Breast (boned) Portions TURKEY Whole 8 11 to 15 minutes 8 10 to 14 minutes 8 11 to 17 minutes 8 11 to 15 minutes NOTES: • The times listed above are clear and the flesh is ...
... halfway through the cooking time. Season if desired. 2. Turn over halfway through the cooking time. 5. After cook time has finished, allow for 5~10 minutes of the stuffed bird should be used when calculating the cooking time. 19 Whole poultry is completely cooked when the juices run clear from... and wings. Poultry Cooking Table Poultry Microwave Cooking Time Power Per Pound CHICKEN Whole Breast (boned) Portions TURKEY Whole 8 11 to 15 minutes 8 10 to 14 minutes 8 11 to 17 minutes 8 11 to 15 minutes NOTES: • The times listed above are clear and the flesh is ...

Owner's Manual (English)
Page 22
... pads. Reassemble the filter basket and reservoir with a soft damp cloth. If you to adjust the flavor of the filter basket (Fig. 10). Warming plate may also be cleaned with opposite motion being careful to properly engage the reservoir's seal. Never immerse the Coffee Maker. USING... YOUR COFFEE MAKER BREW STRENGTH CONTROL Pre-selecting the taste (flavor selector) The flavor selector (Fig. 9) allows you want to remove carafe lid, open and tilt the lid...
... pads. Reassemble the filter basket and reservoir with a soft damp cloth. If you to adjust the flavor of the filter basket (Fig. 10). Warming plate may also be cleaned with opposite motion being careful to properly engage the reservoir's seal. Never immerse the Coffee Maker. USING... YOUR COFFEE MAKER BREW STRENGTH CONTROL Pre-selecting the taste (flavor selector) The flavor selector (Fig. 9) allows you want to remove carafe lid, open and tilt the lid...
Owner's Manual (English)
Page 26
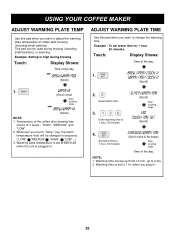
This pad can be set from 10 min. Warming plate temperature is set warm time for 1 hour 30 minutes. Set warm time to 2 hrs. 2. brew/warm-med (Scroll) 1. key, the warm temperature ...
This pad can be set from 10 min. Warming plate temperature is set warm time for 1 hour 30 minutes. Set warm time to 2 hrs. 2. brew/warm-med (Scroll) 1. key, the warm temperature ...