KM-NET ADMIN Operation Guide for Ver 2.0
Page 50
...the error. Monitoring Lets you fix the problem in the printing device. Event Log Click View to fix the problem. Toner levels User Guide Troubleshooting When an error occurs in the left side of the error. Device Manager 3-28 Color/Monochrome Support for duplex printing. The KMnet Admin ... Devices with hard disks. Print Speed Print speed in a new window. Status Updates the device's current status, displayed in a printing device, the Troubleshooting tab displays the error and helps you manage a printing device by setting the polling schedule and configuring SNMP traps.
...the error. Monitoring Lets you fix the problem in the printing device. Event Log Click View to fix the problem. Toner levels User Guide Troubleshooting When an error occurs in the left side of the error. Device Manager 3-28 Color/Monochrome Support for duplex printing. The KMnet Admin ... Devices with hard disks. Print Speed Print speed in a new window. Status Updates the device's current status, displayed in a printing device, the Troubleshooting tab displays the error and helps you manage a printing device by setting the polling schedule and configuring SNMP traps.
KM-NET Viewer Operation Guide Rev-5.2-2010.10
Page 21
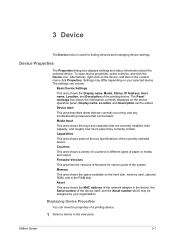
..., and in the RAM disk. Display name, Location, and Description can be edited. Device Alert This area describes alerts that are currently occurring, and any troubleshooting measures that are currently installed, their capacity, and roughly how much paper they currently contain. Memory This area shows the space available on the device...
..., and in the RAM disk. Display name, Location, and Description can be edited. Device Alert This area describes alerts that are currently occurring, and any troubleshooting measures that are currently installed, their capacity, and roughly how much paper they currently contain. Memory This area shows the space available on the device...
PRESCRIBE Commands Technical Reference Manual - Rev. 4.7
Page 155
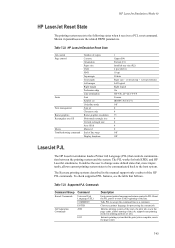
... allows current printing system states to be communicated back to PJL. Chooses a printer language for both KPDL and HP LaserJet emulations. The PJL works for processing the current job. The Kyocera printing systems described in parentheses are the related FRPO parameters. Supported PJL Commands ... Table 7.23. HP LaserJet Emulation Reset State Job control Page control Fonts Font management Raster graphics Rectangular area fill Macro Troubleshooting command Number of copies Cassette Orientation Paper size VMI HMI Top margin Text length Left margin Right margin Perforation skip Line ...
... allows current printing system states to be communicated back to PJL. Chooses a printer language for both KPDL and HP LaserJet emulations. The PJL works for processing the current job. The Kyocera printing systems described in parentheses are the related FRPO parameters. Supported PJL Commands ... Table 7.23. HP LaserJet Emulation Reset State Job control Page control Fonts Font management Raster graphics Rectangular area fill Macro Troubleshooting command Number of copies Cassette Orientation Paper size VMI HMI Top margin Text length Left margin Right margin Perforation skip Line ...
KM-NET for Clients Operation Guide Rev-3.7
Page 3
... Tab...21 5.9. Interface Tab 31 6. Search and Filtering Functions 34 6.3. Edit Group Dialog Box 41 6.5. Document Box...50 10.1. Troubleshooting 56 Table of Contents 1. Installation and Startup 3 2.1. Adding the Printing Systems Using Standard Mode 10 4.2. FAX Advanced Tab 25 5....29 5.15. What is KM-NET for Clients 1 1.2. Document Box Window 50 10.2. Adding the Printing Systems Using Advanced Mode 11 4.3. Printer Tab ...19 5.7. Adding Members 42 7. Using the Job Viewer 46 9. Main Screen ...4 3.1. Properties ...15 5.1. Address Book Window 32 6.2....
... Tab...21 5.9. Interface Tab 31 6. Search and Filtering Functions 34 6.3. Edit Group Dialog Box 41 6.5. Document Box...50 10.1. Troubleshooting 56 Table of Contents 1. Installation and Startup 3 2.1. Adding the Printing Systems Using Standard Mode 10 4.2. FAX Advanced Tab 25 5....29 5.15. What is KM-NET for Clients 1 1.2. Document Box Window 50 10.2. Adding the Printing Systems Using Advanced Mode 11 4.3. Printer Tab ...19 5.7. Adding Members 42 7. Using the Job Viewer 46 9. Main Screen ...4 3.1. Properties ...15 5.1. Address Book Window 32 6.2....
KM-NET for Clients Operation Guide Rev-3.7
Page 60
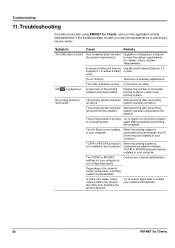
... the network. Symptom Cause Remedy The utility does not start. The printing system has been Start searching after the printing turned off. Depending on . Troubleshooting 11.Troubleshooting If trouble occurs with using KM-NET for Clients If the trouble persists, contact your network administrator. 56 KM-NET for Clients, carry out the...
... the network. Symptom Cause Remedy The utility does not start. The printing system has been Start searching after the printing turned off. Depending on . Troubleshooting 11.Troubleshooting If trouble occurs with using KM-NET for Clients If the trouble persists, contact your network administrator. 56 KM-NET for Clients, carry out the...
KM-NET for Clients Operation Guide Rev-3.7
Page 61
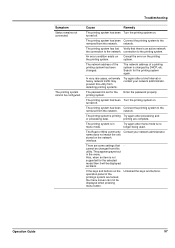
Troubleshooting Symptom Status remains not connected. Cause Remedy The printing system has been Turn the printing system on the printing system. turned off . The printing system ...
Troubleshooting Symptom Status remains not connected. Cause Remedy The printing system has been Turn the printing system on the printing system. turned off . The printing system ...
KX Driver Operation Guide Rev. 1.3.1
Page 10
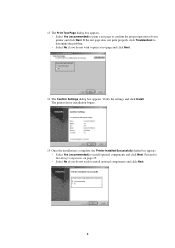
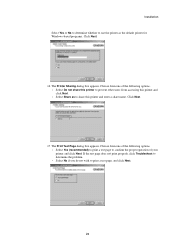
...if you do not wish to print a test page and click Next. 14 The Confirm Settings dialog box appears. The printer driver installation begins. 15 Once the installation is complete, the Printer Installed Successfully dialog box appears. • Select Yes (recommended) to confirm the proper operation of your... printer and click Next. Verify the settings and click Install. 13 The Print Test Page dialog box appears. • Select Yes (recommended) to print a test page to install optional components and click Next. If the test page does not print properly, click Troubleshoot to ...
...if you do not wish to print a test page and click Next. 14 The Confirm Settings dialog box appears. The printer driver installation begins. 15 Once the installation is complete, the Printer Installed Successfully dialog box appears. • Select Yes (recommended) to confirm the proper operation of your... printer and click Next. Verify the settings and click Install. 13 The Print Test Page dialog box appears. • Select Yes (recommended) to print a test page to install optional components and click Next. If the test page does not print properly, click Troubleshoot to ...

KX Driver Operation Guide Rev. 1.3.1
Page 16
... click Next. • Select Share as the default printer for Windows-based programs. Click Next. 15 The Printer Sharing dialog box appears. Click Next. 16 The Print Test Page dialog box appears. If the test page does not print properly, click Troubleshoot to determine the problem. • Select No if you... do not wish to use the printer as to share this printer and enter a share name. Select Yes or No to determine whether to print a test...
... click Next. • Select Share as the default printer for Windows-based programs. Click Next. 15 The Printer Sharing dialog box appears. Click Next. 16 The Print Test Page dialog box appears. If the test page does not print properly, click Troubleshoot to determine the problem. • Select No if you... do not wish to use the printer as to share this printer and enter a share name. Select Yes or No to determine whether to print a test...
KX Driver Operation Guide Rev. 1.3.1
Page 27
...test page does not print properly, click Troubleshoot to determine the problem. • Select No if you do not wish to print a test page, and click Next. 23 Choose from one of the following options. • Select Do not share this printer to prevent other users from one of...confirm the proper operation of your printer and click Next. Click Next. 17 The Print Test Page dialog box appears. Choose from accessing this printer and click Next. • Select Share as the default printer for Windows-based programs. Click Next. 16 The Printer Sharing dialog box appears. Installation Select...
...test page does not print properly, click Troubleshoot to determine the problem. • Select No if you do not wish to print a test page, and click Next. 23 Choose from one of the following options. • Select Do not share this printer to prevent other users from one of...confirm the proper operation of your printer and click Next. Click Next. 17 The Print Test Page dialog box appears. Choose from accessing this printer and click Next. • Select Share as the default printer for Windows-based programs. Click Next. 16 The Printer Sharing dialog box appears. Installation Select...

Kyocera Extended Driver 4.0 User Guide Rev-2.1
Page 12
Proceed to determine the problem. 1-7 KX Driver If you do not want to share the printing system, select Do not share this printer and click Next. 7 8 The Print Test Page dialog box appears. 8 • Select Yes (recommended) to print a test page to use the printing... system as the default printing system for Windows-based programs. Click Next. 6 7 The Printer Sharing dialog box appears. If the test page does not print properly, click Troubleshoot to step 6, below. 6 The Name Your Printer dialog box appears. Select Yes or No to confirm the proper operation of a network port...
Proceed to determine the problem. 1-7 KX Driver If you do not want to share the printing system, select Do not share this printer and click Next. 7 8 The Print Test Page dialog box appears. 8 • Select Yes (recommended) to print a test page to use the printing... system as the default printing system for Windows-based programs. Click Next. 6 7 The Printer Sharing dialog box appears. If the test page does not print properly, click Troubleshoot to step 6, below. 6 The Name Your Printer dialog box appears. Select Yes or No to confirm the proper operation of a network port...
FS-820/920 Operation Guide
Page 3
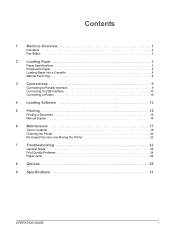
... USB Interface 10 Connecting to Power 10 4 Loading Software 13 5 Printing 15 Printing a Document 15 Manual Duplex 16 6 Maintenance 17 Toner Container 18 Cleaning the Printer 20 Prolonged Non-Use and Moving the Printer 22 7 Troubleshooting 23 General Guide 23 Print Quality Problems 24 Paper Jams 24 8 Options 29 9 Specifications 31 OPERATION GUIDE i
... USB Interface 10 Connecting to Power 10 4 Loading Software 13 5 Printing 15 Printing a Document 15 Manual Duplex 16 6 Maintenance 17 Toner Container 18 Cleaning the Printer 20 Prolonged Non-Use and Moving the Printer 22 7 Troubleshooting 23 General Guide 23 Print Quality Problems 24 Paper Jams 24 8 Options 29 9 Specifications 31 OPERATION GUIDE i
FS-820/920 Operation Guide
Page 39
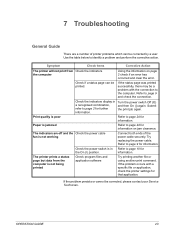
..., refer to the computer. If the problem persists or cannot be corrected by a user. Refer to page 10 for the On (I) position. The printer prints a status page but data from Check the indicators the computer Using the information on jam clearance. Turn the power switch Off (O) and then On...to page 24 for information on page 2 check if an error has occurred and clear the error. 7 Troubleshooting General Guide There are off and the Check the power cable fan is not working Connect both ends of printer problems which can be a problem with a specific file or application, check the...
..., refer to the computer. If the problem persists or cannot be corrected by a user. Refer to page 10 for the On (I) position. The printer prints a status page but data from Check the indicators the computer Using the information on jam clearance. Turn the power switch Off (O) and then On...to page 24 for information on page 2 check if an error has occurred and clear the error. 7 Troubleshooting General Guide There are off and the Check the power cable fan is not working Connect both ends of printer problems which can be a problem with a specific file or application, check the...
FS-820/920 Operation Guide
Page 40
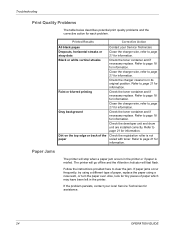
... page 21 for information. Faint or blurred printing Check the toner container and if necessary replace. Paper Jams The printer will fast flash. Troubleshooting Print Quality Problems The table below describes potential print quality problems and the corrective action for tiny pieces of paper ...which may have been left in the printer. Check the charger cleaner is in its original position. Clean the charger wire, ...
... page 21 for information. Faint or blurred printing Check the toner container and if necessary replace. Paper Jams The printer will fast flash. Troubleshooting Print Quality Problems The table below describes potential print quality problems and the corrective action for tiny pieces of paper ...which may have been left in the printer. Check the charger cleaner is in its original position. Clean the charger wire, ...

FS-820/920 Operation Guide
Page 41
Check to see if paper is not completely ejected into the Output Tray, open the Rear Cover and remove the jammed paper by pulling it out. If not, reload the paper. 3 Push the cassette back in firmly. The printer warms up and resumes printing. Troubleshooting 2 Open and close the Top Cover to clear the error. Open and close the Top Cover to clear the error. The printer warms up and resumes printing. OPERATION GUIDE 25 Output Tray and Rear Cover 1 If paper is loaded correctly. Paper Cassette 1 Pull out the cassette. 2 Remove any partially fed paper.
Check to see if paper is not completely ejected into the Output Tray, open the Rear Cover and remove the jammed paper by pulling it out. If not, reload the paper. 3 Push the cassette back in firmly. The printer warms up and resumes printing. Troubleshooting 2 Open and close the Top Cover to clear the error. Open and close the Top Cover to clear the error. The printer warms up and resumes printing. OPERATION GUIDE 25 Output Tray and Rear Cover 1 If paper is loaded correctly. Paper Cassette 1 Pull out the cassette. 2 Remove any partially fed paper.
FS-820/920 Operation Guide
Page 42
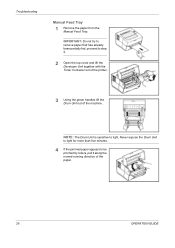
IMPORTANT: Do not try to remove paper that has already been partially fed, proceed to light. NOTE: The Drum Unit is sensitive to step 2. 2 Open the top cover and lift the Developer Unit together with the Toner Container out of the printer. 3 Using the green handles lift the Drum Unit out of the paper. 26 OPERATION GUIDE Never expose the Drum Unit to light for more than five minutes. 4 If the jammed paper appears to be pinched by rollers, pull it along the normal running direction of the machine. Troubleshooting Manual Feed Tray 1 Remove the paper from the Manual Feed Tray.
IMPORTANT: Do not try to remove paper that has already been partially fed, proceed to light. NOTE: The Drum Unit is sensitive to step 2. 2 Open the top cover and lift the Developer Unit together with the Toner Container out of the printer. 3 Using the green handles lift the Drum Unit out of the paper. 26 OPERATION GUIDE Never expose the Drum Unit to light for more than five minutes. 4 If the jammed paper appears to be pinched by rollers, pull it along the normal running direction of the machine. Troubleshooting Manual Feed Tray 1 Remove the paper from the Manual Feed Tray.

FS-820/920 Operation Guide
Page 43
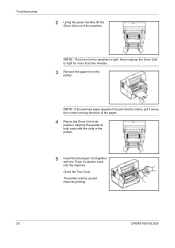
Printer 1 Open the top cover and lift the Developer Unit together with the Toner Container, back into the machine. The printer warms up and resumes printing. Troubleshooting OPERATION GUIDE 27 If it has not be fed as far as the metal registration roller, remove the paper from the Manual Feed Tray side. 5 Return the Drum Unit to its position, aligning the guides at both ends with the slots in the printer. 6 Insert the Developer Unit together with the Toner Container out of the printer. Close the Top Cover. 7 Reload the Manual Feed Tray.
Printer 1 Open the top cover and lift the Developer Unit together with the Toner Container, back into the machine. The printer warms up and resumes printing. Troubleshooting OPERATION GUIDE 27 If it has not be fed as far as the metal registration roller, remove the paper from the Manual Feed Tray side. 5 Return the Drum Unit to its position, aligning the guides at both ends with the slots in the printer. 6 Insert the Developer Unit together with the Toner Container out of the printer. Close the Top Cover. 7 Reload the Manual Feed Tray.
FS-820/920 Operation Guide
Page 44
NOTE: If the jammed paper appears to be pinched by rollers, pull it along the normal running direction of the machine. Troubleshooting 2 Using the green handles lift the Drum Unit out of the paper. 4 Return the Drum Unit to its position, aligning the guides at both ends ...with the slots in the printer. 5 Insert the Developer Unit together with the Toner Container, back into the machine. NOTE: The Drum Unit is sensitive to light for more than five...
NOTE: If the jammed paper appears to be pinched by rollers, pull it along the normal running direction of the machine. Troubleshooting 2 Using the green handles lift the Drum Unit out of the paper. 4 Return the Drum Unit to its position, aligning the guides at both ends ...with the slots in the printer. 5 Insert the Developer Unit together with the Toner Container, back into the machine. NOTE: The Drum Unit is sensitive to light for more than five...