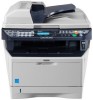
FS-1028MFP/1128MFP Setup Guide Rev-1
Page 2
...; Windows XP and Windows Vista are trademarks of Microsoft Corporation in this guide are trademarks or registered trademarks of the machine • Unpacking • Installing Toner Container • Loading Paper • Connecting Cables • Connecting Modular Cords Operation at the machine panel • Selecting Language • Date and Time Settings •...
...; Windows XP and Windows Vista are trademarks of Microsoft Corporation in this guide are trademarks or registered trademarks of the machine • Unpacking • Installing Toner Container • Loading Paper • Connecting Cables • Connecting Modular Cords Operation at the machine panel • Selecting Language • Date and Time Settings •...
FS-1028MFP/1128MFP Setup Guide Rev-1
Page 4
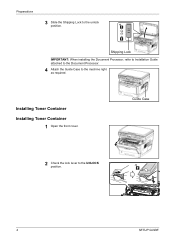
Guide Case 2 Check the lock lever to the unlock position. Preparations 3 Slide the Shipping Lock to the UNLOCK position. 4 SETUP GUIDE Installing Toner Container Installing Toner Container 1 Open the front cover. Shipping Lock IMPORTANT: When installing the Document Processor, refer to Installation Guide attached to the Document Processor. 4 Attach the Guide Case to the machine right as required.
Guide Case 2 Check the lock lever to the unlock position. Preparations 3 Slide the Shipping Lock to the UNLOCK position. 4 SETUP GUIDE Installing Toner Container Installing Toner Container 1 Open the front cover. Shipping Lock IMPORTANT: When installing the Document Processor, refer to Installation Guide attached to the Document Processor. 4 Attach the Guide Case to the machine right as required.
FS-1028MFP/1128MFP Setup Guide Rev-1
Page 5
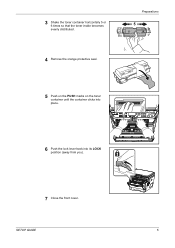
SETUP GUIDE 5 Preparations 6 Push the lock lever back into place. 3 Shake the toner container horizontally 5 or 6 times so that the toner inside becomes evenly distributed. 4 Remove the orange protective seal. 5 Push on the PUSH marks on the toner container until the container clicks into its LOCK position (away from you). 7 Close the front cover.
SETUP GUIDE 5 Preparations 6 Push the lock lever back into place. 3 Shake the toner container horizontally 5 or 6 times so that the toner inside becomes evenly distributed. 4 Remove the orange protective seal. 5 Push on the PUSH marks on the toner container until the container clicks into its LOCK position (away from you). 7 Close the front cover.
FS-1028MFP/1128MFP Setup Guide Rev-1
Page 8
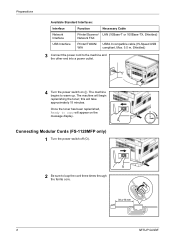
....0 compatible cable (Hi-Speed USB WIA compliant, Max. 5.0 m, Shielded) 3 Connect the power cord to copy will appear on (|). Once the toner has been replenished, Ready to the machine and the other end into a power outlet. 4 Turn the power switch on the message display. The machine... will take approximately 15 minutes. this will begin replenishing the toner; Connecting Modular Cords (FS-1128MFP only) 1 Turn the power switch off (O). 2 Be sure to warm up. The machine begins to loop the cord three ...
....0 compatible cable (Hi-Speed USB WIA compliant, Max. 5.0 m, Shielded) 3 Connect the power cord to copy will appear on (|). Once the toner has been replenished, Ready to the machine and the other end into a power outlet. 4 Turn the power switch on the message display. The machine... will take approximately 15 minutes. this will begin replenishing the toner; Connecting Modular Cords (FS-1128MFP only) 1 Turn the power switch off (O). 2 Be sure to warm up. The machine begins to loop the cord three ...

FS-1028MFP/1128MFP Setup Guide Rev-1
Page 9
... of the machine. Then, connect the modular cord to A the telephone jack (B) of the machine. B 4 Route the cords as shown. Once the toner has been replenished, Ready to warm up. Replacing the Operation Panel Language Sheet 1 Remove the attachements as shown in the figure. SETUP GUIDE 9 Preparations 5... Turn the power switch on the message display. this will begin replenishing the toner; If the mache is first installation, it will take approximately 15 minutes. The machine begins to copy will appear on (|).
... of the machine. Then, connect the modular cord to A the telephone jack (B) of the machine. B 4 Route the cords as shown. Once the toner has been replenished, Ready to warm up. Replacing the Operation Panel Language Sheet 1 Remove the attachements as shown in the figure. SETUP GUIDE 9 Preparations 5... Turn the power switch on the message display. this will begin replenishing the toner; If the mache is first installation, it will take approximately 15 minutes. The machine begins to copy will appear on (|).


