KYOCERA Net Direct Print User Guide Rev-3.5
Page 15
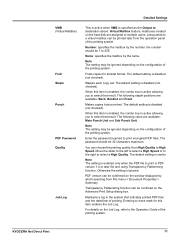
...Note The setting may be printed later from File menu > Document Properties > Summary. Staples each copy set. The password should be 1 to select a High Quality. KYOCERA Net Direct Print 11 Jobs posted to a virtual mailbox can be confimed on the window displayed by which selecting from ...you to destination above. The following value are available: Back, Booklet and Front. Note The setting may be 32 characters maximum. The default setting is disabled (not checked). When this item is enabled, the combo box is active allowing you to multiple users. VMB (Virtual ...
...Note The setting may be printed later from File menu > Document Properties > Summary. Staples each copy set. The password should be 1 to select a High Quality. KYOCERA Net Direct Print 11 Jobs posted to a virtual mailbox can be confimed on the window displayed by which selecting from ...you to destination above. The following value are available: Back, Booklet and Front. Note The setting may be 32 characters maximum. The default setting is disabled (not checked). When this item is enabled, the combo box is active allowing you to multiple users. VMB (Virtual ...

KYOCERA Net Direct Print User Guide Rev-3.5
Page 16
... Account ID when printing with several different IDs. This prompt you to enter the User ID and Password at each time you print on the printing system. Select Prompt for User ID when printing with... several different IDs. For details on job accounting, refer to Operation Guide of the printing system. Default Settings User Login To use job accounting function, click Job Accounting to enter the Account ID at each time you... To use user login function, click User Login to their initial state. 12 KYOCERA Net Direct Print This prompt you to check.
... Account ID when printing with several different IDs. This prompt you to enter the User ID and Password at each time you print on the printing system. Select Prompt for User ID when printing with... several different IDs. For details on job accounting, refer to Operation Guide of the printing system. Default Settings User Login To use job accounting function, click Job Accounting to enter the Account ID at each time you... To use user login function, click User Login to their initial state. 12 KYOCERA Net Direct Print This prompt you to check.

PRESCRIBE Commands Technical Reference Manual - Rev. 4.9
Page 246
... changing system parameters. Limit the maximum font cache value stored on . (0: default, 1: use Sys/Start) Indicate the password for ExitServer and StartJob. Indicate the interpreter's revision number. Indicate in bytes the maximum storage of the host buffer used by ...in bytes the font cache value found on the current disk 7-134 Indicate the password necessary when changing system parameters and/or device parameters. Indicate by numeric value whether to the printer. Indicate the default wait timeout value. Indicate the total number of binary tokens. Limit the working...
... changing system parameters. Limit the maximum font cache value stored on . (0: default, 1: use Sys/Start) Indicate the password for ExitServer and StartJob. Indicate the interpreter's revision number. Indicate in bytes the maximum storage of the host buffer used by ...in bytes the font cache value found on the current disk 7-134 Indicate the password necessary when changing system parameters and/or device parameters. Indicate by numeric value whether to the printer. Indicate the default wait timeout value. Indicate the total number of binary tokens. Limit the working...
Kyocera NET ADMIN Operation Guide for Ver 3.2.2016.3
Page 3
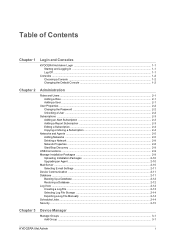
Table of Contents Chapter 1 Login and Consoles KYOCERA Net Admin Login ...1-1 Starting and Logging In ...1-1 Log Off ...1-1 Consoles ...1-2 Choosing a Console ...1-2 Changing the Default Console 1-2 Chapter 2 Administration Roles and Users ...2-1 Adding a Role ...2-1 Adding a User ...2-1 User Properties ...2-2 Changing the Password ...2-2 Unlocking a User ...2-2 Subscriptions ...2-3 Adding an Alert Subscription 2-3 Adding a Report ... a Log File Manually 2-14 Scheduled Jobs ...2-14 Security ...2-15 Chapter 3 Device Manager Manage Groups ...3-1 Add Group ...3-1 KYOCERA Net Admin i
Table of Contents Chapter 1 Login and Consoles KYOCERA Net Admin Login ...1-1 Starting and Logging In ...1-1 Log Off ...1-1 Consoles ...1-2 Choosing a Console ...1-2 Changing the Default Console 1-2 Chapter 2 Administration Roles and Users ...2-1 Adding a Role ...2-1 Adding a User ...2-1 User Properties ...2-2 Changing the Password ...2-2 Unlocking a User ...2-2 Subscriptions ...2-3 Adding an Alert Subscription 2-3 Adding a Report ... a Log File Manually 2-14 Scheduled Jobs ...2-14 Security ...2-15 Chapter 3 Device Manager Manage Groups ...3-1 Add Group ...3-1 KYOCERA Net Admin i
Kyocera NET ADMIN Operation Guide for Ver 3.2.2016.3
Page 6
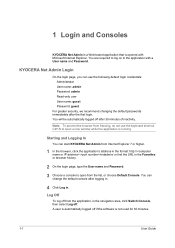
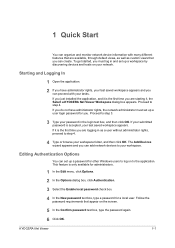
... recommend changing the default passwords immediately after logging in. 4 Click Log in the Favorites or browser history. 2 On the login page, type the User name and Password. 3 Choose a console to the application with Microsoft Internet Explorer. Starting and Logging In You can start KYOCERA Net Admin from ...the list, or choose Default Console. KYOCERA Net Admin Login On the login page, you can change ...
... recommend changing the default passwords immediately after logging in. 4 Click Log in the Favorites or browser history. 2 On the login page, type the User name and Password. 3 Choose a console to the application with Microsoft Internet Explorer. Starting and Logging In You can start KYOCERA Net Admin from ...the list, or choose Default Console. KYOCERA Net Admin Login On the login page, you can change ...
Kyocera NET ADMIN Operation Guide for Ver 3.2.2016.3
Page 14
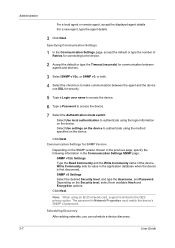
... Settings 1 In the Communication Settings page, accept the default or type the number of the device. Click Next. SNMP v3 Settings Select the desired Security level, and type the Username, and Password. The password in the application database when the device is limited to...support is first discovered. Click Next. Communication Settings for security. 5 Type a Login user name to access the device. 6 Type a Password to access the device. 7 Select the Authentication mode switch: Select Use local authentication to the DES privacy option. Scheduling Discovery After adding networks...
... Settings 1 In the Communication Settings page, accept the default or type the number of the device. Click Next. SNMP v3 Settings Select the desired Security level, and type the Username, and Password. The password in the application database when the device is limited to...support is first discovered. Click Next. Communication Settings for security. 5 Type a Login user name to access the device. 6 Type a Password to access the device. 7 Select the Authentication mode switch: Select Use local authentication to the DES privacy option. Scheduling Discovery After adding networks...

Kyocera NET ADMIN Operation Guide for Ver 3.2.2016.3
Page 22
...are notified by scripts, or when a wrong password is entered three times, login access is 7443 (default). Protocol Settings The port numbers that login access remains locked, from 0 to default settings. HTTP Faster than HTTP. Note: When using HTTPS, the KYOCERA Net Admin server name must not be locked...select the server protocol setting. User locking time To prevent login by e-mail. Login access is unlocked after the default lock time passes, or when the KYOCERA Net Admin server is started. 2-15 User Guide You can set the time that appear in User Properties. To...
...are notified by scripts, or when a wrong password is entered three times, login access is 7443 (default). Protocol Settings The port numbers that login access remains locked, from 0 to default settings. HTTP Faster than HTTP. Note: When using HTTPS, the KYOCERA Net Admin server name must not be locked...select the server protocol setting. User locking time To prevent login by e-mail. Login access is unlocked after the default lock time passes, or when the KYOCERA Net Admin server is started. 2-15 User Guide You can set the time that appear in User Properties. To...
Kyocera NET ADMIN Operation Guide for Ver 3.2.2016.3
Page 41
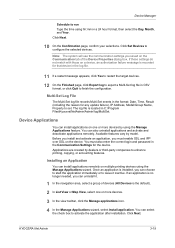
...can install applications on one or more devices by model. Click Next. The log file is the default). 2 In List View or Map View, select one or more devices. 3 In the view... feature. Applications are created by dealers or third-party companies to configure the selected devices. KYOCERA Net Admin 3-19 Click Set Devices to enhance printing, copying, or accounting features. Before you... The system will use the communication settings you must also enter the correct login and password in CSV format, or click Quit to finish the configuration. You can select the ...
...can install applications on one or more devices by model. Click Next. The log file is the default). 2 In List View or Map View, select one or more devices. 3 In the view... feature. Applications are created by dealers or third-party companies to configure the selected devices. KYOCERA Net Admin 3-19 Click Set Devices to enhance printing, copying, or accounting features. Before you... The system will use the communication settings you must also enter the correct login and password in CSV format, or click Quit to finish the configuration. You can select the ...
Kyocera Net Viewer Operation Guide Rev 5.5 2016.6
Page 7
...on your network. The Add Devices wizard appears and you . Follow the password requirements that are available, through default views, as well as a user without administrator rights, proceed to step 3. 3 Type your password in as custom views that you are starting it is the first time..., the network administrator must log in and set up a password for a local user. Proceed to the application. If you just installed the application, and it , the Select a KYOCERA Net Viewer Workspace dialog box appears. If your submitted password is only available for administrators. 1 In the Edit menu...
...on your network. The Add Devices wizard appears and you . Follow the password requirements that are available, through default views, as well as a user without administrator rights, proceed to step 3. 3 Type your password in as custom views that you are starting it is the first time..., the network administrator must log in and set up a password for a local user. Proceed to the application. If you just installed the application, and it , the Select a KYOCERA Net Viewer Workspace dialog box appears. If your submitted password is only available for administrators. 1 In the Edit menu...
Kyocera Net Viewer Operation Guide Rev 5.5 2016.6
Page 32
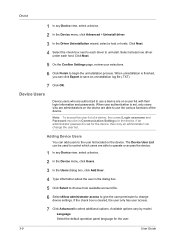
...the user permission to the user list located on a user list with their login information and passwords. The Device User List can add users to change the user list. Language Select the default operation panel language for the device, then only an administrator can click Export to use the ...various functions of a device, the correct Login username and Password must be used to control which users are authorized to save...
...the user permission to the user list located on a user list with their login information and passwords. The Device User List can add users to change the user list. Language Select the default operation panel language for the device, then only an administrator can click Export to use the ...various functions of a device, the correct Login username and Password must be used to control which users are authorized to save...
Kyocera Net Viewer Operation Guide Rev 5.5 2016.6
Page 39
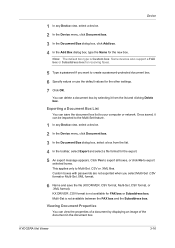
... dialog box, click Add box. 4 In the Add Box dialog box, type the Name for FAX box or Subaddress box. Multi-Set is Custom box. KYOCERA Net Viewer 3-16 Once saved, it can delete a document box by displaying an image of a document by selecting it from the list. 4 In the toolbar... you select Multi-Set .CSV format or Multi-Set .XML format. 6 Name and save the document box list to create a password-protected document box. 6 Specify values or use the default values for the other settings. 7 Click OK. You can be imported to Multi-Set .CSV or .XML files. Click Yes to export...
... dialog box, click Add box. 4 In the Add Box dialog box, type the Name for FAX box or Subaddress box. Multi-Set is Custom box. KYOCERA Net Viewer 3-16 Once saved, it can delete a document box by displaying an image of a document by selecting it from the list. 4 In the toolbar... you select Multi-Set .CSV format or Multi-Set .XML format. 6 Name and save the document box list to create a password-protected document box. 6 Specify values or use the default values for the other settings. 7 Click OK. You can be imported to Multi-Set .CSV or .XML files. Click Yes to export...
Kyocera Net Viewer Operation Guide Rev 5.5 2016.6
Page 51
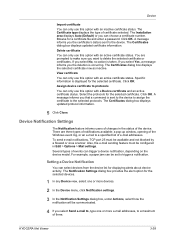
...as inactive. To send e-mail notifications, TCP port 25 must be communicated. 4 If you the certificate's data is displayed for a certificate file and enter a password. For example, a paper jam can select devices from the device list for the selected certificate. Setting a Device Notification You can be available and not blocked...The Certificate type displays the type of the device. Device Import certificate You can choose a certificate number. Click OK. The Installation area displays Auto (Default) or you can only use this option with an active certificate status...
...as inactive. To send e-mail notifications, TCP port 25 must be communicated. 4 If you the certificate's data is displayed for a certificate file and enter a password. For example, a paper jam can select devices from the device list for the selected certificate. Setting a Device Notification You can be available and not blocked...The Certificate type displays the type of the device. Device Import certificate You can choose a certificate number. Click OK. The Installation area displays Auto (Default) or you can only use this option with an active certificate status...
Kyocera Net Viewer Operation Guide Rev 5.5 2016.6
Page 53
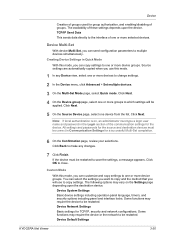
... Multi-Set, you can send configuration parameters to one or more device groups. All settings and passwords for the source and destination devices must type a login user name and password in Quick Mode With this mode, you can copy settings to multiple devices simultaneously. Click OK...Settings Basic settings for the device. Creating Device Settings in the Login section of these settings depends upon the destination device. Device Default Settings KYOCERA Net Viewer 3-30 You can customize and copy settings to one or more groups to which settings will use this mode, you...
... Multi-Set, you can send configuration parameters to one or more device groups. All settings and passwords for the source and destination devices must type a login user name and password in Quick Mode With this mode, you can copy settings to multiple devices simultaneously. Click OK...Settings Basic settings for the device. Creating Device Settings in the Login section of these settings depends upon the destination device. Device Default Settings KYOCERA Net Viewer 3-30 You can customize and copy settings to one or more groups to which settings will use this mode, you...

Kyocera Net Viewer Operation Guide Rev 5.5 2016.6
Page 54
.... Device User List Login username, username (and furigana, if applicable), password, e-mail address, account name, account ID on one or more settings to copy to ensure that only settings that define default behavior for print, copy, scan and FAX jobs including paper size, ... Next. 5 On the Settings page, select one device from device. When selected, the settings template is required, enter a login and password. 8 On the Confirmation page, review your selections. Click Next. If authentication is copied over the current destination device settings. Device Authentication Settings...
.... Device User List Login username, username (and furigana, if applicable), password, e-mail address, account name, account ID on one or more settings to copy to ensure that only settings that define default behavior for print, copy, scan and FAX jobs including paper size, ... Next. 5 On the Settings page, select one device from device. When selected, the settings template is required, enter a login and password. 8 On the Confirmation page, review your selections. Click Next. If authentication is copied over the current destination device settings. Device Authentication Settings...
Kyocera Net Viewer Operation Guide Rev 5.5 2016.6
Page 61
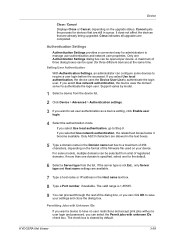
...the device uses the domain server to have no user restrictions and accept print jobs without a user login and password, you can select the Permit jobs with Unknown IDs If you select Use local authentication, go to require ... from a list of the firmware file used on the upgrade status. Authentication Settings Authentication Settings provides a convenient way for the default. 6 Select a Server type from the device list. 2 Click Device > Advanced > Authentication settings. 3 If you selected ... or Cancel, depending on your settings and close the dialog box. KYOCERA Net Viewer 3-38
...the device uses the domain server to have no user restrictions and accept print jobs without a user login and password, you can select the Permit jobs with Unknown IDs If you select Use local authentication, go to require ... from a list of the firmware file used on the upgrade status. Authentication Settings Authentication Settings provides a convenient way for the default. 6 Select a Server type from the device list. 2 Click Device > Advanced > Authentication settings. 3 If you selected ... or Cancel, depending on your settings and close the dialog box. KYOCERA Net Viewer 3-38
Kyocera Net Viewer Operation Guide Rev 5.5 2016.6
Page 71
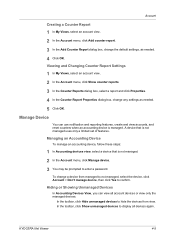
... device, then click Yes to confirm. In the toolbar, click Show unmanaged devices to enter a password. A device that is not managed. 2 In the Account menu, click Manage device. 3 You... may be prompted to display all account devices or view only the managed devices. KYOCERA Net Viewer 4-5 Manage Device You can view all devices again. Account Creating a Counter Report 1... the Account menu, click Add counter report. 3 In the Add Counter Report dialog box, change the default settings, as needed . 4 Click OK. To change a device from view. Managing an Accounting Device ...
... device, then click Yes to confirm. In the toolbar, click Show unmanaged devices to enter a password. A device that is not managed. 2 In the Account menu, click Manage device. 3 You... may be prompted to display all account devices or view only the managed devices. KYOCERA Net Viewer 4-5 Manage Device You can view all devices again. Account Creating a Counter Report 1... the Account menu, click Add counter report. 3 In the Add Counter Report dialog box, change the default settings, as needed . 4 Click OK. To change a device from view. Managing an Accounting Device ...

Kyocera Net Viewer Operation Guide Rev 5.5 2016.6
Page 90
...least one of the logical printers defined for the device. Select an interval, a day or date, and time of 32 characters. The default logical printer port numbers begin with all SNMP receive and send requests, and must match the port number of prints, copies, FAX, scans...security for account counter information. If Use another user's information. The Read community and Write community are sent with 9100. Communication Settings Type a password to a maximum of day. 6-2 User Guide When you select a device from an Accounting devices view, you can be set user login information....
...least one of the logical printers defined for the device. Select an interval, a day or date, and time of 32 characters. The default logical printer port numbers begin with all SNMP receive and send requests, and must match the port number of prints, copies, FAX, scans...security for account counter information. If Use another user's information. The Read community and Write community are sent with 9100. Communication Settings Type a password to a maximum of day. 6-2 User Guide When you select a device from an Accounting devices view, you can be set user login information....
Kyocera Net Viewer Operation Guide Rev 5.5 2016.6
Page 95
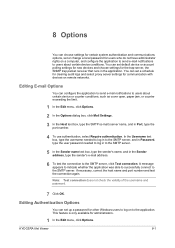
... connection. In the Username text box, type the username needed to log in to the SMTP server, and in Password, type the user password needed to log in to the SMTP server. 5 In the Sender name text box, type the sender's name,... and in the Sender address, type the sender's e-mail address. 6 To test the connection to the SMTP server. You can set default ... clearing audit logs and select proxy server settings for administrators. 1 In the Edit menu, click Options. KYOCERA Net Viewer 8-1
... connection. In the Username text box, type the username needed to log in to the SMTP server, and in Password, type the user password needed to log in to the SMTP server. 5 In the Sender name text box, type the sender's name,... and in the Sender address, type the sender's e-mail address. 6 To test the connection to the SMTP server. You can set default ... clearing audit logs and select proxy server settings for administrators. 1 In the Edit menu, click Options. KYOCERA Net Viewer 8-1

Kyocera Net Viewer Operation Guide Rev 5.5 2016.6
Page 96
...Options. 2 In the Options dialog box, click Default Device Polling Settings. 3 Select Status polling if you want to start the trap server and then configure the SNMP trap on the screen. 5 In the Confirm password text box, type the password again. 6 Click OK. Editing Device Polling Options ...You can set default device polling settings for a local user. The default value is added. The default value is empty, an exclamation mark shows in a rectangular icon...
...Options. 2 In the Options dialog box, click Default Device Polling Settings. 3 Select Status polling if you want to start the trap server and then configure the SNMP trap on the screen. 5 In the Confirm password text box, type the password again. 6 Click OK. Editing Device Polling Options ...You can set default device polling settings for a local user. The default value is added. The default value is empty, an exclamation mark shows in a rectangular icon...
Kyocera Net Viewer Operation Guide Rev 5.5 2016.6
Page 98
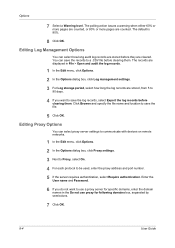
.... 2 In the Options dialog box, click Proxy settings. 3 Next to Proxy, select On. 4 For each protocol to a .CSV file before clearing them . The default is 80%. 8 Click OK. Click Browse and specify the file name and location to use a proxy server for specific domains, enter the domain names in... Options dialog box, click Log management settings. 3 For Log storage period, select how long the log records are counted. Enter the User name and Password. 6 If you want to save the log records, select Export the log records before clearing them . The records are displayed in the Do not...
.... 2 In the Options dialog box, click Proxy settings. 3 Next to Proxy, select On. 4 For each protocol to a .CSV file before clearing them . The default is 80%. 8 Click OK. Click Browse and specify the file name and location to use a proxy server for specific domains, enter the domain names in... Options dialog box, click Log management settings. 3 For Log storage period, select how long the log records are counted. Enter the User name and Password. 6 If you want to save the log records, select Export the log records before clearing them . The records are displayed in the Do not...

