
IB-51 WEB Browser Management Guide
Page 1
... and IB-51 are linked via TCP/IP. The IB-51's IP address must support TCP/IP. - Windows Server 2008 (32bit/64bit) - Launch a web browser. 2. Login to manage the IB-51 using a web browser. 1. Your computer must be used with these operating systems. - Windows Vista (32bit/64bit) - Compatible Web Browsers The...
... and IB-51 are linked via TCP/IP. The IB-51's IP address must support TCP/IP. - Windows Server 2008 (32bit/64bit) - Launch a web browser. 2. Login to manage the IB-51 using a web browser. 1. Your computer must be used with these operating systems. - Windows Vista (32bit/64bit) - Compatible Web Browsers The...

IB-51 WEB Browser Management Guide
Page 11
... set to be designated as desired. To activate the configuration, the Encryption needs to ON. Consult your network administrator for connections in print server mode. Login requires that are registered, network discovery is supported with NetWare is performed at startup, and the first servers (up NetWare, client software must be installed...
... set to be designated as desired. To activate the configuration, the Encryption needs to ON. Consult your network administrator for connections in print server mode. Login requires that are registered, network discovery is supported with NetWare is performed at startup, and the first servers (up NetWare, client software must be installed...
IB-51 WEB Browser Management Guide
Page 13
Select OFF when it is not used for SMTP authentication. StartTLS - POP before SMTP : Uses [POP before SMTP] as Login User Name Login Password Sender Address Signature For designating the SMTP port number. (Default setting is used . - Up to 64 characters can be sent at... of the printer/MFP administrator or other print system manager so that the toner is used . Only if errors meeting your designated login user name and login password will a message be sent automatically at the designated interval. file:///C:/Tom/PDF/IB-51/IB-51%20Setup%20Guide%20HTML%20English/card_homepa...
Select OFF when it is not used for SMTP authentication. StartTLS - POP before SMTP : Uses [POP before SMTP] as Login User Name Login Password Sender Address Signature For designating the SMTP port number. (Default setting is used . - Up to 64 characters can be sent at... of the printer/MFP administrator or other print system manager so that the toner is used . Only if errors meeting your designated login user name and login password will a message be sent automatically at the designated interval. file:///C:/Tom/PDF/IB-51/IB-51%20Setup%20Guide%20HTML%20English/card_homepa...
IB-51 WEB Browser Management Guide
Page 14
... configuring user and password settings to receive any mail on the designated day. - Enter the e-mail addresses of users 1-3. Designate the user account login name (up to 64 characters). Monthly: Reports are sent weekly on the file size and the content of Subject, To, Cc, and From....now Description Choose whether POP3 protocol is 15 minutes. Item User 1-3 E-mail Address POP3 Server Name POP3 Port Number POP3 Server Timeout Login User Name Login Password Use APOP Test Delete e-mail after they are sent. - Choose whether or not to 64 characters). Even if you designate...
... configuring user and password settings to receive any mail on the designated day. - Enter the e-mail addresses of users 1-3. Designate the user account login name (up to 64 characters). Monthly: Reports are sent weekly on the file size and the content of Subject, To, Cc, and From....now Description Choose whether POP3 protocol is 15 minutes. Item User 1-3 E-mail Address POP3 Server Name POP3 Port Number POP3 Server Timeout Login User Name Login Password Use APOP Test Delete e-mail after they are sent. - Choose whether or not to 64 characters). Even if you designate...

IB-51 WEB Browser Management Guide
Page 16
... server. The IPX address that receives traps. Item LDAP Settings Shared Address Book LDAP LDAP Encryption LDAP Server Name LDAP Port Number Search Timeout Login User Name Login Password Description Enable (on) or disable (off) the LDAP server. LDAP over SSL - Specifies a port number for the LDAP server. file:///C:/Tom/PDF/IB...
... server. The IPX address that receives traps. Item LDAP Settings Shared Address Book LDAP LDAP Encryption LDAP Server Name LDAP Port Number Search Timeout Login User Name Login Password Description Enable (on) or disable (off) the LDAP server. LDAP over SSL - Specifies a port number for the LDAP server. file:///C:/Tom/PDF/IB...
Card Authentication Kit (B) Operation Guide Rev 2013.1
Page 2
... Select CARD AUTHENTICATION KIT(B) and press [Activate]. 4 The License Key entry screen is disabled, the user authentication screen appears. NOTE:For User Login setting, refer to Management in order to make authentication using the numeric keys and press [Official]. 5 The confirmation screen appears. When you are...refer to the To register the ID card information. For ID card reading, refer to log in the Local User List you enable User Login on the machine. Installation Procedure 1 Press the System Menu key and then press [System/ Network]. For this, you to issue the ...
... Select CARD AUTHENTICATION KIT(B) and press [Activate]. 4 The License Key entry screen is disabled, the user authentication screen appears. NOTE:For User Login setting, refer to Management in order to make authentication using the numeric keys and press [Official]. 5 The confirmation screen appears. When you are...refer to the To register the ID card information. For ID card reading, refer to log in the Local User List you enable User Login on the machine. Installation Procedure 1 Press the System Menu key and then press [System/ Network]. For this, you to issue the ...

Card Authentication Kit (B) Operation Guide Rev 2013.1
Page 3
... below . 1 Perform the step 1 to 3 of To register the ID card information. 2 Select the user from the vendor's website. 3 In User Login Setting, press [Next] → [Local User List], and then [Register/Edit]. 4 Select the user for registering/deleting ID card information on Local User List...the Detail menu. 7 In the Detail menu, press [Register]. To register the ID card information To login using the login user name. 2 Press [User Login/Job Accounting]. NOTE: If User Login is now deleted. Completed. Follow the steps below are to register or delete the card information of user...
... below . 1 Perform the step 1 to 3 of To register the ID card information. 2 Select the user from the vendor's website. 3 In User Login Setting, press [Next] → [Local User List], and then [Register/Edit]. 4 Select the user for registering/deleting ID card information on Local User List...the Detail menu. 7 In the Detail menu, press [Register]. To register the ID card information To login using the login user name. 2 Press [User Login/Job Accounting]. NOTE: If User Login is now deleted. Completed. Follow the steps below are to register or delete the card information of user...

Card Authentication Kit (B) Operation Guide Rev 2013.1
Page 4
... ID Card Login screen, press [ID Card Login]. NOTE: You can login by entering the login user name and login password without using the login user name. 2 Press [User Login/ Job Accounting]. Refer to Login or refer to the procedure of Keyboard Login, and login using the ID...press the Logout key on the control panel. Keyboard Login setting You can make the login permission or prohibition setting. Follow the steps below. 1 Press [Keyboard Login]. 2 Enter the login user name and login password, and then press [Login]. 3 In [User Login Setting], press [Next] → [ID Card Setting...
... ID Card Login screen, press [ID Card Login]. NOTE: You can login by entering the login user name and login password without using the login user name. 2 Press [User Login/ Job Accounting]. Refer to Login or refer to the procedure of Keyboard Login, and login using the ID...press the Logout key on the control panel. Keyboard Login setting You can make the login permission or prohibition setting. Follow the steps below. 1 Press [Keyboard Login]. 2 Enter the login user name and login password, and then press [Login]. 3 In [User Login Setting], press [Next] → [ID Card Setting...

Data Security Kit (E) Operation Guide Rev-4 2013.1
Page 8
Password CAUTION: Avoid any easy-to-guess numbers for the default login user name and password. 4 Press [Next] of Data Security. 5 Press [Next] of Hard Disk Initialization. 6 Enter the default security password, 000000. 7 Press [Change] of Security ...]. 7 Changing Security Functions Changing Security Password Enter the security password to change the security password. 1 Press the [System Menu] key. 2 Press [System/Network]. 3 If user login is disabled, the user authentication screen appears. Security Password Set password. Enter your...
Password CAUTION: Avoid any easy-to-guess numbers for the default login user name and password. 4 Press [Next] of Data Security. 5 Press [Next] of Hard Disk Initialization. 6 Enter the default security password, 000000. 7 Press [Change] of Security ...]. 7 Changing Security Functions Changing Security Password Enter the security password to change the security password. 1 Press the [System Menu] key. 2 Press [System/Network]. 3 If user login is disabled, the user authentication screen appears. Security Password Set password. Enter your...
Data Security Kit (E) Operation Guide Rev-4 2013.1
Page 9
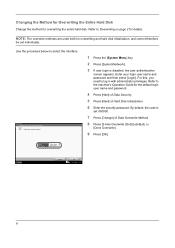
...you need to select the interface. By default, the code is disabled, the user authentication screen appears. Enter your login user name and password and then press [Login]. Data Overwrite Method Select data overwrite method. 1 Press the [System Menu] key. 2 Press [System/Network]. 3 ... the machine's Operation Guide for overwriting the entire hard disk. Changing the Method for Overwriting the Entire Hard Disk Change the method for the default login user name and password. 4 Press [Next] of Data Security. 5 Press [Next] of Data Overwrite Method. 8 Press [3-time Overwrite (DoD...
...you need to select the interface. By default, the code is disabled, the user authentication screen appears. Enter your login user name and password and then press [Login]. Data Overwrite Method Select data overwrite method. 1 Press the [System Menu] key. 2 Press [System/Network]. 3 ... the machine's Operation Guide for overwriting the entire hard disk. Changing the Method for Overwriting the Entire Hard Disk Change the method for the default login user name and password. 4 Press [Next] of Data Security. 5 Press [Next] of Data Overwrite Method. 8 Press [3-time Overwrite (DoD...

Data Security Kit (E) Operation Guide Rev-4 2013.1
Page 10
... System Initialization: Execute Security Password: ********** Change 1 Press the [System Menu] key. 2 Press [System/Network]. 3 If the user authentication screen appears, enter the login user name and login password, and press [Login]. System Initialization Overwrite all the data stored in the system when disposing of System Initialization. 8 Press [Yes] on the screen to initialize...
... System Initialization: Execute Security Password: ********** Change 1 Press the [System Menu] key. 2 Press [System/Network]. 3 If the user authentication screen appears, enter the login user name and login password, and press [Login]. System Initialization Overwrite all the data stored in the system when disposing of System Initialization. 8 Press [Yes] on the screen to initialize...

KYOCERA Net Direct Print User Guide Rev-3.5
Page 16
...when printing with several different IDs. Detailed Settings Authentication Displays Authentication dialog box. For details on user login function, refer to Operation Guide of the printing system. For details on job accounting, refer to... Operation Guide of the printing system. Job Accounting To use user login function, click User Login to enter the User ID and Password at each time you print on the printing system... all settings to check. Default Settings User Login To use job accounting function, click Job Accounting to their initial state. 12...
...when printing with several different IDs. Detailed Settings Authentication Displays Authentication dialog box. For details on user login function, refer to Operation Guide of the printing system. For details on job accounting, refer to... Operation Guide of the printing system. Job Accounting To use user login function, click User Login to enter the User ID and Password at each time you print on the printing system... all settings to check. Default Settings User Login To use job accounting function, click Job Accounting to their initial state. 12...

Kyocera NET ADMIN Operation Guide for Ver 3.1
Page 3
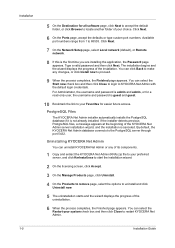
... of Earlier Versions 1-3 Installing the New Version 3.x 1-3 Restoring a Database in Version 3.x 1-3 Restore Files Manually ...1-4 Server Installation ...1-4 Installing KYOCERA Net Admin 1-4 PostgreSQL Files ...1-5 Uninstalling KYOCERA Net Admin 1-5 Removing PostgreSQL Files 1-6 Remote Agent Installation ...1-6 RPC Connections for Remote Agent Installation 1-6 Stand-alone Agent Installation 1-7 USB Device... a Local Device Agent 1-9 Multi-Set Template Editor Installation 1-10 Installing the Multi-Set Template Editor 1-10 KYOCERA Net Admin Login ...1-10 Starting and Logging In ...1-11...
... of Earlier Versions 1-3 Installing the New Version 3.x 1-3 Restoring a Database in Version 3.x 1-3 Restore Files Manually ...1-4 Server Installation ...1-4 Installing KYOCERA Net Admin 1-4 PostgreSQL Files ...1-5 Uninstalling KYOCERA Net Admin 1-5 Removing PostgreSQL Files 1-6 Remote Agent Installation ...1-6 RPC Connections for Remote Agent Installation 1-6 Stand-alone Agent Installation 1-7 USB Device... a Local Device Agent 1-9 Multi-Set Template Editor Installation 1-10 Installing the Multi-Set Template Editor 1-10 KYOCERA Net Admin Login ...1-10 Starting and Logging In ...1-11...
Kyocera NET ADMIN Operation Guide for Ver 3.1
Page 8
... proceed. 9 When the process completes, the Finished page appears. By default, the KYOCERA Net Admin database connects to 65535. You can uninstall KYOCERA Net Admin or any changes, or click Install now to KYOCERA Net Admin with the default login credentials. For Administrator, the username and password is admin and admin, or for a read...
... proceed. 9 When the process completes, the Finished page appears. By default, the KYOCERA Net Admin database connects to 65535. You can uninstall KYOCERA Net Admin or any changes, or click Install now to KYOCERA Net Admin with the default login credentials. For Administrator, the username and password is admin and admin, or for a read...
Kyocera NET ADMIN Operation Guide for Ver 3.1
Page 10
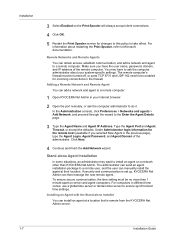
.... Adding a Remote Network and Remote Agent You can add a network and agent to a remote computer. 1 Open KYOCERA Net Admin in the previous page), type the Agent Login, Agent Password, and Agent Domain of the remote computer. Type the Agent Port and Agent Timeout, or accept the defaults.... If security and communication is remote from the KYOCERA Net Admin server. 1-7 Installation Guide The remote computer's firewall must be turned off, or ports TCP 8731 and UDP 162 need to do it. Under Administrator login information for the remote host (available if you have to ...
.... Adding a Remote Network and Remote Agent You can add a network and agent to a remote computer. 1 Open KYOCERA Net Admin in the previous page), type the Agent Login, Agent Password, and Agent Domain of the remote computer. Type the Agent Port and Agent Timeout, or accept the defaults.... If security and communication is remote from the KYOCERA Net Admin server. 1-7 Installation Guide The remote computer's firewall must be turned off, or ports TCP 8731 and UDP 162 need to do it. Under Administrator login information for the remote host (available if you have to ...

Kyocera NET ADMIN Operation Guide for Ver 3.1
Page 11
...of the installation is the default) to function correctly: KYOCERA Net Admin must be installed and operating on the server. The agent service files are needed for the USB connection and LDA to the target computer. Leave the administrator login information blank. Click Next. 4 Continue and finish the...Network, and proceed through the Local Device Agent (LDA). Type the Agent Port, and Agent Timeout, or accept the defaults. USB Device Connections KYOCERA Net Admin can discover and manage local USB devices (connected to exit the wizard. Adding a Network to a Remote Agent You can support ...
...of the installation is the default) to function correctly: KYOCERA Net Admin must be installed and operating on the server. The agent service files are needed for the USB connection and LDA to the target computer. Leave the administrator login information blank. Click Next. 4 Continue and finish the...Network, and proceed through the Local Device Agent (LDA). Type the Agent Port, and Agent Timeout, or accept the defaults. USB Device Connections KYOCERA Net Admin can discover and manage local USB devices (connected to exit the wizard. Adding a Network to a Remote Agent You can support ...
Kyocera NET ADMIN Operation Guide for Ver 3.1
Page 13
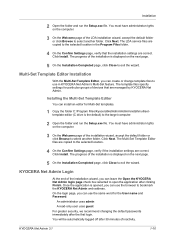
...click Browse to open the application after 30 minutes of devices that the installation settings are managed by KYOCERA Net Admin. On the login page, you can leave the Open the KYOCERA Net Admin login page check box selected to select another folder. You will be automatically logged off after clicking Finish...computer. 2 Open the folder and run the Setup.exe file. Once the application is the default) to exit the wizard. Click Next. KYOCERA Net Admin Login At the end of the installation wizard, you can install an editor for Multi-Set templates. 1 Copy the folder C:\Program Files...
...click Browse to open the application after 30 minutes of devices that the installation settings are managed by KYOCERA Net Admin. On the login page, you can leave the Open the KYOCERA Net Admin login page check box selected to select another folder. You will be automatically logged off after clicking Finish...computer. 2 Open the folder and run the Setup.exe file. Once the application is the default) to exit the wizard. Click Next. KYOCERA Net Admin Login At the end of the installation wizard, you can install an editor for Multi-Set templates. 1 Copy the folder C:\Program Files...
Kyocera NET ADMIN Operation Guide for Ver 3.1
Page 14
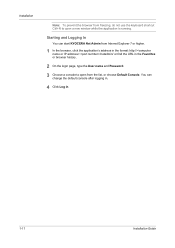
... console after logging in. 4 Click Log in the Favorites or browser history. 2 On the login page, type the User name and Password. 3 Choose a console to open a new window while the application is running. You can start KYOCERA Net Admin from the list, or choose Default Console. Installation Note: To prevent the browser...
... console after logging in. 4 Click Log in the Favorites or browser history. 2 On the login page, type the User name and Password. 3 Choose a console to open a new window while the application is running. You can start KYOCERA Net Admin from the list, or choose Default Console. Installation Note: To prevent the browser...

Kyocera Net Viewer Operation Guide Rev 5.3 2013.06
Page 4
Advanced Searching ...2-8 Chapter 3 Device Device Properties ...3-1 Displaying Device Properties 3-1 Displaying Device Home Page ...3-2 Administrator Login ...3-2 Address Book ...3-2 Adding Contacts ...3-3 Adding Groups ...3-3 Adding a Contact to a Group 3-3 Deleting Contacts and Groups 3-4 Editing Contacts... Drivers in Device View 3-8 Device Users ...3-8 Adding Device Users ...3-8 Searching the Device User List 3-9 Setting a Simple Login Key ...3-10 Searching the Simple Login Key List 3-10 Jobs ...3-11 Showing Job Detail ...3-11 Exporting the Job Log ...3-11 Searching a Job List ...3-11...
Advanced Searching ...2-8 Chapter 3 Device Device Properties ...3-1 Displaying Device Properties 3-1 Displaying Device Home Page ...3-2 Administrator Login ...3-2 Address Book ...3-2 Adding Contacts ...3-3 Adding Groups ...3-3 Adding a Contact to a Group 3-3 Deleting Contacts and Groups 3-4 Editing Contacts... Drivers in Device View 3-8 Device Users ...3-8 Adding Device Users ...3-8 Searching the Device User List 3-9 Setting a Simple Login Key ...3-10 Searching the Simple Login Key List 3-10 Jobs ...3-11 Showing Job Detail ...3-11 Exporting the Job Log ...3-11 Searching a Job List ...3-11...
Kyocera Net Viewer Operation Guide Rev 5.3 2013.06
Page 5
... Installed Application on Multiple Devices 3-27 Activating an Installed Application on One Device 3-28 Viewing Installed Applications 3-29 Searching Applications ...3-29 Chapter 4 Account Administrator Login ...4-1 Adding Account Devices ...4-1 Creating a New Account ...4-1 Account Properties ...4-2 Device Accounts ...4-3 Account Devices ...4-3 Viewing Accounts and Devices ...4-3 Exporting Accounting Information ... in Host View 5-4 Upgrading Printer Drivers in Host View 5-4 Uninstalling Printer Drivers in Host View 5-5 Installing Additional Drivers ...5-5 KYOCERA Net Viewer 5.3 iii
... Installed Application on Multiple Devices 3-27 Activating an Installed Application on One Device 3-28 Viewing Installed Applications 3-29 Searching Applications ...3-29 Chapter 4 Account Administrator Login ...4-1 Adding Account Devices ...4-1 Creating a New Account ...4-1 Account Properties ...4-2 Device Accounts ...4-3 Account Devices ...4-3 Viewing Accounts and Devices ...4-3 Exporting Accounting Information ... in Host View 5-4 Upgrading Printer Drivers in Host View 5-4 Uninstalling Printer Drivers in Host View 5-5 Installing Additional Drivers ...5-5 KYOCERA Net Viewer 5.3 iii


