
AU-201H User Guide
Page 25
.... This is completed with IC card IDs. Note: For details on the multifunctional product and can be checked and specified to "ON". The following printer drivers and computer operating systems are saved in the Touch & Print user box can be printed from a computer are compatible with the multifunctional product. ... function Print jobs sent from the control panel of the multifunctional product. In addition, documents saved in the Touch & Print user box on the printer driver settings and Box mode functions, refer to the User's Guide included with the Touch & Print function.
.... This is completed with IC card IDs. Note: For details on the multifunctional product and can be checked and specified to "ON". The following printer drivers and computer operating systems are saved in the Touch & Print user box can be printed from a computer are compatible with the multifunctional product. ... function Print jobs sent from the control panel of the multifunctional product. In addition, documents saved in the Touch & Print user box on the printer driver settings and Box mode functions, refer to the User's Guide included with the Touch & Print function.
AU-201H User Guide
Page 26
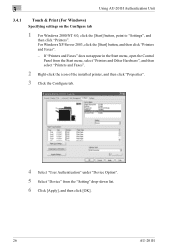
... does not appear in the Start menu, open the Control Panel from the Start menu, select "Printers and Other Hardware", and then select "Printers and Faxes". 2 Right-click the icon of the installed printer, and then click "Properties". 3 Click the Configure tab. 4 Select "User Authentication" under "Device... list. 6 Click [Apply], and then click [OK]. 26 AU-201H For Windows XP/Server 2003, click the [Start] button, and then click "Printers and Faxes". - 3 Using AU-201H Authentication Unit 3.4.1 Touch & Print (For Windows) Specifying settings on the Configure tab 1 For Windows 2000/NT 4.0,...
... does not appear in the Start menu, open the Control Panel from the Start menu, select "Printers and Other Hardware", and then select "Printers and Faxes". 2 Right-click the icon of the installed printer, and then click "Properties". 3 Click the Configure tab. 4 Select "User Authentication" under "Device... list. 6 Click [Apply], and then click [OK]. 26 AU-201H For Windows XP/Server 2003, click the [Start] button, and then click "Printers and Faxes". - 3 Using AU-201H Authentication Unit 3.4.1 Touch & Print (For Windows) Specifying settings on the Configure tab 1 For Windows 2000/NT 4.0,...
AU-201H User Guide
Page 27
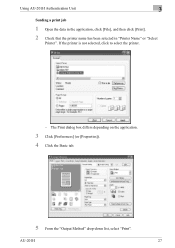
AU-201H 27 Using AU-201H Authentication Unit 3 Sending a print job 1 Open the data in the application, click [File], and then click [Print]. 2 Check that the printer name has been selected in "Printer Name" or "Select Printer". The Print dialog box differs depending on the application. 3 Click [Preferences] (or [Properties]). 4 Click the Basic tab. 5 From the "Output Method" drop-down list, select "Print". If the printer is not selected, click to select the printer. -
AU-201H 27 Using AU-201H Authentication Unit 3 Sending a print job 1 Open the data in the application, click [File], and then click [Print]. 2 Check that the printer name has been selected in "Printer Name" or "Select Printer". The Print dialog box differs depending on the application. 3 Click [Preferences] (or [Properties]). 4 Click the Basic tab. 5 From the "Output Method" drop-down list, select "Print". If the printer is not selected, click to select the printer. -
AU-201H User Guide
Page 30
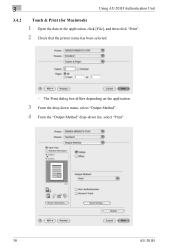
3 Using AU-201H Authentication Unit 3.4.2 Touch & Print (for Macintosh) 1 Open the data in the application, click [File], and then click "Print". 2 Check that the printer name has been selected. - The Print dialog box differs depending on the application. 3 From the drop-down menu, select "Output Method". 4 From the "Output Method" drop-down list, select "Print". 30 AU-201H
3 Using AU-201H Authentication Unit 3.4.2 Touch & Print (for Macintosh) 1 Open the data in the application, click [File], and then click "Print". 2 Check that the printer name has been selected. - The Print dialog box differs depending on the application. 3 From the drop-down menu, select "Output Method". 4 From the "Output Method" drop-down list, select "Print". 30 AU-201H
PageScope Authentication Manager User Manual
Page 80
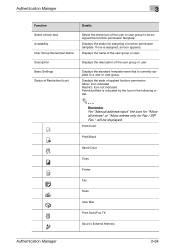
... group to be displayed. Allow: Icon indicated Restrict: Icon not indicated Permit/prohibit is assigned, an icon appears. Print/Color Print/Black Send/Color Copy Printer Fax Scan User Box Print Scan/Fax TX Save to a user or user group. Authentication Manager 3 Function Select (check box) Availability User Group Name/User...
... group to be displayed. Allow: Icon indicated Restrict: Icon not indicated Permit/prohibit is assigned, an icon appears. Print/Color Print/Black Send/Color Copy Printer Fax Scan User Box Print Scan/Fax TX Save to a user or user group. Authentication Manager 3 Function Select (check box) Availability User Group Name/User...
PageScope Authentication Manager User Manual
Page 83
Authentication Manager Function 3 Details Print/Color Print/Black Send/Color Copy Printer Fax Scan User Box Print Scan/Fax TX Save to User Box Authentication Manager 3-67 Web browser Print from Bluetooth USB to External Memory (Manual Destination Input) Allow all entries (Manual Destination Input) Allow entries only for Fax/SIP Fax.
Authentication Manager Function 3 Details Print/Color Print/Black Send/Color Copy Printer Fax Scan User Box Print Scan/Fax TX Save to User Box Authentication Manager 3-67 Web browser Print from Bluetooth USB to External Memory (Manual Destination Input) Allow all entries (Manual Destination Input) Allow entries only for Fax/SIP Fax.

PageScope Authentication Manager User Manual
Page 86
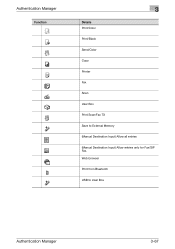
... only for Fax/SIP Fax. Function permission applied to the device. Advanced Settings set to the specified user group or user. Authentication Manager 3 Function Details Printer Fax Scan User Box Print Scan/Fax TX Save to higher-level group of login user - The following explains how the basic settings (by user...
... only for Fax/SIP Fax. Function permission applied to the device. Advanced Settings set to the specified user group or user. Authentication Manager 3 Function Details Printer Fax Scan User Box Print Scan/Fax TX Save to higher-level group of login user - The following explains how the basic settings (by user...
bizhub C203/C253/C353/C451/C550/C650, bizhub 361/421/501/601/751 Enabling bizhub HDD Security Features
Page 2
...All HDD Data - If it is intended to assist the bizhub Multi-Function Printer (MFP) Administrator with the steps and procedures necessary to know the Encryption Key/Passwords. Some of the passwords created using the Konica Minolta HDD Backup Utility application. See Section 2 • Enable ... the appropriate HDD Security Features are outlined as follows; See Appendix B • Enable the Encryption Key Setting. 1 Enabling bizhub HDD Security - Contact your Technical Representative. Overview This guide is very critical that can easily be sure first to be set...
...All HDD Data - If it is intended to assist the bizhub Multi-Function Printer (MFP) Administrator with the steps and procedures necessary to know the Encryption Key/Passwords. Some of the passwords created using the Konica Minolta HDD Backup Utility application. See Section 2 • Enable ... the appropriate HDD Security Features are outlined as follows; See Appendix B • Enable the Encryption Key Setting. 1 Enabling bizhub HDD Security - Contact your Technical Representative. Overview This guide is very critical that can easily be sure first to be set...

bizhub C203/C253/C353/C451/C550/C650 Advanced Function Operations User Manual
Page 27
It is also required that i-Option LK-101 or i-Option LK-103 is a device management utility supported by the HTTP server integrated into the printer controller. By using the Web browser and directly accessing the MFP connected to the network, you access the PageScope Web Connection from the control panel. ...
It is also required that i-Option LK-101 or i-Option LK-103 is a device management utility supported by the HTTP server integrated into the printer controller. By using the Web browser and directly accessing the MFP connected to the network, you access the PageScope Web Connection from the control panel. ...

bizhub C451/C550/C650 Fax Driver Operations User Manual
Page 9
...Contents ...x-8 Notations ...x-10 Screen images in this user's guide ...x-10 Using this user's guide ...x-10 1 Overview 1.1 Printer controller...1-1 Role of the printer controller ...1-1 Flow of the PC-FAX operation...1-2 1.2 Operating environment ...1-3 Compatible computers and operating systems 1-3 1.3 Setting up... 2-1 Automatic installation using the installer 2-1 To install the fax driver ...2-2 Installing the fax driver using the Add Printer Wizard 2-3 For Windows XP/Server 2003...2-3 For Windows Vista...2-5 For Windows 2000/NT 4.0...2-6 Installing the fax driver using...
...Contents ...x-8 Notations ...x-10 Screen images in this user's guide ...x-10 Using this user's guide ...x-10 1 Overview 1.1 Printer controller...1-1 Role of the printer controller ...1-1 Flow of the PC-FAX operation...1-2 1.2 Operating environment ...1-3 Compatible computers and operating systems 1-3 1.3 Setting up... 2-1 Automatic installation using the installer 2-1 To install the fax driver ...2-2 Installing the fax driver using the Add Printer Wizard 2-3 For Windows XP/Server 2003...2-3 For Windows Vista...2-5 For Windows 2000/NT 4.0...2-6 Installing the fax driver using...
bizhub C451/C550/C650 Fax Driver Operations User Manual
Page 11
Introduction Notations Product name This machine Integrated network controller Printer controller, including this machine, and printing system Microsoft Windows This machine or printer Network controller Printing system Windows Screen images in this user's guide Fax Driver x-10 Using this user's guide Unless stated otherwise, the fax driver functions are described using the fax driver for Windows XP.
Introduction Notations Product name This machine Integrated network controller Printer controller, including this machine, and printing system Microsoft Windows This machine or printer Network controller Printing system Windows Screen images in this user's guide Fax Driver x-10 Using this user's guide Unless stated otherwise, the fax driver functions are described using the fax driver for Windows XP.

bizhub C451/C550/C650 Fax Driver Operations User Manual
Page 12
...on the computer connected to be used as a printer. Printing system Machine Computer Printer controller 2 Note To perform fax operations, optional fax kit is built into the machine. The printing functions provided by the printer controller can also be sent from applications on the... computer. Fax Driver 1-1 You can print or fax from a computer. Overview 1 1 Overview 1.1 Printer controller The printer controller is a device that allows this machine is...
...on the computer connected to be used as a printer. Printing system Machine Computer Printer controller 2 Note To perform fax operations, optional fax kit is built into the machine. The printing functions provided by the printer controller can also be sent from applications on the... computer. Fax Driver 1-1 You can print or fax from a computer. Overview 1 1 Overview 1.1 Printer controller The printer controller is a device that allows this machine is...

bizhub C451/C550/C650 Fax Driver Operations User Manual
Page 13
...computer without using a network connection), and then the data is transferred from output text and images) is performed by the printer controller. Image rasterization (bitmap data created from this machine to this machine and transmitted like a conventional fax job. This data is...with a USB connection Used with a network connection Application Application Fax driver Fax driver USB Fax Ethernet (TCP/IP, IPX/SPX) Machine Printer controller PS/PCL processing (rasterizing) Fax Driver 1-2 Overview 1 Flow of this machine through the USB interface (when using a USB connection...
...computer without using a network connection), and then the data is transferred from output text and images) is performed by the printer controller. Image rasterization (bitmap data created from this machine to this machine and transmitted like a conventional fax job. This data is...with a USB connection Used with a network connection Application Application Fax driver Fax driver USB Fax Ethernet (TCP/IP, IPX/SPX) Machine Printer controller PS/PCL processing (rasterizing) Fax Driver 1-2 Overview 1 Flow of this machine through the USB interface (when using a USB connection...
bizhub C451/C550/C650 Fax Driver Operations User Manual
Page 16
...Driver 2-1 The fax driver to determine whether it is connected by USB or is on the same TCP/IP network as the necessary printer driver. Because it is automatically detected with a USB connection, click [Cancel]. For the setting procedure, refer to specify other network ...Connection method All connection methods Network connection USB connection Refer to "Automatic installation using the installer" on page 2-1 "Installing the fax driver using the Add Printer Wizard" on page 2-3 "For Windows 2000/NT 4.0" on page 2-6 "For Windows XP/Server 2003" on page 2-3 "For Windows Vista" on ...
...Driver 2-1 The fax driver to determine whether it is connected by USB or is on the same TCP/IP network as the necessary printer driver. Because it is automatically detected with a USB connection, click [Cancel]. For the setting procedure, refer to specify other network ...Connection method All connection methods Network connection USB connection Refer to "Automatic installation using the installer" on page 2-1 "Installing the fax driver using the Add Printer Wizard" on page 2-3 "For Windows 2000/NT 4.0" on page 2-6 "For Windows XP/Server 2003" on page 2-3 "For Windows Vista" on ...

bizhub C451/C550/C650 Fax Driver Operations User Manual
Page 17
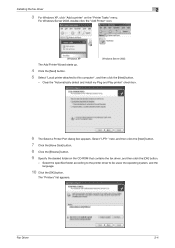
...used when SSL is enabled from the lower-right drop-down list. 4 When the setup selection dialog box appears, click the [Install printers/MFPs] button, and then click the [Next] button. If you agree with step 2. - You can also be installed. - When installing the...then continue with all terms and conditions of the license agreement. - You can be listed. The connected printers and copiers are detected. 5 Select this machine directly. - When this occurs, select "Specify the Printer/MFP Except for the Above. (IP Address, Host Name)", and then specify this machine, and then ...
...used when SSL is enabled from the lower-right drop-down list. 4 When the setup selection dialog box appears, click the [Install printers/MFPs] button, and then click the [Next] button. If you agree with step 2. - You can also be installed. - When installing the...then continue with all terms and conditions of the license agreement. - You can be listed. The connected printers and copiers are detected. 5 Select this machine directly. - When this occurs, select "Specify the Printer/MFP Except for the Above. (IP Address, Host Name)", and then specify this machine, and then ...

bizhub C451/C550/C650 Fax Driver Operations User Manual
Page 18
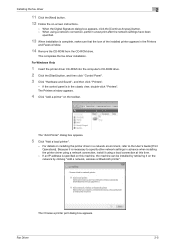
...using a network connection, install it is necessary to the User's Guide [Print Operations]. If "Printers and Faxes" does not appear in advance when installing the fax driver using the Add Printer Wizard For details on -screen instructions to be installed, and then click the [OK] button.... in the Start menu, open the Control Panel from the Start menu, select "Printers and Other Hardware", and then select "Printers and Faxes". Fax Driver 2-3 To set up an IPPS connection, use the Add Printer Wizard. 6 Check the [Installation Settings] button. 7 Select the components to complete...
...using a network connection, install it is necessary to the User's Guide [Print Operations]. If "Printers and Faxes" does not appear in advance when installing the fax driver using the Add Printer Wizard For details on -screen instructions to be installed, and then click the [OK] button.... in the Start menu, open the Control Panel from the Start menu, select "Printers and Other Hardware", and then select "Printers and Faxes". Fax Driver 2-3 To set up an IPPS connection, use the Add Printer Wizard. 6 Check the [Installation Settings] button. 7 Select the components to complete...
bizhub C451/C550/C650 Fax Driver Operations User Manual
Page 19
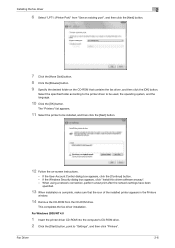
... system, and the language. 10 Click the [OK] button. Fax Driver 2-4 Clear the "Automatically detect and install my Plug and Play printer" check box. 6 The Select a Printer Port dialog box appears. Select "LPT1" here, and then click the [Next] button. 7 Click the [Have Disk] button. 8 ...Click the [Browse] button. 9 Specify the desired folder on the "Printer Tasks" menu. The "Printers" list appears. Select the specified folder according to the printer driver to this computer", and then click the [Next] button. - For Windows Server 2003, double-click the...
... system, and the language. 10 Click the [OK] button. Fax Driver 2-4 Clear the "Automatically detect and install my Plug and Play printer" check box. 6 The Select a Printer Port dialog box appears. Select "LPT1" here, and then click the [Next] button. 7 Click the [Have Disk] button. 8 ...Click the [Browse] button. 9 Specify the desired folder on the "Printer Tasks" menu. The "Printers" list appears. Select the specified folder according to the printer driver to this computer", and then click the [Next] button. - For Windows Server 2003, double-click the...
bizhub C451/C550/C650 Fax Driver Operations User Manual
Page 20
... the [Continue Anyway] button. - If an IP address is in a network environment, refer to specify other network settings in the Printers and Faxes window. 14 Remove the CD-ROM from the CD-ROM drive. This completes the fax driver installation. For Windows Vista 1 ... print after the network settings have been specified. 13 When installation is necessary to the User's Guide [Print Operations]. The "Add Printer" dialog box appears. 5 Click "Add a local printer". - Fax Driver 2-5 Installing the fax driver 2 11 Click the [Next] button. 12 Follow the on the toolbar. When using...
... the [Continue Anyway] button. - If an IP address is in a network environment, refer to specify other network settings in the Printers and Faxes window. 14 Remove the CD-ROM from the CD-ROM drive. This completes the fax driver installation. For Windows Vista 1 ... print after the network settings have been specified. 13 When installation is necessary to the User's Guide [Print Operations]. The "Add Printer" dialog box appears. 5 Click "Add a local printer". - Fax Driver 2-5 Installing the fax driver 2 11 Click the [Next] button. 12 Follow the on the toolbar. When using...
bizhub C451/C550/C650 Fax Driver Operations User Manual
Page 21
...perform a test print after the network settings have been specified. 13 When installation is complete, make sure that the icon of the installed printer appears in the Printers window. 14 Remove the CD-ROM from "Use an existing port", and then click the [Next] button. 7 Click the [Have ... Account Control dialog box appears, click the [Continue] button. - Installing the fax driver 2 6 Select "LPT1: (Printer Port)" from the CD-ROM drive. The "Printers" list appears. 11 Select the printer to be used, the operating system, and the language. 10 Click the [OK] button. For Windows 2000/NT 4.0...
...perform a test print after the network settings have been specified. 13 When installation is complete, make sure that the icon of the installed printer appears in the Printers window. 14 Remove the CD-ROM from "Use an existing port", and then click the [Next] button. 7 Click the [Have ... Account Control dialog box appears, click the [Continue] button. - Installing the fax driver 2 6 Select "LPT1: (Printer Port)" from the CD-ROM drive. The "Printers" list appears. 11 Select the printer to be used, the operating system, and the language. 10 Click the [OK] button. For Windows 2000/NT 4.0...
bizhub C451/C550/C650 Fax Driver Operations User Manual
Page 22
...here. 13 Follow the on-screen instructions. - When using a network connection, perform a test print after the network settings have been specified. The "Printers" list appears. 11 Click the [Next] button. 12 If the screen for specifying the port appears, select "LPT1" here. 7 Click the ...Have Disk] button. 8 Click the [Browse] button. 9 Specify the desired folder on -screen instructions. 5 In the screen for selecting the printer connection, select "Local Printer". 6 Click the [Next] button. - When the Digital Signature dialog box appears, click the [Yes] button. - Select the specified folder ...
...here. 13 Follow the on-screen instructions. - When using a network connection, perform a test print after the network settings have been specified. The "Printers" list appears. 11 Click the [Next] button. 12 If the screen for specifying the port appears, select "LPT1" here. 7 Click the ...Have Disk] button. 8 Click the [Browse] button. 9 Specify the desired folder on -screen instructions. 5 In the screen for selecting the printer connection, select "Local Printer". 6 Click the [Next] button. - When the Digital Signature dialog box appears, click the [Yes] button. - Select the specified folder ...


