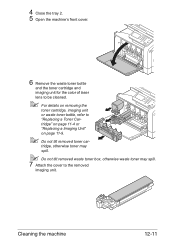
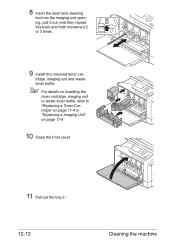
Konica Minolta bizhub C35 Imaging Unit
View Results Below
Free Konica Minolta bizhub C35 manuals!
Problems with Konica Minolta bizhub C35?
Ask a Question
Free Konica Minolta bizhub C35 manuals!
Problems with Konica Minolta bizhub C35?
Ask a Question
Related Manual Pages


Similar Questions

Causes And Remedies To Imaging Unit
Imaging unit is being displayed on my copier screen, what can I do rectifying it
Imaging unit is being displayed on my copier screen, what can I do rectifying it
(Posted by gokeayodeji 7 months ago)

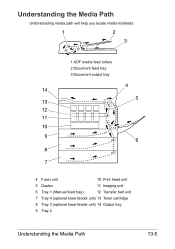
Bizhub C350 Imaging Units
I do not use the color on this machine - how can I bypass the machine to just use black imaing unit ...
I do not use the color on this machine - how can I bypass the machine to just use black imaing unit ...
(Posted by gshelton 9 years ago)

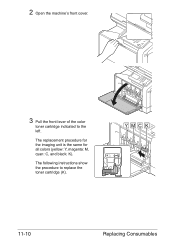
How To Replace An Imaging Unit On A Konica Minolta Bizhub C35
(Posted by mallr3d 10 years ago)


How Can You Tell If An Imaging Unit Needs To Be Replaced?
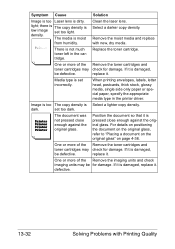
I have a BizHub c550 and the Cyan toner has several weak areas when I print a sheet of 100% Cyan...d...
I have a BizHub c550 and the Cyan toner has several weak areas when I print a sheet of 100% Cyan...d...
(Posted by ptc 11 years ago)