bizhub 160 TWAIN Driver User Guide
Page 16
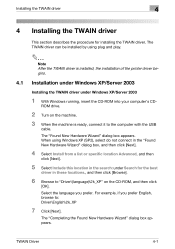
... driver in these locations., and then click [Browse]. 6 Browse to "Driver\(language)\2k_XP" on the machine. 3 When the machine is installed, the installation of the printer driver begins. 4.1 Installation under Windows XP/Server 2003 Installing the TWAIN driver under Search for installing the TWAIN driver. The "Found New Hardware Wizard" dialog...
... driver in these locations., and then click [Browse]. 6 Browse to "Driver\(language)\2k_XP" on the machine. 3 When the machine is installed, the installation of the printer driver begins. 4.1 Installation under Windows XP/Server 2003 Installing the TWAIN driver under Search for installing the TWAIN driver. The "Found New Hardware Wizard" dialog...
bizhub 160 TWAIN Driver User Guide
Page 17
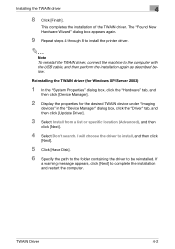
... cable, and then perform the installation again as described below. The "Found New Hardware Wizard" dialog box appears again. 9 Repeat steps 4 through 8 to install the printer driver. 2 Note To reinstall the TWAIN driver, connect the machine to be reinstalled. TWAIN Driver 4-2 If a warning message appears, click [Next] to complete the installation...
... cable, and then perform the installation again as described below. The "Found New Hardware Wizard" dialog box appears again. 9 Repeat steps 4 through 8 to install the printer driver. 2 Note To reinstall the TWAIN driver, connect the machine to be reinstalled. TWAIN Driver 4-2 If a warning message appears, click [Next] to complete the installation...
bizhub 160 TWAIN Driver User Guide
Page 18
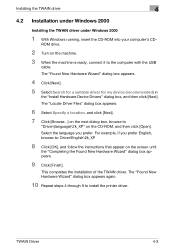
... New Hardware Wizard" dialog box appears. 9 Click [Finish]. For example, if you prefer. TWAIN Driver 4-3 Select the language you prefer English, browse to install the printer driver. This completes the installation of the TWAIN driver.
... New Hardware Wizard" dialog box appears. 9 Click [Finish]. For example, if you prefer. TWAIN Driver 4-3 Select the language you prefer English, browse to install the printer driver. This completes the installation of the TWAIN driver.

SU-502 User Guide
Page 58
... settings using PageScope Web Connection. Getting ready Chapter 3 SU-502 3-27 Refer to "Using PageScope Web Connection" on page 2-15. 2 Log in to "NIC and Printer Controller Reset" on the Network tab are modified, they are only enabled after the [Apply] button is clicked after the message Update Successful has appeared...
... settings using PageScope Web Connection. Getting ready Chapter 3 SU-502 3-27 Refer to "Using PageScope Web Connection" on page 2-15. 2 Log in to "NIC and Printer Controller Reset" on the Network tab are modified, they are only enabled after the [Apply] button is clicked after the message Update Successful has appeared...
bizhub 160 User Guide
Page 36
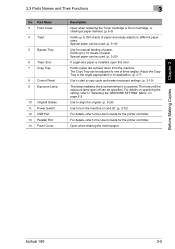
...to the angle appropriate for the printer controller. Use to align the original. (p. 3-26) Use to start a copy cycle and make necessary settings. (p. 3-10) This lamp irradiates the document when it is installed, open this door. Open when clearing the misfed paper. bizhub 160 3-5 Holds up to the User... the setting, refer to the User's Guide for manual feeding of three angles. Special paper can be used . (p. 3-16) Use for the printer controller. For details, refer to "Selecting the "MACHINE SETTING" Menu" on and off can be specified. Holds copies fed out face down from ...
...to the angle appropriate for the printer controller. Use to align the original. (p. 3-26) Use to start a copy cycle and make necessary settings. (p. 3-10) This lamp irradiates the document when it is installed, open this door. Open when clearing the misfed paper. bizhub 160 3-5 Holds up to the User... the setting, refer to the User's Guide for manual feeding of three angles. Special paper can be used . (p. 3-16) Use for the printer controller. For details, refer to "Selecting the "MACHINE SETTING" Menu" on and off can be specified. Holds copies fed out face down from ...
bizhub 160 User Guide
Page 41
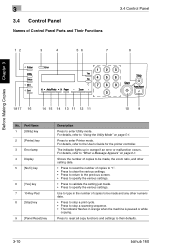
Part Name 1 [Utility] key 2 [Printer] key 3 Error lamp 4 Display 5 [No/C] key 6 [Yes] key 7 10-Key Pad 8 [Stop] key 9 [Panel Reset] key Description Press to their defaults. 3-10 bizhub 160 The indicator lights up in orange when the machine is paused or while copying. Press to reset... all copy functions and settings to enter Utility mode. For details, refer to enter Printer mode. Press to the User's Guide for the...
Part Name 1 [Utility] key 2 [Printer] key 3 Error lamp 4 Display 5 [No/C] key 6 [Yes] key 7 10-Key Pad 8 [Stop] key 9 [Panel Reset] key Description Press to their defaults. 3-10 bizhub 160 The indicator lights up in orange when the machine is paused or while copying. Press to reset... all copy functions and settings to enter Utility mode. For details, refer to enter Printer mode. Press to the User's Guide for the...

bizhub 160 User Guide
Page 48
... quality, paper misfeeds or damage to the machine may occur. G Paper that has been printed on by a heat-transfer printer or an inkjet printer G Paper that is still blank, do not reuse it. attached bizhub 160 3-17 Before Making Copies Chapter 3 3.7 Copy Paper 3 Unsuitable Paper The following types of time G Damp paper G Perforated paper...
... quality, paper misfeeds or damage to the machine may occur. G Paper that has been printed on by a heat-transfer printer or an inkjet printer G Paper that is still blank, do not reuse it. attached bizhub 160 3-17 Before Making Copies Chapter 3 3.7 Copy Paper 3 Unsuitable Paper The following types of time G Damp paper G Perforated paper...

bizhub 160 User Guide
Page 63
Before Making Copies Chapter 3 3 3.10 Print Area 3.10 Print Area Any part of the paper (C) For details on both sides of the image within the area indicated below is not copied. G A margin 1/4 (at full size) from the leading edge of the paper (A) G A margin 1/4 (at full size) from the trailing edge of the paper (B) G A margin 1/4 (at full size) Paper output direction 3-32 bizhub 160 A: 1/4 (at full size) B: 1/4 (at full size) C: 1/4 (at full size) on using the machine to print from a computer, refer to the User's Guide for the printer controller.
Before Making Copies Chapter 3 3 3.10 Print Area 3.10 Print Area Any part of the paper (C) For details on both sides of the image within the area indicated below is not copied. G A margin 1/4 (at full size) from the leading edge of the paper (A) G A margin 1/4 (at full size) from the trailing edge of the paper (B) G A margin 1/4 (at full size) Paper output direction 3-32 bizhub 160 A: 1/4 (at full size) B: 1/4 (at full size) C: 1/4 (at full size) on using the machine to print from a computer, refer to the User's Guide for the printer controller.

Service Manual
Page 18
... are to be used, select ones with a lens conforming to the above specifications. • When a disassembly job needs to turn the printer OFF. • If the job requires that the printer be left ON, take off your watch and ring and wear laser protective goggles. • A highly reflective tool can be performed...
... are to be used, select ones with a lens conforming to the above specifications. • When a disassembly job needs to turn the printer OFF. • If the job requires that the printer be left ON, take off your watch and ring and wear laser protective goggles. • A highly reflective tool can be performed...
Service Manual
Page 24
... Driver Using Plug and Play 22 Troubleshooting Appendix i Field Service Ver. 1.0 Apr. 2005 CONTENTS bizhub 160/160f bizhub 161/161f General Maintenance Adjustment / Setting General 1. Product specifications 2 2.1 bizhub 160 / bizhub 161 2 2.1.1 Main Unit...2 2.1.2 GDI Printer Function (bizhub 160 only 4 2.1.3 PCL Printer Function (bizhub 161 only 5 2.2 bizhub 160f / bizhub 161f 6 2.2.1 Main Unit...6 2.2.2 GDI Printer Function (bizhub 160f only 8 2.2.3 PCL Printer Function (bizhub 161f only 9 2.2.4 FAX Function 10 Maintenance 3.
... Driver Using Plug and Play 22 Troubleshooting Appendix i Field Service Ver. 1.0 Apr. 2005 CONTENTS bizhub 160/160f bizhub 161/161f General Maintenance Adjustment / Setting General 1. Product specifications 2 2.1 bizhub 160 / bizhub 161 2 2.1.1 Main Unit...2 2.1.2 GDI Printer Function (bizhub 160 only 4 2.1.3 PCL Printer Function (bizhub 161 only 5 2.2 bizhub 160f / bizhub 161f 6 2.2.1 Main Unit...6 2.2.2 GDI Printer Function (bizhub 160f only 8 2.2.3 PCL Printer Function (bizhub 161f only 9 2.2.4 FAX Function 10 Maintenance 3.
Service Manual
Page 37
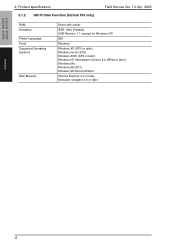
IEEE 1284 (Parallel), USB Revision 1.1 (except for Windows NT) GDI Windows Windows XP (SP2 or later), Windows server 2003, Windows 2000 (SP4 or later), Windows NT Workstation Version 4.0 (SP6a or later), Windows Me, Windows 98 (SP1), Windows 98 Second Edition Internet Explorer 4.0 or later, Netscape navigator 4.0 or later General 4 bizhub 160/160f bizhub 161/161f 2. Product specifications 2.1.2 GDI Printer Function (bizhub 160 only) Field Service Ver. 1.0 Apr. 2005 RAM Interfaces Printer Language Fonts Supported Operating Systems Web Browser Share with copier.
IEEE 1284 (Parallel), USB Revision 1.1 (except for Windows NT) GDI Windows Windows XP (SP2 or later), Windows server 2003, Windows 2000 (SP4 or later), Windows NT Workstation Version 4.0 (SP6a or later), Windows Me, Windows 98 (SP1), Windows 98 Second Edition Internet Explorer 4.0 or later, Netscape navigator 4.0 or later General 4 bizhub 160/160f bizhub 161/161f 2. Product specifications 2.1.2 GDI Printer Function (bizhub 160 only) Field Service Ver. 1.0 Apr. 2005 RAM Interfaces Printer Language Fonts Supported Operating Systems Web Browser Share with copier.
Service Manual
Page 38
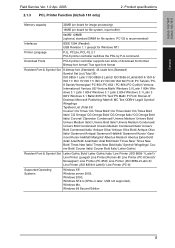
.../ 128MB (optional, standard DIMM for Windows NT) Printer Language PJL, PCL5e, PCL-XL 2.1 PCL6 printer controller switches the PDL by PJL command. Download Fonts PCL6 printer controller supports two kinds of download font format. bizhub 160/160f bizhub 161/161f General Field Service Ver. 1.0 Apr. 2005 2.1.3 PCL Printer Function (bizhub 161 only) 2. Bitmap font format/ True type font...
.../ 128MB (optional, standard DIMM for Windows NT) Printer Language PJL, PCL5e, PCL-XL 2.1 PCL6 printer controller switches the PDL by PJL command. Download Fonts PCL6 printer controller supports two kinds of download font format. bizhub 160/160f bizhub 161/161f General Field Service Ver. 1.0 Apr. 2005 2.1.3 PCL Printer Function (bizhub 161 only) 2. Bitmap font format/ True type font...

Service Manual
Page 41
IEEE 1284 (Parallel), USB Revision 1.1 (except for Windows NT) GDI Windows Windows XP (SP2 or later), Windows server 2003, Windows 2000 (SP4 or later), Windows NT Workstation Version 4.0 (SP6a or later), Windows Me, Windows 98 (SP1), Windows 98 Second Edition Internet Explorer 4.0 or later, Netscape navigator 4.0 or later General 8 bizhub 160/160f bizhub 161/161f 2. Product specifications 2.2.2 GDI Printer Function (bizhub 160f only) Field Service Ver. 1.0 Apr. 2005 RAM Interfaces Printer Language Fonts Supported Operating Systems Web Browser Share with copier.
IEEE 1284 (Parallel), USB Revision 1.1 (except for Windows NT) GDI Windows Windows XP (SP2 or later), Windows server 2003, Windows 2000 (SP4 or later), Windows NT Workstation Version 4.0 (SP6a or later), Windows Me, Windows 98 (SP1), Windows 98 Second Edition Internet Explorer 4.0 or later, Netscape navigator 4.0 or later General 8 bizhub 160/160f bizhub 161/161f 2. Product specifications 2.2.2 GDI Printer Function (bizhub 160f only) Field Service Ver. 1.0 Apr. 2005 RAM Interfaces Printer Language Fonts Supported Operating Systems Web Browser Share with copier.
Service Manual
Page 42
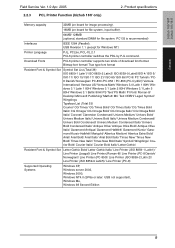
... supports two kinds of download font format. bizhub 160/160f bizhub 161/161f General Field Service Ver. 1.0 Apr. 2005 2.2.3 PCL Printer Function (bizhub 161f only) 2. Bitmap font format/ True type font format Resident Font & Symbol Set Symbol Set...Symbol Set Letter Gothic Bold/ Letter Gothic Italic/ Line Printer (ISO 8859-1 Latin1)/ Line Printer (Leagal)/ Line Printer (Roman-8)/ Line Printer (PC-8 Danish/ Norwegian)/ Line Printer (PC-850)/ Line Printer (ISO 8859-2 Latin 2)/ Line Printer (ISO 8859-9 Latin5)/ Line Printer (PC-8) Supported Operating Systems Windows XP, Windows server ...
... supports two kinds of download font format. bizhub 160/160f bizhub 161/161f General Field Service Ver. 1.0 Apr. 2005 2.2.3 PCL Printer Function (bizhub 161f only) 2. Bitmap font format/ True type font format Resident Font & Symbol Set Symbol Set...Symbol Set Letter Gothic Bold/ Letter Gothic Italic/ Line Printer (ISO 8859-1 Latin1)/ Line Printer (Leagal)/ Line Printer (Roman-8)/ Line Printer (PC-8 Danish/ Norwegian)/ Line Printer (PC-850)/ Line Printer (ISO 8859-2 Latin 2)/ Line Printer (ISO 8859-9 Latin5)/ Line Printer (PC-8) Supported Operating Systems Windows XP, Windows server ...
Service Manual
Page 47
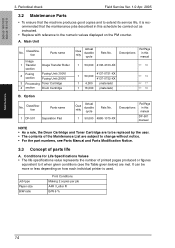
... to the numeric values displayed on how each individual printer is recommended that the machine produces good copies and to change without notice. • For the part numbers, see Parts Manual and Parts Modification Notice. 3.3 Concept of the Maintenance List are met. bizhub 160/160f bizhub 161/161f Maintenance 3. Periodical check Field Service Ver...
... to the numeric values displayed on how each individual printer is recommended that the machine produces good copies and to change without notice. • For the part numbers, see Parts Manual and Parts Modification Notice. 3.3 Concept of the Maintenance List are met. bizhub 160/160f bizhub 161/161f Maintenance 3. Periodical check Field Service Ver...

Service Manual
Page 51
... Toner Cartridge type before replacing it. Removal Procedure 1. Ensure that the Imaging Cartridge is not tilted when inserted. 2. bizhub 160/160f bizhub 161/161f Maintenance 3. NOTE • Insert the Toner Cartridge along the guide provided on the new Drum Cartridge side ...regions : Toner Cartridge 602 B 3.5.2 Replacement of the Drum Cartridge A. NOTE • Insert the Imaging Cartridge along the guide provided on the printer side. Close the Front Door. Reinstallation Procedure 1. Remove the Imaging Cartridge. 2. Mount the Toner Cartridge to reset the I/C counter in the ...
... Toner Cartridge type before replacing it. Removal Procedure 1. Ensure that the Imaging Cartridge is not tilted when inserted. 2. bizhub 160/160f bizhub 161/161f Maintenance 3. NOTE • Insert the Toner Cartridge along the guide provided on the new Drum Cartridge side ...regions : Toner Cartridge 602 B 3.5.2 Replacement of the Drum Cartridge A. NOTE • Insert the Imaging Cartridge along the guide provided on the printer side. Close the Front Door. Reinstallation Procedure 1. Remove the Imaging Cartridge. 2. Mount the Toner Cartridge to reset the I/C counter in the ...

Service Manual
Page 52
... reduce the risk of the Fusing Unit NOTE • Immediately after turning off the printer, the area around the Fusing Unit is mounted) ☞ 34 3. Remove the two screws, and then remove the Left Rear Cover. 4980U044AA 7. bizhub 160/160f bizhub 161/161f Maintenance Field Service Ver. 1.0 Apr. 2005 3. Periodical check 3.5.3 Replacement of burns...
... reduce the risk of the Fusing Unit NOTE • Immediately after turning off the printer, the area around the Fusing Unit is mounted) ☞ 34 3. Remove the two screws, and then remove the Left Rear Cover. 4980U044AA 7. bizhub 160/160f bizhub 161/161f Maintenance Field Service Ver. 1.0 Apr. 2005 3. Periodical check 3.5.3 Replacement of burns...

Service Manual
Page 53
... 20 Use utmost care not to touch any surfaces other than the Fusing Unit. 11. Mount the Fusing Unit in the printer and secure it in the illustration and make sure that no part of the harness is tightened together with the Upper Right Cover. 10. NOTE &#... Unit. 4980E003AA B. B 2. Connect connectors B and C. Remove the Upper Left Cover. 9. Remove the two screws, and then remove the Upper Right Cover and Protective Metal Bracket. bizhub 160/160f bizhub 161/161f Maintenance 3. Reinstallation Procedure A 1. Connect connector A.
... 20 Use utmost care not to touch any surfaces other than the Fusing Unit. 11. Mount the Fusing Unit in the printer and secure it in the illustration and make sure that no part of the harness is tightened together with the Upper Right Cover. 10. NOTE &#... Unit. 4980E003AA B. B 2. Connect connectors B and C. Remove the Upper Left Cover. 9. Remove the two screws, and then remove the Upper Right Cover and Protective Metal Bracket. bizhub 160/160f bizhub 161/161f Maintenance 3. Reinstallation Procedure A 1. Connect connector A.
Service Manual
Page 55
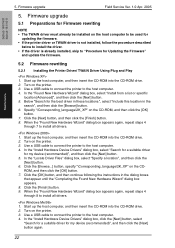
... the [Finish] button. 9. Use a USB cable to connect the printer to the host computer. 4. bizhub 160/160f bizhub 161/161f Maintenance 5. Start up the host computer, and then insert the CD-ROM into the CD-ROM drive. 2. Start up the host ...Next] button again. 22 ROM, and then click the [OK] button. 7. Turn on the CD- Click the [Browse...] button, specify "\Corresponding_language\2K_XP" on the printer. 3. In the "Install Hardware Device Drivers" dialog box, click the [Next] button, select "Search for a suitable driver for Firmware rewriting NOTE • The TWAIN ...
... the [Finish] button. 9. Use a USB cable to connect the printer to the host computer. 4. bizhub 160/160f bizhub 161/161f Maintenance 5. Start up the host computer, and then insert the CD-ROM into the CD-ROM drive. 2. Start up the host ...Next] button again. 22 ROM, and then click the [OK] button. 7. Turn on the CD- Click the [Browse...] button, specify "\Corresponding_language\2K_XP" on the printer. 3. In the "Install Hardware Device Drivers" dialog box, click the [Next] button, select "Search for a suitable driver for Firmware rewriting NOTE • The TWAIN ...
Service Manual
Page 56
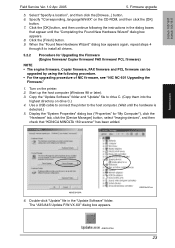
... until the "Completing the Found New Hardware Wizard" dialog box appears. 8. Double-click "Update" file in the dialog boxes that "KONICA MINOLTA 160 scanner" has been added. Click the [OK] button, and then continue following procedure. • For the upgrading procedure of NIC ... check that appear until the hardware is detected.) 5. Firmware upgrade 5. Use a USB cable to connect the printer to drive C. (Copy them into the highest directory on drive C.) 4. bizhub 160/160f bizhub 161/161f Field Service Ver. 1.0 Apr. 2005 5. Select "Specify a location", and then click the [...
... until the "Completing the Found New Hardware Wizard" dialog box appears. 8. Double-click "Update" file in the dialog boxes that "KONICA MINOLTA 160 scanner" has been added. Click the [OK] button, and then continue following procedure. • For the upgrading procedure of NIC ... check that appear until the hardware is detected.) 5. Firmware upgrade 5. Use a USB cable to connect the printer to drive C. (Copy them into the highest directory on drive C.) 4. bizhub 160/160f bizhub 161/161f Field Service Ver. 1.0 Apr. 2005 5. Select "Specify a location", and then click the [...


