bizhub 160 User Guide
Page 5
...into Tray1 6-3 Loading Paper into the Bypass Tray 6-3 Loading Paper into Tray2 (Optional 6-4 6.2 When the Message "TONER EMPTY" Appears 6-5 Replacing the Toner Cartridge 6-6 6.3 When the Message "D/C LIFE" Appears 6-10 Replacing the Drum Cartridge 6-10 6.4 When the Message "PAPER MISFEED" Appears 6-13 Clearing a Paper Misfeed in the Paper Trays 6-13 ...Message Mean 6-26 6.10 When Incorrect Copies Are Produced 6-27 6.11 The machine is not functioning as designed 6-30 iv bizhub 160 JAM" Appears 6-20 Clearing a Paper Misfeed in the Machine 6-16 6.6 When the Message "ORIGINAL DOC.
...into Tray1 6-3 Loading Paper into the Bypass Tray 6-3 Loading Paper into Tray2 (Optional 6-4 6.2 When the Message "TONER EMPTY" Appears 6-5 Replacing the Toner Cartridge 6-6 6.3 When the Message "D/C LIFE" Appears 6-10 Replacing the Drum Cartridge 6-10 6.4 When the Message "PAPER MISFEED" Appears 6-13 Clearing a Paper Misfeed in the Paper Trays 6-13 ...Message Mean 6-26 6.10 When Incorrect Copies Are Produced 6-27 6.11 The machine is not functioning as designed 6-30 iv bizhub 160 JAM" Appears 6-20 Clearing a Paper Misfeed in the Machine 6-16 6.6 When the Message "ORIGINAL DOC.

bizhub 160 User Guide
Page 15
... any of time. 1-8 bizhub 160 The product may also be sure to disconnect the power cord and other documents. Introduction Chapter 1 1 1.1 Safety Information Consumables WARNING • Do not throw the toner cartridge or toner into an open flame. CAUTION • Do not leave a toner unit or drum unit in...cable, resulting in a fire, electrical shock, or breakdown. • When moving this could injure your health. • Do not store toner units and PC drum units near a floppy disk or watch that are susceptible to malfunction. Before successive holidays CAUTION • Unplug the ...
... any of time. 1-8 bizhub 160 The product may also be sure to disconnect the power cord and other documents. Introduction Chapter 1 1 1.1 Safety Information Consumables WARNING • Do not throw the toner cartridge or toner into an open flame. CAUTION • Do not leave a toner unit or drum unit in...cable, resulting in a fire, electrical shock, or breakdown. • When moving this could injure your health. • Do not store toner units and PC drum units near a floppy disk or watch that are susceptible to malfunction. Before successive holidays CAUTION • Unplug the ...
bizhub 160 User Guide
Page 36
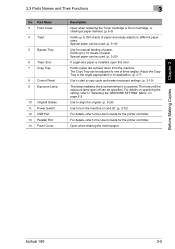
...Panel 9 Exposure Lamp 10 Original Scales 11 Power Switch 12 USB Port 13 Parallel Port 14 Fuser Cover Description Open when replacing the Toner Cartridge or Drum Cartridge, or clearing a paper misfeed. (p. 6-5) Holds up to the User's Guide for manual feeding of paper. For details on specifying... this door. Use to align the original. (p. 3-26) Use to "Selecting the "MACHINE SETTING" Menu" on and off can be specified. bizhub 160 3-5 Holds copies fed out face down from the machine. Before Making Copies Chapter 3 3.3 Parts Names and Their Functions 3 No. Open when clearing...
...Panel 9 Exposure Lamp 10 Original Scales 11 Power Switch 12 USB Port 13 Parallel Port 14 Fuser Cover Description Open when replacing the Toner Cartridge or Drum Cartridge, or clearing a paper misfeed. (p. 6-5) Holds up to the User's Guide for manual feeding of paper. For details on specifying... this door. Use to align the original. (p. 3-26) Use to "Selecting the "MACHINE SETTING" Menu" on and off can be specified. bizhub 160 3-5 Holds copies fed out face down from the machine. Before Making Copies Chapter 3 3.3 Parts Names and Their Functions 3 No. Open when clearing...

bizhub 160 User Guide
Page 37
Before Making Copies Chapter 3 3-6 bizhub 160 The Imaging Cartridge is constructed of both the Drum Cartridge and the Toner Cartridge set into place. Part Name 1 Imaging Cartridge Description Generates the copy image. 3 Inside the Machine 3.3 Parts Names and Their Functions 1 No.
Before Making Copies Chapter 3 3-6 bizhub 160 The Imaging Cartridge is constructed of both the Drum Cartridge and the Toner Cartridge set into place. Part Name 1 Imaging Cartridge Description Generates the copy image. 3 Inside the Machine 3.3 Parts Names and Their Functions 1 No.
bizhub 160 User Guide
Page 38
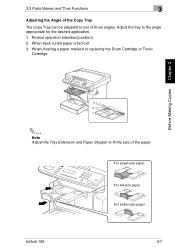
Adjust the tray to fit the size of three angles. When back curled paper is fed out 3. 3.3 Parts Names and Their Functions 3 Adjusting the Angle of the Copy Tray The Copy Tray can be adjusted to one of the paper. Normal operation (standard position) 2. When clearing a paper misfeed or replacing the Drum Cartridge or Toner Cartridge Before Making Copies Chapter 3 ✎ Note Adjust the Tray Extension and Paper Stopper to the angle appropriate for the desired application. 1. For Legal-size paper For A4-size paper For Letter-size paper bizhub 160 3-7
Adjust the tray to fit the size of three angles. When back curled paper is fed out 3. 3.3 Parts Names and Their Functions 3 Adjusting the Angle of the Copy Tray The Copy Tray can be adjusted to one of the paper. Normal operation (standard position) 2. When clearing a paper misfeed or replacing the Drum Cartridge or Toner Cartridge Before Making Copies Chapter 3 ✎ Note Adjust the Tray Extension and Paper Stopper to the angle appropriate for the desired application. 1. For Legal-size paper For A4-size paper For Letter-size paper bizhub 160 3-7
bizhub 160 User Guide
Page 110
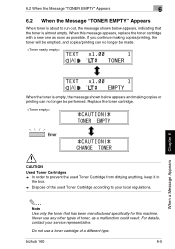
... use any other types of toner, as possible. When the toner is empty, the message shown below appears, indicating that has been manufactured specifically for this message appears, replace the toner cartridge with a new one as soon as a malfunction could result. bizhub 160 6-5 When this machine. Never use a toner cartridge of the used Toner Cartridge from dirtying anything, keep it...
... use any other types of toner, as possible. When the toner is empty, the message shown below appears, indicating that has been manufactured specifically for this message appears, replace the toner cartridge with a new one as soon as a malfunction could result. bizhub 160 6-5 When this machine. Never use a toner cartridge of the used Toner Cartridge from dirtying anything, keep it...

bizhub 160 User Guide
Page 111
6 6.2 When the Message "TONER EMPTY" Appears Replacing the Toner Cartridge 1 Open the Front Cover. 2 Grab the handle of the Imaging Cartridge, and then pull it toward you to remove the cartridge. ✎ Note Since the Imaging Cartridge can easily be damaged by light, exposing the cartridge to light for a long period of time will result in decreased image quality. 3 Move the lever in the direction of the arrow to release the lock. When a Message Appears Chapter 6 6-6 bizhub 160
6 6.2 When the Message "TONER EMPTY" Appears Replacing the Toner Cartridge 1 Open the Front Cover. 2 Grab the handle of the Imaging Cartridge, and then pull it toward you to remove the cartridge. ✎ Note Since the Imaging Cartridge can easily be damaged by light, exposing the cartridge to light for a long period of time will result in decreased image quality. 3 Move the lever in the direction of the arrow to release the lock. When a Message Appears Chapter 6 6-6 bizhub 160

bizhub 160 User Guide
Page 112
Do not touch any metal parts of the Drum Cartridge, otherwise decreased image quality may result. When a Message Appears Chapter 6 bizhub 160 6-7 6.2 When the Message "TONER EMPTY" Appears 6 4 Remove the Toner Cartridge from the Drum Cartridge. ✎ Note When separating the Toner Cartridge from the Drum Cartridge, do not tilt the cartridge, otherwise toner may be damaged by static electricity. Do not touch the PC drum under the flap of the Drum Cartridge or Toner Cartridge, otherwise the units may spill.
Do not touch any metal parts of the Drum Cartridge, otherwise decreased image quality may result. When a Message Appears Chapter 6 bizhub 160 6-7 6.2 When the Message "TONER EMPTY" Appears 6 4 Remove the Toner Cartridge from the Drum Cartridge. ✎ Note When separating the Toner Cartridge from the Drum Cartridge, do not tilt the cartridge, otherwise toner may be damaged by static electricity. Do not touch the PC drum under the flap of the Drum Cartridge or Toner Cartridge, otherwise the units may spill.

bizhub 160 User Guide
Page 113
6 6.2 When the Message "TONER EMPTY" Appears 5 Shake the new Toner Cartridge well. 6 Remove the protective cover from the Toner Cartridge. ✎ Note Do not touch the developer roller, otherwise decreased image quality may result. Developer roller When a Message Appears Chapter 6 6-8 bizhub 160
6 6.2 When the Message "TONER EMPTY" Appears 5 Shake the new Toner Cartridge well. 6 Remove the protective cover from the Toner Cartridge. ✎ Note Do not touch the developer roller, otherwise decreased image quality may result. Developer roller When a Message Appears Chapter 6 6-8 bizhub 160

bizhub 160 User Guide
Page 114
6.2 When the Message "TONER EMPTY" Appears 6 7 Align the blue parts of the Drum Cartridge and Toner Cartridge, and then attach them together. Blue parts 8 Align the tab on the Imaging Cartridge with the rail in the machine, and then install the cartridge. ✎ Note Do not push in the Imaging Cartridge with excessive force if the cartridge is not correctly aligned on the rail, otherwise the units may be damaged. 9 Close the Front Cover. When a Message Appears Chapter 6 bizhub 160 6-9
6.2 When the Message "TONER EMPTY" Appears 6 7 Align the blue parts of the Drum Cartridge and Toner Cartridge, and then attach them together. Blue parts 8 Align the tab on the Imaging Cartridge with the rail in the machine, and then install the cartridge. ✎ Note Do not push in the Imaging Cartridge with excessive force if the cartridge is not correctly aligned on the rail, otherwise the units may be damaged. 9 Close the Front Cover. When a Message Appears Chapter 6 bizhub 160 6-9

bizhub 160 User Guide
Page 116
... a long period of time will result in decreased image quality. 3 Move the lever in the direction of the Drum Cartridge, otherwise decreased image quality may spill. When a Message Appears Chapter 6 4 Remove the Toner Cartridge from the Drum Cartridge. ✎ Note When separating the Toner Cartridge from the Drum Cartridge, do not tilt the cartridge, otherwise toner may result. bizhub 160 6-11
... a long period of time will result in decreased image quality. 3 Move the lever in the direction of the Drum Cartridge, otherwise decreased image quality may spill. When a Message Appears Chapter 6 4 Remove the Toner Cartridge from the Drum Cartridge. ✎ Note When separating the Toner Cartridge from the Drum Cartridge, do not tilt the cartridge, otherwise toner may result. bizhub 160 6-11

bizhub 160 User Guide
Page 117
... damaged. 7 Close the Front Cover. ✎ Note After replacing the Drum Cartridge, specify the necessary setting for the function on the "USER MANAGEMENT" menu in the Utility mode. 6-12 bizhub 160 6 6.3 When the Message "D/C LIFE" Appears Do not touch any metal parts of the new Drum Cartridge and the Toner Cartridge, and then attach them together.
... damaged. 7 Close the Front Cover. ✎ Note After replacing the Drum Cartridge, specify the necessary setting for the function on the "USER MANAGEMENT" menu in the Utility mode. 6-12 bizhub 160 6 6.3 When the Message "D/C LIFE" Appears Do not touch any metal parts of the new Drum Cartridge and the Toner Cartridge, and then attach them together.
bizhub 160 User Guide
Page 131
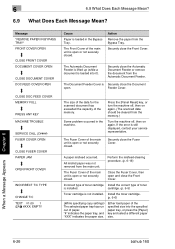
...open or not securely closed . 6 6.9 What Does Each Message Mean? 6.9 What Does Each Message Mean? cartridge. (p. 6-5) Toner cartridge is still displayed, contact your service representative. Install the toner cartridge. (p. 6-6) (While specifying copy settings) The selected paper tray has run out of the memory. "#" ... press the [Paper] key and select a different paper size. The Fuser Cover of toner is open . When a Message Appears Chapter 6 6-26 bizhub 160 Incorrect type of toner cartridge Install the correct type of the main unit is installed. Press the [Panel Reset]...
...open or not securely closed . 6 6.9 What Does Each Message Mean? 6.9 What Does Each Message Mean? cartridge. (p. 6-5) Toner cartridge is still displayed, contact your service representative. Install the toner cartridge. (p. 6-6) (While specifying copy settings) The selected paper tray has run out of the memory. "#" ... press the [Paper] key and select a different paper size. The Fuser Cover of toner is open . When a Message Appears Chapter 6 6-26 bizhub 160 Incorrect type of toner cartridge Install the correct type of the main unit is installed. Press the [Panel Reset]...

bizhub 160 User Guide
Page 132
...held tightly against the Original Glass. Press the [Ö ] key, and then select a darker copy density. (p. 4-12) Does the message "TONER Change the Toner Cartridge EMPTY" appear in position so that it is too light. Adjust the setting for DENSITY LEVEL (A) in the Utility mode. (p. 5-22) Otherwise... Glass. The copy is damp. The density level for the Auto setting is set to "LIGHT". When a Message Appears Chapter 6 bizhub 160 6-27 Change the paper. The paper is blurry. Possible Cause Action The density level for the Auto setting is too dark. The ...
...held tightly against the Original Glass. Press the [Ö ] key, and then select a darker copy density. (p. 4-12) Does the message "TONER Change the Toner Cartridge EMPTY" appear in position so that it is too light. Adjust the setting for DENSITY LEVEL (A) in the Utility mode. (p. 5-22) Otherwise... Glass. The copy is damp. The density level for the Auto setting is set to "LIGHT". When a Message Appears Chapter 6 bizhub 160 6-27 Change the paper. The paper is blurry. Possible Cause Action The density level for the Auto setting is too dark. The ...

bizhub 160 User Guide
Page 149
Index Chapter 8 8 8.1 Index Placing original Original glass 3-26 Precautions 3-26 Specific types of originals 3-24 Positioning Books 3-29 Highly transparent originals 3-28 Sheet original 3-27 Power source 2-2 Print area 3-32 R Regulation notices 1-9 Replacing Toner cartridge 6-6 Resetting Auto panel reset 3-14 Panel 3-14 S Safety information 1-2 Sorting 4-16 Space requirements 2-3 Specifications 7-2 T Turning Off 3-12 On 3-12 U User management settings 5-17 Utility mode 5-2 Z Zoom ratio 4-10, 7-8 8-4 bizhub 160
Index Chapter 8 8 8.1 Index Placing original Original glass 3-26 Precautions 3-26 Specific types of originals 3-24 Positioning Books 3-29 Highly transparent originals 3-28 Sheet original 3-27 Power source 2-2 Print area 3-32 R Regulation notices 1-9 Replacing Toner cartridge 6-6 Resetting Auto panel reset 3-14 Panel 3-14 S Safety information 1-2 Sorting 4-16 Space requirements 2-3 Specifications 7-2 T Turning Off 3-12 On 3-12 U User management settings 5-17 Utility mode 5-2 Z Zoom ratio 4-10, 7-8 8-4 bizhub 160
Service Manual
Page 24
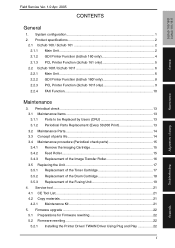
... the Toner Cartridge 17 3.5.2 Replacement of the Drum Cartridge 18 3.5.3 Replacement of the Fusing Unit 19 4. Service tool ...21 4.1 CE Tool List...21 4.2 Copy materials...21 4.2.1 Maintenance Kit 21 5. Field Service Ver. 1.0 Apr. 2005 CONTENTS bizhub 160/160f bizhub 161/161f General Maintenance Adjustment / Setting General 1. System configuration 1 2. Product specifications 2 2.1 bizhub 160 / bizhub 161 2 2.1.1 Main Unit...2 2.1.2 GDI Printer Function (bizhub 160...
... the Toner Cartridge 17 3.5.2 Replacement of the Drum Cartridge 18 3.5.3 Replacement of the Fusing Unit 19 4. Service tool ...21 4.1 CE Tool List...21 4.2 Copy materials...21 4.2.1 Maintenance Kit 21 5. Field Service Ver. 1.0 Apr. 2005 CONTENTS bizhub 160/160f bizhub 161/161f General Maintenance Adjustment / Setting General 1. System configuration 1 2. Product specifications 2 2.1 bizhub 160 / bizhub 161 2 2.1.1 Main Unit...2 2.1.2 GDI Printer Function (bizhub 160...
Service Manual
Page 46
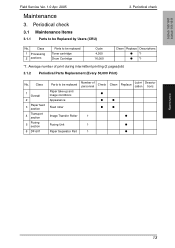
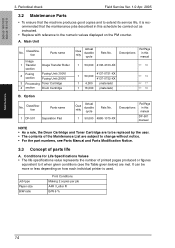
...-501 Parts to be replaced Toner cartridge Drum Cartridge Cycle 4,300 16,000 Clean Replace Descriptions ● *1 ● *1 *1: Average number of personnel Check ● ● Clean ● Replace Lubri- Descripcation tions Feed roller ● ● Image Transfer Roller 1 ● Fusing Unit 1 ● Paper Separator Pad 1 ● Maintenance 13 bizhub 160/160f bizhub 161/161f Field Service...
...-501 Parts to be replaced Toner cartridge Drum Cartridge Cycle 4,300 16,000 Clean Replace Descriptions ● *1 ● *1 *1: Average number of personnel Check ● ● Clean ● Replace Lubri- Descripcation tions Feed roller ● ● Image Transfer Roller 1 ● Fusing Unit 1 ● Paper Separator Pad 1 ● Maintenance 13 bizhub 160/160f bizhub 161/161f Field Service...
Service Manual
Page 47
...-1075-XX Descriptions Ref.Page in this manual DF-501 manual NOTE • As a rule, the Drum Cartridge and Toner Cartridge are met. Conditions for Life Specifications Values • The life specifications value represents the number of printed pages produced...Unit (100V) Fusing Unit (200V) 3 Processing Toner Cartridge 4 section Drum Cartridge Qua ntity Actual durable cycle Pats No. Main Unit No. Job type Paper size B/W ratio Print Conditions Making 2 copies per job A4R / Letter R B/W 6 % 14 bizhub 160/160f bizhub 161/161f Maintenance 3. Periodical check Field Service ...
...-1075-XX Descriptions Ref.Page in this manual DF-501 manual NOTE • As a rule, the Drum Cartridge and Toner Cartridge are met. Conditions for Life Specifications Values • The life specifications value represents the number of printed pages produced...Unit (100V) Fusing Unit (200V) 3 Processing Toner Cartridge 4 section Drum Cartridge Qua ntity Actual durable cycle Pats No. Main Unit No. Job type Paper size B/W ratio Print Conditions Making 2 copies per job A4R / Letter R B/W 6 % 14 bizhub 160/160f bizhub 161/161f Maintenance 3. Periodical check Field Service ...

Service Manual
Page 48
... Feed Roller clean of dirt. 4980E006AA B. Cleaning 1. Remove the Imaging Cartridge. 2. bizhub 160/160f bizhub 161/161f Maintenance Field Service Ver. 1.0 Apr. 2005 3. NOTE • The Imaging Cartridge is the Drum Cartridge, to which the Toner Cartridge is mounted. 4136E006AA A. Periodical check 3.4 Maintenance procedure (Periodical check parts) 3.4.1 Remove the Imaging Cartridge 1. Lift up the Exit Tray and remove it. 2.
... Feed Roller clean of dirt. 4980E006AA B. Cleaning 1. Remove the Imaging Cartridge. 2. bizhub 160/160f bizhub 161/161f Maintenance Field Service Ver. 1.0 Apr. 2005 3. NOTE • The Imaging Cartridge is the Drum Cartridge, to which the Toner Cartridge is mounted. 4136E006AA A. Periodical check 3.4 Maintenance procedure (Periodical check parts) 3.4.1 Remove the Imaging Cartridge 1. Lift up the Exit Tray and remove it. 2.

Service Manual
Page 50
... similar place, use care to the Drum Cartridge. NOTE • Placing the Toner Cartridge in an upright position or shaking it in the illustration and disconnect the Toner Cartridge from the Toner Cartridge. C4136o049AC 4136E009AC 3. Remove the protective cover from the Drum Cartridge. Remove the Imaging Cartridge. 2. Removal Procedure 1. Reinstallation Procedure 1. bizhub 160/160f bizhub 161/161f Maintenance Field Service Ver. 1.0 Apr...
... similar place, use care to the Drum Cartridge. NOTE • Placing the Toner Cartridge in an upright position or shaking it in the illustration and disconnect the Toner Cartridge from the Toner Cartridge. C4136o049AC 4136E009AC 3. Remove the protective cover from the Drum Cartridge. Remove the Imaging Cartridge. 2. Removal Procedure 1. Reinstallation Procedure 1. bizhub 160/160f bizhub 161/161f Maintenance Field Service Ver. 1.0 Apr...


