User Guide
Page 2
... cord or use a damaged power cord. When accessing the MSDSs from the wall outlet before moving or relocating the scanner. • Follow the Kodak recommended cleaning procedures. Users and their employee practices and make compliance with these precautions a part of the job description ...locations within 1.52 meters (5 feet) of the scanner or any machinery. Contact Kodak Service. • Do not disassemble, service or modify the scanner except as explained in a bundle. • Remove all sides of the scanner. • When relocating the scanner, it can be kept short, using a hair ...
... cord or use a damaged power cord. When accessing the MSDSs from the wall outlet before moving or relocating the scanner. • Follow the Kodak recommended cleaning procedures. Users and their employee practices and make compliance with these precautions a part of the job description ...locations within 1.52 meters (5 feet) of the scanner or any machinery. Contact Kodak Service. • Do not disassemble, service or modify the scanner except as explained in a bundle. • Remove all sides of the scanner. • When relocating the scanner, it can be kept short, using a hair ...
User Guide
Page 3
...that when the last user wishes to discard this product. follow local regulations or contact Kodak locally for more information. • The product packaging is recyclable. • Kodak Truper Scanners are Energy Star compliant and shipped from the factory with the default time set to ...; Acoustic emission Maschinenlärminformationsverordnung - 3, GSGV Der arbeitsplatzbezogene Emissionswert beträgt Environmental information • The Kodak Truper Scanners are designed to meet worldwide environmental requirements. • Guidelines are available for recovery and recycling.
...that when the last user wishes to discard this product. follow local regulations or contact Kodak locally for more information. • The product packaging is recyclable. • Kodak Truper Scanners are Energy Star compliant and shipped from the factory with the default time set to ...; Acoustic emission Maschinenlärminformationsverordnung - 3, GSGV Der arbeitsplatzbezogene Emissionswert beträgt Environmental information • The Kodak Truper Scanners are designed to meet worldwide environmental requirements. • Guidelines are available for recovery and recycling.
User Guide
Page 5
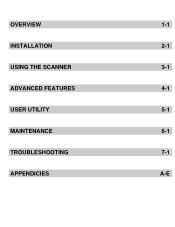
OVERVIEW 1-1 INSTALLATION 2-1 USING THE SCANNER 3-1 ADVANCED FEATURES 4-1 USER UTILITY 5-1 MAINTENANCE 6-1 TROUBLESHOOTING 7-1 APPENDICIES A-E
OVERVIEW 1-1 INSTALLATION 2-1 USING THE SCANNER 3-1 ADVANCED FEATURES 4-1 USER UTILITY 5-1 MAINTENANCE 6-1 TROUBLESHOOTING 7-1 APPENDICIES A-E
User Guide
Page 6
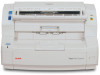
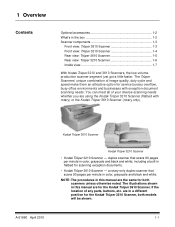
...;per 3610 Scanner - duplex scanner that scans 90 pages per minute in the box 1-2 Scanner components 1-3 Front view: Trūper 3610 Scanner 1-3 Front view: Trūper 3210 Scanner 1-4 Rear view: Trūper 3610 Scanner 1-5 Rear view: Trūper 3210 Scanner 1-6 Inside view 1-7 With Kodak Trūper 3610 Scanner (rotary only). Kodak Trūper 3610 Scanner Kodak Trūper 3210 Scanner • Kodak...
...;per 3610 Scanner - duplex scanner that scans 90 pages per minute in the box 1-2 Scanner components 1-3 Front view: Trūper 3610 Scanner 1-3 Front view: Trūper 3210 Scanner 1-4 Rear view: Trūper 3610 Scanner 1-5 Rear view: Trūper 3210 Scanner 1-6 Inside view 1-7 With Kodak Trūper 3610 Scanner (rotary only). Kodak Trūper 3610 Scanner Kodak Trūper 3210 Scanner • Kodak...
User Guide
Page 7
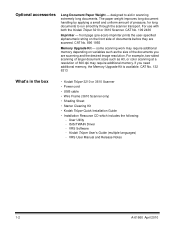
... long documents to aid in the box • Kodak Trūper 3210 or 3610 Scanner • Power cord • USB cable • Wire Frame (3610 Scanner only) • Shading Sheet • Starter Cleaning Kit • Kodak Trūper Quick Installation Guide • Installation Resource... CD which includes the following: - VRS Software - If you are scanned. CAT No. 109 2436 Imprinter - Kodak Trūper 3210 or 3610 Scanner. some scanning work may require additional memory. User Utility - CAT No. 132 6313 What's in scanning extremely long documents...
... long documents to aid in the box • Kodak Trūper 3210 or 3610 Scanner • Power cord • USB cable • Wire Frame (3610 Scanner only) • Shading Sheet • Starter Cleaning Kit • Kodak Trūper Quick Installation Guide • Installation Resource... CD which includes the following: - VRS Software - If you are scanned. CAT No. 109 2436 Imprinter - Kodak Trūper 3210 or 3610 Scanner. some scanning work may require additional memory. User Utility - CAT No. 132 6313 What's in scanning extremely long documents...
User Guide
Page 8
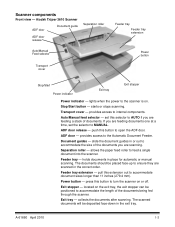
...components. Feeder tray - pull this button to ensure they are scanning. The scanned documents will be placed face-up to turn the scanner on . Transport cover - provides access to accommodate document sizes longer than 11 inches (279.4 mm). slide the document guides in .... Auto/Manual feed selector - The documents should be deposited face-down in place for automatic or manual scanning. Kodak Trūper 3610 Scanner ADF door Document guide Separation roller ADF door release Auto/Manual Feed selector Transport cover Feeder tray Feeder tray extension Power...
...components. Feeder tray - pull this button to ensure they are scanning. The scanned documents will be placed face-up to turn the scanner on . Transport cover - provides access to accommodate document sizes longer than 11 inches (279.4 mm). slide the document guides in .... Auto/Manual feed selector - The documents should be deposited face-down in place for automatic or manual scanning. Kodak Trūper 3610 Scanner ADF door Document guide Separation roller ADF door release Auto/Manual Feed selector Transport cover Feeder tray Feeder tray extension Power...
User Guide
Page 9
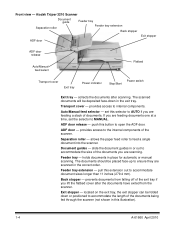
Kodak Trūper 3210 Scanner Document guide Separation roller Feeder tray Feeder tray extension Back stopper ADF door Exit stopper ADF door release Auto/Manual feed select Flatbed Transport cover Exit tray Power indicator Power switch Stop/Start Exit tray - collects the documents after the documents have exited from the scanner...scanning. ADF door release - push this extension out to the internal components of the documents being fed through the scanner (not shown in place for automatic or manual scanning. Document guides - Transport cover - Feeder tray - Feeder ...
Kodak Trūper 3210 Scanner Document guide Separation roller Feeder tray Feeder tray extension Back stopper ADF door Exit stopper ADF door release Auto/Manual feed select Flatbed Transport cover Exit tray Power indicator Power switch Stop/Start Exit tray - collects the documents after the documents have exited from the scanner...scanning. ADF door release - push this extension out to the internal components of the documents being fed through the scanner (not shown in place for automatic or manual scanning. Document guides - Transport cover - Feeder tray - Feeder ...
User Guide
Page 10
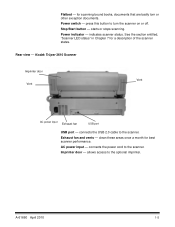
... optional imprinter. A-61660 April 2010 1-5 Flatbed - Kodak Trūper 3610 Scanner Imprinter door Vent Vent AC power input Exhaust fan USB port USB port - Stop/Start button - allows access to the scanner. indicates scanner status. AC power input - See the section entitled, "Scanner LED status" in Chapter 7 for best scanner performance. starts or stops scanning. for...
... optional imprinter. A-61660 April 2010 1-5 Flatbed - Kodak Trūper 3610 Scanner Imprinter door Vent Vent AC power input Exhaust fan USB port USB port - Stop/Start button - allows access to the scanner. indicates scanner status. AC power input - See the section entitled, "Scanner LED status" in Chapter 7 for best scanner performance. starts or stops scanning. for...

User Guide
Page 11
clean these areas once a month for best scanner performance. Imprinter door - Kodak Trūper 3210 Scanner Imprinter door AC power input Exhaust fan and vents USB port USB port - Exhaust fan and vents - allows access to the scanner. Rear view - connects the USB 2.0 cable to the optional imprinter. 1-6 A-61660 April 2010 AC power input - connects the power cord to the scanner.
clean these areas once a month for best scanner performance. Imprinter door - Kodak Trūper 3210 Scanner Imprinter door AC power input Exhaust fan and vents USB port USB port - Exhaust fan and vents - allows access to the scanner. Rear view - connects the USB 2.0 cable to the optional imprinter. 1-6 A-61660 April 2010 AC power input - connects the power cord to the scanner.
User Guide
Page 12
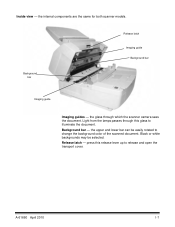
... color of the scanned document. A-61660 April 2010 1-7 the internal components are the same for both scanner models. the upper and lower bar can be selected. Light from the lamps passes through which the scanner camera sees the document. Release latch - Background bar Release latch Imaging guide Background bar Imaging guide Imaging...
... color of the scanned document. A-61660 April 2010 1-7 the internal components are the same for both scanner models. the upper and lower bar can be selected. Light from the lamps passes through which the scanner camera sees the document. Release latch - Background bar Release latch Imaging guide Background bar Imaging guide Imaging...

User Guide
Page 13
... for more information. • Verify the computer system requirements. A-61660 April 2010 2-1 2 Installation Contents Installation checklist 2-1 Attaching the feeder tray 2-2 Making connections 2-2 Installing the Windows scanner driver 2-3 Installing the software 2-4 Step 1: User utility 2-4 Step 2: ISIS/TWAIN Driver 2-5 Step 3: VirtualReScan 2-5 Step 4: Applications 2-5 User Utilities 2-6 Viewing manuals 2-6 Installation checklist • After the...
... for more information. • Verify the computer system requirements. A-61660 April 2010 2-1 2 Installation Contents Installation checklist 2-1 Attaching the feeder tray 2-2 Making connections 2-2 Installing the Windows scanner driver 2-3 Installing the software 2-4 Step 1: User utility 2-4 Step 2: ISIS/TWAIN Driver 2-5 Step 3: VirtualReScan 2-5 Step 4: Applications 2-5 User Utilities 2-6 Viewing manuals 2-6 Installation checklist • After the...
User Guide
Page 14
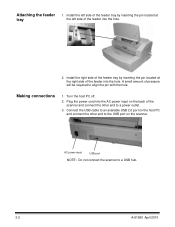
...2.0 port on the host PC and connect the other end to a power outlet. 3. A small amount of the scanner and connect the other end to the USB port on the back of pressure will be required to a USB hub.... 2-2 A-61660 April 2010 AC power input USB port NOTE: Do not connect the scanner to align the pin with the hole. Attaching the feeder tray 1. Install the right side of the feeder...inserting the pin located at the right side of the feeder into the AC power input on the scanner. Turn the host PC off. 2. Install the left side of the feeder tray by inserting the...
...2.0 port on the host PC and connect the other end to a power outlet. 3. A small amount of the scanner and connect the other end to the USB port on the back of pressure will be required to a USB hub.... 2-2 A-61660 April 2010 AC power input USB port NOTE: Do not connect the scanner to align the pin with the hole. Attaching the feeder tray 1. Install the right side of the feeder...inserting the pin located at the right side of the feeder into the AC power input on the scanner. Turn the host PC off. 2. Install the left side of the feeder tray by inserting the...

User Guide
Page 15
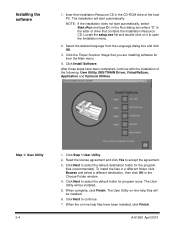
... the Installation Resource CD. The Found New Hardware Wizard will flash orange then display a steady green when the scanner is no request for my device, then click Next. 5. Windows will detect the scanner and start the Found New Hardware Wizard. 3. Restart the host PC. Installing the Windows... scanner driver 1. Turn on the host PC. 7. For Windows 2000, Windows XP or Windows Vista: You must be logged in...
... the Installation Resource CD. The Found New Hardware Wizard will flash orange then display a steady green when the scanner is no request for my device, then click Next. 5. Windows will detect the scanner and start the Found New Hardware Wizard. 3. Restart the host PC. Installing the Windows... scanner driver 1. Turn on the host PC. 7. For Windows 2000, Windows XP or Windows Vista: You must be logged in...
User Guide
Page 16
... of drive that you are installing software for from the Language dialog box and click OK. 3. When complete, click Finish. Click the Trūper Scanner image that contains the Installation Resource CD. A-61660 April 2010 The installation will start automatically, select Start>Run and type D:\ in the Run dialog box...
... of drive that you are installing software for from the Language dialog box and click OK. 3. When complete, click Finish. Click the Trūper Scanner image that contains the Installation Resource CD. A-61660 April 2010 The installation will start automatically, select Start>Run and type D:\ in the Run dialog box...
User Guide
Page 17
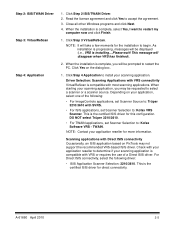
... with VRS or requires the use of the following driver: • ISIS Application Scanner Selection: 3210/3610. For Direct ISIS connectivity, select the following : • For ImageControls applications, set Scanner Source to: Trūper 3210/3610. • For TWAIN applications, set Scanner Selection to : Kofax Software VRS - Click Step 3 VirtualReScan. Step 2: ISIS/TWAIN Driver...
... with VRS or requires the use of the following driver: • ISIS Application Scanner Selection: 3210/3610. For Direct ISIS connectivity, select the following : • For ImageControls applications, set Scanner Source to: Trūper 3210/3610. • For TWAIN applications, set Scanner Selection to : Kofax Software VRS - Click Step 3 VirtualReScan. Step 2: ISIS/TWAIN Driver...
User Guide
Page 18
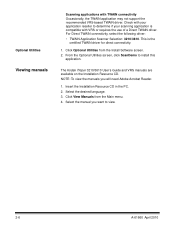
... 2. Click Optional Utilities from the Main menu. 4. Select the manual you will need Adobe Acrobat Reader. 1. The Kodak Trūper 3210/3610 User's Guide and VRS manuals are available on the Installation Resource CD. Insert the Installation Resource CD in the PC.... 2. For Direct TWAIN connectivity, select the following driver: • TWAIN Application Scanner Selection: 3210/3610. Optional Utilities Viewing manuals Scanning applications with your application reseller to determine if your scanning application is the certified TWAIN driver for...
... 2. Click Optional Utilities from the Main menu. 4. Select the manual you will need Adobe Acrobat Reader. 1. The Kodak Trūper 3210/3610 User's Guide and VRS manuals are available on the Installation Resource CD. Insert the Installation Resource CD in the PC.... 2. For Direct TWAIN connectivity, select the following driver: • TWAIN Application Scanner Selection: 3210/3610. Optional Utilities Viewing manuals Scanning applications with your application reseller to determine if your scanning application is the certified TWAIN driver for...
User Guide
Page 19
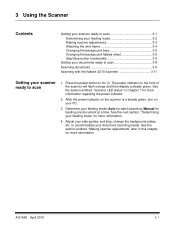
... information. Determine your side guides, end stop, change the background plates, etc. 3 Using the Scanner Contents Getting your scanner ready to scan 3-1 Determining your feeding mode 3-2 Making scanner adjustments 3-3 Attaching the wire frame 3-4 Changing the background bars 3-5 Changing the background flatbed sheet ...ready to scan 3-8 Scanning documents 3-9 Scanning with the flatbed (3210 Scanner 3-11 Getting your PC. 3. After the power indicator on the scanner is a steady green, turn on the front of the scanner will flash orange and then display a steady green. See the ...
... information. Determine your side guides, end stop, change the background plates, etc. 3 Using the Scanner Contents Getting your scanner ready to scan 3-1 Determining your feeding mode 3-2 Making scanner adjustments 3-3 Attaching the wire frame 3-4 Changing the background bars 3-5 Changing the background flatbed sheet ...ready to scan 3-8 Scanning documents 3-9 Scanning with the flatbed (3210 Scanner 3-11 Getting your PC. 3. After the power indicator on the scanner is a steady green, turn on the front of the scanner will flash orange and then display a steady green. See the ...
User Guide
Page 20
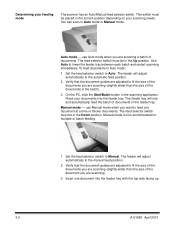
... needs. The feed selector switch must be in the Down position. Set the feed selector switch to Manual. Manual mode - Place your feeding mode The scanner has an Auto/Manual feed selector switch. The feed selector switch must be in the Up position. Set the feed selector switch to Auto. On...
... needs. The feed selector switch must be in the Down position. Set the feed selector switch to Manual. Manual mode - Place your feeding mode The scanner has an Auto/Manual feed selector switch. The feed selector switch must be in the Up position. Set the feed selector switch to Auto. On...
User Guide
Page 21
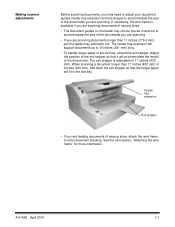
... wire frame is adjustable to 17 inches (432 mm). When scanning a document longer than 11 inches (279.4 mm), pull the feeder tray extension out. Making scanner adjustments Before scanning documents, you may need to adjust your document guides, feeder tray extension and exit stopper to accommodate the size of the documents.
... wire frame is adjustable to 17 inches (432 mm). When scanning a document longer than 11 inches (279.4 mm), pull the feeder tray extension out. Making scanner adjustments Before scanning documents, you may need to adjust your document guides, feeder tray extension and exit stopper to accommodate the size of the documents.
User Guide
Page 23
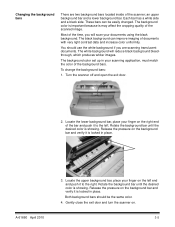
... can be the same color. 4. Most of documents with very light contrast data and increase color uniformity. A-61660 April 2010 3. Turn the scanner off and open the exit door. 2. Rotate the background bar until the desired color is showing. Release the pressure on the background bar and...place. The white background will scan your finger on the right end of the scanner; Rotate the background bar until the desired color is showing. Gently close the exit door and turn the scanner on the background bar and verify it is may affect the cropping quality of...
... can be the same color. 4. Most of documents with very light contrast data and increase color uniformity. A-61660 April 2010 3. Turn the scanner off and open the exit door. 2. Rotate the background bar until the desired color is showing. Release the pressure on the background bar and...place. The white background will scan your finger on the right end of the scanner; Rotate the background bar until the desired color is showing. Gently close the exit door and turn the scanner on the background bar and verify it is may affect the cropping quality of...


