
User Manual
Page 3
Safety Warning The following meaning: WARNING This WARNING mark means that there is a possibility of the printer. The following symbols are found throughout the USER'S Manual and have the following warnings are important in order to " (2) CAUTION This CAUTION mark means that there is a possibility of injury or physical damage if ...
Safety Warning The following meaning: WARNING This WARNING mark means that there is a possibility of the printer. The following symbols are found throughout the USER'S Manual and have the following warnings are important in order to " (2) CAUTION This CAUTION mark means that there is a possibility of injury or physical damage if ...
User Manual
Page 4
.../60Hz, 20A or higher 2. Do not plug in a fire or an electrical shock. 1. Do not throw the toner into a multi-wire connector in this User's Manual. Use a circuit with the printer. If you ignore this warning, you wish to do so in which some other sources of the printer. 2. Do not...
.../60Hz, 20A or higher 2. Do not plug in a fire or an electrical shock. 1. Do not throw the toner into a multi-wire connector in this User's Manual. Use a circuit with the printer. If you ignore this warning, you wish to do so in which some other sources of the printer. 2. Do not...

User Manual
Page 13
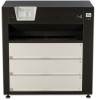
One toner cartridge contains 1kg.) Corona Transfer roller Automatic (*3 Roll Decks) and manual (**20 cut sheets capacity) Input power Interface Power consumption Acoustic noise Ozone Dimensions Weight * Image quality on A3, 15", 12", 11...(Average of media feeding system. 1. 4 Specifications Subject Model Type Printing method Color Photoconductor Print speed Exposure method Resolution Print width Print length Specification KIP C7800 Console LED Array Electro Photography CMYK Organic Photoconductive Drum Color : 100mm / sec standard medias 60mm/sec for special medias, speed varies by media ...
One toner cartridge contains 1kg.) Corona Transfer roller Automatic (*3 Roll Decks) and manual (**20 cut sheets capacity) Input power Interface Power consumption Acoustic noise Ozone Dimensions Weight * Image quality on A3, 15", 12", 11...(Average of media feeding system. 1. 4 Specifications Subject Model Type Printing method Color Photoconductor Print speed Exposure method Resolution Print width Print length Specification KIP C7800 Console LED Array Electro Photography CMYK Organic Photoconductive Drum Color : 100mm / sec standard medias 60mm/sec for special medias, speed varies by media ...

User Manual
Page 33
..." in the UI screen and set "Bypass" button to [Enabled]. 2. "Small sizes" are as needed. 2-12 Stack Tray Chapter 2 Basic Operations Be sure that the manual feed should be broken in the worst case. (2) Do not leave the cut sheet media in a small size. Metric : A4 (210mm x 297mm) A3 (297mm x 420mm...
..." in the UI screen and set "Bypass" button to [Enabled]. 2. "Small sizes" are as needed. 2-12 Stack Tray Chapter 2 Basic Operations Be sure that the manual feed should be broken in the worst case. (2) Do not leave the cut sheet media in a small size. Metric : A4 (210mm x 297mm) A3 (297mm x 420mm...
User Manual
Page 35
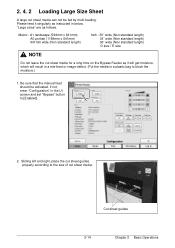
Be sure that the manual feed should be fed by multi-feeding. 2. 4. 2 Loading Large Size Sheet A large cut sheet media can not be activated. Please feed it singularly as it ...
Be sure that the manual feed should be fed by multi-feeding. 2. 4. 2 Loading Large Size Sheet A large cut sheet media can not be activated. Please feed it singularly as it ...

User Manual
Page 50
Open Rear Door, Fuser Exit Door and Left Side Door. Left Side Door 2. This will manually forward the media, then pull and remove it downward CAUTION Inside of the covers of the left side to the arrow direction (clockwise). NOTE Slowly ...
Open Rear Door, Fuser Exit Door and Left Side Door. Left Side Door 2. This will manually forward the media, then pull and remove it downward CAUTION Inside of the covers of the left side to the arrow direction (clockwise). NOTE Slowly ...

User Manual
Page 52
It should be cut yet] on page 3-10. mis-fed media 3-5 Chapter 3 Troubleshooting 3-2. Press the green lever and lift up the upper part of the Lower Feeder Unit. See [If the mis-fed media not cut manually. Green Lever mis-fed media NOTE If a mis-fed media is found but you could not pull it out, the media have not had cut at the Cutter Unit. While lifting, pull and remove a mis-fed media from the Lower Feeder Unit.
It should be cut yet] on page 3-10. mis-fed media 3-5 Chapter 3 Troubleshooting 3-2. Press the green lever and lift up the upper part of the Lower Feeder Unit. See [If the mis-fed media not cut manually. Green Lever mis-fed media NOTE If a mis-fed media is found but you could not pull it out, the media have not had cut at the Cutter Unit. While lifting, pull and remove a mis-fed media from the Lower Feeder Unit.

