

User Guide
Page 3
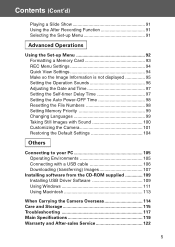
... 22 Turning the Power ON/OFF 23 Setting the Menu Language/Date and Time 24 Inserting/Removing Cards 26 Basic Operation Taking Pictures 29 Holding Your Camera 29 Viewfinder and Indicator LEDs 29 Taking Pictures using the Viewfinder 31 Shooting with Focus Lock 34 Taking Pictures using the LCD Monitor 35 Selecting the Shooting Mode 38 AUTO (Auto Flash 39 Red-Eye Reduction 39 Fill-In 40 Slow-Sync 40 Off (Flash Override 40 Macro-photo Mode 41 Distant View Mode 41 Self-Timer Mode 41 Advanced Shooting Using the REC Menu 42...
... 22 Turning the Power ON/OFF 23 Setting the Menu Language/Date and Time 24 Inserting/Removing Cards 26 Basic Operation Taking Pictures 29 Holding Your Camera 29 Viewfinder and Indicator LEDs 29 Taking Pictures using the Viewfinder 31 Shooting with Focus Lock 34 Taking Pictures using the LCD Monitor 35 Selecting the Shooting Mode 38 AUTO (Auto Flash 39 Red-Eye Reduction 39 Fill-In 40 Slow-Sync 40 Off (Flash Override 40 Macro-photo Mode 41 Distant View Mode 41 Self-Timer Mode 41 Advanced Shooting Using the REC Menu 42...

User Guide
Page 4
... Default Settings 44 Selecting a Combination of Image Sizes and Compression Ratios 45 Shooting Movies 48 Adjusting Exposure Compensation 50 Adjusting White Balance 51 Adjusting the Brightness of the LCD Monitor 52 Using the Digital Zoom 53 Changing Auto-Exposure (AE) Modes 54 Changing to the Slow Shutter Speed Mode 55 Making Voice Memos 56 Using After Recording 57 Taking Monochrome Pictures 59 Selecting the Set-up Menu 60 Setting with the REC (BASIC) Menu 61 Selecting the Image Size 62 Basic Playback/Erasing Playback 64 Playing Back Pre-recorded Images 64 Playing...
... Default Settings 44 Selecting a Combination of Image Sizes and Compression Ratios 45 Shooting Movies 48 Adjusting Exposure Compensation 50 Adjusting White Balance 51 Adjusting the Brightness of the LCD Monitor 52 Using the Digital Zoom 53 Changing Auto-Exposure (AE) Modes 54 Changing to the Slow Shutter Speed Mode 55 Making Voice Memos 56 Using After Recording 57 Taking Monochrome Pictures 59 Selecting the Set-up Menu 60 Setting with the REC (BASIC) Menu 61 Selecting the Image Size 62 Basic Playback/Erasing Playback 64 Playing Back Pre-recorded Images 64 Playing...
User Guide
Page 5
...Formatting a Memory Card 93 REC Menu Settings 94 Quick View Settings 94 Make so the Image Information is not displayed 95 Setting the Operation Sounds 96 Adjusting the Date and Time 97 Setting the Self-timer Delay Time 97 Setting the Auto Power-OFF Time 98 Resetting the File Numbers 98 Setting Memory Priority 99 Changing Languages 99 Taking Still Images with Sound 100 Customizing the Camera 101 Restoring the Default Settings 104 Others Connecting to your PC 105 Operating Environments 105 Connecting with a USB cable 106 Downloading (transferring) Images 107 Installing software...
...Formatting a Memory Card 93 REC Menu Settings 94 Quick View Settings 94 Make so the Image Information is not displayed 95 Setting the Operation Sounds 96 Adjusting the Date and Time 97 Setting the Self-timer Delay Time 97 Setting the Auto Power-OFF Time 98 Resetting the File Numbers 98 Setting Memory Priority 99 Changing Languages 99 Taking Still Images with Sound 100 Customizing the Camera 101 Restoring the Default Settings 104 Others Connecting to your PC 105 Operating Environments 105 Connecting with a USB cable 106 Downloading (transferring) Images 107 Installing software...

User Guide
Page 13
... only play back on the card. A card formatted in any way for such data loss. • Always back-up important data. • When using SD Memory Cards/Multi-Media Cards/Memory Stick on a PC, do not change the file names or the directory name of image data saved on the card are protected. Konica can not accept responsibility in a PC may not operate properly. • The SD Memory Card and Memory Stick includes a write-protect switch. Doing...
... only play back on the card. A card formatted in any way for such data loss. • Always back-up important data. • When using SD Memory Cards/Multi-Media Cards/Memory Stick on a PC, do not change the file names or the directory name of image data saved on the card are protected. Konica can not accept responsibility in a PC may not operate properly. • The SD Memory Card and Memory Stick includes a write-protect switch. Doing...

User Guide
Page 16
... switching the picture information display on and off. t 4-way Button (̇̈̆̄) Use the different buttons and ̄, to select menu items, images, etc. This button can be turned OFF when you are shooting through the viewfinder. When the power is ON, the LCD monitor lights, so it should be used whether the camera's power is used for playing back images, or setting up the play menu. r Zoom Buttons For operating the optical and digital zoom functions...
... switching the picture information display on and off. t 4-way Button (̇̈̆̄) Use the different buttons and ̄, to select menu items, images, etc. This button can be turned OFF when you are shooting through the viewfinder. When the power is ON, the LCD monitor lights, so it should be used whether the camera's power is used for playing back images, or setting up the play menu. r Zoom Buttons For operating the optical and digital zoom functions...

User Guide
Page 25
.... 5 5. Setting the Menu Language/Date and Time (Cont'd) 4 4. (1) Once the "YEAR" has been adjusted, press ̄ to move to the "MONTH" setting mode. (2) Use ̇ or ̈ to adjust the month in the camera, the information will display playback images. * The internal clock is removed for about 24 hours. After finishing the settings... • If you may have finished making new date-and-time settings. If the battery is maintained by opening the lens...
.... 5 5. Setting the Menu Language/Date and Time (Cont'd) 4 4. (1) Once the "YEAR" has been adjusted, press ̄ to move to the "MONTH" setting mode. (2) Use ̇ or ̈ to adjust the month in the camera, the information will display playback images. * The internal clock is removed for about 24 hours. After finishing the settings... • If you may have finished making new date-and-time settings. If the battery is maintained by opening the lens...

User Guide
Page 30
... Insufficient battery warning (Green LED flashing/Red LED on) Card being accessed, images being connected (Flashing) System error; Taking Pictures (Cont'd) Viewfinder LED Indicators When the LED Indicators light, they mean the following: • Green LED: (On) Camera ready to shoot (Flash does not fire) (Flashing) Warning that the camera cannot auto-focus (AF) • Red LED: (On) Flash charging, Formatting the card (Flashing) Warning that your hands are shaking • Both Red and Green LEDs: (On) Camera ready to shoot (Flash fires) USB cable...
... Insufficient battery warning (Green LED flashing/Red LED on) Card being accessed, images being connected (Flashing) System error; Taking Pictures (Cont'd) Viewfinder LED Indicators When the LED Indicators light, they mean the following: • Green LED: (On) Camera ready to shoot (Flash does not fire) (Flashing) Warning that the camera cannot auto-focus (AF) • Red LED: (On) Flash charging, Formatting the card (Flashing) Warning that your hands are shaking • Both Red and Green LEDs: (On) Camera ready to shoot (Flash fires) USB cable...

User Guide
Page 36
t White Balance White balance icon will be displayed in Memory : IN * Even when a Multi Media Card is being used, the remaining battery power will be displayed as SD. For details of how to 41. u Battery Remaining Display If the battery is used, the type will be displayed. Taking Pictures (Cont'd) Image Display Shooting with the LCD monitor displays the picture and the following other information: • You can set the camera so information is used (p.53). y Digital Zoom Magnification This will...
t White Balance White balance icon will be displayed in Memory : IN * Even when a Multi Media Card is being used, the remaining battery power will be displayed as SD. For details of how to 41. u Battery Remaining Display If the battery is used, the type will be displayed. Taking Pictures (Cont'd) Image Display Shooting with the LCD monitor displays the picture and the following other information: • You can set the camera so information is used (p.53). y Digital Zoom Magnification This will...

User Guide
Page 38
... following modes. 1) AUTO mode (no display) 2) Macro-photo mode (p.41) 3) Distant View mode (p.41) 4) Self-Timer mode (p.41) 5) Self-Timer + Macro-photo mode 6) Self-Timer + Distant View mode • Every time ̇ is pressed, the mode symbol will be returned to create the best shooting condition for the next shot only. You can shoot continuously. Using the custom function (p.101) enables you to AUTO mode (no display). Turn the power on the LCD monitor. Selecting different shooting modes enables you to AUTO-mode shooting operation (no display) after shooting. -
... following modes. 1) AUTO mode (no display) 2) Macro-photo mode (p.41) 3) Distant View mode (p.41) 4) Self-Timer mode (p.41) 5) Self-Timer + Macro-photo mode 6) Self-Timer + Distant View mode • Every time ̇ is pressed, the mode symbol will be returned to create the best shooting condition for the next shot only. You can shoot continuously. Using the custom function (p.101) enables you to AUTO mode (no display). Turn the power on the LCD monitor. Selecting different shooting modes enables you to AUTO-mode shooting operation (no display) after shooting. -

User Guide
Page 41
... the self-timer can continue to use a tripod. • The flash will be also set at "3-second delay" by using the self-timer. 41 If you take a picture using the set the mode every time you wish to take a picture. • The activation time for shooting. If you set the self-timer for a 3-second delay, the setting is close -ups. • The self-timer function can be used in conjunction with this mode when shooting a distant subject, such as shutter speeds...
... the self-timer can continue to use a tripod. • The flash will be also set at "3-second delay" by using the self-timer. 41 If you take a picture using the set the mode every time you wish to take a picture. • The activation time for shooting. If you set the self-timer for a 3-second delay, the setting is close -ups. • The self-timer function can be used in conjunction with this mode when shooting a distant subject, such as shutter speeds...
User Guide
Page 42
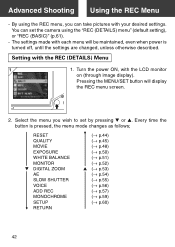
Setting with the LCD monitor on (through image display). Pressing the MENU/SET button will be maintained, even when power is pressed, the menu mode changes as follows; By using the REC menu, you wish to set the camera using the "REC (DETAILS) menu" (default setting), or "REC (BASIC)" (p.61). - Every time the button is turned off, until the settings are changed, unless otherwise described. RESET QUALITY MOVIE EXPOSURE WHITE BALANCE MONITOR ̄ DIGITAL ZOOM AE SLOW SHUTTER VOICE ADD REC MONOCHROME SETUP RETURN...
Setting with the LCD monitor on (through image display). Pressing the MENU/SET button will be maintained, even when power is pressed, the menu mode changes as follows; By using the REC menu, you wish to set the camera using the "REC (DETAILS) menu" (default setting), or "REC (BASIC)" (p.61). - Every time the button is turned off, until the settings are changed, unless otherwise described. RESET QUALITY MOVIE EXPOSURE WHITE BALANCE MONITOR ̄ DIGITAL ZOOM AE SLOW SHUTTER VOICE ADD REC MONOCHROME SETUP RETURN...

User Guide
Page 45
... chosen size displayed. • If you press ̇, the setting is invalidated and you will change the picture quality settings for every photo. While using the same card, you change the picture quality, the number of photos is the priority, select "FINE"; Select "QUALITY" and press ̈. 2 2. when the number of images remaining will return to select the desired image size, then press either ̈ or the MENU/SET button. Use...
... chosen size displayed. • If you press ̇, the setting is invalidated and you will change the picture quality settings for every photo. While using the same card, you change the picture quality, the number of photos is the priority, select "FINE"; Select "QUALITY" and press ̈. 2 2. when the number of images remaining will return to select the desired image size, then press either ̈ or the MENU/SET button. Use...

User Guide
Page 47
... photos you can shoot pictures in each quality mode (without sound or motion) Image Size 2592 × 1944 2048 × 1536 1600 × 1200 640 × 480 Compression Ratio FINE NORMAL FINE NORMAL FINE NORMAL FINE NORMAL 64 MB SD Memory Card About 30 Photos About 51 Photos About 53 Photos About 85 Photos About 91 Photos About 160 Photos About 320 Photos About 640 Photos Internal Memory - - - - - - Use this mode...
... photos you can shoot pictures in each quality mode (without sound or motion) Image Size 2592 × 1944 2048 × 1536 1600 × 1200 640 × 480 Compression Ratio FINE NORMAL FINE NORMAL FINE NORMAL FINE NORMAL 64 MB SD Memory Card About 30 Photos About 51 Photos About 53 Photos About 85 Photos About 91 Photos About 160 Photos About 320 Photos About 640 Photos Internal Memory - - - - - - Use this mode...

User Guide
Page 71
... displayed. 2. After selecting the menu, press ̈ and in screen 1 (PLAY menu screen), to turn off the LCD monitor. • If you press the shutter button half-way even when you press the button, the menu mode screen changes as the REC menu (p.42), the setting screen of the selected menu will return to screen 1. 4. Press the PLAY button to exit the PLAY menu mode, press either the Playback mode. Advanced Playback/Erasing Using the PLAY Menu - After pressing the PLAY button, press the MENU/SET button...
... displayed. 2. After selecting the menu, press ̈ and in screen 1 (PLAY menu screen), to turn off the LCD monitor. • If you press the shutter button half-way even when you press the button, the menu mode screen changes as the REC menu (p.42), the setting screen of the selected menu will return to screen 1. 4. Press the PLAY button to exit the PLAY menu mode, press either the Playback mode. Advanced Playback/Erasing Using the PLAY Menu - After pressing the PLAY button, press the MENU/SET button...

User Guide
Page 92
... menu. 92 Using ̄ or ̆, select the menu settings; It does not matter whether the main power is pressed, the menu scrolls through image (picture shooting mode) or playback image. • Refer to the following pages for details on making settings for each item on the set -up menu screen by one. Advanced Operations Using the Set-up menu from the PLAY menu, the display returns to the PLAY menu. • If you press the shutter button...
... menu. 92 Using ̄ or ̆, select the menu settings; It does not matter whether the main power is pressed, the menu scrolls through image (picture shooting mode) or playback image. • Refer to the following pages for details on making settings for each item on the set -up menu screen by one. Advanced Operations Using the Set-up menu from the PLAY menu, the display returns to the PLAY menu. • If you press the shutter button...
User Guide
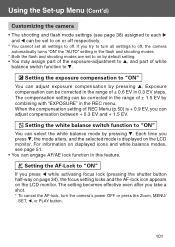
Page 101
... + 1.5 EV. Setting the AF-Lock to off , the camera automatically turns "ON" the "AUTO" setting in the flash and shooting modes. * Both the flash and shooting modes are set to "ON" You can be corrected in the range of white balance switch function to turn the camera's power OFF or press the Zoom, MENU/ SET, ̇, or PLAY button. 101 Exposure compensation can select the white balance mode by default setting. • You may assign part of the exposure-adjustment to ̆, and part of...
... + 1.5 EV. Setting the AF-Lock to off , the camera automatically turns "ON" the "AUTO" setting in the flash and shooting modes. * Both the flash and shooting modes are set to "ON" You can be corrected in the range of white balance switch function to turn the camera's power OFF or press the Zoom, MENU/ SET, ̇, or PLAY button. 101 Exposure compensation can select the white balance mode by default setting. • You may assign part of the exposure-adjustment to ̆, and part of...

User Guide
Page 107
...", the image file icon will be displayed on the desktop. 3. If you are using Windows, open "My Computer" and double-click the newly created icon "removable device". If you are using Mac, a "Undefined Name" icon will be displayed. When saving the file, copy it . 107 Turn on the directory in the card. 5. Connecting to your camera and PC with USB cable (p.106). 2. To conserve the battery, using Windows 98 or Windows 98SE, first install the "USB device driver software" (attached...
...", the image file icon will be displayed on the desktop. 3. If you are using Windows, open "My Computer" and double-click the newly created icon "removable device". If you are using Mac, a "Undefined Name" icon will be displayed. When saving the file, copy it . 107 Turn on the directory in the card. 5. Connecting to your camera and PC with USB cable (p.106). 2. To conserve the battery, using Windows 98 or Windows 98SE, first install the "USB device driver software" (attached...

User Guide
Page 117
... the center • Subject hard to the Self-Timer mode. • Flash being charged. even if pressing the • SD Memory Card or Memory Stick's shutter button write protected. • Pictures taken have reached the maximum number. → Erase unwanted pictures. • Set to focus • Dirty lens • Incorrect distance from the subject LCD monitor display • LCD brightness adjusted incorrectly and images are not • Finger prints or dirt on . If the following...
... the center • Subject hard to the Self-Timer mode. • Flash being charged. even if pressing the • SD Memory Card or Memory Stick's shutter button write protected. • Pictures taken have reached the maximum number. → Erase unwanted pictures. • Set to focus • Dirty lens • Incorrect distance from the subject LCD monitor display • LCD brightness adjusted incorrectly and images are not • Finger prints or dirt on . If the following...

User Guide
Page 120
... card k k 9) Konica Card k - 10)On-Line Lab (CD-ROM) k - 11)SD Memory Card k k • The performance of the product may be altered without notification. 120 Main Specifications (Cont'd) Shooting modes LCD monitor Playback Erase function LED display Buzzer Auto-date function Power supply I/O terminals Operating temperature Dimensions Weight Attachments : Single shooting/ red eye reduction/ forced flash/ portrait night view/ no flash/ macro-photo/ distant view/ self-timer (10 sec, 3 sec.)/ digital zoom (×2, ×3)/ movie (320 × 240, with maximum length of sound...
... card k k 9) Konica Card k - 10)On-Line Lab (CD-ROM) k - 11)SD Memory Card k k • The performance of the product may be altered without notification. 120 Main Specifications (Cont'd) Shooting modes LCD monitor Playback Erase function LED display Buzzer Auto-date function Power supply I/O terminals Operating temperature Dimensions Weight Attachments : Single shooting/ red eye reduction/ forced flash/ portrait night view/ no flash/ macro-photo/ distant view/ self-timer (10 sec, 3 sec.)/ digital zoom (×2, ×3)/ movie (320 × 240, with maximum length of sound...

User Guide
Page 122
... period Repairs will be repaired for repairing digital still cameras is 8 years after having checked the table on pages 117 and 118, Troubleshooting, disconnect the power supply and contact the dealer from whom you purchased the camera according to the contents of performance parts for a charge upon request. Warranty (separately attached) Before accepting the warranty card, please make sure that the date of...
... period Repairs will be repaired for repairing digital still cameras is 8 years after having checked the table on pages 117 and 118, Troubleshooting, disconnect the power supply and contact the dealer from whom you purchased the camera according to the contents of performance parts for a charge upon request. Warranty (separately attached) Before accepting the warranty card, please make sure that the date of...

