
Operation Guide
Page 4
ScanSnap iX500 Operator's Guide (this manual) Read this manual for Windows 8, right-click the Start screen, and select [All apps] on the app bar → [Getting Started] under [ScanSnap Manager]). Included in Finder, select [Applications] → [ScanSnap] → [Manual], and then double-click [Safety Precautions]. ScanSnap iX500 Getting Started From the sidebar in the package. This manual explains about the basic operations of the ScanSnap, software installation, scanning methods, various settings, and handling of the ScanSnap. From the sidebar...
ScanSnap iX500 Operator's Guide (this manual) Read this manual for Windows 8, right-click the Start screen, and select [All apps] on the app bar → [Getting Started] under [ScanSnap Manager]). Included in Finder, select [Applications] → [ScanSnap] → [Manual], and then double-click [Safety Precautions]. ScanSnap iX500 Getting Started From the sidebar in the package. This manual explains about the basic operations of the ScanSnap, software installation, scanning methods, various settings, and handling of the ScanSnap. From the sidebar...

Operation Guide
Page 5
...z Select [Start] menu → [All Programs] → [ScanSnap Manager] → [Troubleshooting (installation)] (for information about the resolutions for such troubles. Introduction Manual Troubleshooting (installation) Description Location Read this manual for Windows 8, right-click the Start screen, and select [All apps] on the app bar → [Troubleshooting (installation)] under [ScanSnap Manager]). It explains about connecting the mobile device and the computer, ScanSnap Connect Application operations on the mobile device, settings and receiving files. z Double-click the...
...z Select [Start] menu → [All Programs] → [ScanSnap Manager] → [Troubleshooting (installation)] (for information about the resolutions for such troubles. Introduction Manual Troubleshooting (installation) Description Location Read this manual for Windows 8, right-click the Start screen, and select [All apps] on the app bar → [Troubleshooting (installation)] under [ScanSnap Manager]). It explains about connecting the mobile device and the computer, ScanSnap Connect Application operations on the mobile device, settings and receiving files. z Double-click the...

Operation Guide
Page 20
... Use......... 381 Scanning Only One Side of a Document 381 Scanning Color Documents in Gray or Black & White 383 Deleting Blank Pages 385 Correcting Skewed Character Strings 387 Rotating Scanned Image to its Correct Orientation 389 Reducing Bleed-Through 391 Scanning Documents of Different Widths or Lengths in One Batch ...... 393 Scanning Documents Larger Than A4/Letter Size 397 Scanning Documents Such as Photographs and Clippings 402 Long Page Scanning 406 Saving Scanned Images in Multiple PDF Files...
... Use......... 381 Scanning Only One Side of a Document 381 Scanning Color Documents in Gray or Black & White 383 Deleting Blank Pages 385 Correcting Skewed Character Strings 387 Rotating Scanned Image to its Correct Orientation 389 Reducing Bleed-Through 391 Scanning Documents of Different Widths or Lengths in One Batch ...... 393 Scanning Documents Larger Than A4/Letter Size 397 Scanning Documents Such as Photographs and Clippings 402 Long Page Scanning 406 Saving Scanned Images in Multiple PDF Files...
Operation Guide
Page 53
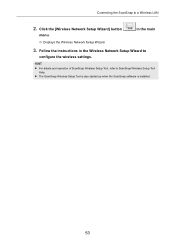
Click the [Wireless Network Setup Wizard] button menu. HINT z For details and operation of ScanSnap Wireless Setup Tool, refer to a Wireless LAN 2. z The ScanSnap Wireless Setup Tool is also started up when the ScanSnap software is installed. 53 Connecting the ScanSnap to ScanSnap Wireless Setup Tool Help. in the Wireless Network Setup Wizard to configure the wireless settings. Follow the instructions in the main 3. D Displays the Wireless Network Setup Wizard.
Click the [Wireless Network Setup Wizard] button menu. HINT z For details and operation of ScanSnap Wireless Setup Tool, refer to a Wireless LAN 2. z The ScanSnap Wireless Setup Tool is also started up when the ScanSnap software is installed. 53 Connecting the ScanSnap to ScanSnap Wireless Setup Tool Help. in the Wireless Network Setup Wizard to configure the wireless settings. Follow the instructions in the main 3. D Displays the Wireless Network Setup Wizard.

Operation Guide
Page 61
...; length) - Clean the rollers occasionally when you use the Carrier Sheet to "Cleaning the Inside of the ScanSnap, refer to scan such documents. For details about how to clean the inside of the ScanSnap" (page 441). Tracing paper - z Scanning the following documents. Odd shaped documents (not square or rectangular) - Make sure to clean the rollers occasionally to maintain the scanner performance when scanning carbonless paper directly without using the Carrier Sheet. Carbon paper or thermal paper -
...; length) - Clean the rollers occasionally when you use the Carrier Sheet to "Cleaning the Inside of the ScanSnap, refer to scan such documents. For details about how to clean the inside of the ScanSnap" (page 441). Tracing paper - z Scanning the following documents. Odd shaped documents (not square or rectangular) - Make sure to clean the rollers occasionally to maintain the scanner performance when scanning carbonless paper directly without using the Carrier Sheet. Carbon paper or thermal paper -

Operation Guide
Page 82
... the Troubleshooting (installation). 82 To configure the wireless settings, click the [Setup Now] button, and then follow the instructions on the screen. Otherwise, click the [Later] button. HINT If you want to configure the wireless settings for connecting the ScanSnap to a wireless LAN. ATTENTION If the installation is not successfully completed, select [Manuals] → [Troubleshooting (installation)] in Windows 12.Select whether you want to configure the wireless settings for connecting the ScanSnap...
... the Troubleshooting (installation). 82 To configure the wireless settings, click the [Setup Now] button, and then follow the instructions on the screen. Otherwise, click the [Later] button. HINT If you want to configure the wireless settings for connecting the ScanSnap to a wireless LAN. ATTENTION If the installation is not successfully completed, select [Manuals] → [Troubleshooting (installation)] in Windows 12.Select whether you want to configure the wireless settings for connecting the ScanSnap...
Operation Guide
Page 87
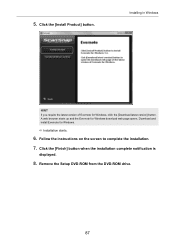
5. Follow the instructions on the screen to complete the installation. 7. D Installation starts. 6. Remove the Setup DVD-ROM from the DVD-ROM drive. 87 Installing in Windows HINT If you require the latest version of Evernote for Windows download web page opens. A web browser starts up and the Evernote for Windows, click the [Download latest version] button. Download and install Evernote for Windows. Click the [Install Product] button. Click the [Finish] button when the installation complete notification is displayed. 8.
5. Follow the instructions on the screen to complete the installation. 7. D Installation starts. 6. Remove the Setup DVD-ROM from the DVD-ROM drive. 87 Installing in Windows HINT If you require the latest version of Evernote for Windows download web page opens. A web browser starts up and the Evernote for Windows, click the [Download latest version] button. Download and install Evernote for Windows. Click the [Install Product] button. Click the [Finish] button when the installation complete notification is displayed. 8.

Operation Guide
Page 91
Installing in the [Manuals] dialog box to open the Scan to Microsoft SharePoint User's Guide. HINT For details about how to use Scan to Microsoft SharePoint, refer to the Scan to Microsoft SharePoint User's Guide. 91 Remove the Setup DVD-ROM from the DVD-ROM drive. 4. Click the [Finish] button when the installation complete notification is displayed. 7. Click the [Scan to Microsoft SharePoint] button in Windows D Installation starts. 5. Follow the instructions on the screen to Microsoft SharePoint] button. Click the [Scan to complete the installation. 6.
Installing in the [Manuals] dialog box to open the Scan to Microsoft SharePoint User's Guide. HINT For details about how to use Scan to Microsoft SharePoint, refer to the Scan to Microsoft SharePoint User's Guide. 91 Remove the Setup DVD-ROM from the DVD-ROM drive. 4. Click the [Finish] button when the installation complete notification is displayed. 7. Click the [Scan to Microsoft SharePoint] button in Windows D Installation starts. 5. Follow the instructions on the screen to Microsoft SharePoint] button. Click the [Scan to complete the installation. 6.

Operation Guide
Page 288
... mode during scanning. z Do not allow the ScanSnap to "ScanSnap Manager Menu (Mac OS)" (page 39). Image scanning and file saving] window appears. Preview When you can switch the [Scan] button setting to [Simplex Scan (Single-sided)] in default. ATTENTION z Do not connect or disconnect the ScanSnap and other USB devices during scanning. z Do not close the ADF paper chute (cover) during scanning. z You can be displayed. z Do not switch users during scanning. Up to stop scanning the document. D The Quick Menu appears when the scanning is [Duplex Scan (Double-sided)] in ScanSnap...
... mode during scanning. z Do not allow the ScanSnap to "ScanSnap Manager Menu (Mac OS)" (page 39). Image scanning and file saving] window appears. Preview When you can switch the [Scan] button setting to [Simplex Scan (Single-sided)] in default. ATTENTION z Do not connect or disconnect the ScanSnap and other USB devices during scanning. z Do not close the ADF paper chute (cover) during scanning. z You can be displayed. z Do not switch users during scanning. Up to stop scanning the document. D The Quick Menu appears when the scanning is [Duplex Scan (Double-sided)] in ScanSnap...

Operation Guide
Page 381
... Side of using the ScanSnap. Creating Scanned Images Depending on Intended Use (for Mac OS Users) Creating Scanned Images Depending on Intended Use This section explains about the ScanSnap Manager menu, refer to "ScanSnap Manager Menu (Mac OS)" (page 39). D The ScanSnap setup window appears. 2. To perform simplex scanning, perform the following steps to close the ScanSnap setup window. 381 Select [Settings] from the ScanSnap Manager menu. In the [Scanning side] pop-up menu in the upper left corner to change the setting. 1. Click the [ ] button...
... Side of using the ScanSnap. Creating Scanned Images Depending on Intended Use (for Mac OS Users) Creating Scanned Images Depending on Intended Use This section explains about the ScanSnap Manager menu, refer to "ScanSnap Manager Menu (Mac OS)" (page 39). D The ScanSnap setup window appears. 2. To perform simplex scanning, perform the following steps to close the ScanSnap setup window. 381 Select [Settings] from the ScanSnap Manager menu. In the [Scanning side] pop-up menu in the upper left corner to change the setting. 1. Click the [ ] button...

Operation Guide
Page 385
... check the image data for Mac OS Users) Deleting Blank Pages The ScanSnap can detect and automatically delete blank pages from the ScanSnap Manager menu. D The ScanSnap setup window appears. 385 Almost blank documents with only a few characters - Select [Settings] from a scanned image. To delete blank pages, perform the following documents may be detected as blank. - z Blank pages are generated without the back sides of only one color (including black) and without any patterns, lines or characters When you scan a mixed batch of double-sided...
... check the image data for Mac OS Users) Deleting Blank Pages The ScanSnap can detect and automatically delete blank pages from the ScanSnap Manager menu. D The ScanSnap setup window appears. 385 Almost blank documents with only a few characters - Select [Settings] from a scanned image. To delete blank pages, perform the following documents may be detected as blank. - z Blank pages are generated without the back sides of only one color (including black) and without any patterns, lines or characters When you scan a mixed batch of double-sided...

Operation Guide
Page 389
... for Mac OS Users) Rotating Scanned Image to "ScanSnap Manager Menu (Mac OS)" (page 39). ATTENTION Since this option determines the document's page orientation based on the character strings printed on the document, the following procedure. Select [Settings] from the ScanSnap Manager menu. D The ScanSnap setup window appears. 389 The ScanSnap is often the case that case, clear the [Automatic image rotation] checkbox: z Documents with many extremely large or small characters z Documents on which pitches between lines...
... for Mac OS Users) Rotating Scanned Image to "ScanSnap Manager Menu (Mac OS)" (page 39). ATTENTION Since this option determines the document's page orientation based on the character strings printed on the document, the following procedure. Select [Settings] from the ScanSnap Manager menu. D The ScanSnap setup window appears. 389 The ScanSnap is often the case that case, clear the [Automatic image rotation] checkbox: z Documents with many extremely large or small characters z Documents on which pitches between lines...

Operation Guide
Page 397
... "ScanSnap Manager Menu (Mac OS)" (page 39). HINT You can scan documents larger than A4/Letter size and have both sides saved as A3, 11 × 17 in duplex mode, the two sides are merged into a single image. Select [Settings] from the ScanSnap Manager menu. Creating Scanned Images Depending on document] checkbox ([Scanning] tab → [Option] in [Paper size], and then click the [Carrier Sheet Settings] button. ATTENTION The [Deskew by text on Intended Use (for Mac OS Users) Scanning Documents Larger...
... "ScanSnap Manager Menu (Mac OS)" (page 39). HINT You can scan documents larger than A4/Letter size and have both sides saved as A3, 11 × 17 in duplex mode, the two sides are merged into a single image. Select [Settings] from the ScanSnap Manager menu. Creating Scanned Images Depending on document] checkbox ([Scanning] tab → [Option] in [Paper size], and then click the [Carrier Sheet Settings] button. ATTENTION The [Deskew by text on Intended Use (for Mac OS Users) Scanning Documents Larger...

Operation Guide
Page 402
... Sheet Settings] window appears. 402 Select [Settings] from the ScanSnap Manager menu. In the [Paper] tab, select [Automatic detection] in [Paper size], and then click the [Carrier Sheet Settings] button. ATTENTION The [Deskew by text on Intended Use (for Mac OS Users) Scanning Documents Such as Photographs and Clippings Using the Carrier Sheet allows you to scan documents that are difficult to load directly such as clippings. D The ScanSnap setup window appears. 2. Change the settings to "ScanSnap Manager Menu (Mac OS)" (page 39). Creating Scanned Images...
... Sheet Settings] window appears. 402 Select [Settings] from the ScanSnap Manager menu. In the [Paper] tab, select [Automatic detection] in [Paper size], and then click the [Carrier Sheet Settings] button. ATTENTION The [Deskew by text on Intended Use (for Mac OS Users) Scanning Documents Such as Photographs and Clippings Using the Carrier Sheet allows you to scan documents that are difficult to load directly such as clippings. D The ScanSnap setup window appears. 2. Change the settings to "ScanSnap Manager Menu (Mac OS)" (page 39). Creating Scanned Images...

Operation Guide
Page 408
... details about the ScanSnap Manager menu, refer to save scanned image in separate PDF files based on Intended Use (for Mac OS Users) Saving Scanned Images in Multiple PDF Files The ScanSnap is able to "ScanSnap Manager Menu (Mac OS)" (page 39). In the [File format] pop-up menu in the [File option] tab, select [PDF (*.pdf)], and then click the [Option] button. Select [Settings] from the ScanSnap Manager menu. Creating Scanned Images Depending on the specified number of slips, and save image data in multiple PDF files, change the settings in the following...
... details about the ScanSnap Manager menu, refer to save scanned image in separate PDF files based on Intended Use (for Mac OS Users) Saving Scanned Images in Multiple PDF Files The ScanSnap is able to "ScanSnap Manager Menu (Mac OS)" (page 39). In the [File format] pop-up menu in the [File option] tab, select [PDF (*.pdf)], and then click the [Option] button. Select [Settings] from the ScanSnap Manager menu. Creating Scanned Images Depending on the specified number of slips, and save image data in multiple PDF files, change the settings in the following...

Operation Guide
Page 409
... ScanSnap setup window. 7. Press the [Scan] button on Intended Use (for Mac OS Users) 3. has been scanned. 409 Clear this checkbox when you select the [Blank page removal] checkbox in the upper left corner to Load Documents" (page 63). 8. For details, refer to "How to close the [PDF file format option] window. 5. HINT In duplex mode, two pages (front/back) are created per (n) page(s)] and enter the number of the original document and the scanned image...
... ScanSnap setup window. 7. Press the [Scan] button on Intended Use (for Mac OS Users) 3. has been scanned. 409 Clear this checkbox when you select the [Blank page removal] checkbox in the upper left corner to Load Documents" (page 63). 8. For details, refer to "How to close the [PDF file format option] window. 5. HINT In duplex mode, two pages (front/back) are created per (n) page(s)] and enter the number of the original document and the scanned image...

Operation Guide
Page 458
... Update ScanSnap Online Update ScanSnap Online Update allows you to the ScanSnap Online Update Help. Follow the instructions on the dialog box that appears and install the update. It is as follows: z ScanSnap Manager z ScanSnap Organizer z CardMinder z ScanSnap Online Update ScanSnap Online Update checks the download server periodically. ATTENTION To run the update. 458 Update list appears. When the latest version of the program is available, ScanSnap Online Update notifies you need to have access to enhance security, operability...
... Update ScanSnap Online Update ScanSnap Online Update allows you to the ScanSnap Online Update Help. Follow the instructions on the dialog box that appears and install the update. It is as follows: z ScanSnap Manager z ScanSnap Organizer z CardMinder z ScanSnap Online Update ScanSnap Online Update checks the download server periodically. ATTENTION To run the update. 458 Update list appears. When the latest version of the program is available, ScanSnap Online Update notifies you need to have access to enhance security, operability...

Operation Guide
Page 461
... z Screen displays may vary slightly depending on the operating system that case, follow the instructions by the operating system. ScanSnap Organizer - In that you cannot successfully uninstall the following software, select [Manuals] → [Troubleshooting (installation)] in the [ScanSnap Setup] dialog box and refer to 6. z To uninstall Evernote for Windows Select [Evernote]. ScanSnap Manager - D A confirmation message appears. 6. Example: - [Programs and Features] In Windows XP: [Add or Remove Programs] - [Uninstall] button In Windows XP: [Remove] button...
... z Screen displays may vary slightly depending on the operating system that case, follow the instructions by the operating system. ScanSnap Organizer - In that you cannot successfully uninstall the following software, select [Manuals] → [Troubleshooting (installation)] in the [ScanSnap Setup] dialog box and refer to 6. z To uninstall Evernote for Windows Select [Evernote]. ScanSnap Manager - D A confirmation message appears. 6. Example: - [Programs and Features] In Windows XP: [Add or Remove Programs] - [Uninstall] button In Windows XP: [Remove] button...

Getting Started Guide
Page 2
Double-click the [Operator's Guide] icon in the [ScanSnap Setup] dialog box, and then the [Operator's Guide] button. The ScanSnap can be connected to the ScanSnap via wireless LAN. Referring to the "Operator's Guide" To refer to the manual of your wireless access point or router. Click the [Manuals] button in the [ScanSnap] window. To use this function, make sure to read and understand the information provided in This Manual Symbol CAUTION Description...
Double-click the [Operator's Guide] icon in the [ScanSnap Setup] dialog box, and then the [Operator's Guide] button. The ScanSnap can be connected to the ScanSnap via wireless LAN. Referring to the "Operator's Guide" To refer to the manual of your wireless access point or router. Click the [Manuals] button in the [ScanSnap] window. To use this function, make sure to read and understand the information provided in This Manual Symbol CAUTION Description...

Getting Started Guide
Page 6
...to Troubleshooting (installation). 6 For details, refer to a Wireless LAN" (page 12). Check the operation of the ScanSnap. D Otherwise, click the [Later] button. 5. Follow the instructions on the screen. For details, refer to "Connecting the ScanSnap to "Connecting the ScanSnap" (page 9). Remove the Setup DVD-ROM from the DVD-ROM drive. HINT If you want to configure the wireless settings for connecting the ScanSnap to "Scan Test (USB Connection)" (page 11). 7. Check the ScanSnap operation before connecting the ScanSnap to the Operator' s Guide. 8. D To configure...
...to Troubleshooting (installation). 6 For details, refer to a Wireless LAN" (page 12). Check the operation of the ScanSnap. D Otherwise, click the [Later] button. 5. Follow the instructions on the screen. For details, refer to "Connecting the ScanSnap to "Connecting the ScanSnap" (page 9). Remove the Setup DVD-ROM from the DVD-ROM drive. HINT If you want to configure the wireless settings for connecting the ScanSnap to "Scan Test (USB Connection)" (page 11). 7. Check the ScanSnap operation before connecting the ScanSnap to the Operator' s Guide. 8. D To configure...


