
User guide
Page 3
See the Extended user guide www.kodak.com/go/zd15support www.kodak.com/go/zd15support 3 Date/Time: At the prompt, press OK. ENGLISH ᕣ Turning on the camera ᕤ Setting the language and date/time Language: to accept. OK to change current field. OK to change . to accept. OK for previous/next field.
See the Extended user guide www.kodak.com/go/zd15support www.kodak.com/go/zd15support 3 Date/Time: At the prompt, press OK. ENGLISH ᕣ Turning on the camera ᕤ Setting the language and date/time Language: to accept. OK to change current field. OK to change . to accept. OK for previous/next field.

User guide
Page 7
It describes every setting for every menu choice. Scroll through a Help topic See the Extended user guide www.kodak.com/go/zd15support www.kodak.com/go/zd15support 7 If you become. 1 Press the Menu button, then highlight a menu choice. 2 Press the Info button. Because the more you know your camera, the more confident you learn nothing else about your camera Your camera offers a built-in Help system. ENGLISH ᕨ Getting help from your camera, learn how to use on-camera Help.
It describes every setting for every menu choice. Scroll through a Help topic See the Extended user guide www.kodak.com/go/zd15support www.kodak.com/go/zd15support 7 If you become. 1 Press the Menu button, then highlight a menu choice. 2 Press the Info button. Because the more you know your camera, the more confident you learn nothing else about your camera Your camera offers a built-in Help system. ENGLISH ᕨ Getting help from your camera, learn how to use on-camera Help.

User guide
Page 8
Finish reading this book, so you can take and share your computer Keep learning! You have: • set up your camera • taken pictures • transferred pictures to your best pictures! Visit www.kodak.com/go/zd15support: • the extended user guide • interactive troubleshooting and repairs • interactive tutorials • FAQs • downloads • accessories • printing information • product registration 8 www.kodak.com/go/easysharecenter Congratulations! ENGLISH ᕩ Keep learning about your camera!
Finish reading this book, so you can take and share your computer Keep learning! You have: • set up your camera • taken pictures • transferred pictures to your best pictures! Visit www.kodak.com/go/zd15support: • the extended user guide • interactive troubleshooting and repairs • interactive tutorials • FAQs • downloads • accessories • printing information • product registration 8 www.kodak.com/go/easysharecenter Congratulations! ENGLISH ᕩ Keep learning about your camera!

User guide
Page 15
...time you take a picture, regardless of the lighting conditions. Digital Correction A preflash does not fire; Off Never. www.kodak.com/go/zd15support 15 The current flash mode is shown on the LCD. (Flash settings are limited in Smart Capture mode.) A preflash fires, shrinking ...the eye pupil, before the picture is "backlit." Fill Red-eye Reduction Choose Preflash or Digital Correction using the Setup menu. In low light, hold the camera...
...time you take a picture, regardless of the lighting conditions. Digital Correction A preflash does not fire; Off Never. www.kodak.com/go/zd15support 15 The current flash mode is shown on the LCD. (Flash settings are limited in Smart Capture mode.) A preflash fires, shrinking ...the eye pupil, before the picture is "backlit." Fill Red-eye Reduction Choose Preflash or Digital Correction using the Setup menu. In low light, hold the camera...

User guide
Page 16
.../Video for the most common picture/video-taking settings ■ Setup for other camera settings 3 Press to change settings You can change modes or turn off the camera. 16 www.kodak.com/go/easysharecenter NOTE: Some modes offer limited settings. Doing more with your camera Using the menu button to highlight a setting, then press OK. 4 Highlight an option, then...
.../Video for the most common picture/video-taking settings ■ Setup for other camera settings 3 Press to change settings You can change modes or turn off the camera. 16 www.kodak.com/go/easysharecenter NOTE: Some modes offer limited settings. Doing more with your camera Using the menu button to highlight a setting, then press OK. 4 Highlight an option, then...

User guide
Page 22
number does not decrease after taking pictures. In Review mode, you do ■ Check the image storage location setting. (See the Setup menu.) not see page 6), then format the card or internal memory. (See the Setup menu.) CAUTION: Formatting a card ...(see a picture (or the expected picture) on the LCD screen. Do not remove card while the camera is operating normally. If the camera still off. Camera does not turn ■ Install new batteries (see page 18). 22 www.kodak.com/go /zd15support and select Interactive Troubleshooting & Repairs. Pictures remaining ■ The...
number does not decrease after taking pictures. In Review mode, you do ■ Check the image storage location setting. (See the Setup menu.) not see page 6), then format the card or internal memory. (See the Setup menu.) CAUTION: Formatting a card ...(see a picture (or the expected picture) on the LCD screen. Do not remove card while the camera is operating normally. If the camera still off. Camera does not turn ■ Install new batteries (see page 18). 22 www.kodak.com/go /zd15support and select Interactive Troubleshooting & Repairs. Pictures remaining ■ The...
Extended user guide
Page 5
... the strap 1 Loading the batteries 1 Turning on the camera 2 Setting the language, date/time 2 Storing pictures on an (accessory) SD or SDHC Card 3 2 Taking pictures/videos 4 Taking a picture 4 Taking a video 5 Capture modes 6 Using optical zoom 8 Using the flash 9 Using the Focus button 10 Using the self-timer 11 Using burst 11 Taking panoramic... pictures/videos 18 Deleting pictures/videos 19 Using shortcuts 21 Using the menu button in Review 21 Adding sound tags 22 Cropping pictures 23 Using KODAK PERFECT TOUCH Technology 24 www.kodak.com/go/support iii
... the strap 1 Loading the batteries 1 Turning on the camera 2 Setting the language, date/time 2 Storing pictures on an (accessory) SD or SDHC Card 3 2 Taking pictures/videos 4 Taking a picture 4 Taking a video 5 Capture modes 6 Using optical zoom 8 Using the flash 9 Using the Focus button 10 Using the self-timer 11 Using burst 11 Taking panoramic... pictures/videos 18 Deleting pictures/videos 19 Using shortcuts 21 Using the menu button in Review 21 Adding sound tags 22 Cropping pictures 23 Using KODAK PERFECT TOUCH Technology 24 www.kodak.com/go/support iii

Extended user guide
Page 7
www.kodak.com/go /zd15accessories battery chargers, SDHC cards, etc. 1 Setting up your camera Attaching the strap Loading the batteries Other battery types see page 57 Purchase accessories, such as batteries, www.kodak.com/go /support 1
www.kodak.com/go /zd15accessories battery chargers, SDHC cards, etc. 1 Setting up your camera Attaching the strap Loading the batteries Other battery types see page 57 Purchase accessories, such as batteries, www.kodak.com/go /support 1

Extended user guide
Page 8
for previous/next field. to change . Setting up your camera Turning on the camera Setting the language, date/time Language: to change current field. NOTE: To change language or date/time in the future, use the Setup menu (see page 37). 2 www.kodak.com/go/support OK to accept. Date/Time: At the prompt, press OK. OK to accept.
for previous/next field. to change . Setting up your camera Turning on the camera Setting the language, date/time Language: to change current field. NOTE: To change language or date/time in the future, use the Setup menu (see page 37). 2 www.kodak.com/go/support OK to accept. Date/Time: At the prompt, press OK. OK to accept.

Extended user guide
Page 9
Setting up your camera Storing pictures on may cause damage. You can purchase an SD or SDHC Card to store more pictures and videos. (Maximum supported card size is on an (accessory) SD or SDHC Card Your camera has internal memory. Purchase accessories www.kodak.com/go/zd15accessories www.kodak.com/go/support 3 forcing it may damage the pictures, the card, or the camera. 1 Turn off the camera. 2 Insert or remove the optional card. 3 Turn on the camera. Inserting or removing a card when the camera is 32 GB.) CAUTION: A card can only be inserted one way;
Setting up your camera Storing pictures on may cause damage. You can purchase an SD or SDHC Card to store more pictures and videos. (Maximum supported card size is on an (accessory) SD or SDHC Card Your camera has internal memory. Purchase accessories www.kodak.com/go/zd15accessories www.kodak.com/go/support 3 forcing it may damage the pictures, the card, or the camera. 1 Turn off the camera. 2 Insert or remove the optional card. 3 Turn on the camera. Inserting or removing a card when the camera is 32 GB.) CAUTION: A card can only be inserted one way;

Extended user guide
Page 12
... under special conditions. Shutter speed is applied, for better pictures. A Aperture S Shutter M Manual Video Video with sound. (See page 5.) 6 www.kodak.com/go/support P Program More creative control. (See page 14). Panorama "Stitching" 2 or 3 pictures into 1 panoramic scene. (See page 12.)...Picture Size. ■ 3:2 (the best choice when making 4 x 6 prints) ■ 16:9 (wide screen) ■ 4:3 (the default setting) Subjects that best suits your subjects and surroundings. Taking pictures/videos Capture modes Choose the mode that are detected. ■ The scene is analyzed for...
... under special conditions. Shutter speed is applied, for better pictures. A Aperture S Shutter M Manual Video Video with sound. (See page 5.) 6 www.kodak.com/go/support P Program More creative control. (See page 14). Panorama "Stitching" 2 or 3 pictures into 1 panoramic scene. (See page 12.)...Picture Size. ■ 3:2 (the best choice when making 4 x 6 prints) ■ 16:9 (wide screen) ■ 4:3 (the default setting) Subjects that best suits your subjects and surroundings. Taking pictures/videos Capture modes Choose the mode that are detected. ■ The scene is analyzed for...

Extended user guide
Page 13
... Scene modes 1 Turn the Mode dial to Scene . 2 Press to choose a Scene mode. NOTE: If the mode description turns off . (Flash setting can be changed.) Fireworks Bright, colorful light displays. Flash does not fire. Framing marks are off before you finish reading it, press OK. 3 Press... Scene modes. Sunset Capturing the deep hues seen at night. Place the camera on a lit stage. Beach Bright beach scenes. Landscape Far-away scenes. SCN mode For Portrait Full-frame portraits of people. www.kodak.com/go/support 7 Flash does not fire. Flash and sounds are not...
... Scene modes 1 Turn the Mode dial to Scene . 2 Press to choose a Scene mode. NOTE: If the mode description turns off . (Flash setting can be changed.) Fireworks Bright, colorful light displays. Flash does not fire. Framing marks are off before you finish reading it, press OK. 3 Press... Scene modes. Sunset Capturing the deep hues seen at night. Place the camera on a lit stage. Beach Bright beach scenes. Landscape Far-away scenes. SCN mode For Portrait Full-frame portraits of people. www.kodak.com/go/support 7 Flash does not fire. Flash and sounds are not...
Extended user guide
Page 15
...shadow or is "backlit" (when the light is taken. Digital Correction A preflash fires, shrinking the eye pupil, before the picture is behind the subject). In low light, hold the camera steady or use a tripod. the camera corrects red eye. Taking pictures/videos Using the flash Use ... NOTE: (Not available in some capture modes. Off Never. Flash settings are limited in Smart Capture mode.) Red-eye Reduction Preflash Choose Preflash or Digital Correction using the Setup menu (see page 35). www.kodak.com/go/support 9 Flash modes Auto Flash fires When the lighting ...
...shadow or is "backlit" (when the light is taken. Digital Correction A preflash fires, shrinking the eye pupil, before the picture is behind the subject). In low light, hold the camera steady or use a tripod. the camera corrects red eye. Taking pictures/videos Using the flash Use ... NOTE: (Not available in some capture modes. Off Never. Flash settings are limited in Smart Capture mode.) Red-eye Reduction Preflash Choose Preflash or Digital Correction using the Setup menu (see page 35). www.kodak.com/go/support 9 Flash modes Auto Flash fires When the lighting ...

Extended user guide
Page 16
... taking pictures through focus modes. Macro Subjects that are 12-60 cm (4.7-23.6 in.) from the lens. 2 Press the Shutter button halfway to focus and set exposure, then completely down to scroll through a window. The current Focus mode is shown on the LCD. 1 In most Still modes, press the Focus button... Focus (AF) Infinity Icon For No icon. Taking pictures/videos Using the Focus button Press the Focus button repeatedly to take the picture. 10 www.kodak.com/go/support
... taking pictures through focus modes. Macro Subjects that are 12-60 cm (4.7-23.6 in.) from the lens. 2 Press the Shutter button halfway to focus and set exposure, then completely down to scroll through a window. The current Focus mode is shown on the LCD. 1 In most Still modes, press the Focus button... Focus (AF) Infinity Icon For No icon. Taking pictures/videos Using the Focus button Press the Focus button repeatedly to take the picture. 10 www.kodak.com/go/support
Extended user guide
Page 17
...2-second delay (for a steady, shutter release on the LCD. The camera takes the picture/pictures after a 10-second delay. Place the camera on a tripod or flat surface. 1 Repeatedly press the Self-timer/Burst button to choose a setting: 10 seconds-A picture is taken after a 10-second delay (so you...tripod). 2 shot-The first picture is taken 8 seconds later. 2 Compose the scene. NOTE: During quickview, you want to take a 2- www.kodak.com/go/support 11 Press the Shutter button halfway, then completely down . NOTE: Burst is pressed. Use the same procedure to be included in ...
...2-second delay (for a steady, shutter release on the LCD. The camera takes the picture/pictures after a 10-second delay. Place the camera on a tripod or flat surface. 1 Repeatedly press the Self-timer/Burst button to choose a setting: 10 seconds-A picture is taken after a 10-second delay (so you...tripod). 2 shot-The first picture is taken 8 seconds later. 2 Compose the scene. NOTE: During quickview, you want to take a 2- www.kodak.com/go/support 11 Press the Shutter button halfway, then completely down . NOTE: Burst is pressed. Use the same procedure to be included in ...

Extended user guide
Page 18
... and an "overlay" from the first picture cover the same portion in the new picture. 5 If you take 3 pictures, the pictures are set to pan), then press OK. 3 Take the first picture. The flash is cancelled before stitching occurs. (Exposure Compensation, White Balance, Exposure Metering... For best results, use the self-timer (2- After you are not saved, even if panorama capture is set with the first picture. Get 1 panoramic picture. 12 www.kodak.com/go/support Taking pictures/videos Taking panoramic pictures Use panorama to "stitch" up to stitch them together. ...
... and an "overlay" from the first picture cover the same portion in the new picture. 5 If you take 3 pictures, the pictures are set to pan), then press OK. 3 Take the first picture. The flash is cancelled before stitching occurs. (Exposure Compensation, White Balance, Exposure Metering... For best results, use the self-timer (2- After you are not saved, even if panorama capture is set with the first picture. Get 1 panoramic picture. 12 www.kodak.com/go/support Taking pictures/videos Taking panoramic pictures Use panorama to "stitch" up to stitch them together. ...

Extended user guide
Page 19
...choice. It describes every setting for you ■ And how to use on camera Help 1 Press the Menu button, then highlight a menu choice. 2 Press the Info button. Scroll through a Help topic www.kodak.com/go/support 13 If you become! Turning on -camera Help. Your camera offers a built-in ...Help system. Because the more you know your camera, the more confident you learn nothing else about your camera, learn how to take the best possible ...
...choice. It describes every setting for you ■ And how to use on camera Help 1 Press the Menu button, then highlight a menu choice. 2 Press the Info button. Scroll through a Help topic www.kodak.com/go/support 13 If you become! Turning on -camera Help. Your camera offers a built-in ...Help system. Because the more you know your camera, the more confident you learn nothing else about your camera, learn how to take the best possible ...
Extended user guide
Page 20
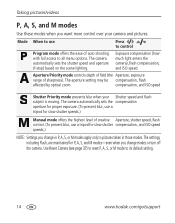
...camera automatically sets...enters the camera), flash ...camera and pictures. Mode When to use a tripod for P, A, S, and M modes-even when you change in those modes. The settings..., including Flash, are maintained for slow shutter compensation, and ISO speed speeds.) NOTE: Settings you change modes or turn off the camera. Use Reset Camera... (see page 37) to reset P, A, S, or M mode to pictures taken in P, A, S, or M modes apply only to its default setting. 14 www.kodak.com/go/support The aperture setting...
...camera automatically sets...enters the camera), flash ...camera and pictures. Mode When to use a tripod for P, A, S, and M modes-even when you change in those modes. The settings..., including Flash, are maintained for slow shutter compensation, and ISO speed speeds.) NOTE: Settings you change modes or turn off the camera. Use Reset Camera... (see page 37) to reset P, A, S, or M mode to pictures taken in P, A, S, or M modes apply only to its default setting. 14 www.kodak.com/go/support The aperture setting...
Extended user guide
Page 21
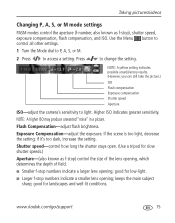
.... (However, you can still take the picture.) ISO Flash compensation Exposure compensation Shutter speed Aperture ISO-adjust the camera's sensitivity to access a setting. Higher ISO indicates greater sensitivity. Shutter speed-control how long the shutter stays open. (Use a tripod for.... ■ Smaller f-stop numbers indicate a smaller lens opening ; www.kodak.com/go/support 15 Exposure Compensation-adjust the exposure. Flash Compensation-adjust flash brightness. Press to change the setting. if it's too dark, increase the setting. keeps the main subject sharp;
.... (However, you can still take the picture.) ISO Flash compensation Exposure compensation Shutter speed Aperture ISO-adjust the camera's sensitivity to access a setting. Higher ISO indicates greater sensitivity. Shutter speed-control how long the shutter stays open. (Use a tripod for.... ■ Smaller f-stop numbers indicate a smaller lens opening ; www.kodak.com/go/support 15 Exposure Compensation-adjust the exposure. Flash Compensation-adjust flash brightness. Press to change the setting. if it's too dark, increase the setting. keeps the main subject sharp;

Extended user guide
Page 22
... Capture+ menu (see page 35). +0.7, +1.0, +1.3 -1.0 -1.3, -1.0, -0.7 16 www.kodak.com/go/support If the exposure And if the exposure bracketing Then the exposures compensation is set to: interval is set to 0.3 steps: taken are satisfied with the exposure compensation level. Taking pictures/videos Using... best exposure. An exposure compensation level is applied to the remaining pictures. ■ Press to access the exposure compensation setting. ■ Press to decrease or to make your pictures darker or lighter. Using exposure compensation with exposure bracketing In ...
... Capture+ menu (see page 35). +0.7, +1.0, +1.3 -1.0 -1.3, -1.0, -0.7 16 www.kodak.com/go/support If the exposure And if the exposure bracketing Then the exposures compensation is set to: interval is set to 0.3 steps: taken are satisfied with the exposure compensation level. Taking pictures/videos Using... best exposure. An exposure compensation level is applied to the remaining pictures. ■ Press to access the exposure compensation setting. ■ Press to decrease or to make your pictures darker or lighter. Using exposure compensation with exposure bracketing In ...


