

User Manual
Page 5
...up your camera 1 Attaching the strap 1 Loading the battery 1 Turning on the camera 2 Setting the language, date/time 2 Using an optional SD/SDHC or MMC card 3 2 Taking pictures/videos 4 Taking a picture 4 Capture modes 6 Using optical zoom 8 Using...videos 13 Reviewing pictures/videos 13 Deleting pictures/videos 15 Using the menu button in Review 16 Adding sound tags 17 Cropping pictures 18 Using Kodak Perfect Touch technology 18 Editing videos 19 Running a slide show 21 Viewing pictures/videos in different ways 24 Selecting multiple pictures/videos 25 Copying pictures/videos...
...up your camera 1 Attaching the strap 1 Loading the battery 1 Turning on the camera 2 Setting the language, date/time 2 Using an optional SD/SDHC or MMC card 3 2 Taking pictures/videos 4 Taking a picture 4 Capture modes 6 Using optical zoom 8 Using...videos 13 Reviewing pictures/videos 13 Deleting pictures/videos 15 Using the menu button in Review 16 Adding sound tags 17 Cropping pictures 18 Using Kodak Perfect Touch technology 18 Editing videos 19 Running a slide show 21 Viewing pictures/videos in different ways 24 Selecting multiple pictures/videos 25 Copying pictures/videos...
User Manual
Page 9
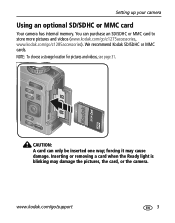
CAUTION: A card can purchase an SD/SDHC or MMC card to store more pictures and videos (www.kodak.com/go/z1275accessories, www.kodak.com/go /support 3 We recommend Kodak SD/SDHC or MMC cards. forcing it may damage the pictures, the card, or the camera. Inserting or removing a card when the Ready light is blinking may cause damage. NOTE: To choose a storage location for pictures and videos, see page 31. Setting up your camera Using an optional SD/SDHC or MMC card Your camera has internal memory. www.kodak.com/go /z1285accessories). You can only be inserted one way;
CAUTION: A card can purchase an SD/SDHC or MMC card to store more pictures and videos (www.kodak.com/go/z1275accessories, www.kodak.com/go /support 3 We recommend Kodak SD/SDHC or MMC cards. forcing it may damage the pictures, the card, or the camera. Inserting or removing a card when the Ready light is blinking may cause damage. NOTE: To choose a storage location for pictures and videos, see page 31. Setting up your camera Using an optional SD/SDHC or MMC card Your camera has internal memory. www.kodak.com/go /z1285accessories). You can only be inserted one way;

User Manual
Page 10
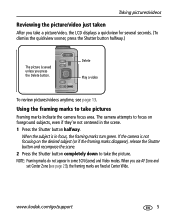
NOTE: Press to focus and set exposure. Taking a video 1 2 3 Press the Shutter button completely down . To stop recording, press and release the Shutter button again. 4 www.kodak.com/go/support For more information on /off status icons (see page 12) and histogram (see page 5. Ready Framing light marks When the Ready light turns green, press the Shutter button completely down and release. 2 Taking pictures/videos Taking a picture 1 2 3 Press the Shutter button halfway to turn on framing marks, see page 38).
NOTE: Press to focus and set exposure. Taking a video 1 2 3 Press the Shutter button completely down . To stop recording, press and release the Shutter button again. 4 www.kodak.com/go/support For more information on /off status icons (see page 12) and histogram (see page 5. Ready Framing light marks When the Ready light turns green, press the Shutter button completely down and release. 2 Taking pictures/videos Taking a picture 1 2 3 Press the Shutter button halfway to turn on framing marks, see page 38).
User Manual
Page 11
... (see page 13. www.kodak.com/go/support 5 The camera attempts to take the picture. When the subject is saved unless you press the Delete button. Taking pictures/videos Reviewing the picture/video just taken After you take pictures Framing marks indicate the camera focus area. Delete Play a video To review pictures/videos anytime, see page 29...
... (see page 13. www.kodak.com/go/support 5 The camera attempts to take the picture. When the subject is saved unless you press the Delete button. Taking pictures/videos Reviewing the picture/video just taken After you take pictures Framing marks indicate the camera focus area. Delete Play a video To review pictures/videos anytime, see page 29...

User Manual
Page 12
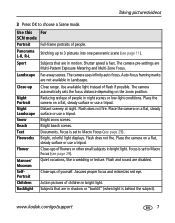
Digital Image Minimizing the effects of camera shake and subject movement. NOTE: If the mode description turns off before you finish reading it, press OK. 6 www.kodak.com/go/support Taking pictures/videos Capture modes Choose the mode that best suits your subjects and... Program, Manual modes for more creative control. (See page 33). Capture mode For General picture taking pictures under special conditions. (See page 6.) Video Capturing video with sound. (See page 4.) Favorites Viewing favorite pictures. (See page 40.) Scene modes 1 Turn the Mode dial to Scene . 2 Press...
Digital Image Minimizing the effects of camera shake and subject movement. NOTE: If the mode description turns off before you finish reading it, press OK. 6 www.kodak.com/go/support Taking pictures/videos Capture modes Choose the mode that best suits your subjects and... Program, Manual modes for more creative control. (See page 33). Capture mode For General picture taking pictures under special conditions. (See page 6.) Video Capturing video with sound. (See page 4.) Favorites Viewing favorite pictures. (See page 40.) Scene modes 1 Turn the Mode dial to Scene . 2 Press...
User Manual
Page 13
...one panoramic scene (see page 11). Assures proper focus and minimizes red eye. Taking pictures/videos 3 Press OK to Macro Focus (see page 29). Place the camera on the zoom position. The camera pre-settings are in night scenes or low-light conditions. Subjects that are in bright light.... other small subjects in motion. L-R, R-L Sport Subjects that are Multi-Pattern Exposure Metering and Multi-Zone Focus. Documents. www.kodak.com/go/support 7 The camera automatically sets the focus distance depending on a flat, steady surface or use a tripod. Focus is fast.
...one panoramic scene (see page 11). Assures proper focus and minimizes red eye. Taking pictures/videos 3 Press OK to Macro Focus (see page 29). Place the camera on the zoom position. The camera pre-settings are in night scenes or low-light conditions. Subjects that are in bright light.... other small subjects in motion. L-R, R-L Sport Subjects that are Multi-Pattern Exposure Metering and Multi-Zone Focus. Documents. www.kodak.com/go/support 7 The camera automatically sets the focus distance depending on a flat, steady surface or use a tripod. Focus is fast.

User Manual
Page 14
... still. Optical zoom is effective when the lens is > 1/180 sec. Zoom indicator Optical zoom range Digital zoom range W TD Using the digital zoom Use digital zoom to get up to zoom in . (10 x 15 cm) print. 8 www.kodak.com/go/support Taking pictures/videos Use this For.... NOTE: You may notice decreased image quality when using digital zoom. For focus distances, see Camera specifications, page 57. 2 Press Telephoto (T) to 5X beyond optical zoom while taking pictures/videos. The slider on the zoom indicator turns red when the picture quality reaches the limit for...
... still. Optical zoom is effective when the lens is > 1/180 sec. Zoom indicator Optical zoom range Digital zoom range W TD Using the digital zoom Use digital zoom to get up to zoom in . (10 x 15 cm) print. 8 www.kodak.com/go/support Taking pictures/videos Use this For.... NOTE: You may notice decreased image quality when using digital zoom. For focus distances, see Camera specifications, page 57. 2 Press Telephoto (T) to 5X beyond optical zoom while taking pictures/videos. The slider on the zoom indicator turns red when the picture quality reaches the limit for...
User Manual
Page 15
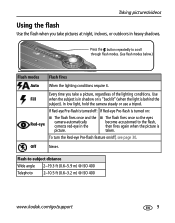
... the ■ The flash fires once so the eyes Red-eye camera automatically corrects red-eye in the become accustomed to -subject distance Wide angle 2-19.3 ft (0.6-5.9 m) @ ISO 400 Telephoto 2-10.5 ft (0.6-3.2 m) @ ISO 400 www.kodak.com/go/support 9 Taking pictures/videos Using the flash Use the flash when you take pictures at...
... the ■ The flash fires once so the eyes Red-eye camera automatically corrects red-eye in the become accustomed to -subject distance Wide angle 2-19.3 ft (0.6-5.9 m) @ ISO 400 Telephoto 2-10.5 ft (0.6-3.2 m) @ ISO 400 www.kodak.com/go/support 9 Taking pictures/videos Using the flash Use the flash when you take pictures at...

User Manual
Page 16
... ensure a steady Shutter button press. 1 Place camera on a tripod) • Again for a 10-second delay (so you have time to Video . ■ Press the Shutter button completely down. Use the same procedure to use the self-timer in video mode. 10 www.kodak.com/go/support and 10-second options are available... in Video mode, but: ■ Turn the Mode dial to get into the scene) • Again for a 2-second delay (for a ...
... ensure a steady Shutter button press. 1 Place camera on a tripod) • Again for a 10-second delay (so you have time to Video . ■ Press the Shutter button completely down. Use the same procedure to use the self-timer in video mode. 10 www.kodak.com/go/support and 10-second options are available... in Video mode, but: ■ Turn the Mode dial to get into the scene) • Again for a 2-second delay (for a ...

User Manual
Page 17
...-second delays) while taking only 2 pictures, press the OK button to 4.8 MP for each picture. After you are set with the first picture. Taking pictures/videos Taking panoramic pictures Use panorama to "stitch" up to pan), then press the OK button. 3 Take the first picture. NOTE: For best results, use the.... 2 Press to highlight Panorama Left-Right or Panorama Right-Left (depending on the direction you want to 3 pictures into a panoramic scene. Get 1 panoramic picture. www.kodak.com/go/support 11
...-second delays) while taking only 2 pictures, press the OK button to 4.8 MP for each picture. After you are set with the first picture. Taking pictures/videos Taking panoramic pictures Use panorama to "stitch" up to pan), then press the OK button. 3 Take the first picture. NOTE: For best results, use the.... 2 Press to highlight Panorama Left-Right or Panorama Right-Left (depending on the direction you want to 3 pictures into a panoramic scene. Get 1 panoramic picture. www.kodak.com/go/support 11
User Manual
Page 18
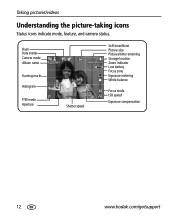
Taking pictures/videos Understanding the picture-taking icons Status icons indicate mode, feature, and camera status. Flash Date stamp Camera mode Album name Framing marks Histogram P/M mode Aperture Shutter speed Self-timer/Burst Picture size Pictures/time remaining Storage location Zoom indicator Low battery Focus zone Exposure metering White balance Focus mode ISO speed Exposure compensation 12 www.kodak.com/go/support
Taking pictures/videos Understanding the picture-taking icons Status icons indicate mode, feature, and camera status. Flash Date stamp Camera mode Album name Framing marks Histogram P/M mode Aperture Shutter speed Self-timer/Burst Picture size Pictures/time remaining Storage location Zoom indicator Low battery Focus zone Exposure metering White balance Focus mode ISO speed Exposure compensation 12 www.kodak.com/go/support
User Manual
Page 20
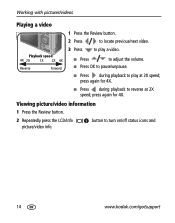
...9632; Press during playback to play at 2X speed; Viewing picture/video information 1 Press the Review button. 2 Repeatedly press the LCD/Info picture/video info. button to locate previous/next video. Working with pictures/videos Playing a video 1 Press the Review button. 2 Press to turn on/off... status icons and 14 www.kodak.com/go/support press again for 4X. ■ ...
...9632; Press during playback to play at 2X speed; Viewing picture/video information 1 Press the Review button. 2 Repeatedly press the LCD/Info picture/video info. button to locate previous/next video. Working with pictures/videos Playing a video 1 Press the Review button. 2 Press to turn on/off... status icons and 14 www.kodak.com/go/support press again for 4X. ■ ...
User Manual
Page 21
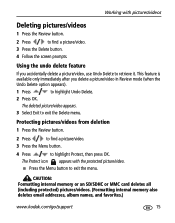
... internal memory also deletes email addresses, album names, and favorites.) www.kodak.com/go/support 15 The deleted picture/video appears. 3 Select Exit to highlight Undo Delete. 2 Press OK. Protecting pictures/videos from deletion 1 Press the Review button. 2 Press to find a picture/video. 3 Press the Delete button. 4 Follow the screen prompts. Using the undo...
... internal memory also deletes email addresses, album names, and favorites.) www.kodak.com/go/support 15 The deleted picture/video appears. 3 Select Exit to highlight Undo Delete. 2 Press OK. Protecting pictures/videos from deletion 1 Press the Review button. 2 Press to find a picture/video. 3 Press the Delete button. 4 Follow the screen prompts. Using the undo...
User Manual
Page 22
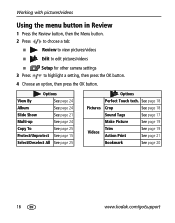
... See page 18 Sound Tags See page 17 Make Picture See page 19 Trim Videos Action Print See page 19 See page 21 Bookmark See page 20 16 www.kodak.com/go/support Working with pictures/videos Using the menu button in Review 1 Press the Review button, then the Menu... button. 2 Press to choose a tab: ■ Review to view pictures/videos ■ Edit to edit pictures/videos ■ 3 Press Setup for other camera settings to highlight a ...
... See page 18 Sound Tags See page 17 Make Picture See page 19 Trim Videos Action Print See page 19 See page 21 Bookmark See page 20 16 www.kodak.com/go/support Working with pictures/videos Using the menu button in Review 1 Press the Review button, then the Menu... button. 2 Press to choose a tab: ■ Review to view pictures/videos ■ Edit to edit pictures/videos ■ 3 Press Setup for other camera settings to highlight a ...
User Manual
Page 23
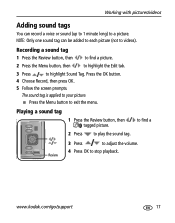
... a Review 3 Press to adjust the volume. 4 Press OK to stop playback. Press the OK button. 4 Choose Record, then press OK. 5 Follow the screen prompts. www.kodak.com/go/support 17 The sound tag is applied to your picture. ■ Press the Menu button to play the sound tag. Working with pictures...
... a Review 3 Press to adjust the volume. 4 Press OK to stop playback. Press the OK button. 4 Choose Record, then press OK. 5 Follow the screen prompts. www.kodak.com/go/support 17 The sound tag is applied to your picture. ■ Press the Menu button to play the sound tag. Working with pictures...

User Manual
Page 24
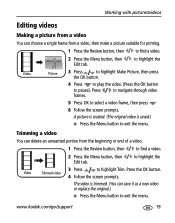
Press picture. Press the OK 4 Press Telephoto (T) to zoom in a split screen. Press the OK button. to move the crop box. NOTE: You cannot enhance previously enhanced or panorama pictures, or videos. ■ Press the Menu button to exit the menu. The picture is saved. (Cropped ... button to exit the menu. 18 www.kodak.com/go/support The enhancement is previewed in , or to highlight Crop. to highlight the Picture Cropped picture Edit tab. 3 Press button. The original is cropped. Working with pictures/videos Cropping pictures You can crop a picture so...
Press picture. Press the OK 4 Press Telephoto (T) to zoom in a split screen. Press the OK button. to move the crop box. NOTE: You cannot enhance previously enhanced or panorama pictures, or videos. ■ Press the Menu button to exit the menu. The picture is saved. (Cropped ... button to exit the menu. 18 www.kodak.com/go/support The enhancement is previewed in , or to highlight Crop. to highlight the Picture Cropped picture Edit tab. 3 Press button. The original is cropped. Working with pictures/videos Cropping pictures You can crop a picture so...
User Manual
Page 25
... button, then Edit tab. to highlight the Video Picture 3 Press to highlight Make Picture, then press the OK button. 4 Press to play the video. (Press the OK button to highlight Trim. Press to navigate through video frames. 5 Press OK to select a video frame, then press . 6 Follow the screen prompts. www.kodak.com/go/support 19
... button, then Edit tab. to highlight the Video Picture 3 Press to highlight Make Picture, then press the OK button. 4 Press to play the video. (Press the OK button to highlight Trim. Press to navigate through video frames. 5 Press OK to select a video frame, then press . 6 Follow the screen prompts. www.kodak.com/go/support 19
User Manual
Page 26
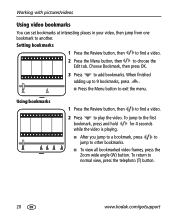
Choose Bookmark, then press OK. 3 Press to other bookmarks. ■ To view all bookmarked video frames, press the Zoom wide angle (W) button. To jump to the first bookmark, press and hold for 4 seconds while the video is playing. ■ After you jump to a bookmark, press to jump to add bookmarks....set bookmarks at interesting places in your video, then jump from one bookmark to exit the menu. Using bookmarks 1 Press the Review button, then to find a video. 2 Press the Menu button, then to normal view, press the telephoto (T) button. 20 www.kodak.com/go/support To return to ...
Choose Bookmark, then press OK. 3 Press to other bookmarks. ■ To view all bookmarked video frames, press the Zoom wide angle (W) button. To jump to the first bookmark, press and hold for 4 seconds while the video is playing. ■ After you jump to a bookmark, press to jump to add bookmarks....set bookmarks at interesting places in your video, then jump from one bookmark to exit the menu. Using bookmarks 1 Press the Review button, then to find a video. 2 Press the Menu button, then to normal view, press the telephoto (T) button. 20 www.kodak.com/go/support To return to ...
User Manual
Page 27
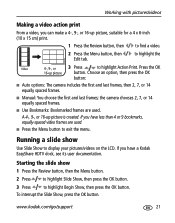
...or 16-up picture, suitable for a 4 x 6-inch (10 x 15 cm) print. 1 Press the Review button, then to display your pictures/videos on the LCD. the camera chooses 2, 7, or 14 equally spaced frames. ■ Use Bookmarks: Bookmarked frames are used . Running a slide show 1 Press the Review button, then... the OK 16-up picture is created. If you have a Kodak EasyShare HDTV dock, see its user documentation. A 4-, 9-, or 16-up picture button. To interrupt the Slide Show, press the OK button. to highlight the Video 4-, 9-, or 3 Press to exit the menu. Choose an option...
...or 16-up picture, suitable for a 4 x 6-inch (10 x 15 cm) print. 1 Press the Review button, then to display your pictures/videos on the LCD. the camera chooses 2, 7, or 14 equally spaced frames. ■ Use Bookmarks: Bookmarked frames are used . Running a slide show 1 Press the Review button, then... the OK 16-up picture is created. If you have a Kodak EasyShare HDTV dock, see its user documentation. A 4-, 9-, or 16-up picture button. To interrupt the Slide Show, press the OK button. to highlight the Video 4-, 9-, or 3 Press to exit the menu. Choose an option...

User Manual
Page 28
The slide show repeats until you change it . 22 www.kodak.com/go/support to highlight Loop, then press the OK 2 Press to highlight On, then press the OK button. 3 Press to highlight Interval, then press ... show loop When you change it . You can set the display interval from 3-60 seconds. 1 On the Slide Show menu, press button. Working with pictures/videos Changing the slide show is exhausted. to highlight Begin Show, then press the OK button.
The slide show repeats until you change it . 22 www.kodak.com/go/support to highlight Loop, then press the OK 2 Press to highlight On, then press the OK button. 3 Press to highlight Interval, then press ... show loop When you change it . You can set the display interval from 3-60 seconds. 1 On the Slide Show menu, press button. Working with pictures/videos Changing the slide show is exhausted. to highlight Begin Show, then press the OK button.


