
User guide
Page 1
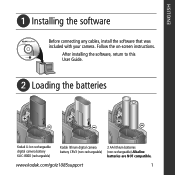
Follow the on-screen instructions. www.kodak.com/go/z1085support 1 After installing the software, return to this User Guide. ᕢ Loading the batteries Kodak Li-Ion rechargeable digital camera battery KLIC-8000 (rechargeable) Kodak lithium digital camera battery CRV3 (non-rechargeable) 2 AA lithium batteries (non-rechargeable) Alkaline batteries are NOT compatible. ENGLISH ᕡ Installing the software Before connecting any cables, install the software that was included with your camera.
Follow the on-screen instructions. www.kodak.com/go/z1085support 1 After installing the software, return to this User Guide. ᕢ Loading the batteries Kodak Li-Ion rechargeable digital camera battery KLIC-8000 (rechargeable) Kodak lithium digital camera battery CRV3 (non-rechargeable) 2 AA lithium batteries (non-rechargeable) Alkaline batteries are NOT compatible. ENGLISH ᕡ Installing the software Before connecting any cables, install the software that was included with your camera.

User guide
Page 8
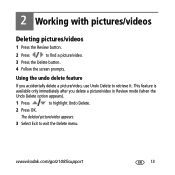
...your needs-just press the Menu button and choose Picture Size. ■ 3:2 (the best choice when making 4 x 6 prints) ■ 16:9 (wide screen) ■ 4:3 (the default setting) P Program More creative control (page 19). Smart Capture ■ Faces are detected. ■ The scene is analyzed for... other content and for lighting. ■ Kodak Perfect Touch technology is applied, for your camera Capture modes Capture mode For General picture taking pictures under special conditions. You can choose the best picture size and...
...your needs-just press the Menu button and choose Picture Size. ■ 3:2 (the best choice when making 4 x 6 prints) ■ 16:9 (wide screen) ■ 4:3 (the default setting) P Program More creative control (page 19). Smart Capture ■ Faces are detected. ■ The scene is analyzed for... other content and for lighting. ■ Kodak Perfect Touch technology is applied, for your camera Capture modes Capture mode For General picture taking pictures under special conditions. You can choose the best picture size and...
User guide
Page 13
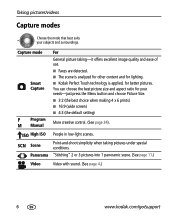
www.kodak.com/go/z1085support 13 2 Working with pictures/videos Deleting pictures/videos 1 Press the Review button. 2 Press to exit the Delete menu. Using the undo delete feature If you delete a picture/video in Review mode (when the Undo Delete option appears). 1 Press to retrieve it. This feature is available only immediately after you accidentally delete a picture/video, use Undo Delete to highlight Undo Delete. 2 Press OK. The deleted picture/video appears. 3 Select Exit to find a picture/video. 3 Press the Delete button. 4 Follow the screen prompts.
www.kodak.com/go/z1085support 13 2 Working with pictures/videos Deleting pictures/videos 1 Press the Review button. 2 Press to exit the Delete menu. Using the undo delete feature If you delete a picture/video in Review mode (when the Undo Delete option appears). 1 Press to retrieve it. This feature is available only immediately after you accidentally delete a picture/video, use Undo Delete to highlight Undo Delete. 2 Press OK. The deleted picture/video appears. 3 Select Exit to find a picture/video. 3 Press the Delete button. 4 Follow the screen prompts.

User guide
Page 15
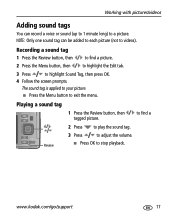
...record a voice or sound (up to 1 minute long) to a picture. Playing a sound tag 1 Press the Review button, then picture. 2 Press to exit the menu. www.kodak.com/go/z1085support 15 Recording a sound tag 1 Press the Review button, then to find a tagged Review 3 Press to adjust the volume. 4 Press the OK button... to find a picture. 2 Press the Menu button, then to highlight the Edit tab. 3 Press to highlight Sound Tag, then press the OK button. 4 Follow the screen prompts. Working with pictures/videos Adding sound tags You can be added to each picture (not to videos).
...record a voice or sound (up to 1 minute long) to a picture. Playing a sound tag 1 Press the Review button, then picture. 2 Press to exit the menu. www.kodak.com/go/z1085support 15 Recording a sound tag 1 Press the Review button, then to find a tagged Review 3 Press to adjust the volume. 4 Press the OK button... to find a picture. 2 Press the Menu button, then to highlight the Edit tab. 3 Press to highlight Sound Tag, then press the OK button. 4 Follow the screen prompts. Working with pictures/videos Adding sound tags You can be added to each picture (not to videos).

User guide
Page 16
...button to see the Day folders.) When you chose a Month/Year folder, press OK to view the picture full-screen. You can sort by the date a picture was taken or-if you've tagged pictures with pictures/videos Searching ...pictures by date, favorites, or other tag If you have many pictures on your camera or card, you can sort them . Press to exit Review. ■ For more about tags, see the results of... choosing tabs and folders, highlight Exit and press OK. 5 To see the Extended User Guide: www.kodak.com/go/z1085support. 16 www...
...button to see the Day folders.) When you chose a Month/Year folder, press OK to view the picture full-screen. You can sort by the date a picture was taken or-if you've tagged pictures with pictures/videos Searching ...pictures by date, favorites, or other tag If you have many pictures on your camera or card, you can sort them . Press to exit Review. ■ For more about tags, see the results of... choosing tabs and folders, highlight Exit and press OK. 5 To see the Extended User Guide: www.kodak.com/go/z1085support. 16 www...

User guide
Page 21
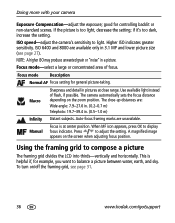
....kodak.com/go/z1085support 21 ISO 8000 is available only in a picture. Focus mode-select a large or concentrated area of flash, if possible. The camera automatically sets the focus distance depending on the screen when adjusting focus position. A magnified image appears on the zoom ..., increase the setting. Higher ISO indicates greater sensitivity. Manual Focus is too light, decrease the setting; ISO speed-adjust the camera's sensitivity to display focus indicator. When MF icon appears, press OK to light. Exposure Compensation-adjust the exposure; If the ...
....kodak.com/go/z1085support 21 ISO 8000 is available only in a picture. Focus mode-select a large or concentrated area of flash, if possible. The camera automatically sets the focus distance depending on the screen when adjusting focus position. A magnified image appears on the zoom ..., increase the setting. Higher ISO indicates greater sensitivity. Manual Focus is too light, decrease the setting; ISO speed-adjust the camera's sensitivity to display focus indicator. When MF icon appears, press OK to light. Exposure Compensation-adjust the exposure; If the ...

Extended user guide
Page 2
Kodak, EasyShare, and Perfect Touch are simulated. Eastman Kodak Company Rochester, NY 14650 © Eastman Kodak Company, 2008 All screen images are trademarks of Eastman Kodak Company. P/N 2F6871_en
Kodak, EasyShare, and Perfect Touch are simulated. Eastman Kodak Company Rochester, NY 14650 © Eastman Kodak Company, 2008 All screen images are trademarks of Eastman Kodak Company. P/N 2F6871_en
Extended user guide
Page 12
...needs-just press the Menu button and choose Picture Size. ■ 3:2 (the best choice when making 4 x 6 prints) ■ 16:9 (wide screen) ■ 4:3 (the default setting) More creative control. (See page 34). SCN Scene Point-and-shoot simplicity when taking -it offers excellent image quality... and ease of use. ■ Faces are detected. ■ The scene is analyzed for other content and for lighting. ■ Kodak Perfect Touch technology is applied, for your subjects and surroundings. Capture mode Smart Capture P Program M Manual For General picture taking pictures under ...
...needs-just press the Menu button and choose Picture Size. ■ 3:2 (the best choice when making 4 x 6 prints) ■ 16:9 (wide screen) ■ 4:3 (the default setting) More creative control. (See page 34). SCN Scene Point-and-shoot simplicity when taking -it offers excellent image quality... and ease of use. ■ Faces are detected. ■ The scene is analyzed for other content and for lighting. ■ Kodak Perfect Touch technology is applied, for your subjects and surroundings. Capture mode Smart Capture P Program M Manual For General picture taking pictures under ...
Extended user guide
Page 21
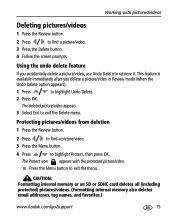
...Protecting pictures/videos from deletion 1 Press the Review button. 2 Press to find a picture/video. 3 Press the Delete button. 4 Follow the screen prompts. Using the undo delete feature If you delete a picture/video in Review mode (when the Undo Delete option appears). 1 Press to ... SDHC card deletes all (including protected) pictures/videos. (Formatting internal memory also deletes email addresses, tag names, and favorites.) www.kodak.com/go/support 15 The Protect icon appears with pictures/videos Deleting pictures/videos 1 Press the Review button. 2 Press to exit ...
...Protecting pictures/videos from deletion 1 Press the Review button. 2 Press to find a picture/video. 3 Press the Delete button. 4 Follow the screen prompts. Using the undo delete feature If you delete a picture/video in Review mode (when the Undo Delete option appears). 1 Press to ... SDHC card deletes all (including protected) pictures/videos. (Formatting internal memory also deletes email addresses, tag names, and favorites.) www.kodak.com/go/support 15 The Protect icon appears with pictures/videos Deleting pictures/videos 1 Press the Review button. 2 Press to exit ...
Extended user guide
Page 23
... sound (up to 1 minute long) to a picture. Review 3 Press to adjust the volume. ■ Press OK to highlight Sound Tag, then press OK. 4 Follow the screen prompts. The sound tag is applied to your picture. ■ Press the Menu button to exit the menu. Recording a sound tag 1 Press the Review button... 1 Press the Review button, then tagged picture. Working with pictures/videos Adding sound tags You can be added to each picture (not to videos). www.kodak.com/go/support 17
... sound (up to 1 minute long) to a picture. Review 3 Press to adjust the volume. ■ Press OK to highlight Sound Tag, then press OK. 4 Follow the screen prompts. The sound tag is applied to your picture. ■ Press the Menu button to exit the menu. Recording a sound tag 1 Press the Review button... 1 Press the Review button, then tagged picture. Working with pictures/videos Adding sound tags You can be added to each picture (not to videos). www.kodak.com/go/support 17
Extended user guide
Page 24
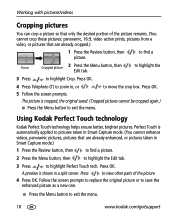
...Press to exit the menu. 18 www.kodak.com/go/support A preview is shown in , or to exit the menu. Follow the screen prompts to replace the original picture or to...picture so that are already cropped.) 1 Press the Review button, then picture. Press OK. 5 Follow the screen prompts. Perfect Touch is cropped, the original saved. (Cropped pictures cannot be cropped again.) ■ Press... tech. Press OK. Press OK. 4 Press Telephoto (T) to zoom in a split screen. Using Kodak Perfect Touch technology Kodak Perfect Touch technology helps ensure better, brighter pictures.
...Press to exit the menu. 18 www.kodak.com/go/support A preview is shown in , or to exit the menu. Follow the screen prompts to replace the original picture or to...picture so that are already cropped.) 1 Press the Review button, then picture. Press OK. 5 Follow the screen prompts. Perfect Touch is cropped, the original saved. (Cropped pictures cannot be cropped again.) ■ Press... tech. Press OK. Press OK. 4 Press Telephoto (T) to zoom in a split screen. Using Kodak Perfect Touch technology Kodak Perfect Touch technology helps ensure better, brighter pictures.
Extended user guide
Page 25
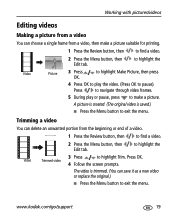
Video Trimmed video 4 Follow the screen prompts. to highlight the Video Picture 3 Press to highlight Make Picture, then press OK. 4 Press OK to play or pause, press to make a picture suitable ... original video is trimmed. (You can save it as a new video or replace the original.) ■ Press the Menu button to exit the menu. www.kodak.com/go/support 19 Working with pictures/videos Editing videos Making a picture from a video You can choose a single frame from the beginning or end of...
Video Trimmed video 4 Follow the screen prompts. to highlight the Video Picture 3 Press to highlight Make Picture, then press OK. 4 Press OK to play or pause, press to make a picture suitable ... original video is trimmed. (You can save it as a new video or replace the original.) ■ Press the Menu button to exit the menu. www.kodak.com/go/support 19 Working with pictures/videos Editing videos Making a picture from a video You can choose a single frame from the beginning or end of...
Extended user guide
Page 30
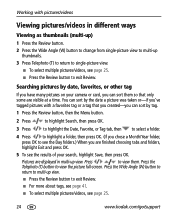
... pictures/videos, see page 25. ■ Press the Review button to single-picture view. ■ To select multiple pictures/videos, see page 25. 24 www.kodak.com/go/support You can sort by date, favorites, or other tag If you have many pictures on your search, highlight Save, then press OK... OK to see the Day folders.) When you are finished choosing tabs and folders, highlight Exit and press OK. 5 To see the results of your camera or card, you 've tagged pictures with pictures/videos Viewing pictures/videos in multi-up view. Press to view the picture full...
... pictures/videos, see page 25. ■ Press the Review button to single-picture view. ■ To select multiple pictures/videos, see page 25. 24 www.kodak.com/go/support You can sort by date, favorites, or other tag If you have many pictures on your search, highlight Save, then press OK... OK to see the Day folders.) When you are finished choosing tabs and folders, highlight Exit and press OK. 5 To see the results of your camera or card, you 've tagged pictures with pictures/videos Viewing pictures/videos in multi-up view. Press to view the picture full...
Extended user guide
Page 37
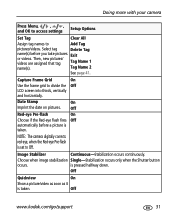
...divide the Off LCD screen into thirds, vertically and horizontally. Date Stamp On Imprint the date on pictures. Image Stabilizer Continuous-Stabilization occurs continuously. is set to Off. Tag Name 2 See page 41. NOTE: The camera digitally corrects red-eye, when... the Red-eye Pre-flash is pressed halfway down. Then, new pictures/ videos are assigned that tag Tag Name 1 name(s). Off Quickview On Show a picture/video as soon as it is taken. Select tag Delete Tag name(s) before a picture is taken. Off www.kodak...
...divide the Off LCD screen into thirds, vertically and horizontally. Date Stamp On Imprint the date on pictures. Image Stabilizer Continuous-Stabilization occurs continuously. is set to Off. Tag Name 2 See page 41. NOTE: The camera digitally corrects red-eye, when... the Red-eye Pre-flash is pressed halfway down. Then, new pictures/ videos are assigned that tag Tag Name 1 name(s). Off Quickview On Show a picture/video as soon as it is taken. Select tag Delete Tag name(s) before a picture is taken. Off www.kodak...
Extended user guide
Page 42
...greater sensitivity. Use available light instead of focus. The camera automatically sets the focus distance depending on the screen when adjusting focus position. To turn on/off the... unwanted grain or "noise" in 3.1 MP and lower picture size (see page 31. 36 www.kodak.com/go/support The close range. When MF icon appears, press OK to adjust the setting. Press... of flash, if possible. A magnified image appears on the zoom position. This is too light, decrease the setting; ISO speed-adjust the camera's sensitivity to compose a picture The framing grid divides the LCD...
...greater sensitivity. Use available light instead of focus. The camera automatically sets the focus distance depending on the screen when adjusting focus position. To turn on/off the... unwanted grain or "noise" in 3.1 MP and lower picture size (see page 31. 36 www.kodak.com/go/support The close range. When MF icon appears, press OK to adjust the setting. Press... of flash, if possible. A magnified image appears on the zoom position. This is too light, decrease the setting; ISO speed-adjust the camera's sensitivity to compose a picture The framing grid divides the LCD...
Extended user guide
Page 45
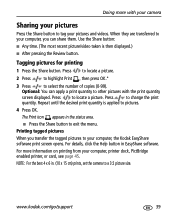
...of copies (0-99). For details, click the Help button in . (10 x 15 cm) prints, set the camera to exit the menu. Press to your computer, the Kodak EasyShare software print screen opens. Press to locate a picture. 2 Press to highlight Print , then press OK.* 3 Press to other... pictures with your camera Sharing your pictures Press the Share button to your computer, you transfer the tagged...
...of copies (0-99). For details, click the Help button in . (10 x 15 cm) prints, set the camera to exit the menu. Press to your computer, the Kodak EasyShare software print screen opens. Press to locate a picture. 2 Press to highlight Print , then press OK.* 3 Press to other... pictures with your camera Sharing your pictures Press the Share button to your computer, you transfer the tagged...
Extended user guide
Page 49
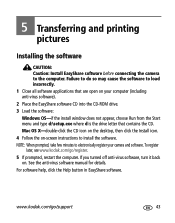
... the CD icon on the desktop, then click the Install icon. 4 Follow the on-screen instructions to electronically register your computer (including anti-virus software). 2 Place the EasyShare software CD into the CD-ROM drive. 3 Load the software: Windows OS-if the install...printing pictures Installing the software CAUTION: Caution: Install EasyShare software before connecting the camera to load incorrectly. 1 Close all software applications that are open on your camera and software. To register later, see www.kodak.com/go /support 43 www.kodak.com/go /register. 5 If prompted, restart the...
... the CD icon on the desktop, then click the Install icon. 4 Follow the on-screen instructions to electronically register your computer (including anti-virus software). 2 Place the EasyShare software CD into the CD-ROM drive. 3 Load the software: Windows OS-if the install...printing pictures Installing the software CAUTION: Caution: Install EasyShare software before connecting the camera to load incorrectly. 1 Close all software applications that are open on your camera and software. To register later, see www.kodak.com/go /support 43 www.kodak.com/go /register. 5 If prompted, restart the...
Extended user guide
Page 54
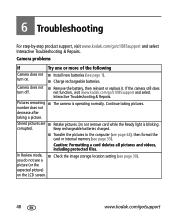
... off. Continue taking a picture. Do not remove card while the Ready light is operating normally. corrupted. If the camera still does turn on the LCD screen. 48 www.kodak.com/go/support not function, visit www.kodak.com/go /z1085support and select Interactive Troubleshooting & Repairs. In Review mode, ■ Check the image storage location...
... off. Continue taking a picture. Do not remove card while the Ready light is operating normally. corrupted. If the camera still does turn on the LCD screen. 48 www.kodak.com/go/support not function, visit www.kodak.com/go /z1085support and select Interactive Troubleshooting & Repairs. In Review mode, ■ Check the image storage location...
Extended user guide
Page 55
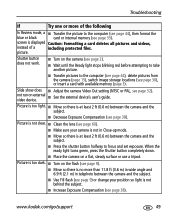
screen is at least 2 ft (0.6 m) between the camera and the subject. ■ Press the shutter button halfway to focus ... (see page 30), or insert a card with available memory (page 3). www.kodak.com/go/support 49 picture. Slide show does ■ Adjust the camera Video Out setting (NTSC or PAL, see page 33). When the ready light turns...). not run on a flat, steady surface or use a tripod. Picture is too dark. ■ Turn on the camera (see page 2). ■ Wait until the Ready light stops blinking red before attempting to take another picture. ■ Transfer...
screen is at least 2 ft (0.6 m) between the camera and the subject. ■ Press the shutter button halfway to focus ... (see page 30), or insert a card with available memory (page 3). www.kodak.com/go/support 49 picture. Slide show does ■ Adjust the camera Video Out setting (NTSC or PAL, see page 33). When the ready light turns...). not run on a flat, steady surface or use a tripod. Picture is too dark. ■ Turn on the camera (see page 2). ■ Wait until the Ready light stops blinking red before attempting to take another picture. ■ Transfer...


