
User Manual
Page 1
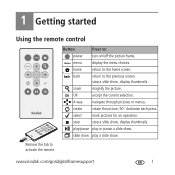
Reset (press and hold 5 seconds) 11 OK 12 Down 13 Up www.kodak.com/go/digitalframesupport i SD, MMC, xD, MS 3 DC-In (12 V) 4 Remote control holder (removable) 5 Slots for remote control holder 6 Frame stand (to install, see page 3) 7 Power 8 Play/Pause 9 Stop/Back 10 Menu; ENGLISH Back View Slide the remote control holder 4 into slots. 5 7 8 9 10 11 12 13 1 2 3 6 1 USB connector 2 Memory card slot -
Reset (press and hold 5 seconds) 11 OK 12 Down 13 Up www.kodak.com/go/digitalframesupport i SD, MMC, xD, MS 3 DC-In (12 V) 4 Remote control holder (removable) 5 Slots for remote control holder 6 Frame stand (to install, see page 3) 7 Power 8 Play/Pause 9 Stop/Back 10 Menu; ENGLISH Back View Slide the remote control holder 4 into slots. 5 7 8 9 10 11 12 13 1 2 3 6 1 USB connector 2 Memory card slot -
User Manual
Page 2
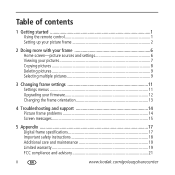
Table of contents 1 1 Getting started 1 Using the remote control 1 Setting up your picture frame 2 2 Doing more with your frame 6 Home screen-picture sources and settings 6 Viewing your pictures 7 Copying pictures 8 Deleting pictures 9 Selecting multiple pictures 9 3 Changing frame settings 11 Settings menus 11 Upgrading your firmware 12 Changing the frame orientation 13 4 Troubleshooting and support 14 Picture frame problems 14 Screen messages 15 5 Appendix 17 Digital frame specifications 17 Important safety instructions 18 Additional care and maintenance 19 Limited ...
Table of contents 1 1 Getting started 1 Using the remote control 1 Setting up your picture frame 2 2 Doing more with your frame 6 Home screen-picture sources and settings 6 Viewing your pictures 7 Copying pictures 8 Deleting pictures 9 Selecting multiple pictures 9 3 Changing frame settings 11 Settings menus 11 Upgrading your firmware 12 Changing the frame orientation 13 4 Troubleshooting and support 14 Picture frame problems 14 Screen messages 15 5 Appendix 17 Digital frame specifications 17 Important safety instructions 18 Additional care and maintenance 19 Limited ...
User Manual
Page 3
... an operation. stop stop a slide show , display thumbnails. play/pause play a slide show . home return to the previous screen. OK accept the current selection. 4-way navigate through pictures or menus. stop a slide show , display thumbnails. slide show play or pause a slide show . Remove the tab to : power turn on/off the picture frame. menu display the menu choices. rotate rotate the picture, 90° clockwise each press. zoom magnify the picture. 1 Getting started Using the remote control menu...
... an operation. stop stop a slide show , display thumbnails. play/pause play a slide show . home return to the previous screen. OK accept the current selection. 4-way navigate through pictures or menus. stop a slide show , display thumbnails. slide show play or pause a slide show . Remove the tab to : power turn on/off the picture frame. menu display the menu choices. rotate rotate the picture, 90° clockwise each press. zoom magnify the picture. 1 Getting started Using the remote control menu...
User Manual
Page 4
... noted. ) are on the back of the remote. Push and hold the release tab* while pulling the battery holder out of the remote control. Follow the graphic on the 2 www.kodak.com/go/easysharecenter Replacing the remote control battery * release tab Replace with a CR2025, 3V lithium cell battery. Setting up your picture frame Buttons and controls All buttons and controls described in this guide (for convenient, out-of-the-way storage.
... noted. ) are on the back of the remote. Push and hold the release tab* while pulling the battery holder out of the remote control. Follow the graphic on the 2 www.kodak.com/go/easysharecenter Replacing the remote control battery * release tab Replace with a CR2025, 3V lithium cell battery. Setting up your picture frame Buttons and controls All buttons and controls described in this guide (for convenient, out-of-the-way storage.
User Manual
Page 5
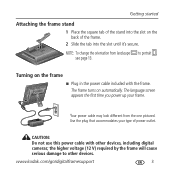
Use the plug that accommodates your frame. Turning on the frame ■ Plug in the power cable included with other devices. The frame turns on automatically. Your power cable may look different from landscape to other devices, including digital cameras; NOTE: To change the orientation from the one pictured. www.kodak.com/go/digitalframesupport 3 Getting started Attaching the frame stand 1 Place the square tab of the stand into the slot on the...
Use the plug that accommodates your frame. Turning on the frame ■ Plug in the power cable included with other devices. The frame turns on automatically. Your power cable may look different from landscape to other devices, including digital cameras; NOTE: To change the orientation from the one pictured. www.kodak.com/go/digitalframesupport 3 Getting started Attaching the frame stand 1 Place the square tab of the stand into the slot on the...

User Manual
Page 6
Getting started Setting your language, then press OK. To change the language at a later time ■ Press Home , Settings → Language. menu back ■ Power off the frame ■ Standby mode-Press the power button on the remote control or on your frame: ■ Press to select your language The first time you turn on the frame. OK 4 www.kodak.com/go/easysharecenter Turning off -unplug the power cable. See page 11.
Getting started Setting your language, then press OK. To change the language at a later time ■ Press Home , Settings → Language. menu back ■ Power off the frame ■ Standby mode-Press the power button on the remote control or on your frame: ■ Press to select your language The first time you turn on the frame. OK 4 www.kodak.com/go/easysharecenter Turning off -unplug the power cable. See page 11.
User Manual
Page 8
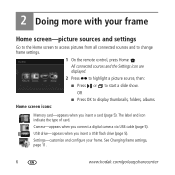
.... 6 www.kodak.com/go/easysharecenter All connected sources and the Settings icon are displayed. 2 Press to highlight a picture source, then: ■ Press or to display thumbnails, folders, albums. Home screen icons: Memory card-appears when you insert a card (page 5). USB drive-appears when you connect a digital camera via USB cable (page 5). 2 Doing more with your frame. The label and icon indicate the type of card. OR ■ Press OK to start a slide...
.... 6 www.kodak.com/go/easysharecenter All connected sources and the Settings icon are displayed. 2 Press to highlight a picture source, then: ■ Press or to display thumbnails, folders, albums. Home screen icons: Memory card-appears when you insert a card (page 5). USB drive-appears when you connect a digital camera via USB cable (page 5). 2 Doing more with your frame. The label and icon indicate the type of card. OR ■ Press OK to start a slide...
User Manual
Page 9
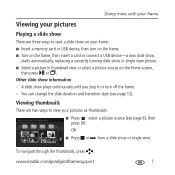
...; Turn on the frame, then insert a card or connect a USB device-a new slide show starts automatically, replacing a currently running slide show or single view picture. ■ Select a picture in thumbnail view or select a picture source on your pictures as thumbnails: ■ Press , select a picture source (see page 12). Viewing thumbnails There are three ways to view your frame: ■ Insert a memory card or USB device, then turn off the frame. - Doing more with your frame Viewing your pictures Playing...
...; Turn on the frame, then insert a card or connect a USB device-a new slide show starts automatically, replacing a currently running slide show or single view picture. ■ Select a picture in thumbnail view or select a picture source on your pictures as thumbnails: ■ Press , select a picture source (see page 12). Viewing thumbnails There are three ways to view your frame: ■ Insert a memory card or USB device, then turn off the frame. - Doing more with your frame Viewing your pictures Playing...

User Manual
Page 10
... press OK. Copying pictures Copy pictures from a memory card to a USB flash drive. 1 Select a picture to copy: In thumbnails view, press to highlight a picture; or, display a picture in thumbnails view and press OK. ■ To magnify a picture up to 8X, press repeatedly. To view other connected device. Doing more with your current picture source to any other parts of the picture, press . The picture is copied. For example, copy pictures from your frame Viewing a single picture ■ To view a single, full-screen picture, highlight...
... press OK. Copying pictures Copy pictures from a memory card to a USB flash drive. 1 Select a picture to copy: In thumbnails view, press to highlight a picture; or, display a picture in thumbnails view and press OK. ■ To magnify a picture up to 8X, press repeatedly. To view other connected device. Doing more with your current picture source to any other parts of the picture, press . The picture is copied. For example, copy pictures from your frame Viewing a single picture ■ To view a single, full-screen picture, highlight...

User Manual
Page 11
... delete multiple pictures, see page 9. Then press . to play a slide show of selected pictures. www.kodak.com/go/digitalframesupport 9 The picture is deleted. Selecting multiple pictures Use the multi-select feature to copy or delete two or more with your frame Deleting pictures 1 Select a picture to delete: In thumbnails view, press to highlight a picture; To cancel the deletion, highlight Exit and press OK. or to highlight a picture; or, display a picture in single view...
... delete multiple pictures, see page 9. Then press . to play a slide show of selected pictures. www.kodak.com/go/digitalframesupport 9 The picture is deleted. Selecting multiple pictures Use the multi-select feature to copy or delete two or more with your frame Deleting pictures 1 Select a picture to delete: In thumbnails view, press to highlight a picture; To cancel the deletion, highlight Exit and press OK. or to highlight a picture; or, display a picture in single view...
User Manual
Page 13
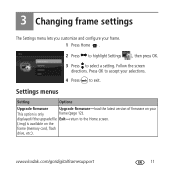
displayed if the upgrade file Exit-return to the Home screen. (.img) is only frame (page 12). Settings menus Setting Options Upgrade firmware Upgrade firmware-load the latest version of firmware on your This option is available on the frame (memory card, flash drive, etc.). Press OK to accept your selections. 4 Press to select a setting. www.kodak.com/go/digitalframesupport 11 3 Changing frame settings The Settings menu lets you customize and configure your frame. 1 Press Home . 2 Press...
displayed if the upgrade file Exit-return to the Home screen. (.img) is only frame (page 12). Settings menus Setting Options Upgrade firmware Upgrade firmware-load the latest version of firmware on your This option is available on the frame (memory card, flash drive, etc.). Press OK to accept your selections. 4 Press to select a setting. www.kodak.com/go/digitalframesupport 11 3 Changing frame settings The Settings menu lets you customize and configure your frame. 1 Press Home . 2 Press...
User Manual
Page 14
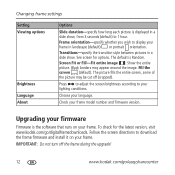
... screen brightness according to download the frame firmware and install it on your frame model number and firmware version. To check for options. IMPORTANT: Do not turn off (cropped). Upgrading your firmware Firmware is the software that runs on your frame. Follow the screen directions to your lighting conditions. Frame orientation-specify whether you wish to 1 hour. Fill the screen (default). Check your frame. The default is Random. Show the entire picture. Choose your language. Changing frame settings Setting Viewing...
... screen brightness according to download the frame firmware and install it on your frame model number and firmware version. To check for options. IMPORTANT: Do not turn off (cropped). Upgrading your firmware Firmware is the software that runs on your frame. Follow the screen directions to your lighting conditions. Frame orientation-specify whether you wish to 1 hour. Fill the screen (default). Check your frame. The default is Random. Show the entire picture. Choose your language. Changing frame settings Setting Viewing...

User Manual
Page 15
Select Frame orientation, then press OK. Select Portrait, then press OK. 3 Press to portrait . You can turn it to exit. Change the setting: 1 Press Home , Settings . 2 Press to display pictures in landscape orientation . www.kodak.com/go/digitalframesupport 13 Change the stand position: 1 Remove the stand, turn it 90 °, and replace as shown (see page 3). Changing frame settings Changing the frame orientation Your frame is set up to select Viewing options, then press OK.
Select Frame orientation, then press OK. Select Portrait, then press OK. 3 Press to portrait . You can turn it to exit. Change the setting: 1 Press Home , Settings . 2 Press to display pictures in landscape orientation . www.kodak.com/go/digitalframesupport 13 Change the stand position: 1 Remove the stand, turn it 90 °, and replace as shown (see page 3). Changing frame settings Changing the frame orientation Your frame is set up to select Viewing options, then press OK.
User Manual
Page 16
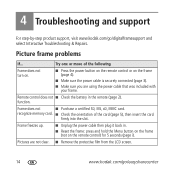
... the battery in . ■ Reset the frame: press and hold the Menu button on the frame (not on the frame (page 4). ■ Make sure the power cable is securely connected (page 3). ■ Make sure you are not clear. ■ Remove the protective film from the LCD screen. 14 www.kodak.com/go /digitalframesupport and select Interactive Troubleshooting & Repairs. function. recognize memory card. ■ Check the orientation of the following Frame does not turn...
... the battery in . ■ Reset the frame: press and hold the Menu button on the frame (not on the frame (page 4). ■ Make sure the power cable is securely connected (page 3). ■ Make sure you are not clear. ■ Remove the protective film from the LCD screen. 14 www.kodak.com/go /digitalframesupport and select Interactive Troubleshooting & Repairs. function. recognize memory card. ■ Check the orientation of the following Frame does not turn...

User Manual
Page 17
...File Copy Failed! If the problem persists, contact customer support help at www.kodak.com/go /digitalframesupport 15 The device (memory card, USB drive, camera, etc.) you are trying to copy to remove write protection. ■ Insert or connect a different device. Error reading from file. Error writing from file. Unknown error. Error writing a file. Error occurred while closing a file. Troubleshooting and support Screen messages Screen message Try one or more of the following Create file failed. Internal error. Error duplicate file name. ■ Turn off the frame...
...File Copy Failed! If the problem persists, contact customer support help at www.kodak.com/go /digitalframesupport 15 The device (memory card, USB drive, camera, etc.) you are trying to copy to remove write protection. ■ Insert or connect a different device. Error reading from file. Error writing from file. Unknown error. Error writing a file. Error occurred while closing a file. Troubleshooting and support Screen messages Screen message Try one or more of the following Create file failed. Internal error. Error duplicate file name. ■ Turn off the frame...
User Manual
Page 18
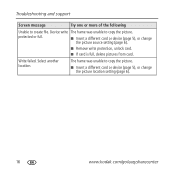
... 6). 16 www.kodak.com/go/easysharecenter The frame was unable to copy the picture. Device write The frame was unable to create file. Write failed. Select another location. Troubleshooting and support Screen message Try one or more of the following Unable to copy the picture. ■ Insert a different card or device (page 5), or change the picture source setting (page 6). ■ Remove write protection, unlock card. ■ If card is full, delete pictures from card.
... 6). 16 www.kodak.com/go/easysharecenter The frame was unable to copy the picture. Device write The frame was unable to create file. Write failed. Select another location. Troubleshooting and support Screen message Try one or more of the following Unable to copy the picture. ■ Insert a different card or device (page 5), or change the picture source setting (page 6). ■ Remove write protection, unlock card. ■ If card is full, delete pictures from card.
User Manual
Page 20
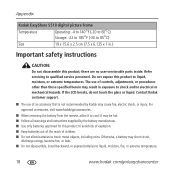
... warnings and instructions supplied by the battery manufacturer. ■ Use only batteries approved for this product to qualified service personnel. If the LCD breaks, do not touch the glass or liquid. For approved accessories, visit www.kodak/go /easysharecenter it to shock and/or electrical or mechanical hazards. Refer servicing to liquid, moisture, or extreme temperatures. Appendix Kodak EasyShare S510 digital picture frame Temperature Operating: -4 to...
... warnings and instructions supplied by the battery manufacturer. ■ Use only batteries approved for this product to qualified service personnel. If the LCD breaks, do not touch the glass or liquid. For approved accessories, visit www.kodak/go /easysharecenter it to shock and/or electrical or mechanical hazards. Refer servicing to liquid, moisture, or extreme temperatures. Appendix Kodak EasyShare S510 digital picture frame Temperature Operating: -4 to...
User Manual
Page 21
... the date of Kodak products for warranty repair. Visit www.kodak.com/go /batterytypes. ■ Internal digital picture frame battery (not removable or replaceable) and remote control battery may apply in some countries. Limited warranty Kodak warrants Kodak consumer electronic products and accessories ("Products"), excluding batteries, to contact painted surfaces. ■ Service agreements are available in California. ■ Read and follow all warnings and instructions supplied by the battery manufacturer. Do not...
... the date of Kodak products for warranty repair. Visit www.kodak.com/go /batterytypes. ■ Internal digital picture frame battery (not removable or replaceable) and remote control battery may apply in some countries. Limited warranty Kodak warrants Kodak consumer electronic products and accessories ("Products"), excluding batteries, to contact painted surfaces. ■ Service agreements are available in California. ■ Read and follow all warnings and instructions supplied by the battery manufacturer. Do not...

User Manual
Page 22
... third party ink or ink tanks), failure to follow Kodak 's operation, maintenance or repacking instructions, failure to use or failure of the Product), regardless of the implied warranty will be one year from the purchase use items supplied by law. This warranty gives you . Warranty service will repair or replace Products if they fail to function properly during the warranty...
... third party ink or ink tanks), failure to follow Kodak 's operation, maintenance or repacking instructions, failure to use or failure of the Product), regardless of the implied warranty will be one year from the purchase use items supplied by law. This warranty gives you . Warranty service will repair or replace Products if they fail to function properly during the warranty...

User Manual
Page 23
... the following two conditions: (1) this device may not cause harmful interference, and (2) this device must be different. FCC compliance and advisory Kodak EasyShare S510 digital picture frame This equipment has been tested and found to radio communications. If this warranty may cause harmful interference to comply with the instructions, may be used in a particular installation. Operation is no warranty or liability exists...
... the following two conditions: (1) this device may not cause harmful interference, and (2) this device must be different. FCC compliance and advisory Kodak EasyShare S510 digital picture frame This equipment has been tested and found to radio communications. If this warranty may cause harmful interference to comply with the instructions, may be used in a particular installation. Operation is no warranty or liability exists...


