User's Guide
Page 7
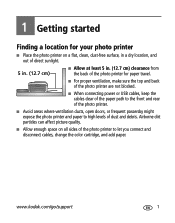
... all sides of the photo printer to high levels of the photo printer. ■ Avoid areas where ventilation ducts, open doors, or frequent passersby might expose the photo printer and paper to let you connect and disconnect cables, change the color cartridge, and add paper. 1 Getting started Finding a location for paper travel. ■ For proper ventilation, make sure the top and back of the photo printer are not blocked. ■ When connecting power or USB cables, keep the cables clear...
... all sides of the photo printer to high levels of the photo printer. ■ Avoid areas where ventilation ducts, open doors, or frequent passersby might expose the photo printer and paper to let you connect and disconnect cables, change the color cartridge, and add paper. 1 Getting started Finding a location for paper travel. ■ For proper ventilation, make sure the top and back of the photo printer are not blocked. ■ When connecting power or USB cables, keep the cables clear...

User's Guide
Page 11
Use the upper limit line inside the paper tray as a guide to keep the sheets from sticking together. Do not load paper that is missing perforated tabs. IMPORTANT: Do not load more than 25 sheets of Kodak products, or visit www.kodak.com/go /support 5 www.kodak.com/go /accessories. Purchase Kodak color cartridge & photo paper kits and other accessories at a retailer of paper. Getting started Loading paper 1 Remove the paper tray from the photo printer if installed (see page 6). 2 Slide the...
Use the upper limit line inside the paper tray as a guide to keep the sheets from sticking together. Do not load paper that is missing perforated tabs. IMPORTANT: Do not load more than 25 sheets of Kodak products, or visit www.kodak.com/go /support 5 www.kodak.com/go /accessories. Purchase Kodak color cartridge & photo paper kits and other accessories at a retailer of paper. Getting started Loading paper 1 Remove the paper tray from the photo printer if installed (see page 6). 2 Slide the...
User's Guide
Page 16
...; Picture size, page 12 ■ Color mode, page 14 ■ Donor level, page 15 ■ Tagged prints, page 15 ■ Wireless settings, page 15 ■ Language, page 15 ■ Default settings, page 16 ■ About, page 16 Reducing red-eye in your pictures The EasyShare photo printer 500 automatically detects red-eye in your subjects and lets you correct your picture 90 degrees clockwise. the picture orientation is disabled when printing from a computer, use EasyShare software. 3 Doing more with the touch of a button. NOTE: Turning...
...; Picture size, page 12 ■ Color mode, page 14 ■ Donor level, page 15 ■ Tagged prints, page 15 ■ Wireless settings, page 15 ■ Language, page 15 ■ Default settings, page 16 ■ About, page 16 Reducing red-eye in your pictures The EasyShare photo printer 500 automatically detects red-eye in your subjects and lets you correct your picture 90 degrees clockwise. the picture orientation is disabled when printing from a computer, use EasyShare software. 3 Doing more with the touch of a button. NOTE: Turning...

User's Guide
Page 18
... the photo printer is selected, three 2 x 3 in. (5.1 x 7.6 cm) pictures are printed. Picture Size setting 1 up (mini photo) Up to print from. For example, if you wish to nine 1.3 x 2 in . (5.1 x 7.6 cm) pictures 9 up (full photo) Number and size of paper. Refer to the appropriate section in this manual or see page 16. For example, if three pictures on the device you choose to print a picture with your device user's guide. 2 Press the Menu button. 3 Press...
... the photo printer is selected, three 2 x 3 in. (5.1 x 7.6 cm) pictures are printed. Picture Size setting 1 up (mini photo) Up to print from. For example, if you wish to nine 1.3 x 2 in . (5.1 x 7.6 cm) pictures 9 up (full photo) Number and size of paper. Refer to the appropriate section in this manual or see page 16. For example, if three pictures on the device you choose to print a picture with your device user's guide. 2 Press the Menu button. 3 Press...
User's Guide
Page 19
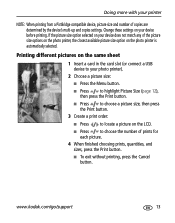
....kodak.com/go/support 13 Change these settings on your photo printer). 2 Choose a picture size: ■ Press the Menu button. ■ Press to highlight Picture Size (page 12), then press the Print button. ■ Press to choose a picture size, then press the Print button. 3 Create a print order: ■ Press to locate a picture on the LCD. ■ Press to your device before printing. Printing different pictures on the same sheet 1 Insert a card in the card slot (or connect a USB device to choose the number...
....kodak.com/go/support 13 Change these settings on your photo printer). 2 Choose a picture size: ■ Press the Menu button. ■ Press to highlight Picture Size (page 12), then press the Print button. ■ Press to choose a picture size, then press the Print button. 3 Create a print order: ■ Press to locate a picture on the LCD. ■ Press to your device before printing. Printing different pictures on the same sheet 1 Insert a card in the card slot (or connect a USB device to choose the number...

User's Guide
Page 23
... -screen instructions to install the software. ■ Select Complete to install. 4 Using the photo printer with a computer, you must install the printer driver. Mac OS X-double-click the CD icon on the desktop, then click the Install icon. 4 Follow the on your computer (including anti-virus software). 2 Place the Kodak EasyShare software CD into the CD-ROM drive. 3 Load the software: Windows OS-if the install window does not appear, choose Run from the Start menu and type d:\setup...
... -screen instructions to install the software. ■ Select Complete to install. 4 Using the photo printer with a computer, you must install the printer driver. Mac OS X-double-click the CD icon on the desktop, then click the Install icon. 4 Follow the on your computer (including anti-virus software). 2 Place the Kodak EasyShare software CD into the CD-ROM drive. 3 Load the software: Windows OS-if the install window does not appear, choose Run from the Start menu and type d:\setup...

User's Guide
Page 24
... software, see the ReadMe file on -screen instructions. For information on the software applications included on . If you turned off anti-virus software, turn it back on the Kodak EasyShare software CD, click the Help button in the Start menu.) 2 Double-click Add/Remove Programs. 3 Select Kodak EasyShare software, then click Remove. 4 Select Modify to uninstall single components, such as the printer driver, or select Remove to uninstall all components. 5 Follow the on the Kodak EasyShare software CD. Using the photo printer...
... software, see the ReadMe file on -screen instructions. For information on the software applications included on . If you turned off anti-virus software, turn it back on the Kodak EasyShare software CD, click the Help button in the Start menu.) 2 Double-click Add/Remove Programs. 3 Select Kodak EasyShare software, then click Remove. 4 Select Modify to uninstall single components, such as the printer driver, or select Remove to uninstall all components. 5 Follow the on the Kodak EasyShare software CD. Using the photo printer...

User's Guide
Page 27
... manage files on the new drive, as you do with a computer Transferring pictures from the card to your computer (see page 19). 2 Insert a card (see page 7.) The current picture is displayed on the LCD. 3 Press the Transfer button on your computer. www.kodak.com/go/support 21 Using the photo printer with other drives on the photo printer. Kodak EasyShare software opens on your computer. 4 Use Kodak EasyShare software to transfer pictures from a card slot 1 Make sure Kodak EasyShare software is installed (see page 17) and the photo printer is connected...
... manage files on the new drive, as you do with a computer Transferring pictures from the card to your computer (see page 19). 2 Insert a card (see page 7.) The current picture is displayed on the LCD. 3 Press the Transfer button on your computer. www.kodak.com/go/support 21 Using the photo printer with other drives on the photo printer. Kodak EasyShare software opens on your computer. 4 Use Kodak EasyShare software to transfer pictures from a card slot 1 Make sure Kodak EasyShare software is installed (see page 17) and the photo printer is connected...

User's Guide
Page 30
... Kodak EasyShare photo printer 500 features three color mode options: Enhanced-to disable automatic color correction. 24 www.kodak.com/go/support None-to get great, natural color for everyday picture-making. Natural-to help you make great-looking prints in the application from a computer. Set printing options in the application from which you want to print. 3 Access printer settings by selecting Print or Page Setup from the File menu (depending on the photo printer is connected to your application and operating...
... Kodak EasyShare photo printer 500 features three color mode options: Enhanced-to disable automatic color correction. 24 www.kodak.com/go/support None-to get great, natural color for everyday picture-making. Natural-to help you make great-looking prints in the application from a computer. Set printing options in the application from which you want to print. 3 Access printer settings by selecting Print or Page Setup from the File menu (depending on the photo printer is connected to your application and operating...
User's Guide
Page 33
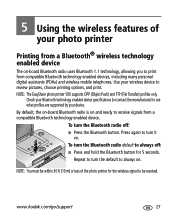
... your wireless device to review pictures, choose printing options, and print. Use your device. To turn the Bluetooth radio default to print from compatible Bluetooth technology enabled devices, including many personal digital assistants (PDAs) and wireless mobile telephones. Press again to always on. To turn the Bluetooth radio off : ■ Press and hold the Bluetooth button for the wireless signal to receive signals from a compatible Bluetooth technology enabled device. NOTE: The EasyShare photo printer 500 supports...
... your wireless device to review pictures, choose printing options, and print. Use your device. To turn the Bluetooth radio default to print from compatible Bluetooth technology enabled devices, including many personal digital assistants (PDAs) and wireless mobile telephones. Press again to always on. To turn the Bluetooth radio off : ■ Press and hold the Bluetooth button for the wireless signal to receive signals from a compatible Bluetooth technology enabled device. NOTE: The EasyShare photo printer 500 supports...

User's Guide
Page 34
...with the USB cable. 2 Open the Kodak wireless printer configuration utility. Then connect the printer to Show, select Bluetooth. 4 Change settings as necessary. c Select Kodak wireless printer configuration utility. Using the wireless features of your photo printer To print from your Bluetooth technology enabled device: 1 Set wireless technology on your device to On, then select pictures to set authentication, enter pin number 1111 (default). 3 Select Send or Beam on your device. The selected images are displayed on your device. 2 Select your printer on your computer. Windows OS...
...with the USB cable. 2 Open the Kodak wireless printer configuration utility. Then connect the printer to Show, select Bluetooth. 4 Change settings as necessary. c Select Kodak wireless printer configuration utility. Using the wireless features of your photo printer To print from your Bluetooth technology enabled device: 1 Set wireless technology on your device to On, then select pictures to set authentication, enter pin number 1111 (default). 3 Select Send or Beam on your device. The selected images are displayed on your device. 2 Select your printer on your computer. Windows OS...
User's Guide
Page 36
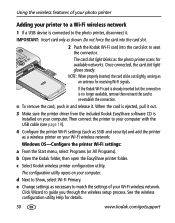
... card is already inserted but the connection is installed on your Wi-Fi wireless network. c Select Kodak wireless printer configuration utility. e Change settings as an antenna for receiving Wi-Fi signals. IMPORTANT: Insert card only as a wireless printer on your printer to a Wi-Fi wireless network 1 If a USB device is connected to Show, select Wi-Fi Primary. When the card is ejected, pull it out. 3 Make sure the printer driver from the included Kodak EasyShare software CD is no longer available, remove...
... card is already inserted but the connection is installed on your Wi-Fi wireless network. c Select Kodak wireless printer configuration utility. e Change settings as an antenna for receiving Wi-Fi signals. IMPORTANT: Insert card only as a wireless printer on your printer to a Wi-Fi wireless network 1 If a USB device is connected to Show, select Wi-Fi Primary. When the card is ejected, pull it out. 3 Make sure the printer driver from the included Kodak EasyShare software CD is no longer available, remove...

User's Guide
Page 37
... Connecting to a computer, page 19. Mac OS X-Add the printer to your printer in the Windows OS list of printers). c Select Kodak wireless printer computer setup assistant. See the wireless configuration utility Help for 5 seconds. c Select the printer from the list, then click Utility. b Open the Kodak folder, then open the Applications folder on your computer, then disconnect the USB cable between the computer and the printer. 6 (Optional) Print a copy of your computer: a From the Start menu, select...
... Connecting to a computer, page 19. Mac OS X-Add the printer to your printer in the Windows OS list of printers). c Select Kodak wireless printer computer setup assistant. See the wireless configuration utility Help for 5 seconds. c Select the printer from the list, then click Utility. b Open the Kodak folder, then open the Applications folder on your computer, then disconnect the USB cable between the computer and the printer. 6 (Optional) Print a copy of your computer: a From the Start menu, select...

User's Guide
Page 42
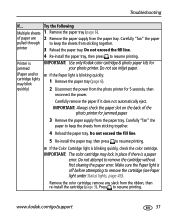
... resume printing. ■ Clean the paper feed roller (page 34). 36 www.kodak.com/go /printerdocks. Do not exceed the fill line. 5 Re-install the paper tray, then press to keep the sheets from sticking together. 4 Reload the paper tray. Try the following Paper does not IMPORTANT: Use only Kodak color cartridge & photo paper kits for feed your photo printer, start here. Do not use inkjet paper. (Paper light may ■ The paper tray may be empty. 7 Troubleshooting When you have not been detached. Printing problems...
... resume printing. ■ Clean the paper feed roller (page 34). 36 www.kodak.com/go /printerdocks. Do not exceed the fill line. 5 Re-install the paper tray, then press to keep the sheets from sticking together. 4 Reload the paper tray. Try the following Paper does not IMPORTANT: Use only Kodak color cartridge & photo paper kits for feed your photo printer, start here. Do not use inkjet paper. (Paper light may ■ The paper tray may be empty. 7 Troubleshooting When you have not been detached. Printing problems...
User's Guide
Page 43
... jammed IMPORTANT: Use only Kodak color cartridge & photo paper kits for 5 seconds, then reconnect the power. Troubleshooting If... printer 3 Reload the paper tray. Try the following Multiple sheets 1 Remove the paper tray (page 6). Do not exceed the fill line. 5 Re-install the paper tray, then press to remove the cartridge without first clearing the paper error. Do not attempt to resume printing. ■ If the Color Cartridge light is off before attempting to keep the sheets from the paper tray. Make sure the Paper light is blinking quickly, check...
... jammed IMPORTANT: Use only Kodak color cartridge & photo paper kits for 5 seconds, then reconnect the power. Troubleshooting If... printer 3 Reload the paper tray. Try the following Multiple sheets 1 Remove the paper tray (page 6). Do not exceed the fill line. 5 Re-install the paper tray, then press to remove the cartridge without first clearing the paper error. Do not attempt to resume printing. ■ If the Color Cartridge light is off before attempting to keep the sheets from the paper tray. Make sure the Paper light is blinking quickly, check...
User's Guide
Page 45
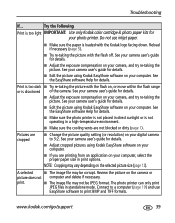
... compensation on your photo printer. The photo printer can only print JPEG files in direct sunlight or is discolored of the camera. See your digital camera to print BMP and TIFF formats. A selected ■ The image file may be JPEG format. Connect to a computer (page 19) and use inkjet paper. ■ Make sure the paper is too light IMPORTANT: Use only Kodak color cartridge & photo paper kits for details. ■ Edit the picture using Kodak EasyShare software on your...
... compensation on your photo printer. The photo printer can only print JPEG files in direct sunlight or is discolored of the camera. See your digital camera to print BMP and TIFF formats. A selected ■ The image file may be JPEG format. Connect to a computer (page 19) and use inkjet paper. ■ Make sure the paper is too light IMPORTANT: Use only Kodak color cartridge & photo paper kits for details. ■ Edit the picture using Kodak EasyShare software on your...

User's Guide
Page 46
... the power connections (page 2). ■ Remove the paper tray, check that paper is properly loaded, and re-install (page 6). ■ If the Paper light glows steady red, load paper (page 5). ■ Make sure the color cartridge is installed (page 17). Upgrade your system. If the Color Cartridge light is at least one picture in the PictBridge compatible device's internal memory or memory card. Install if necessary. compatible device) ■ Make sure there is on (if applicable). Troubleshooting If... Nothing ■ Check the USB connections from the photo printer to...
... the power connections (page 2). ■ Remove the paper tray, check that paper is properly loaded, and re-install (page 6). ■ If the Paper light glows steady red, load paper (page 5). ■ Make sure the color cartridge is installed (page 17). Upgrade your system. If the Color Cartridge light is at least one picture in the PictBridge compatible device's internal memory or memory card. Install if necessary. compatible device) ■ Make sure there is on (if applicable). Troubleshooting If... Nothing ■ Check the USB connections from the photo printer to...

User's Guide
Page 48
... the device, turn wireless technology on, then repeat the discovery process. ■ The device does not use an OPP or FTP profile. when you choose Custom installation, make sure to the computer (page 19). ■ Make sure Kodak EasyShare software is off. Troubleshooting If... Transfer/communication problems If... If you try to print from the photo printer to the transfer pictures to ■ Check the power and USB connections from a Bluetooth technology enabled...
... the device, turn wireless technology on, then repeat the discovery process. ■ The device does not use an OPP or FTP profile. when you choose Custom installation, make sure to the computer (page 19). ■ Make sure Kodak EasyShare software is off. Troubleshooting If... Transfer/communication problems If... If you try to print from the photo printer to the transfer pictures to ■ Check the power and USB connections from a Bluetooth technology enabled...
User's Guide
Page 59
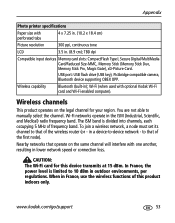
....kodak.com/go/support 53 When in . (8.9 cm); Appendix Photo printer specifications Paper size with perforated tabs 4 x 7.25 in. (10.2 x 18.4 cm) Picture resolution 300 ppi, continuous tone LCD 3.5 in France, use the wireless functions of this device transmits at 15 dBm. To join a wireless network, a node must set its channel to -device network - to manually select the channel. TBD dpi Compatible input devices Memory card slots: CompactFlash Type I, Secure Digital/MultiMedia Card...
....kodak.com/go/support 53 When in . (8.9 cm); Appendix Photo printer specifications Paper size with perforated tabs 4 x 7.25 in. (10.2 x 18.4 cm) Picture resolution 300 ppi, continuous tone LCD 3.5 in France, use the wireless functions of this device transmits at 15 dBm. To join a wireless network, a node must set its channel to -device network - to manually select the channel. TBD dpi Compatible input devices Memory card slots: CompactFlash Type I, Secure Digital/MultiMedia Card...

User's Guide
Page 69
... slot, ii paper tray, i door, i installing, removing, 6 PictBridge compatible device, printing from, 8 picture size and number of copies, 12 changing default, 12 printing different pictures on same sheet, 13 printing different sizes/layouts, 12 printing duplicate pictures on same sheet, 14 pictures automatic color correction of, 24 printing different pictures on same sheet, 13 printing duplicate pictures on same sheet, 14 printing from card reader, 7 printing from PictBridge compatible device, 8 printing tagged, 9 selecting number of copies, 9, 12 tagging for automatic printing, 9 transferring...
... slot, ii paper tray, i door, i installing, removing, 6 PictBridge compatible device, printing from, 8 picture size and number of copies, 12 changing default, 12 printing different pictures on same sheet, 13 printing different sizes/layouts, 12 printing duplicate pictures on same sheet, 14 pictures automatic color correction of, 24 printing different pictures on same sheet, 13 printing duplicate pictures on same sheet, 14 printing from card reader, 7 printing from PictBridge compatible device, 8 printing tagged, 9 selecting number of copies, 9, 12 tagging for automatic printing, 9 transferring...


