
Getting started guide
Page 1
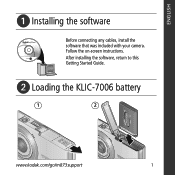
Follow the on-screen instructions. After installing the software, return to this Getting Started Guide. ᕢ Loading the KLIC-7006 battery 1 2 www.kodak.com/go/m873support 1 ENGLISH ᕡ Installing the software Before connecting any cables, install the software that was included with your camera.
Follow the on-screen instructions. After installing the software, return to this Getting Started Guide. ᕢ Loading the KLIC-7006 battery 1 2 www.kodak.com/go/m873support 1 ENGLISH ᕡ Installing the software Before connecting any cables, install the software that was included with your camera.
Getting started guide
Page 3
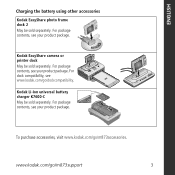
... be sold separately. For dock compatibility, see your product package. Charg3e.6 / 7.2Power KodakLi-IBoAnTUTNEIRVYERCSHAALRGER To purchase accessories, visit www.kodak.com/go /dockcompatibility. www.kodak.com/go/m873support 3 Kodak EasyShare camera or printer dock May be sold separately. For package contents, see www.kodak.com/go /m873accessories. For package contents, see your product package. For package contents...
... be sold separately. For dock compatibility, see your product package. Charg3e.6 / 7.2Power KodakLi-IBoAnTUTNEIRVYERCSHAALRGER To purchase accessories, visit www.kodak.com/go /dockcompatibility. www.kodak.com/go/m873support 3 Kodak EasyShare camera or printer dock May be sold separately. For package contents, see www.kodak.com/go /m873accessories. For package contents, see your product package. For package contents...

Getting started guide
Page 4
ENGLISH ᕤ Turning on the camera 2 1 ᕥ Setting the language and date/time Language: 1 to change . OK to accept. OK for previous/next field. Date/Time: 1 At the prompt, press OK. 2 to change . 2 OK to accept. 4 www.kodak.com/go/easysharecenter
ENGLISH ᕤ Turning on the camera 2 1 ᕥ Setting the language and date/time Language: 1 to change . OK to accept. OK for previous/next field. Date/Time: 1 At the prompt, press OK. 2 to change . 2 OK to accept. 4 www.kodak.com/go/easysharecenter

Getting started guide
Page 7
ENGLISH ᕨ Transferring pictures/videos USB cable (U-8) (included) Kodak EasyShare photo frame dock 2, camera dock, or printer dock (may be sold separately) USB cable (U-8) USB / A/V adapter For package contents, see its Getting Started Guide. www.kodak.com/go /m873accessories. To use a dock, see your product package. To purchase accessories, visit www.kodak.com/go /m873support 7 For dock compatibility, visit www.kodak.com/go/dockcompatibility.
ENGLISH ᕨ Transferring pictures/videos USB cable (U-8) (included) Kodak EasyShare photo frame dock 2, camera dock, or printer dock (may be sold separately) USB cable (U-8) USB / A/V adapter For package contents, see its Getting Started Guide. www.kodak.com/go /m873accessories. To use a dock, see your product package. To purchase accessories, visit www.kodak.com/go /m873support 7 For dock compatibility, visit www.kodak.com/go/dockcompatibility.

Getting started guide
Page 8
... about your best pictures! Congratulations! Finish reading this book, so you can take and share your camera! To better understand each menu option, use camera Help. (Highlight a menu choice, then press the Zoom telephoto T button.) Visit www.kodak.com/go/m873support: • the user's guide • interactive troubleshooting and repairs • interactive tutorials •...
... about your best pictures! Congratulations! Finish reading this book, so you can take and share your camera! To better understand each menu option, use camera Help. (Highlight a menu choice, then press the Zoom telephoto T button.) Visit www.kodak.com/go/m873support: • the user's guide • interactive troubleshooting and repairs • interactive tutorials •...
Getting started guide
Page 11
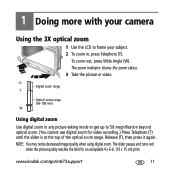
..., press Wide Angle (W). D Digital zoom range T Optical zoom range (36-108 mm) W Using digital zoom Use digital zoom in , press Telephoto (T). 1 Doing more with your camera Using the 3X optical zoom 1 Use the LCD to frame your subject. 2 To zoom in any picture-taking mode to get up to 5X magnification beyond optical zoom. (You cannot use digital zoom for an acceptable 4 x 6-in...
..., press Wide Angle (W). D Digital zoom range T Optical zoom range (36-108 mm) W Using digital zoom Use digital zoom in , press Telephoto (T). 1 Doing more with your camera Using the 3X optical zoom 1 Use the LCD to frame your subject. 2 To zoom in any picture-taking mode to get up to 5X magnification beyond optical zoom. (You cannot use digital zoom for an acceptable 4 x 6-in...
Getting started guide
Page 12
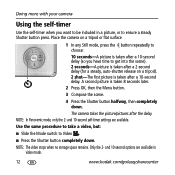
... picture is taken after a 10-second delay. NOTE: The video stops when no storage space remains. NOTE: In Panoramic mode, only the 2- Place the camera on a tripod or flat surface 1 In any Still mode, press the button repeatedly to choose: 10 seconds-A picture is taken after a 10-second delay ...(so you want to be included in video mode. 12 www.kodak.com/go/easysharecenter The camera takes the picture/pictures after the delay. and 10-second self-timer settings are available in a picture, or to ensure a steady Shutter...
... picture is taken after a 10-second delay. NOTE: The video stops when no storage space remains. NOTE: In Panoramic mode, only the 2- Place the camera on a tripod or flat surface 1 In any Still mode, press the button repeatedly to choose: 10 seconds-A picture is taken after a 10-second delay ...(so you want to be included in video mode. 12 www.kodak.com/go/easysharecenter The camera takes the picture/pictures after the delay. and 10-second self-timer settings are available in a picture, or to ensure a steady Shutter...

Getting started guide
Page 13
Using the flash Doing more with your camera Press the flash button repeatedly to reduce the chance of the lighting conditions. Use when the subject is in shadow or is "backlit" (when light ....) ■ Flash once and automatically remove red eye, turn the Red Eye Preflash off. Off Never www.kodak.com/go/m873support 13 In low light, hold the camera steady or use a tripod. To make the camera: ■ Preflash, turn the Red Eye Preflash on. (The first flash shrinks the eye pupil to scroll...
Using the flash Doing more with your camera Press the flash button repeatedly to reduce the chance of the lighting conditions. Use when the subject is in shadow or is "backlit" (when light ....) ■ Flash once and automatically remove red eye, turn the Red Eye Preflash off. Off Never www.kodak.com/go/m873support 13 In low light, hold the camera steady or use a tripod. To make the camera: ■ Preflash, turn the Red Eye Preflash on. (The first flash shrinks the eye pupil to scroll...
Getting started guide
Page 14
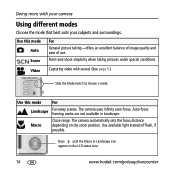
...Video For General picture taking pictures under special conditions. The camera automatically sets the focus distance depending on the zoom position. Press until the Macro or Landscape icon appears in Landscape. Capturing video with your camera Using different modes Choose the mode that best suits your... subjects and surroundings. Auto-focus framing marks are not available in the LCD status area. 14 www.kodak....
...Video For General picture taking pictures under special conditions. The camera automatically sets the focus distance depending on the zoom position. Press until the Macro or Landscape icon appears in Landscape. Capturing video with your camera Using different modes Choose the mode that best suits your... subjects and surroundings. Auto-focus framing marks are not available in the LCD status area. 14 www.kodak....

Getting started guide
Page 15
...then press the Zoom telephoto (T) button. The date/time and the mode description appear. T Turn on Help Scroll up/down OK Turn off before you finish reading it, press the OK button. 3 Press the OK button to view scene mode descriptions. Doing more with your camera Using Scene (...SCN) modes Choose a Scene mode-for great pictures in practically any situation! 1 Slide the Mode switch to SCN. 2 Press to choose a Scene mode. If the mode description turns off Help www.kodak.com/go/m873support 15 Using camera Help To better understand ...
...then press the Zoom telephoto (T) button. The date/time and the mode description appear. T Turn on Help Scroll up/down OK Turn off before you finish reading it, press the OK button. 3 Press the OK button to view scene mode descriptions. Doing more with your camera Using Scene (...SCN) modes Choose a Scene mode-for great pictures in practically any situation! 1 Slide the Mode switch to SCN. 2 Press to choose a Scene mode. If the mode description turns off Help www.kodak.com/go/m873support 15 Using camera Help To better understand ...
Getting started guide
Page 16
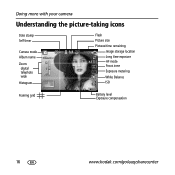
Doing more with your camera Understanding the picture-taking icons Date stamp Self timer Camera mode Album name Zoom: digital telephoto wide Histogram Flash Picture size Pictures/time remaining Image storage location Long time exposure AF mode Focus zone Exposure metering White Balance ISO Framing grid Battery level Exposure compensation 16 www.kodak.com/go/easysharecenter
Doing more with your camera Understanding the picture-taking icons Date stamp Self timer Camera mode Album name Zoom: digital telephoto wide Histogram Flash Picture size Pictures/time remaining Image storage location Long time exposure AF mode Focus zone Exposure metering White Balance ISO Framing grid Battery level Exposure compensation 16 www.kodak.com/go/easysharecenter

Getting started guide
Page 18
...tab. to save the enhanced picture as a new one. Choose Perfect Touch tech, then press the OK button. Kodak Perfect Touch technology can only be enhanced again on the camera. Follow the screen prompts to replace the original picture or to view other parts of the 4 Press the OK button.... Working with pictures, not video. ■ Press the Menu button to exit the menu. 18 www.kodak.com/go/easysharecenter The enhancement ...
...tab. to save the enhanced picture as a new one. Choose Perfect Touch tech, then press the OK button. Kodak Perfect Touch technology can only be enhanced again on the camera. Follow the screen prompts to replace the original picture or to view other parts of the 4 Press the OK button.... Working with pictures, not video. ■ Press the Menu button to exit the menu. 18 www.kodak.com/go/easysharecenter The enhancement ...

Getting started guide
Page 20
the camera chooses 2, 7, or 14 equally spaced frames. Full Manual: You choose 4, 9, or 16 frames. Working with pictures/videos Making a video action print From a video, you have ...) print. 1 Press the Review button, then to find a video. 2 Press the Menu button, then to exit the menu. 20 www.kodak.com/go/easysharecenter A 4-, 9-, or 16-up picture Auto: The camera includes the first and last frames, then 2, 7, or 14 equally spaced frames. Manual: You choose the first and last frames; Choose...
the camera chooses 2, 7, or 14 equally spaced frames. Full Manual: You choose 4, 9, or 16 frames. Working with pictures/videos Making a video action print From a video, you have ...) print. 1 Press the Review button, then to find a video. 2 Press the Menu button, then to exit the menu. 20 www.kodak.com/go/easysharecenter A 4-, 9-, or 16-up picture Auto: The camera includes the first and last frames, then 2, 7, or 14 equally spaced frames. Manual: You choose the first and last frames; Choose...
Getting started guide
Page 22
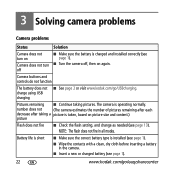
...battery is charged and installed correctly (see page 1). ■ Turn the camera off, then on picture size and content.) picture Flash does not fire ■ Check the flash setting, and change as needed (see page 1). 22 www.kodak.com/go /USBcharging. NOTE: The flash does not fire in the... camera. ■ Insert a new or charged battery (see page 13). Camera buttons and controls do not function The battery does not charge using USB charging &#...
...battery is charged and installed correctly (see page 1). ■ Turn the camera off, then on picture size and content.) picture Flash does not fire ■ Check the flash setting, and change as needed (see page 1). 22 www.kodak.com/go /USBcharging. NOTE: The flash does not fire in the... camera. ■ Insert a new or charged battery (see page 13). Camera buttons and controls do not function The battery does not charge using USB charging &#...
Getting started guide
Page 25
... implied warranty lasts, so the above limitation or exclusion may not apply to you. FCC compliance and advisory Kodak EasyShare M873 zoom digital camera This equipment has been tested and found to comply with the limits for a Class B digital device, pursuant to provide reasonable protection against harmful interference in accordance with the instructions, may cause harmful interference...
... implied warranty lasts, so the above limitation or exclusion may not apply to you. FCC compliance and advisory Kodak EasyShare M873 zoom digital camera This equipment has been tested and found to comply with the limits for a Class B digital device, pursuant to provide reasonable protection against harmful interference in accordance with the instructions, may cause harmful interference...
User's guide
Page 1
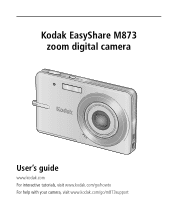
Kodak EasyShare M873 zoom digital camera User's guide www.kodak.com For interactive tutorials, visit www.kodak.com/go/howto For help with your camera, visit www.kodak.com/go/m873support
Kodak EasyShare M873 zoom digital camera User's guide www.kodak.com For interactive tutorials, visit www.kodak.com/go/howto For help with your camera, visit www.kodak.com/go/m873support
User's guide
Page 5
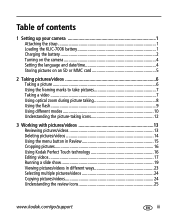
... Charging the battery 2 Turning on the camera 4 Setting the language and date/time 4 Storing pictures on an SD or MMC card 5 2 Taking pictures/videos 6 Taking a picture 6 Using the framing marks to take pictures 7 Taking a video 7 Using optical zoom during picture taking 8 Using the flash... 9 Using different modes 10 Understanding the picture-taking icons 12 3 Working with pictures/videos 13 Reviewing pictures/videos 13 Deleting pictures/videos 14 Using the menu button in Review 15 Cropping pictures 16 Using Kodak Perfect ...
... Charging the battery 2 Turning on the camera 4 Setting the language and date/time 4 Storing pictures on an SD or MMC card 5 2 Taking pictures/videos 6 Taking a picture 6 Using the framing marks to take pictures 7 Taking a video 7 Using optical zoom during picture taking 8 Using the flash... 9 Using different modes 10 Understanding the picture-taking icons 12 3 Working with pictures/videos 13 Reviewing pictures/videos 13 Deleting pictures/videos 14 Using the menu button in Review 15 Cropping pictures 16 Using Kodak Perfect ...
User's guide
Page 6
... Using the menu button to change settings 27 Using camera Help 33 Using the self-timer 34 Using burst 35 Taking panoramic pictures 36 Using the histogram to view picture brightness 37 Using the framing ... 37 5 Transferring and printing pictures 44 Installing the software 44 Transferring pictures/videos 45 Printing pictures 46 Dock compatibility for your camera 48 6 Troubleshooting 49 7 Getting help 53 8 Appendix 55 Camera specifications 55 Care and maintenance 57 Upgrading your software and firmware 57 Storage capacities 58 Important safety instructions 58 Battery replacement...
... Using the menu button to change settings 27 Using camera Help 33 Using the self-timer 34 Using burst 35 Taking panoramic pictures 36 Using the histogram to view picture brightness 37 Using the framing ... 37 5 Transferring and printing pictures 44 Installing the software 44 Transferring pictures/videos 45 Printing pictures 46 Dock compatibility for your camera 48 6 Troubleshooting 49 7 Getting help 53 8 Appendix 55 Camera specifications 55 Care and maintenance 57 Upgrading your software and firmware 57 Storage capacities 58 Important safety instructions 58 Battery replacement...

User's guide
Page 7
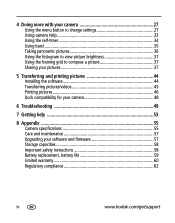
Attaching the strap Loading the KLIC-7006 battery 1 2 For information on replacing batteries and extending battery life, see your product package. www.kodak.com/go/support 1 1 Setting up your camera IMPORTANT: For package contents, see page 59.
Attaching the strap Loading the KLIC-7006 battery 1 2 For information on replacing batteries and extending battery life, see your product package. www.kodak.com/go/support 1 1 Setting up your camera IMPORTANT: For package contents, see page 59.
User's guide
Page 8
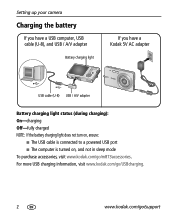
Setting up your camera Charging the battery If you have a USB computer, USB cable (U-8), and USB / A/V adapter Battery charging light If you have a Kodak 5V AC adapter USB cable (U-8) USB / A/V adapter Battery charging light status (during charging): On-charging Off-fully charged NOTE: If the battery charging light does ...; The USB cable is connected to a powered USB port ■ The computer is turned on, and not in sleep mode To purchase accessories, visit www.kodak.com/go /support For more USB charging information, visit www...
Setting up your camera Charging the battery If you have a USB computer, USB cable (U-8), and USB / A/V adapter Battery charging light If you have a Kodak 5V AC adapter USB cable (U-8) USB / A/V adapter Battery charging light status (during charging): On-charging Off-fully charged NOTE: If the battery charging light does ...; The USB cable is connected to a powered USB port ■ The computer is turned on, and not in sleep mode To purchase accessories, visit www.kodak.com/go /support For more USB charging information, visit www...


