
User's Guide
Page 1
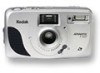
15 film chamber 16 film door 15 17 tripod socket 18 battery door 16 17 18 Kodak F320/F330 AutoCamera Consumer Imaging EASTMAN KODAK COMPANY Rochester, NY 14650 © Eastman Kodak Company, 2001 Pt. No. 919 6403 Printed in USA ENGLISH/ESPAÑOL/FRANÇAIS Camera Identification 4 5 3 6 2 1 1 shutter button 2 self-timer button 3 LCD panel 4 viewfinder 5 self-timer bulb 6 flash 7 lens-cover switch 8 lens 9 film-door lever 7 8 9 Unfold front and back cover flaps of manual to view camera diagrams.
15 film chamber 16 film door 15 17 tripod socket 18 battery door 16 17 18 Kodak F320/F330 AutoCamera Consumer Imaging EASTMAN KODAK COMPANY Rochester, NY 14650 © Eastman Kodak Company, 2001 Pt. No. 919 6403 Printed in USA ENGLISH/ESPAÑOL/FRANÇAIS Camera Identification 4 5 3 6 2 1 1 shutter button 2 self-timer button 3 LCD panel 4 viewfinder 5 self-timer bulb 6 flash 7 lens-cover switch 8 lens 9 film-door lever 7 8 9 Unfold front and back cover flaps of manual to view camera diagrams.

User's Guide
Page 2
... interference, and (2) this camera does cause interference to operate the equipment. Consult the dealer or an experienced radio/television technician for a Class B digital device, pursuant to radio communications. 11 10 12 13 14 10 print-format switch 11 viewfinder eyepiece 12 film-rewind button 13 flash-ready lamp 14 strap post This device complies with part 15 of the Canadian...
... interference, and (2) this camera does cause interference to operate the equipment. Consult the dealer or an experienced radio/television technician for a Class B digital device, pursuant to radio communications. 11 10 12 13 14 10 print-format switch 11 viewfinder eyepiece 12 film-rewind button 13 flash-ready lamp 14 strap post This device complies with part 15 of the Canadian...

User's Guide
Page 3
...-465-6325, ext. 36100; ENGLISH Kodak F320/F330 Auto Camera NEED HELP WITH YOUR CAMERA OR MORE INFORMATION ABOUT THE ADVANCED PHOTO SYSTEM? For warranty purposes, please keep your camera available. When you call, please have your sales receipt as proof of the date of purchase. 1 for Canada) or call 416-766-8233, ext. 36100. Go to 5:00 p.m. (Eastern time) Monday through Friday at http...
...-465-6325, ext. 36100; ENGLISH Kodak F320/F330 Auto Camera NEED HELP WITH YOUR CAMERA OR MORE INFORMATION ABOUT THE ADVANCED PHOTO SYSTEM? For warranty purposes, please keep your camera available. When you call, please have your sales receipt as proof of the date of purchase. 1 for Canada) or call 416-766-8233, ext. 36100. Go to 5:00 p.m. (Eastern time) Monday through Friday at http...
User's Guide
Page 4
CONTENTS CAMERAFEATURES 3 ATTACHING THE STRAP .......... 4 LOADING THE BATTERIES ...... 5 Low-batteries indicator ......... 6 Battery tips 6 Power shutdown 7 LOADING THE FILM 8 TAKING PICTURES 10 Typical print sizes (formats 12 Tips for better pictures ...... 13 TAKING FLASH PICTURES .... 14 Flash-to-subject distance .. 15 USING THE SELF-TIMER ....... 15 UNLOADING THE FILM .......... 16 Automatic rewind 16 Manual rewind 17 CARING FOR YOUR CAMERA 18 TROUBLESHOOTING 19 SPECIFICATIONS 21 2
CONTENTS CAMERAFEATURES 3 ATTACHING THE STRAP .......... 4 LOADING THE BATTERIES ...... 5 Low-batteries indicator ......... 6 Battery tips 6 Power shutdown 7 LOADING THE FILM 8 TAKING PICTURES 10 Typical print sizes (formats 12 Tips for better pictures ...... 13 TAKING FLASH PICTURES .... 14 Flash-to-subject distance .. 15 USING THE SELF-TIMER ....... 15 UNLOADING THE FILM .......... 16 Automatic rewind 16 Manual rewind 17 CARING FOR YOUR CAMERA 18 TROUBLESHOOTING 19 SPECIFICATIONS 21 2
User's Guide
Page 5
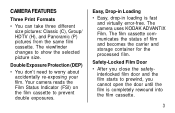
... safetyinterlocked film door and the film starts to prevent double exposures. The camera uses KODAK ADVANTIX Film. Easy, Drop-in Loading • Easy, drop-in loading is completely rewound into the film cassette. 3 Safety-Locked Film Door • After you cannot open the door until the film is fast and virtually error-free. CAMERA FEATURES Three Print Formats • You can take three different size pictures: Classic (C), Group/ HDTV (H), and Panoramic (P) pictures from the same film cassette...
... safetyinterlocked film door and the film starts to prevent double exposures. The camera uses KODAK ADVANTIX Film. Easy, Drop-in Loading • Easy, drop-in loading is completely rewound into the film cassette. 3 Safety-Locked Film Door • After you cannot open the door until the film is fast and virtually error-free. CAMERA FEATURES Three Print Formats • You can take three different size pictures: Classic (C), Group/ HDTV (H), and Panoramic (P) pictures from the same film cassette...

User's Guide
Page 7
Open the battery door (18). 2. Snap the battery door closed. NOTE: Insert the batteries into the chamber as shown. • Before you load the film. 5 Place the batteries over the battery-pull strap and insert into the camera before you remove the old batteries, close the lens cover. 3. LOADING THE BATTERIES This camera uses 2 AAA-size batteries that supply power for all camera operations. 1.
Open the battery door (18). 2. Snap the battery door closed. NOTE: Insert the batteries into the chamber as shown. • Before you load the film. 5 Place the batteries over the battery-pull strap and insert into the camera before you remove the old batteries, close the lens cover. 3. LOADING THE BATTERIES This camera uses 2 AAA-size batteries that supply power for all camera operations. 1.
User's Guide
Page 8
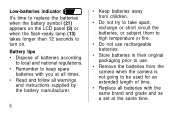
... or fire. • Do not use rechargeable batteries. • Store batteries in their original packaging prior to use. • Remove the batteries from the camera when the camera is not going to turn on. Battery tips • Dispose of batteries according to local and national regulations. • Remember to keep spare batteries with the same brand and grade and as a set at the same time.
... or fire. • Do not use rechargeable batteries. • Store batteries in their original packaging prior to use. • Remove the batteries from the camera when the camera is not going to turn on. Battery tips • Dispose of batteries according to local and national regulations. • Remember to keep spare batteries with the same brand and grade and as a set at the same time.
User's Guide
Page 9
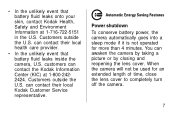
... leaks inside the camera, U.S. can contact the Kodak Information Center (KIC) at 1-716-722-5151 in the U.S. You can contact their local Kodak Customer Service representative. Customers outside the U.S. Customers outside the U.S. Power shutdown To conserve battery power, the camera automatically goes into a sleep mode if it is not operated for an extended length of time, close the lens cover to completely turn off the...
... leaks inside the camera, U.S. can contact the Kodak Information Center (KIC) at 1-716-722-5151 in the U.S. You can contact their local Kodak Customer Service representative. Customers outside the U.S. Customers outside the U.S. Power shutdown To conserve battery power, the camera automatically goes into a sleep mode if it is not operated for an extended length of time, close the lens cover to completely turn off the...
User's Guide
Page 10
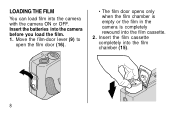
LOADING THE FILM You can load film into the film cassette. 2. Move the film-door lever (9) to open the film door (16). • The film door opens only when the film chamber is empty or the film in the camera is completely rewound into the camera with the camera ON or OFF. Insert the film cassette completely into the camera before you load the film. 1. Insert the batteries into the film chamber (15). 8
LOADING THE FILM You can load film into the film cassette. 2. Move the film-door lever (9) to open the film door (16). • The film door opens only when the film chamber is empty or the film in the camera is completely rewound into the camera with the camera ON or OFF. Insert the film cassette completely into the camera before you load the film. 1. Insert the batteries into the film chamber (15). 8

User's Guide
Page 11
... buy is made for developing your film and to assure that you cannot open the door until the film is at q (#1 position) for a new cassette. • Do not force the film cassette into the film cassette. Close the film door to prewind, you get all the features of the Advanced Photo System. 9 The picture counter (20) on the LCD panel (3) displays the number of pictures...
... buy is made for developing your film and to assure that you cannot open the door until the film is at q (#1 position) for a new cassette. • Do not force the film cassette into the film cassette. Close the film door to prewind, you get all the features of the Advanced Photo System. 9 The picture counter (20) on the LCD panel (3) displays the number of pictures...
User's Guide
Page 12
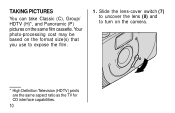
Slide the lens-cover switch (7) to uncover the lens (8) and to expose the film. 1. Your photo-processing cost may be based on the format size(s) that you use to turn on the same film cassette. TAKING PICTURES You can take Classic (C), Group/ HDTV (H)*, and Panoramic (P) pictures on the camera. * High Definition Television (HDTV) prints are the same aspect ratio as the TV for CD interface capabilities. 10
Slide the lens-cover switch (7) to uncover the lens (8) and to expose the film. 1. Your photo-processing cost may be based on the format size(s) that you use to turn on the same film cassette. TAKING PICTURES You can take Classic (C), Group/ HDTV (H)*, and Panoramic (P) pictures on the camera. * High Definition Television (HDTV) prints are the same aspect ratio as the TV for CD interface capabilities. 10
User's Guide
Page 15
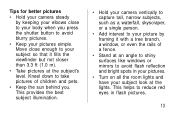
... mirrors to reduce red eyes in your pictures. • Turn on all the room lights and have your pictures simple. This helps to avoid flash reflection and bright spots in flash pictures. 13 Tips for better pictures • Hold your camera steady by framing it fills the viewfinder but not closer than 3.3 ft (1.0 m). • Take pictures at the subject's level. This provides the best...
... mirrors to reduce red eyes in your pictures. • Turn on all the room lights and have your pictures simple. This helps to avoid flash reflection and bright spots in flash pictures. 13 Tips for better pictures • Hold your camera steady by framing it fills the viewfinder but not closer than 3.3 ft (1.0 m). • Take pictures at the subject's level. This provides the best...

User's Guide
Page 16
... your camera (see Flash-to turn green. 5. Frame your subject within the distance range for the flash-ready lamp (13) to take pictures beyond the maximum distance or your pictures will be dark. 4. TAKING FLASH PICTURES In dim light, such as needed. 1. Slide the lens-cover switch (7) to uncover the lens (8) and to -subject distance). 14 • Don't take a picture. Press the shutter button (1) to turn on dark overcast days, you need flash...
... your camera (see Flash-to turn green. 5. Frame your subject within the distance range for the flash-ready lamp (13) to take pictures beyond the maximum distance or your pictures will be dark. 4. TAKING FLASH PICTURES In dim light, such as needed. 1. Slide the lens-cover switch (7) to uncover the lens (8) and to -subject distance). 14 • Don't take a picture. Press the shutter button (1) to turn on dark overcast days, you need flash...
User's Guide
Page 17
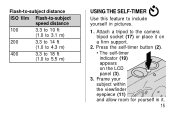
Attach a tripod to include yourself in it on the LCD panel (3). 3. Flash-to-subject distance ISO film Flash-to-subject speed distance 100 3.3 to 10 ft (1.0 to 3.1 m) 200 3.3 to 14 ft (1.0 to 4.3 m) 400 3.3 to 18 ft (1.0 to 5.5 m) USING THE SELF-TIMER Use this feature to the camera tripod socket (17) or place it . 15 Frame your subject within the viewfinder eyepiece (11) and allow room for yourself in pictures. 1. Press the self-timer button (2). • The self-timer indicator (19) appears on a firm support. 2.
Attach a tripod to include yourself in it on the LCD panel (3). 3. Flash-to-subject distance ISO film Flash-to-subject speed distance 100 3.3 to 10 ft (1.0 to 3.1 m) 200 3.3 to 14 ft (1.0 to 4.3 m) 400 3.3 to 18 ft (1.0 to 5.5 m) USING THE SELF-TIMER Use this feature to the camera tripod socket (17) or place it . 15 Frame your subject within the viewfinder eyepiece (11) and allow room for yourself in pictures. 1. Press the self-timer button (2). • The self-timer indicator (19) appears on a firm support. 2.
User's Guide
Page 18
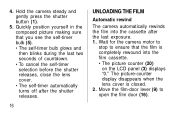
... stop to open the film door (16). The picture-counter display disappears when the lens cover is completely rewound into the cassette after the shutter releases. 16 UNLOADING THE FILM Automatic rewind The camera automatically rewinds the film into the film cassette. • The picture counter (20) on the LCD panel (3) displays "0." Move the film-door lever (9) to ensure that you see the self-timer bulb (5). • The self-timer bulb glows and then blinks...
... stop to open the film door (16). The picture-counter display disappears when the lens cover is completely rewound into the cassette after the shutter releases. 16 UNLOADING THE FILM Automatic rewind The camera automatically rewinds the film into the film cassette. • The picture counter (20) on the LCD panel (3) displays "0." Move the film-door lever (9) to ensure that you see the self-timer bulb (5). • The self-timer bulb glows and then blinks...
User's Guide
Page 19
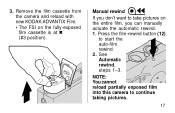
3. Remove the film cassette from the camera and reload with new KODAK ADVANTIX Film. • The FSI on the entire film, you can manually actuate the automatic rewind. 1. NOTE: You cannot reload partially exposed film into this camera to start the auto-film rewind. 2. See Automatic rewind, steps 1-3. Press the film-rewind button (12) to continue taking pictures. 17 Manual rewind If you don't want to take pictures on the fully-exposed film cassette is at ✖ (#3 position).
3. Remove the film cassette from the camera and reload with new KODAK ADVANTIX Film. • The FSI on the entire film, you can manually actuate the automatic rewind. 1. NOTE: You cannot reload partially exposed film into this camera to start the auto-film rewind. 2. See Automatic rewind, steps 1-3. Press the film-rewind button (12) to continue taking pictures. 17 Manual rewind If you don't want to take pictures on the fully-exposed film cassette is at ✖ (#3 position).
User's Guide
Page 20
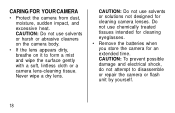
... cleaning eyeglasses. • Remove the batteries when you store the camera for cleaning camera lenses. Never wipe a dry lens. Do not use solvents or solutions not designed for an extended time. CAUTION: Do not use solvents or harsh or abrasive cleaners on the camera body. • If the lens appears dirty, breathe on it to disassemble or repair the camera or flash unit by yourself. 18...
... cleaning eyeglasses. • Remove the batteries when you store the camera for cleaning camera lenses. Never wipe a dry lens. Do not use solvents or solutions not designed for an extended time. CAUTION: Do not use solvents or harsh or abrasive cleaners on the camera body. • If the lens appears dirty, breathe on it to disassemble or repair the camera or flash unit by yourself. 18...
User's Guide
Page 21
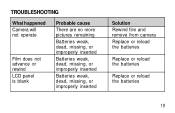
TROUBLESHOOTING What happened Camera will not operate Film does not advance or rewind LCD panel is blank Probable cause There are no more pictures remaining Batteries weak, dead, missing, or improperly inserted Batteries weak, dead, missing, or improperly inserted Batteries weak, dead, missing, or improperly inserted Solution Rewind film and remove from camera Replace or reload the batteries Replace or reload the batteries Replace or reload the batteries 19
TROUBLESHOOTING What happened Camera will not operate Film does not advance or rewind LCD panel is blank Probable cause There are no more pictures remaining Batteries weak, dead, missing, or improperly inserted Batteries weak, dead, missing, or improperly inserted Batteries weak, dead, missing, or improperly inserted Solution Rewind film and remove from camera Replace or reload the batteries Replace or reload the batteries Replace or reload the batteries 19
User's Guide
Page 22
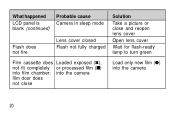
What happened LCD panel is blank (continued) Flash does not fire Probable cause Camera in sleep mode Lens cover closed Flash not fully charged Solution Take a picture or close Load only new film (q) into film chamber; into the camera film door does not close and reopen lens cover Open lens cover Wait for flash-ready lamp to turn green Film cassette does Loaded exposed (✖), not fit completely or processed film (s) into the camera 20
What happened LCD panel is blank (continued) Flash does not fire Probable cause Camera in sleep mode Lens cover closed Flash not fully charged Solution Take a picture or close Load only new film (q) into film chamber; into the camera film door does not close and reopen lens cover Open lens cover Wait for flash-ready lamp to turn green Film cassette does Loaded exposed (✖), not fit completely or processed film (s) into the camera 20
User's Guide
Page 23
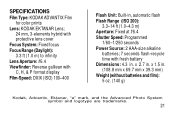
SPECIFICATIONS Film Type: KODAK ADVANTIX Film for color prints Lens: KODAK EKTANAR Lens; 24 mm, 3-elements hybrid with protective lens cover Focus System: Fixed focus Focus Range (Daylight): 3.3 ft (1.0 m) to infinity Lens Aperture: f/6.4 Viewfinder: Reverse galilean with C, H, & P format display Film-Speed: DXIX (ISO) 100-400 Flash Unit: Built-in, automatic flash Flash Range (ISO 200): 3.3-14 ft (1.0-4.3 m) Aperture: Fixed at f/6.4 Shutter Speed: Programmed 1/60-1/250 seconds Power Source: 2 AAA-size alkaline batteries; 7 seconds flash-recycle time with fresh battery Dimensions: 4.3 in . x...
SPECIFICATIONS Film Type: KODAK ADVANTIX Film for color prints Lens: KODAK EKTANAR Lens; 24 mm, 3-elements hybrid with protective lens cover Focus System: Fixed focus Focus Range (Daylight): 3.3 ft (1.0 m) to infinity Lens Aperture: f/6.4 Viewfinder: Reverse galilean with C, H, & P format display Film-Speed: DXIX (ISO) 100-400 Flash Unit: Built-in, automatic flash Flash Range (ISO 200): 3.3-14 ft (1.0-4.3 m) Aperture: Fixed at f/6.4 Shutter Speed: Programmed 1/60-1/250 seconds Power Source: 2 AAA-size alkaline batteries; 7 seconds flash-recycle time with fresh battery Dimensions: 4.3 in . x...


