User Manual
Page 4
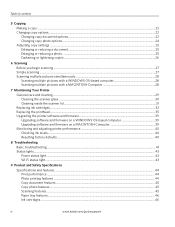
... with a MACINTOSH Computer 28 7 Maintaining Your Printer General care and cleaning...29 Cleaning the scanner glass ...30 Cleaning inside the scanner lid ...31 Replacing ink cartridges...32 Replacing the printhead ...35 Upgrading the printer software and firmware ...39 Upgrading software and firmware... light ...43 9 Product and Safety Specifications Specifications and features ...44 Print performance ...44 Photo printing features ...44 Copy document features ...45 Copy photo features ...45 Scanning features ...45 Paper tray features...46 Ink cartridges ...46 iv www.kodak.com/go/aiosupport
... with a MACINTOSH Computer 28 7 Maintaining Your Printer General care and cleaning...29 Cleaning the scanner glass ...30 Cleaning inside the scanner lid ...31 Replacing ink cartridges...32 Replacing the printhead ...35 Upgrading the printer software and firmware ...39 Upgrading software and firmware... light ...43 9 Product and Safety Specifications Specifications and features ...44 Print performance ...44 Photo printing features ...44 Copy document features ...45 Copy photo features ...45 Scanning features ...45 Paper tray features...46 Ink cartridges ...46 iv www.kodak.com/go/aiosupport

User Manual
Page 6
1 Printer Overview This printer lets you access the printer over a wireless (Wi-Fi) network. Components 1 2 34 56 7 Rotate Back Home MS SD/HC MMC 15 14 13 Rotate Back Home MS SD/HC MMC 8 ...12 11 10 9 1 Wi-Fi connectivity LED 2 Memory card slot 3 Control panel 4 LCD 5 USB port 6 Power cord connection port 7 Rear-access cleanout area 8 Printer access door 9 Printhead with ink cartridges installed 10 Right paper-edge guide 11 Paper tray 12 Paper tray extender / paper stop 13 Left paper-edge guide 14 Scanner glass...
1 Printer Overview This printer lets you access the printer over a wireless (Wi-Fi) network. Components 1 2 34 56 7 Rotate Back Home MS SD/HC MMC 15 14 13 Rotate Back Home MS SD/HC MMC 8 ...12 11 10 9 1 Wi-Fi connectivity LED 2 Memory card slot 3 Control panel 4 LCD 5 USB port 6 Power cord connection port 7 Rear-access cleanout area 8 Printer access door 9 Printhead with ink cartridges installed 10 Right paper-edge guide 11 Paper tray 12 Paper tray extender / paper stop 13 Left paper-edge guide 14 Scanner glass...
User Manual
Page 34
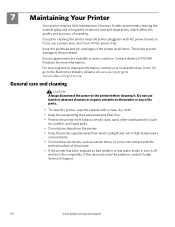
... solve the problem, contact Kodak Service & Support. 29 www.kodak.com/go to remove dust and fingerprints, which affect the quality and accuracy of the printer. • If the printer has been exposed to bad weather or has water inside it, turn off and let it . Keep the printhead and ink cartridges in with the painted...
... solve the problem, contact Kodak Service & Support. 29 www.kodak.com/go to remove dust and fingerprints, which affect the quality and accuracy of the printer. • If the printer has been exposed to bad weather or has water inside it, turn off and let it . Keep the printhead and ink cartridges in with the painted...
User Manual
Page 37
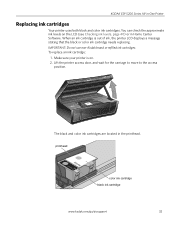
... black or color ink cartridge needs replacing. To replace an ink cartridge: 1. The black and color ink cartridges are located in -One Printer Replacing ink cartridges Your printer uses both black and color ink cartridges. When an ink cartridge is on the LCD (see Checking ink levels, page 40) or in Home Center Software. printhead color ink cartridge black ink cartridge www.kodak.com/go/aiosupport 32 KODAK ESP 5200 Series All...
... black or color ink cartridge needs replacing. To replace an ink cartridge: 1. The black and color ink cartridges are located in -One Printer Replacing ink cartridges Your printer uses both black and color ink cartridges. When an ink cartridge is on the LCD (see Checking ink levels, page 40) or in Home Center Software. printhead color ink cartridge black ink cartridge www.kodak.com/go/aiosupport 32 KODAK ESP 5200 Series All...
User Manual
Page 38
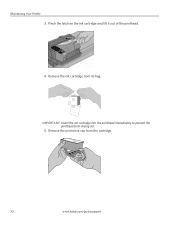
IMPORTANT: Insert the ink cartridge into the printhead immediately to prevent the printhead from its bag. Remove the ink cartridge from drying out. 5. Remove the protective cap from the cartridge. 10 33 www.kodak.com/go/aiosupport Maintaining Your Printer 3. Pinch the latch on the ink cartridge and lift it out of the printhead. 4.
IMPORTANT: Insert the ink cartridge into the printhead immediately to prevent the printhead from its bag. Remove the ink cartridge from drying out. 5. Remove the protective cap from the cartridge. 10 33 www.kodak.com/go/aiosupport Maintaining Your Printer 3. Pinch the latch on the ink cartridge and lift it out of the printhead. 4.
User Manual
Page 39
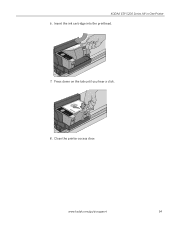
Press down on the tab until you hear a click. 8. www.kodak.com/go/aiosupport 34 Close the printer access door. Insert the ink cartridge into the printhead. 7. KODAK ESP 5200 Series All-in-One Printer 6.
Press down on the tab until you hear a click. 8. www.kodak.com/go/aiosupport 34 Close the printer access door. Insert the ink cartridge into the printhead. 7. KODAK ESP 5200 Series All-in-One Printer 6.
User Manual
Page 40
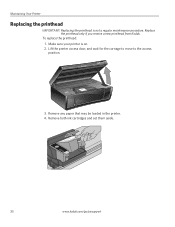
To replace the printhead: 1. Remove any paper that may be loaded in the printer. 4. Replace the printhead only if you receive a new printhead from Kodak. Remove both ink cartridges and set them aside. 35 www.kodak.com/go/aiosupport Lift the printer access door, and wait for the carriage to move to the access position. 3. Make sure your printer is not a regular maintenance procedure. Maintaining Your Printer Replacing the printhead IMPORTANT: Replacing the printhead is on. 2.
To replace the printhead: 1. Remove any paper that may be loaded in the printer. 4. Replace the printhead only if you receive a new printhead from Kodak. Remove both ink cartridges and set them aside. 35 www.kodak.com/go/aiosupport Lift the printer access door, and wait for the carriage to move to the access position. 3. Make sure your printer is not a regular maintenance procedure. Maintaining Your Printer Replacing the printhead IMPORTANT: Replacing the printhead is on. 2.
User Manual
Page 43
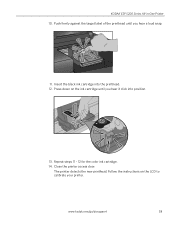
Press down on the LCD to calibrate your printer. The printer detects the new printhead. Repeat steps 11 - 12 for the color ink cartridge. 14. Insert the black ink cartridge into position. www.kodak.com/go/aiosupport 38 Cartouche d'encre noire 10 10 13. KODAK ESP 5200 Series All-in-One Printer 10. Close the printer access door. Follow the instructions on the ink cartridge until you hear it click into the printhead. 12. Push firmly against the target label of the printhead until you hear a loud snap. 11.
Press down on the LCD to calibrate your printer. The printer detects the new printhead. Repeat steps 11 - 12 for the color ink cartridge. 14. Insert the black ink cartridge into position. www.kodak.com/go/aiosupport 38 Cartouche d'encre noire 10 10 13. KODAK ESP 5200 Series All-in-One Printer 10. Close the printer access door. Follow the instructions on the ink cartridge until you hear it click into the printhead. 12. Push firmly against the target label of the printhead until you hear a loud snap. 11.
User Manual
Page 45
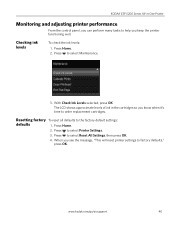
KODAK ESP 5200 Series All-in the cartridges so you keep the printer functioning well. Resetting factory To reset all defaults to select Printer Settings. 3. Press to the factory default settings: defaults 1. With Check Ink Levels selected, press OK. Checking ink levels To check the ink levels: 1. Press to select Reset All Settings, then press OK. 4. www.kodak.com/go...
KODAK ESP 5200 Series All-in the cartridges so you keep the printer functioning well. Resetting factory To reset all defaults to select Printer Settings. 3. Press to the factory default settings: defaults 1. With Check Ink Levels selected, press OK. Checking ink levels To check the ink levels: 1. Press to select Reset All Settings, then press OK. 4. www.kodak.com/go...
User Manual
Page 46
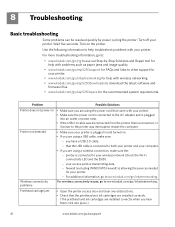
.../inkjetnetworking. Wireless connectivity problems For wireless connectivity issues, go to www.kodak.com/go/inkjetnetworking. Printhead carriage jam • Open the printer access door and clear any obstructions. • Check that the printhead and ink cartridges are installed correctly. (The printhead and ink cartridges are installed correctly when you hear them click into an outlet or...
.../inkjetnetworking. Wireless connectivity problems For wireless connectivity issues, go to www.kodak.com/go/inkjetnetworking. Printhead carriage jam • Open the printer access door and clear any obstructions. • Check that the printhead and ink cartridges are installed correctly. (The printhead and ink cartridges are installed correctly when you hear them click into an outlet or...
User Manual
Page 47
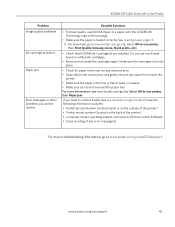
... troubleshooting information, go to contact Kodak (see www.kodak.com/go /esp5250support. KODAK ESP 5200 Series All-in-One Printer Problem Image quality problems Ink cartridge problems Paper jam Error messages or other problems you cannot resolve Possible Solutions • For best results, use non-Kodak brand or refilled ink cartridges. • Remove, then install the cartridges again. If you do...
... troubleshooting information, go to contact Kodak (see www.kodak.com/go /esp5250support. KODAK ESP 5200 Series All-in-One Printer Problem Image quality problems Ink cartridge problems Paper jam Error messages or other problems you cannot resolve Possible Solutions • For best results, use non-Kodak brand or refilled ink cartridges. • Remove, then install the cartridges again. If you do...
User Manual
Page 51
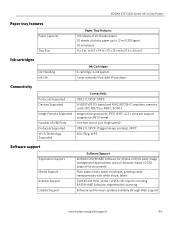
... OS) import, including EASYSHARE Software, segmentation scanning Software and firmware updates available through Web support www.kodak.com/go/aiosupport 46 optical character reader (OCR) support for photos or third-party image management applications; KODAK ESP 5200 Series All-in . to 8.5 x 14 in. (10 x 15 cm to 21.6 x 36 cm) Ink cartridges Ink Handling Ink Life Ink Cartridges 2-cartridge, 6-ink system 1-year warranty...
... OS) import, including EASYSHARE Software, segmentation scanning Software and firmware updates available through Web support www.kodak.com/go/aiosupport 46 optical character reader (OCR) support for photos or third-party image management applications; KODAK ESP 5200 Series All-in . to 8.5 x 14 in. (10 x 15 cm to 21.6 x 36 cm) Ink cartridges Ink Handling Ink Life Ink Cartridges 2-cartridge, 6-ink system 1-year warranty...
User Manual
Page 55
... leak out of the product). • Avoid placing this product in an environment that extends beyond the product's base in all ink cartridges out of the reach of time, unplug it on its side. If any of the extension cord. • Place the product on a flat, stable surface ... level, unplug this product off by using the On/Off button. KODAK ESP 5200 Series All-in-One Printer • If you need to clean the LCD screen. If ink gets into your eyes, flush your hands, wash then thoroughly with water. www.kodak.com/go /contact. Wait until the On/Off button stops flashing...
... leak out of the product). • Avoid placing this product in an environment that extends beyond the product's base in all ink cartridges out of the reach of time, unplug it on its side. If any of the extension cord. • Place the product on a flat, stable surface ... level, unplug this product off by using the On/Off button. KODAK ESP 5200 Series All-in-One Printer • If you need to clean the LCD screen. If ink gets into your eyes, flush your hands, wash then thoroughly with water. www.kodak.com/go /contact. Wait until the On/Off button stops flashing...
User Manual
Page 60
... setting, 4 Cropping pictures. See Tagged images printing E Energy Star qualification, 52 Enlarging or reducing a copy document, 25 photo, 25 Envelopes capacity, 15 loading, 15 sizes, 13 Extender, paper tray, 1 F FAQs, Web support, 41 Firewall,... on network, installing printer on LCD, using, 7 KODAK Home Center Software. See Replacing ink cartridges Cleaning the printer, 29 Components, printer, 1 Configuring your printer, 4 basic printer settings, 4 setting printer as the default printer, 5 wireless network settings, 5 Connecting to your computer, 4 Default printer settings, resetting, 4...
... setting, 4 Cropping pictures. See Tagged images printing E Energy Star qualification, 52 Enlarging or reducing a copy document, 25 photo, 25 Envelopes capacity, 15 loading, 15 sizes, 13 Extender, paper tray, 1 F FAQs, Web support, 41 Firewall,... on network, installing printer on LCD, using, 7 KODAK Home Center Software. See Replacing ink cartridges Cleaning the printer, 29 Components, printer, 1 Configuring your printer, 4 basic printer settings, 4 setting printer as the default printer, 5 wireless network settings, 5 Connecting to your computer, 4 Default printer settings, resetting, 4...
User Manual
Page 61
..., 1 Power status light, 43 Print photos options, 16 Print sizes, 44 Printer access door, 1 Printer performance, monitoring and adjusting, 40 Printer supplies maintaining, 29 recycling, 29 Printhead removing, 36 replacing, 35 Printhead with ink cartridges installed, 1 Printing panoramic photos, 20 tagged image photos, 19 Protecting the printer, 29 R Rear-access cleanout area, 1 Recycling printer or supplies, 29 Red box around...
..., 1 Power status light, 43 Print photos options, 16 Print sizes, 44 Printer access door, 1 Printer performance, monitoring and adjusting, 40 Printer supplies maintaining, 29 recycling, 29 Printhead removing, 36 replacing, 35 Printhead with ink cartridges installed, 1 Printing panoramic photos, 20 tagged image photos, 19 Protecting the printer, 29 R Rear-access cleanout area, 1 Recycling printer or supplies, 29 Red box around...


