User Manual
Page 7
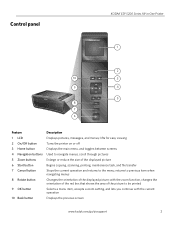
Control panel KODAK ESP 5200 Series All-in-One Printer ESP 5250 1 All-in-One-Printer 2 Back Home 10 3 9 OK 4 Rotate Back Home MS SD/HC MMC 8 Zoom Rotate 5 Cancel 7 Start 6 Feature 1 LCD 2 On/Off button 3 Home button 4 Navigation buttons...picture; returns to previous item when navigating menus Changes the orientation of the displayed picture Begins copying, scanning, printing, maintenance task, and file transfer Stops the current operation and returns to be printed Selects a menu item, accepts a zoom setting, and lets you continue with the current operation Displays the ...
Control panel KODAK ESP 5200 Series All-in-One Printer ESP 5250 1 All-in-One-Printer 2 Back Home 10 3 9 OK 4 Rotate Back Home MS SD/HC MMC 8 Zoom Rotate 5 Cancel 7 Start 6 Feature 1 LCD 2 On/Off button 3 Home button 4 Navigation buttons...picture; returns to previous item when navigating menus Changes the orientation of the displayed picture Begins copying, scanning, printing, maintenance task, and file transfer Stops the current operation and returns to be printed Selects a menu item, accepts a zoom setting, and lets you continue with the current operation Displays the ...
User Manual
Page 15
... are connecting to a newer model printer (for example, you already have an another KODAK ESP 7 printer and now you are adding an ESP 5250 printer), you are connecting to another ESP 5250 printer or to add the printer. From the dock, open System Preferences. Press to select Print Network Configuration, then press OK. d. Select Start > All Programs > Kodak > Kodak Printer Network Setup Utility. Click the...
... are connecting to a newer model printer (for example, you already have an another KODAK ESP 7 printer and now you are adding an ESP 5250 printer), you are connecting to another ESP 5250 printer or to add the printer. From the dock, open System Preferences. Press to select Print Network Configuration, then press OK. d. Select Start > All Programs > Kodak > Kodak Printer Network Setup Utility. Click the...


