
User's Guide
Page 1
KODAK EASYSHARE DX4330 Zoom Digital Camera User's Guide Visit Kodak on the World Wide Web at www.kodak.com
KODAK EASYSHARE DX4330 Zoom Digital Camera User's Guide Visit Kodak on the World Wide Web at www.kodak.com

User's Guide
Page 7
... Print 1 What Can I Do With My Camera 2 What Can I Do With My Digital Pictures and Videos? .....2 Package Contents 3 Attaching the Wrist Strap 4 Attaching the Lens Cap Strap 4 Adding Optional Lenses 4 Loading the Battery 5 Mode Dial Settings 6 Turning On the Camera 7 Setting the Date and Time 8 Checking Camera Status Bar 9 Inserting an MMC/SD Card...
... Print 1 What Can I Do With My Camera 2 What Can I Do With My Digital Pictures and Videos? .....2 Package Contents 3 Attaching the Wrist Strap 4 Attaching the Lens Cap Strap 4 Adding Optional Lenses 4 Loading the Battery 5 Mode Dial Settings 6 Turning On the Camera 7 Setting the Date and Time 8 Checking Camera Status Bar 9 Inserting an MMC/SD Card...
User's Guide
Page 10
... Still Modes 51 Turning Off the Shutter Sound 51 Setting Video Out 52 Selecting a Language 52 Formatting Internal Memory or MMC/SD Card 53 Viewing Camera Information 54 7 Installing the Software 55 WINDOWS System Requirements 55 MAC OS X System Requirements 56 MAC OS 8.6/9.x System Requirements 56 Install the Software 57 8 Connecting...
... Still Modes 51 Turning Off the Shutter Sound 51 Setting Video Out 52 Selecting a Language 52 Formatting Internal Memory or MMC/SD Card 53 Viewing Camera Information 54 7 Installing the Software 55 WINDOWS System Requirements 55 MAC OS X System Requirements 56 MAC OS 8.6/9.x System Requirements 56 Install the Software 57 8 Connecting...

User's Guide
Page 11
9 Using the Optional EASYSHARE Camera Dock II . 61 Camera Dock Package Contents 61 Installing the Camera Insert 62 Connecting the Camera Dock 63 Installing the Battery Pack in the Camera 64 Docking the Camera 65 Charging the Battery Pack 66 Transferring Pictures and Videos 67 Caution When Using a Tripod 67 Earlier Camera Dock Model 68 10 Troubleshooting 69 Troubleshooting-Camera 69 Troubleshooting-Camera Dock II 81 11 Getting Help 85 Helpful Web Links 85 Help in this Manual 85 Software Help 85 Telephone Customer Support 86 ix
9 Using the Optional EASYSHARE Camera Dock II . 61 Camera Dock Package Contents 61 Installing the Camera Insert 62 Connecting the Camera Dock 63 Installing the Battery Pack in the Camera 64 Docking the Camera 65 Charging the Battery Pack 66 Transferring Pictures and Videos 67 Caution When Using a Tripod 67 Earlier Camera Dock Model 68 10 Troubleshooting 69 Troubleshooting-Camera 69 Troubleshooting-Camera Dock II 81 11 Getting Help 85 Helpful Web Links 85 Help in this Manual 85 Software Help 85 Telephone Customer Support 86 ix

User's Guide
Page 13
For a large print version of this User's Guide: 1 Go to http://www.kodak.com/go/dx4330support. 2 Under Explore EasyShare, click Service and Support. 3 Under Manuals/Guides, View PDF, click your language to 200%. 5 Print as usual. 1 See the Quick Start Guide or Installing the .... With the User's Guide open on MACINTOSH OS X: m From the File menu, select Page Setup. 1 Getting Started Install Software First Install the software from the KODAK EASYSHARE Software CD before connecting the camera (or optional camera dock) to the computer.
For a large print version of this User's Guide: 1 Go to http://www.kodak.com/go/dx4330support. 2 Under Explore EasyShare, click Service and Support. 3 Under Manuals/Guides, View PDF, click your language to 200%. 5 Print as usual. 1 See the Quick Start Guide or Installing the .... With the User's Guide open on MACINTOSH OS X: m From the File menu, select Page Setup. 1 Getting Started Install Software First Install the software from the KODAK EASYSHARE Software CD before connecting the camera (or optional camera dock) to the computer.

User's Guide
Page 14
...Landscape, and Close-up modes to the Quick Start Guide or KODAK EASYSHARE Software Help for professional printing Refer to expand your capabilities. Or purchase an optional KODAK Multimedia Card (MMC) or a Secure Digital (SD) card and: m Automatically print to any printer with ...QUICKTIME movies. Some MACINTOSH operating systems may support limited KODAK EASYSHARE Software features. 2 Install the software from Ofoto, a Kodak Company. Capture Videos with flash, self timer, and zoom features. What Can I Do With My Camera? "Tag" pictures to your local photo retailer for...
...Landscape, and Close-up modes to the Quick Start Guide or KODAK EASYSHARE Software Help for professional printing Refer to expand your capabilities. Or purchase an optional KODAK Multimedia Card (MMC) or a Secure Digital (SD) card and: m Automatically print to any printer with ...QUICKTIME movies. Some MACINTOSH operating systems may support limited KODAK EASYSHARE Software features. 2 Install the software from Ofoto, a Kodak Company. Capture Videos with flash, self timer, and zoom features. What Can I Do With My Camera? "Tag" pictures to your local photo retailer for...

User's Guide
Page 15
... shown: User's Guide, Quick Start Guide, KODAK EASYSHARE Software CD. (In some countries, the User's Guide is provided on a CD only.) * The custom camera dock insert lets your camera fit the optional KODAK EASYSHARE Camera Dock II. Do not discard. Chapter 1 Package Contents 6 7 1 5 2 4 3 1 Custom Camera Dock insert* 2 Lens cap with a KODAK EASYSHARE Camera Dock II, a KODAK EASYSHARE Ni-MH Rechargeable Battery Pack and...
... shown: User's Guide, Quick Start Guide, KODAK EASYSHARE Software CD. (In some countries, the User's Guide is provided on a CD only.) * The custom camera dock insert lets your camera fit the optional KODAK EASYSHARE Camera Dock II. Do not discard. Chapter 1 Package Contents 6 7 1 5 2 4 3 1 Custom Camera Dock insert* 2 Lens cap with a KODAK EASYSHARE Camera Dock II, a KODAK EASYSHARE Ni-MH Rechargeable Battery Pack and...

User's Guide
Page 16
Pull until secure. Adding Optional Lenses Lens threads Purchase optional lenses at your Kodak retail dealer or on our Web site at http://www.kodak.com/go/accessories. 4 Use the lens cap to protect the lens when camera is not in use. Pull until secure. Long loop Short loop Attaching the Lens Cap Strap 1 Thread the lens cap string through the lens cap strap post. 2 Thread the lens cap through the short loop. Chapter 1 Attaching the Wrist Strap 1 Thread the wrist strap as shown. 2 Thread the long loop through the loop.
Pull until secure. Adding Optional Lenses Lens threads Purchase optional lenses at your Kodak retail dealer or on our Web site at http://www.kodak.com/go/accessories. 4 Use the lens cap to protect the lens when camera is not in use. Pull until secure. Long loop Short loop Attaching the Lens Cap Strap 1 Thread the lens cap string through the lens cap strap post. 2 Thread the lens cap through the short loop. Chapter 1 Attaching the Wrist Strap 1 Thread the wrist strap as shown. 2 Thread the long loop through the loop.

User's Guide
Page 17
See page 95 for details on the optional KODAK Digital Camera AC Adapter, 3-Volt, see page 96. * If you purchased the KODAK EASYSHARE Camera Dock II, see page 64 for acceptable battery types. NOTE: For information on installing the KODAK EASYSHARE Ni-MH Rechargeable Battery Pack. 5 Chapter 1 Loading the Battery 1 Turn off the camera. 2 Open the battery door. 3 Orient the...
See page 95 for details on the optional KODAK Digital Camera AC Adapter, 3-Volt, see page 96. * If you purchased the KODAK EASYSHARE Camera Dock II, see page 64 for acceptable battery types. NOTE: For information on installing the KODAK EASYSHARE Ni-MH Rechargeable Battery Pack. 5 Chapter 1 Loading the Battery 1 Turn off the camera. 2 Open the battery door. 3 Orient the...

User's Guide
Page 18
.... Landscape For distant subjects. Chapter 1 Mode Dial Settings AUTO OFF Icon Mode Off Off Auto Sport Purpose Turns off the camera. Captures close and background subjects. Flash fires if needed . Place camera on the flash, see page 22. 6 Flash fires if needed . Automatically sets exposure and focus. Night For night scenes or... on.* Close-up For subjects 2.8 to 28 in. (7 to 70 cm) from the lens in wide angle, or 11 to 28 in. (28 to avoid camera shake. Flash fires if needed . Flash does not fire unless you turn on a flat, steady surface or tripod to 70 cm) in motion. Shutter speed...
.... Landscape For distant subjects. Chapter 1 Mode Dial Settings AUTO OFF Icon Mode Off Off Auto Sport Purpose Turns off the camera. Captures close and background subjects. Flash fires if needed . Place camera on the flash, see page 22. 6 Flash fires if needed . Automatically sets exposure and focus. Night For night scenes or... on.* Close-up For subjects 2.8 to 28 in. (7 to 70 cm) from the lens in wide angle, or 11 to 28 in. (28 to avoid camera shake. Flash fires if needed . Flash does not fire unless you turn on a flat, steady surface or tripod to 70 cm) in motion. Shutter speed...
User's Guide
Page 19
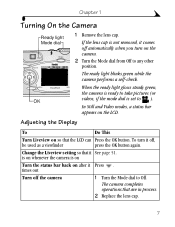
MENU EasyShare REVI OK When the ready light glows steady green, the camera is ready to take pictures (or videos, if the mode dial is not removed, it off the camera 1 Turn the Mode dial to Off. Change the Liveview setting so that the LCD can Press the OK button. To turn it comes... it See page 51. Adjusting the Display To Do This Turn Liveview on the camera. 2 Turn the Mode dial from Off to ). is on whenever the camera is on Turn the status bar back on the LCD. The camera completes operations that are in process. 2 Replace the lens cap. 7 Chapter 1 Turning On the...
MENU EasyShare REVI OK When the ready light glows steady green, the camera is ready to take pictures (or videos, if the mode dial is not removed, it off the camera 1 Turn the Mode dial to Off. Change the Liveview setting so that the LCD can Press the OK button. To turn it comes... it See page 51. Adjusting the Display To Do This Turn Liveview on the camera. 2 Turn the Mode dial from Off to ). is on whenever the camera is on Turn the status bar back on the LCD. The camera completes operations that are in process. 2 Replace the lens cap. 7 Chapter 1 Turning On the...

User's Guide
Page 20
...the Menu button to highlight Date & Time, then press the OK button. NOTE: Depending on your computer operating system, KODAK EASYSHARE Software may allow your computer to Step 3. See the KODAK EASYSHARE Software Help for more than 10 minutes. DELETE 3 Press to exit the menu. The time is YYYY/MM/DD. ...The setting remains until you connect the camera. Share 2 Press to adjust the date and time. Chapter 1 Setting the Date...
...the Menu button to highlight Date & Time, then press the OK button. NOTE: Depending on your computer operating system, KODAK EASYSHARE Software may allow your computer to Step 3. See the KODAK EASYSHARE Software Help for more than 10 minutes. DELETE 3 Press to exit the menu. The time is YYYY/MM/DD. ...The setting remains until you connect the camera. Share 2 Press to adjust the date and time. Chapter 1 Setting the Date...

User's Guide
Page 21
... icons depict the current mode or a battery concern: Auto Sport Night Landscape Close-up Review Video Share Share Low battery Exhausted battery (blinking) 9 Chapter 1 Checking Camera Status Bar Status Bar Screen Icon To check the current camera settings, turn the Mode dial from the Off position.
... icons depict the current mode or a battery concern: Auto Sport Night Landscape Close-up Review Video Share Share Low battery Exhausted battery (blinking) 9 Chapter 1 Checking Camera Status Bar Status Bar Screen Icon To check the current camera settings, turn the Mode dial from the Off position.

User's Guide
Page 22
...insert or remove a card when the green ready light is partially ejected, pull it . Purchase cards at http://www.kodak.com/go/accessories. 10 When the card is blinking; Chapter 1 Inserting an MMC/SD Card Optional MMC/SD cards... provide removable, reusable storage for storage capacities. doing so may damage the camera or card. Notched To insert an MMC/SD card: corner 1 Turn off the camera. of card 2 Open the card door. 3 Orient the card as shown on the card...one way; See page 93 for pictures and videos. forcing it may damage your pictures, card, or camera.
...insert or remove a card when the green ready light is partially ejected, pull it . Purchase cards at http://www.kodak.com/go/accessories. 10 When the card is blinking; Chapter 1 Inserting an MMC/SD Card Optional MMC/SD cards... provide removable, reusable storage for storage capacities. doing so may damage the camera or card. Notched To insert an MMC/SD card: corner 1 Turn off the camera. of card 2 Open the card door. 3 Orient the card as shown on the card...one way; See page 93 for pictures and videos. forcing it may damage your pictures, card, or camera.

User's Guide
Page 23
...kodak.com/go/accessories. Managing Your Storage Location Setting 1 Turn on the size of the card. MMC/SD Card -store as many pictures and videos as you change it and applies to all camera functions. 6 Press the Menu button to highlight an option, then DELETE press the OK button: MENU EasyShare... REVIEW Menu Auto (default)-the camera uses the card if one is installed. 5 Highlight Continue, then ...
...kodak.com/go/accessories. Managing Your Storage Location Setting 1 Turn on the size of the card. MMC/SD Card -store as many pictures and videos as you change it and applies to all camera functions. 6 Press the Menu button to highlight an option, then DELETE press the OK button: MENU EasyShare... REVIEW Menu Auto (default)-the camera uses the card if one is installed. 5 Highlight Continue, then ...

User's Guide
Page 24
...location Press the Review button. -Picture or video is stored on a card -Picture or video is stored in the status bar indicates the camera's storage location. Chapter 1 Checking Your Storage Setting In Still and Video modes, the storage location icon that appears with a picture indicates the location... of the picture or video and the camera setting. To check the location, either: Picture or video location m Turn the Mode dial from the Off position, or m In any capture mode...
...location Press the Review button. -Picture or video is stored on a card -Picture or video is stored in the status bar indicates the camera's storage location. Chapter 1 Checking Your Storage Setting In Still and Video modes, the storage location icon that appears with a picture indicates the location... of the picture or video and the camera setting. To check the location, either: Picture or video location m Turn the Mode dial from the Off position, or m In any capture mode...
User's Guide
Page 25
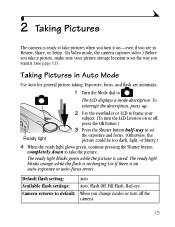
... green while the picture is an auto-exposure or auto-focus error). Taking Pictures in Review, Share, or Setup. (In Video mode, the camera captures video.) Before you want it (see page 11). Exposure, focus, and flash are in Auto Mode Use Auto for general picture-taking. ...The LCD displays a mode description. Default flash setting: Auto Available flash settings: Auto, Flash Off, Fill Flash, Red-eye Camera returns to default: When you change modes or turn off , press the OK button.) Ready light 3 Press the Shutter button half-way to set ...
... green while the picture is an auto-exposure or auto-focus error). Taking Pictures in Review, Share, or Setup. (In Video mode, the camera captures video.) Before you want it (see page 11). Exposure, focus, and flash are in Auto Mode Use Auto for general picture-taking. ...The LCD displays a mode description. Default flash setting: Auto Available flash settings: Auto, Flash Off, Fill Flash, Red-eye Camera returns to default: When you change modes or turn off , press the OK button.) Ready light 3 Press the Shutter button half-way to set ...

User's Guide
Page 26
Default flash setting: Auto Available flash settings: Auto, Flash Off, Fill Flash, Red-eye Camera returns to take the picture. The ready light blinks green while the picture is in Sport Mode Use this mode when the subject is saved. ... and focus. 3 When the ready light glows green, continue pressing the Shutter button completely down to default: When you change modes or turn off the camera. 14 Ready light 1 Turn the Mode dial to . Chapter 2 Taking Pictures in motion.
Default flash setting: Auto Available flash settings: Auto, Flash Off, Fill Flash, Red-eye Camera returns to take the picture. The ready light blinks green while the picture is in Sport Mode Use this mode when the subject is saved. ... and focus. 3 When the ready light glows green, continue pressing the Shutter button completely down to default: When you change modes or turn off the camera. 14 Ready light 1 Turn the Mode dial to . Chapter 2 Taking Pictures in motion.

User's Guide
Page 27
... ready light blinks green while the picture is saved. Default flash setting: Auto Available flash settings: Auto, Flash Off, Fill Flash, Red-eye Camera returns to . The LCD displays a mode description for night scenes or low light conditions. A longer exposure captures more detail of background subjects. ...Auto Mode Night Mode Ready light 1 To avoid blurry pictures, place the camera on a flat, steady surface or use a tripod. 2 Turn the Mode dial to default: When you change modes or turn off the...
... ready light blinks green while the picture is saved. Default flash setting: Auto Available flash settings: Auto, Flash Off, Fill Flash, Red-eye Camera returns to . The LCD displays a mode description for night scenes or low light conditions. A longer exposure captures more detail of background subjects. ...Auto Mode Night Mode Ready light 1 To avoid blurry pictures, place the camera on a flat, steady surface or use a tripod. 2 Turn the Mode dial to default: When you change modes or turn off the...

User's Guide
Page 28
Ready light 1 Turn the Mode dial to default: When you change modes or turn off the camera. 16 Default flash setting: Off Available flash settings: Auto, Flash Off, Fill Flash, Red-eye Camera returns to . The ready light blinks green while the picture is saved. The LCD displays a mode description for a few seconds...
Ready light 1 Turn the Mode dial to default: When you change modes or turn off the camera. 16 Default flash setting: Off Available flash settings: Auto, Flash Off, Fill Flash, Red-eye Camera returns to . The ready light blinks green while the picture is saved. The LCD displays a mode description for a few seconds...


