
User Manual
Page 1
... and create photo-quality enlargements with a touch of a button. m Transfer your new camera, picture taking and print making is fun and easy. Visit Kodak on your purchase of the new KODAK DC4800 Zoom Digital Camera-the camera that takes pictures digitally, without the use of film. KODAK DC4800 Zoom Digital Camera User's Guide Congratulations on the World Wide Web at home using...
... and create photo-quality enlargements with a touch of a button. m Transfer your new camera, picture taking and print making is fun and easy. Visit Kodak on your purchase of the new KODAK DC4800 Zoom Digital Camera-the camera that takes pictures digitally, without the use of film. KODAK DC4800 Zoom Digital Camera User's Guide Congratulations on the World Wide Web at home using...

User Manual
Page 3
Table of Contents 1 Getting Started 1 Attaching the Neck Strap 2 Using the Lens Cap 2 Loading the Battery 3 Charging the Battery 4 Inserting a Picture Card 5 Removing a Picture Card 6 Turning the Camera On and Off 6 Checking the Battery 7 Setting the Clock 8 Adjusting the Viewfinder 9 Camera Menus Overview 10 Manual Picture Taking Menu 10 Review Pictures Menu 11 Camera Setup Menu 12 2 Taking Pictures 13 Choosing a Capture Mode 14 Taking a Picture 15 Shooting in Fully Automatic Mode 16 i
Table of Contents 1 Getting Started 1 Attaching the Neck Strap 2 Using the Lens Cap 2 Loading the Battery 3 Charging the Battery 4 Inserting a Picture Card 5 Removing a Picture Card 6 Turning the Camera On and Off 6 Checking the Battery 7 Setting the Clock 8 Adjusting the Viewfinder 9 Camera Menus Overview 10 Manual Picture Taking Menu 10 Review Pictures Menu 11 Camera Setup Menu 12 2 Taking Pictures 13 Choosing a Capture Mode 14 Taking a Picture 15 Shooting in Fully Automatic Mode 16 i
User Manual
Page 5
Setting Picture Sharpness 38 Adjusting the ISO Sensitivity 39 Setting the Shutter Speed 40 Placing the Date on Pictures 40 4 Reviewing Your Pictures 41 Viewing Pictures 42 Magnifying Pictures 43 Deleting Pictures 44 Protecting Pictures 45 Running a Slide Show 46 Selecting Pictures for Automatic Printing 47 Viewing Picture Information 49 5 Personalizing Your Camera 51 Selecting a Power Save Setting 52 Setting Digital Zoom Behavior 54 Adjusting the Camera Sounds 56 Setting Video Out 57 Selecting a Language 58 Formatting a Picture Card 59 iii
Setting Picture Sharpness 38 Adjusting the ISO Sensitivity 39 Setting the Shutter Speed 40 Placing the Date on Pictures 40 4 Reviewing Your Pictures 41 Viewing Pictures 42 Magnifying Pictures 43 Deleting Pictures 44 Protecting Pictures 45 Running a Slide Show 46 Selecting Pictures for Automatic Printing 47 Viewing Picture Information 49 5 Personalizing Your Camera 51 Selecting a Power Save Setting 52 Setting Digital Zoom Behavior 54 Adjusting the Camera Sounds 56 Setting Video Out 57 Selecting a Language 58 Formatting a Picture Card 59 iii

User Manual
Page 6
... 63 WINDOWS-Based System Requirements 64 MACINTOSH System Requirements 64 KODAK Software 65 Installing the Software 66 7 Transferring Pictures To Your Computer 67 Using a USB Cable Connection 68 Starting KODAK Digital Camera Software 69 WINDOWS-based computers 69 MACINTOSH computers 69 Locating ...Your Pictures on the Picture Card 70 Picture Naming Conventions 71 8 Tips and Troubleshooting 73 Connecting Your Camera 73 Adjusting Your Monitor for Better...
... 63 WINDOWS-Based System Requirements 64 MACINTOSH System Requirements 64 KODAK Software 65 Installing the Software 66 7 Transferring Pictures To Your Computer 67 Using a USB Cable Connection 68 Starting KODAK Digital Camera Software 69 WINDOWS-based computers 69 MACINTOSH computers 69 Locating ...Your Pictures on the Picture Card 70 Picture Naming Conventions 71 8 Tips and Troubleshooting 73 Connecting Your Camera 73 Adjusting Your Monitor for Better...

User Manual
Page 7
9 Getting Help 85 Software Help 85 Kodak Online Services 85 Kodak Fax Support 85 Telephone Customer Support 86 Before You Call 86 Telephone Numbers 86 10 Warranty and Regulatory Information 89 Warranty Time Period 89 Warranty Repair Coverage 89 Limitations 90 Regulatory Information 91 FCC Compliance and Advisory 91 Canadian DOC Statement 92 11 Appendix 93 Original Camera Default Settings 94 DC4800 Zoom Camera Specifications 95 General Camera Maintenance 97 General Safety 97 Using Your Battery 99 v
9 Getting Help 85 Software Help 85 Kodak Online Services 85 Kodak Fax Support 85 Telephone Customer Support 86 Before You Call 86 Telephone Numbers 86 10 Warranty and Regulatory Information 89 Warranty Time Period 89 Warranty Repair Coverage 89 Limitations 90 Regulatory Information 91 FCC Compliance and Advisory 91 Canadian DOC Statement 92 11 Appendix 93 Original Camera Default Settings 94 DC4800 Zoom Camera Specifications 95 General Camera Maintenance 97 General Safety 97 Using Your Battery 99 v

User Manual
Page 9
Attaching the Neck Strap page 2 Using the Lens Cap 2 Loading the Battery 3 Charging the Battery 4 Inserting a Picture Card 5 Removing a Picture Card 6 Turning the Camera On and Off 6 Checking the Battery 7 Setting the Clock 8 Adjusting the Viewfinder 9 Camera Menus Overview 10 1 1 Getting Started 1 This chapter describes how to access them. It also describes the camera menus and settings, and how to prepare your camera for taking pictures.
Attaching the Neck Strap page 2 Using the Lens Cap 2 Loading the Battery 3 Charging the Battery 4 Inserting a Picture Card 5 Removing a Picture Card 6 Turning the Camera On and Off 6 Checking the Battery 7 Setting the Clock 8 Adjusting the Viewfinder 9 Camera Menus Overview 10 1 1 Getting Started 1 This chapter describes how to access them. It also describes the camera menus and settings, and how to prepare your camera for taking pictures.

User Manual
Page 10
Depress the tabs on the lens cap, fit the cap on each side of the camera. 2 Put the ends of the neck strap to the strap post on the lens, and release the tabs. 2 OPEN CARD Attaching the Neck Strap 1 Attach the metal clips on the ends of the neck strap through the metal clips. 3 Thread the strap through the plastic clips as shown. Using the Lens Cap To protect the lens, cover it with the lens cap whenever you are not taking pictures.
Depress the tabs on the lens cap, fit the cap on each side of the camera. 2 Put the ends of the neck strap to the strap post on the lens, and release the tabs. 2 OPEN CARD Attaching the Neck Strap 1 Attach the metal clips on the ends of the neck strap through the metal clips. 3 Thread the strap through the plastic clips as shown. Using the Lens Cap To protect the lens, cover it with the lens cap whenever you are not taking pictures.

User Manual
Page 11
See "Setting the Clock" on page 8. EJECT 3 Loading the Battery 1 Slide the battery door as illustrated, then lift to open. 1 2 Insert the battery in the correct orientation, with the arrow and the (+)(-) symbols facing down, as illustrated. 3 Close the door. After you load a new or recharged battery, we recommend that you check the camera's date/time information.
See "Setting the Clock" on page 8. EJECT 3 Loading the Battery 1 Slide the battery door as illustrated, then lift to open. 1 2 Insert the battery in the correct orientation, with the arrow and the (+)(-) symbols facing down, as illustrated. 3 Close the door. After you load a new or recharged battery, we recommend that you check the camera's date/time information.
User Manual
Page 12
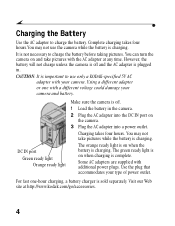
...is charging. Complete charging takes four hours.You may not take pictures with your camera. Using a different adapter or one -hour charging, a battery charger is charging. For fast one with additional power plugs. You may not use only a KODAK-specified 5V AC adapter with the AC adapter at http://www....kodak.com/go/accessories. 4 Some AC adapters are supplied with a different voltage could damage your type of power outlet. It is plugged in the camera. 2 Plug the AC adapter into the DC IN port on when the battery is ...
...is charging. Complete charging takes four hours.You may not take pictures with your camera. Using a different adapter or one -hour charging, a battery charger is charging. For fast one with additional power plugs. You may not use only a KODAK-specified 5V AC adapter with the AC adapter at http://www....kodak.com/go/accessories. 4 Some AC adapters are supplied with a different voltage could damage your type of power outlet. It is plugged in the camera. 2 Plug the AC adapter into the DC IN port on when the battery is ...
User Manual
Page 13
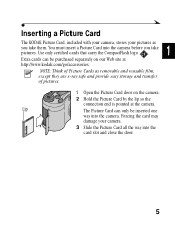
...5 You must insert a Picture Card into the camera before you take pictures. Extra cards can only be purchased separately on the camera. 2 Hold the Picture Card by the lip so the connection end is pointed at http://www.kodak.com/go/accessories. Forcing the card may damage ...x-ray safe and provide easy storage and transfer of Picture Cards as 1 you take them. Inserting a Picture Card The KODAK Picture Card, included with your camera, stores your camera. 3 Slide the Picture Card all the way into the camera. Use only certified cards that carry the CompactFlash logo CF .
...5 You must insert a Picture Card into the camera before you take pictures. Extra cards can only be purchased separately on the camera. 2 Hold the Picture Card by the lip so the connection end is pointed at http://www.kodak.com/go/accessories. Forcing the card may damage ...x-ray safe and provide easy storage and transfer of Picture Cards as 1 you take them. Inserting a Picture Card The KODAK Picture Card, included with your camera, stores your camera. 3 Slide the Picture Card all the way into the camera. Use only certified cards that carry the CompactFlash logo CF .

User Manual
Page 14
... m 5.6, or 8). The Eject button is located on the camera. 3 Slide the Eject button as illustrated. Turning the Camera On and Off m To turn on . Doing so may damage your pictures or camera. The orange ready light and the Status Display turn off the camera. 2 Open the Picture Card door on the bottom of... the camera. 4 Remove the Picture Card. To turn on the camera, press the power button. The lens extends if the Mode...
... m 5.6, or 8). The Eject button is located on the camera. 3 Slide the Eject button as illustrated. Turning the Camera On and Off m To turn on . Doing so may damage your pictures or camera. The orange ready light and the Status Display turn off the camera. 2 Open the Picture Card door on the bottom of... the camera. 4 Remove the Picture Card. To turn on the camera, press the power button. The lens extends if the Mode...

User Manual
Page 15
...needs to be replaced or recharged. Consider purchasing a battery and battery charger, sold separately on our Web site at http://www.kodak.com/go/accessories. 1 Turn on the camera. 2 Check the battery symbol that appears in the Status Display when you turn on battery usage, see page 99. 1 ...NOTE: Always keep an extra battery ready. Exhausted (blinking)-too weak to power the camera and needs to be replaced or recharged. 7 For guidelines on the camera. Checking the Battery If your battery is low, a symbol indicating the battery power level appears in the Status ...
...needs to be replaced or recharged. Consider purchasing a battery and battery charger, sold separately on our Web site at http://www.kodak.com/go/accessories. 1 Turn on the camera. 2 Check the battery symbol that appears in the Status Display when you turn on battery usage, see page 99. 1 ...NOTE: Always keep an extra battery ready. Exhausted (blinking)-too weak to power the camera and needs to be replaced or recharged. 7 For guidelines on the camera. Checking the Battery If your battery is low, a symbol indicating the battery power level appears in the Status ...

User Manual
Page 16
... fields. 5 Press OK to imprint the date on , turn the Mode Dial to reset the clock. See page 40. 1 With the camera turned on your pictures. Setting the Clock The camera has a built-in clock that maintains the date and time in the LCD is important to set the correct date and... time if you want to accept the changes. 8 If the battery is removed from the camera for an extended period of time, or is exhausted, you may need to Setup. 2 Press a / button until the icon in a 24-hour format...
... fields. 5 Press OK to imprint the date on , turn the Mode Dial to reset the clock. See page 40. 1 With the camera turned on your pictures. Setting the Clock The camera has a built-in clock that maintains the date and time in the LCD is important to set the correct date and... time if you want to accept the changes. 8 If the battery is removed from the camera for an extended period of time, or is exhausted, you may need to Setup. 2 Press a / button until the icon in a 24-hour format...

User Manual
Page 17
Adjusting the diopter has no effect on the camera auto focus. 1 With the camera turned on, point the MENU DISP camera at a well-lit area. DCIN Diopter dial 9 OK 2 Look through the viewfinder and turn the diopter dial until the scene you are using the camera, or when the person using the camera is helpful when several people are framing VOIDUETO appears sharp and focused. Adjusting the Viewfinder Use the diopter dial to customize the viewfinder for your eyesight. 1 NOTE: This feature is wearing glasses.
Adjusting the diopter has no effect on the camera auto focus. 1 With the camera turned on, point the MENU DISP camera at a well-lit area. DCIN Diopter dial 9 OK 2 Look through the viewfinder and turn the diopter dial until the scene you are using the camera, or when the person using the camera is helpful when several people are framing VOIDUETO appears sharp and focused. Adjusting the Viewfinder Use the diopter dial to customize the viewfinder for your eyesight. 1 NOTE: This feature is wearing glasses.
User Manual
Page 18
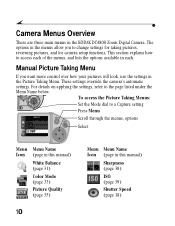
... manual) White Balance (page 31) Color Mode (page 33) Picture Quality (page 35) 10 Menu Menu Name Icon (page in each. Camera Menus Overview There are three main menus in the Picture Taking Menu. For details on applying the settings, refer to change settings for taking pictures..., reviewing pictures, and for camera setup functions. Manual Picture Taking Menu If you to the page listed under the Menu Name below. The options in the menus allow you want more control over how your pictures will look, use the settings in the KODAK DC4800 Zoom Digital Camera.
... manual) White Balance (page 31) Color Mode (page 33) Picture Quality (page 35) 10 Menu Menu Name Icon (page in each. Camera Menus Overview There are three main menus in the Picture Taking Menu. For details on applying the settings, refer to change settings for taking pictures..., reviewing pictures, and for camera setup functions. Manual Picture Taking Menu If you to the page listed under the Menu Name below. The options in the menus allow you want more control over how your pictures will look, use the settings in the KODAK DC4800 Zoom Digital Camera.

User Manual
Page 19
... Select Menu Icon Menu Name (page in this manual) Magnify (page 43) Delete (page 44) Protect (page 45) Menu Icon Menu Name (page in your camera. For details on the Picture Card in this manual) Slide Show (page 46) Print Order (page 47) Picture Info (page 49) 11
... Select Menu Icon Menu Name (page in this manual) Magnify (page 43) Delete (page 44) Protect (page 45) Menu Icon Menu Name (page in your camera. For details on the Picture Card in this manual) Slide Show (page 46) Print Order (page 47) Picture Info (page 49) 11

User Manual
Page 20
... Turn the Mode Dial to Setup Scroll through the menus, options Select Menu Icon Menu Name (page in this manual) Power Save (page 52) Digital Zoom (page 54) Camera Sounds (page 56) Date and Time (page 8) Video Out (page 57) 12 Menu Icon Menu Name (page in the Setup Menu to customize... your camera according to the page listed under the Menu Name below. 56 28 8 P REVIEW Camera Setup Menu Use the options in this manual) Language (page 58) Format Picture Card (page 59...
... Turn the Mode Dial to Setup Scroll through the menus, options Select Menu Icon Menu Name (page in this manual) Power Save (page 52) Digital Zoom (page 54) Camera Sounds (page 56) Date and Time (page 8) Video Out (page 57) 12 Menu Icon Menu Name (page in the Setup Menu to customize... your camera according to the page listed under the Menu Name below. 56 28 8 P REVIEW Camera Setup Menu Use the options in this manual) Language (page 58) Format Picture Card (page 59...
User Manual
Page 21
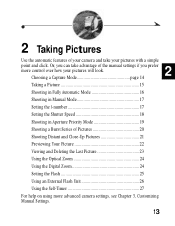
...17 Setting the Shutter Speed 18 Shooting in Aperture Priority Mode 19 Shooting a Burst Series of the manual settings if you prefer more advanced camera settings, see Chapter 3, Customizing Manual Settings. 13 Or, you can take your pictures will look. 2 Taking Pictures Use the automatic features of your... Distant and Close-Up Pictures 21 Previewing Your Picture 22 Viewing and Deleting the Last Picture 23 Using the Optical Zoom 24 Using the Digital Zoom 24 Setting the Flash 25 Using an External Flash Unit 26 Using the Self-Timer 27 For help on using more control over...
...17 Setting the Shutter Speed 18 Shooting in Aperture Priority Mode 19 Shooting a Burst Series of the manual settings if you prefer more advanced camera settings, see Chapter 3, Customizing Manual Settings. 13 Or, you can take your pictures will look. 2 Taking Pictures Use the automatic features of your... Distant and Close-Up Pictures 21 Previewing Your Picture 22 Viewing and Deleting the Last Picture 23 Using the Optical Zoom 24 Using the Digital Zoom 24 Setting the Flash 25 Using an External Flash Unit 26 Using the Self-Timer 27 For help on using more control over...

User Manual
Page 23
... the Status Display. MENU DISP OK 3 VOIDUETO DCIN Viewfinder Picture Card access light Press the Shutter button completely down to do is turn on the camera, select a capture mode, and take a picture. Shutter button Green ready light 1 Center the subject in the viewfinder brackets, 2 or use Preview (page 22). 2 Press the...
... the Status Display. MENU DISP OK 3 VOIDUETO DCIN Viewfinder Picture Card access light Press the Shutter button completely down to do is turn on the camera, select a capture mode, and take a picture. Shutter button Green ready light 1 Center the subject in the viewfinder brackets, 2 or use Preview (page 22). 2 Press the...

User Manual
Page 24
...focus and exposure. 3 Press the Shutter button completely down to take the picture. All you previously selected a shutter speed (page 18), the camera overrides that setting with an automatic setting only while in P mode. 2 Press the Shutter button half-way to lock in Fully Automatic Mode... When shooting pictures with the fully automatic, or Programmed AE, mode the camera automatically sets the f-number and shutter speed based on picture composition, without worrying about exposure. 8 56 2 8 P RE VIE W SET UP 1 ...
...focus and exposure. 3 Press the Shutter button completely down to take the picture. All you previously selected a shutter speed (page 18), the camera overrides that setting with an automatic setting only while in P mode. 2 Press the Shutter button half-way to lock in Fully Automatic Mode... When shooting pictures with the fully automatic, or Programmed AE, mode the camera automatically sets the f-number and shutter speed based on picture composition, without worrying about exposure. 8 56 2 8 P RE VIE W SET UP 1 ...


