

Extended user guide
Page 5
... 13 Deleting pictures from the frame 14 3 Troubleshooting and support 15 Learning more about your frame 15 Maintaining your frame 15 Upgrading your firmware 16 Picture frame problems 17 Identifying graphic messages 18 Identifying error messages 19 Setting automatic shut-off time 20 4 Appendix 21 Digital frame specifications 21 Important safety instructions 22 Limited warranty 23 www.kodak.com...
... 13 Deleting pictures from the frame 14 3 Troubleshooting and support 15 Learning more about your frame 15 Maintaining your frame 15 Upgrading your firmware 16 Picture frame problems 17 Identifying graphic messages 18 Identifying error messages 19 Setting automatic shut-off time 20 4 Appendix 21 Digital frame specifications 21 Important safety instructions 22 Limited warranty 23 www.kodak.com...

Extended user guide
Page 6
1 Getting started Welcome to your pictures couldn't be simpler! Viewing your KODAK EASYSHARE Digital Frame. Attaching the stand and faceplate Fit the stand into the slot and slide to a different slot. 3 2 1 1 www.kodak.com/go/support To adjust the display angle, move the stand to lock.
1 Getting started Welcome to your pictures couldn't be simpler! Viewing your KODAK EASYSHARE Digital Frame. Attaching the stand and faceplate Fit the stand into the slot and slide to a different slot. 3 2 1 1 www.kodak.com/go/support To adjust the display angle, move the stand to lock.
Extended user guide
Page 10
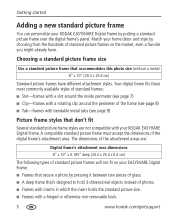
... inserts in which the insert holds the standard picture size. ■ Frames with your KODAK EASYHARE Digital Frame. A compatible standard picture frame must accept the dimensions of the digital frame's attachment area. Getting started Adding a new standard picture frame You can personalize your KODAK EASYSHARE Digital Frame by choosing from the hundreds of standard picture frames on your EASYSHARE Digital Frame. ■ Frames that secure a photo by pressing it between two...
... inserts in which the insert holds the standard picture size. ■ Frames with your KODAK EASYHARE Digital Frame. A compatible standard picture frame must accept the dimensions of the digital frame's attachment area. Getting started Adding a new standard picture frame You can personalize your KODAK EASYSHARE Digital Frame by choosing from the hundreds of standard picture frames on your EASYSHARE Digital Frame. ■ Frames that secure a photo by pressing it between two...
Extended user guide
Page 11
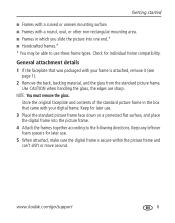
... glass. www.kodak.com/go/support 6 Check for later use these frame types. Use CAUTION when handling the glass, the edges are sharp. Store the original faceplate and contents of the standard picture frame in which you slide the picture into the picture frame. 4 Attach the frames together according to use . 5 When attached, make sure the digital frame is attached...
... glass. www.kodak.com/go/support 6 Check for later use these frame types. Use CAUTION when handling the glass, the edges are sharp. Store the original faceplate and contents of the standard picture frame in which you slide the picture into the picture frame. 4 Attach the frames together according to use . 5 When attached, make sure the digital frame is attached...
Extended user guide
Page 12
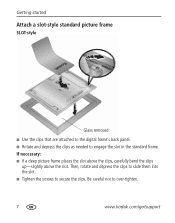
Be careful not to secure the clips. If necessary: ■ If a deep picture frame places the slot above the clips, carefully bend the clips up-slightly above the slot. Then, rotate and depress the clips to slide them into the slot. ■ Tighten the screws to over-tighten. 7 www.kodak.com/go/support Getting started Attach a slot-style standard picture frame SLOT-style Glass removed ■ Use the clips that are attached to the digital frame's back panel. ■ Rotate and depress the clips as needed to engage the slot in the standard frame.
Be careful not to secure the clips. If necessary: ■ If a deep picture frame places the slot above the clips, carefully bend the clips up-slightly above the slot. Then, rotate and depress the clips to slide them into the slot. ■ Tighten the screws to over-tighten. 7 www.kodak.com/go/support Getting started Attach a slot-style standard picture frame SLOT-style Glass removed ■ Use the clips that are attached to the digital frame's back panel. ■ Rotate and depress the clips as needed to engage the slot in the standard frame.
Extended user guide
Page 13
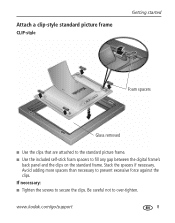
Be careful not to secure the clips. If necessary: ■ Tighten the screws to over-tighten. Stack the spacers if necessary. Avoid adding more spacers than necessary to fill any gap between the digital frame's back panel and the clips on the standard frame. www.kodak.com/go/support 8 Attach a clip-style standard picture frame CLIP-style Getting started Foam spacers Glass removed ■ Use the clips that are attached to the standard picture frame. ■ Use the included self-stick foam spacers to prevent excessive force against the clips.
Be careful not to secure the clips. If necessary: ■ Tighten the screws to over-tighten. Stack the spacers if necessary. Avoid adding more spacers than necessary to fill any gap between the digital frame's back panel and the clips on the standard frame. www.kodak.com/go/support 8 Attach a clip-style standard picture frame CLIP-style Getting started Foam spacers Glass removed ■ Use the clips that are attached to the standard picture frame. ■ Use the included self-stick foam spacers to prevent excessive force against the clips.

Extended user guide
Page 14
Getting started Attach a bendable metal tab-style standard picture frame TAB-style Foam spacers Glass removed ■ Bend the metal tabs down to secure the digital frame to the standard frame. ■ If necessary, use the included self-stick foam spacers to fill any gap between the digital frame's back panel and the metal tabs. 9 www.kodak.com/go/support
Getting started Attach a bendable metal tab-style standard picture frame TAB-style Foam spacers Glass removed ■ Bend the metal tabs down to secure the digital frame to the standard frame. ■ If necessary, use the included self-stick foam spacers to fill any gap between the digital frame's back panel and the metal tabs. 9 www.kodak.com/go/support

Extended user guide
Page 26
XD; 4 Appendix Digital frame specifications For more specifications, visit www.kodak.com/go /support Output: 5V DC 1.5 Amp Communication USB 2.0 High Speed Type A with USB devices Picture formats JPEG, EXIF 2.2 Memory cards see page 4 Temperature Top card slot: SD (SECURE DIGITAL); MS (MEMORY ...512 MB Manufacturer, Model #: Malata MPA-05015, EIAJ class 2 DC plug Input: 100-240V AC 50/60 Hz. KODAK EASYSHARE D825 Digital Frame / Decor Series Color display 20.3 cm (8 in.) diagonal digital LCD, 800 x 600 pixels, 4:3 aspect ratio, 16.2 x 12.2 cm (6.4 x 4.8 in .) without faceplate ...
XD; 4 Appendix Digital frame specifications For more specifications, visit www.kodak.com/go /support Output: 5V DC 1.5 Amp Communication USB 2.0 High Speed Type A with USB devices Picture formats JPEG, EXIF 2.2 Memory cards see page 4 Temperature Top card slot: SD (SECURE DIGITAL); MS (MEMORY ...512 MB Manufacturer, Model #: Malata MPA-05015, EIAJ class 2 DC plug Input: 100-240V AC 50/60 Hz. KODAK EASYSHARE D825 Digital Frame / Decor Series Color display 20.3 cm (8 in.) diagonal digital LCD, 800 x 600 pixels, 4:3 aspect ratio, 16.2 x 12.2 cm (6.4 x 4.8 in .) without faceplate ...


