

User Manual
Page 6
Table of contents Changing frame settings 29 Settings menus 29 Upgrading your firmware (recommended 32 Maintaining your frame 33 Learning more about your frame 33 5 Troubleshooting and support 34 Picture frame problems 34 Screen messages 37 6 Appendix 39 Digital frame specifications 39 Important safety instructions 40 Upgrading your software and firmware 40 Additional care and maintenance 41 Limited warranty 41 Regulatory compliance and advisory 43 iv www.kodak.com/go/support
Table of contents Changing frame settings 29 Settings menus 29 Upgrading your firmware (recommended 32 Maintaining your frame 33 Learning more about your frame 33 5 Troubleshooting and support 34 Picture frame problems 34 Screen messages 37 6 Appendix 39 Digital frame specifications 39 Important safety instructions 40 Upgrading your software and firmware 40 Additional care and maintenance 41 Limited warranty 41 Regulatory compliance and advisory 43 iv www.kodak.com/go/support
User Manual
Page 7
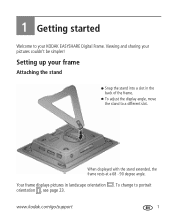
Viewing and sharing your KODAK EASYSHARE Digital Frame. Your frame displays pictures in the back of the frame. www.kodak.com/go/support 1 Setting up your frame Attaching the stand Snap the stand into a slot in landscape orientation . When displayed with the stand extended, the frame rests at a 68 - 90 degree angle. 1 Getting started Welcome to a different slot. To adjust the display angle, move the stand to your pictures couldn't be simpler! To change to portrait orientation , see page 23.
Viewing and sharing your KODAK EASYSHARE Digital Frame. Your frame displays pictures in the back of the frame. www.kodak.com/go/support 1 Setting up your frame Attaching the stand Snap the stand into a slot in landscape orientation . When displayed with the stand extended, the frame rests at a 68 - 90 degree angle. 1 Getting started Welcome to a different slot. To adjust the display angle, move the stand to your pictures couldn't be simpler! To change to portrait orientation , see page 23.

User Manual
Page 15
Attaching the included faceplate Getting started To attach To remove You can also personalize your KODAK EASYSHARE Digital Frame by putting a standard picture frame over the digital frame's panel. www.kodak.com/go/support 9 See Adding a new standard picture frame, page 24.
Attaching the included faceplate Getting started To attach To remove You can also personalize your KODAK EASYSHARE Digital Frame by putting a standard picture frame over the digital frame's panel. www.kodak.com/go/support 9 See Adding a new standard picture frame, page 24.

User Manual
Page 18
Changing viewing modes Press the Mode button for quick access to the next mode. Each time you turn off the frame or change the duration (how long each picture stays on the other . Collage-multiple pictures in your frame: Pictures & Videos, Collage, Clock, and Calendar. Viewing pictures ■ You can change modes. Clock-a clock with today's date highlighted is displayed on your current picture source play on the screen) and transition style between pictures. Mode button Single picture (default) Collage (6 pictures) Calendar/picture Clock/picture Viewing Modes Pictures (...
Changing viewing modes Press the Mode button for quick access to the next mode. Each time you turn off the frame or change the duration (how long each picture stays on the other . Collage-multiple pictures in your frame: Pictures & Videos, Collage, Clock, and Calendar. Viewing pictures ■ You can change modes. Clock-a clock with today's date highlighted is displayed on your current picture source play on the screen) and transition style between pictures. Mode button Single picture (default) Collage (6 pictures) Calendar/picture Clock/picture Viewing Modes Pictures (...
User Manual
Page 25
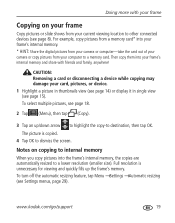
... Menu →Settings →Automatic resizing (see page 15). The picture is unnecessary for viewing and quickly fills up /down arrow to highlight the copy-to dismiss the screen. Full resolution is copied. 4 Tap OK to destination, then tap OK. Then copy them into the frame's internal memory, the copies are automatically resized to a memory card. For example, copy pictures from a memory card* into your frame's internal memory. * HINT: Share the digital pictures from your camera...
... Menu →Settings →Automatic resizing (see page 15). The picture is unnecessary for viewing and quickly fills up /down arrow to highlight the copy-to dismiss the screen. Full resolution is copied. 4 Tap OK to destination, then tap OK. Then copy them into the frame's internal memory, the copies are automatically resized to a memory card. For example, copy pictures from a memory card* into your frame's internal memory. * HINT: Share the digital pictures from your camera...

User Manual
Page 27
... software . Download EASYSHARE Digital Display Software Download and install the latest version of a multimedia slide show (WINDOWS OS only). The software icon appears on your operating system, then follow the screen directions to download and install KODAK EASYSHARE Digital Display Software. Doing more with your frame Creating and playing a multimedia slide show Use KODAK EASYSHARE Digital Display Software on your computer to create a multimedia slide show (if included) do not support audio or video playback. When prompted, take a few minutes to electronically...
... software . Download EASYSHARE Digital Display Software Download and install the latest version of a multimedia slide show (WINDOWS OS only). The software icon appears on your operating system, then follow the screen directions to download and install KODAK EASYSHARE Digital Display Software. Doing more with your frame Creating and playing a multimedia slide show Use KODAK EASYSHARE Digital Display Software on your computer to create a multimedia slide show (if included) do not support audio or video playback. When prompted, take a few minutes to electronically...
User Manual
Page 30
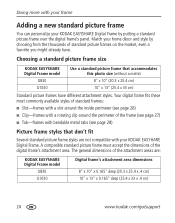
... décor and style by putting a standard picture frame over the digital frame's panel. Choosing a standard picture frame size KODAK EASYSHARE Digital Frame model D830 D1030 Use a standard picture frame that don't fit Several standard picture frame styles are : KODAK EASYSHARE Digital Frame model D830 D1030 Digital frame's attachment area dimensions 8" x 10" x 0.165" deep (20.3 x 25.4 x .4 cm) 10" x 13" x 0.165" deep (25.4 x 33 x .4 cm) 24 www.kodak.com/go/support Your digital frame fits these most commonly available styles of...
... décor and style by putting a standard picture frame over the digital frame's panel. Choosing a standard picture frame size KODAK EASYSHARE Digital Frame model D830 D1030 Use a standard picture frame that don't fit Several standard picture frame styles are : KODAK EASYSHARE Digital Frame model D830 D1030 Digital frame's attachment area dimensions 8" x 10" x 0.165" deep (20.3 x 25.4 x .4 cm) 10" x 13" x 0.165" deep (25.4 x 33 x .4 cm) 24 www.kodak.com/go/support Your digital frame fits these most commonly available styles of...
User Manual
Page 31
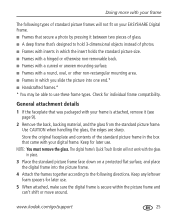
... picture frame in the box that 's designed to hold 3-dimensional objects instead of glass. ■ A deep frame that came with your digital frame. Keep for individual frame compatibility. www.kodak.com/go/support 25 Doing more with your frame The following types of standard picture frames will not work with your frame is secure within the picture frame and can't shift or move around. NOTE: You must remove...
... picture frame in the box that 's designed to hold 3-dimensional objects instead of glass. ■ A deep frame that came with your digital frame. Keep for individual frame compatibility. www.kodak.com/go/support 25 Doing more with your frame The following types of standard picture frames will not work with your frame is secure within the picture frame and can't shift or move around. NOTE: You must remove...
User Manual
Page 32
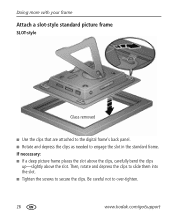
Be careful not to engage the slot in the standard frame. If necessary: ■ If a deep picture frame places the slot above the clips, carefully bend the clips up-slightly above the slot. Doing more with your frame Attach a slot-style standard picture frame SLOT-style Glass removed ■ Use the clips that are attached to the digital frame's back panel. ■ Rotate and depress the clips as needed to over-tighten. 26 www.kodak.com/go/support Then, rotate and depress the clips to slide them into the slot. ■ Tighten the screws to secure the clips.
Be careful not to engage the slot in the standard frame. If necessary: ■ If a deep picture frame places the slot above the clips, carefully bend the clips up-slightly above the slot. Doing more with your frame Attach a slot-style standard picture frame SLOT-style Glass removed ■ Use the clips that are attached to the digital frame's back panel. ■ Rotate and depress the clips as needed to over-tighten. 26 www.kodak.com/go/support Then, rotate and depress the clips to slide them into the slot. ■ Tighten the screws to secure the clips.
User Manual
Page 33
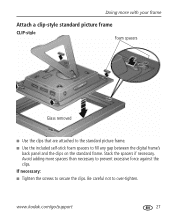
If necessary: ■ Tighten the screws to over-tighten. Be careful not to secure the clips. www.kodak.com/go/support 27 Avoid adding more with your frame Attach a clip-style standard picture frame CLIP-style Foam spacers Glass removed ■ Use the clips that are attached to the standard picture frame. ■ Use the included self-stick foam spacers to fill any gap between the digital frame's back panel and the clips on the standard frame. Doing more spacers than necessary to prevent excessive force against the clips. Stack the spacers if necessary.
If necessary: ■ Tighten the screws to over-tighten. Be careful not to secure the clips. www.kodak.com/go/support 27 Avoid adding more with your frame Attach a clip-style standard picture frame CLIP-style Foam spacers Glass removed ■ Use the clips that are attached to the standard picture frame. ■ Use the included self-stick foam spacers to fill any gap between the digital frame's back panel and the clips on the standard frame. Doing more spacers than necessary to prevent excessive force against the clips. Stack the spacers if necessary.
User Manual
Page 34
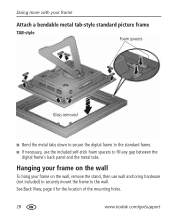
... anchoring hardware (not included) to securely mount the frame to fill any gap between the digital frame's back panel and the metal tabs. See Back View, page ii for the location of the mounting holes. 28 www.kodak.com/go/support Hanging your frame on the wall, remove the stand, then use the included self-stick foam spacers to the...
... anchoring hardware (not included) to securely mount the frame to fill any gap between the digital frame's back panel and the metal tabs. See Back View, page ii for the location of the mounting holes. 28 www.kodak.com/go/support Hanging your frame on the wall, remove the stand, then use the included self-stick foam spacers to the...
User Manual
Page 35
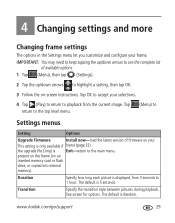
.... 4 Tap (Play) to return to the main menu. the upgrade file (.img) is Exit-return to playback from 3 seconds to highlight a setting, then tap OK. 3 Follow the on an inserted memory card or flash drive, or copied into internal memory). present on the frame (on -screen instructions. www.kodak.com/go/support 29 The default is Random. Transition Specify the transition style between pictures during playback. 4 Changing settings and more Changing frame settings The options...
.... 4 Tap (Play) to return to the main menu. the upgrade file (.img) is Exit-return to playback from 3 seconds to highlight a setting, then tap OK. 3 Follow the on an inserted memory card or flash drive, or copied into internal memory). present on the frame (on -screen instructions. www.kodak.com/go/support 29 The default is Random. Transition Specify the transition style between pictures during playback. 4 Changing settings and more Changing frame settings The options...

User Manual
Page 37
... the pictures on the screen. Z - Clock & Date See Setting the clock, date, and timer, page 6. Day-set the current time. Exit Return to A. www.kodak.com/go/support 31 About this setting. Changing settings and more Setting Options Fit or Fill Specify how to look their best on your frame. Fill (default)-the picture fills the entire screen; Display Picture Order By Old to new (default)-start play with no actions performed or saved...
... the pictures on the screen. Z - Clock & Date See Setting the clock, date, and timer, page 6. Day-set the current time. Exit Return to A. www.kodak.com/go/support 31 About this setting. Changing settings and more Setting Options Fit or Fill Specify how to look their best on your frame. Fill (default)-the picture fills the entire screen; Display Picture Order By Old to new (default)-start play with no actions performed or saved...
User Manual
Page 42
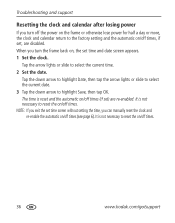
... or more, the clock and calendar return to the factory setting and the automatic on/off times, if set, are re-enabled. Troubleshooting and support Resetting the clock and calendar after losing power If you turn the frame back on, the set time screen without setting the time, you can manually reset the clock and re-enable the automatic on/off times (see page 6). Tap the arrow lights or slide to highlight Save, then tap...
... or more, the clock and calendar return to the factory setting and the automatic on/off times, if set, are re-enabled. Troubleshooting and support Resetting the clock and calendar after losing power If you turn the frame back on, the set time screen without setting the time, you can manually reset the clock and re-enable the automatic on/off times (see page 6). Tap the arrow lights or slide to highlight Save, then tap...

User Manual
Page 45
6 Appendix Digital frame specifications For more specifications, visit www.kodak.com/go /support 39 MS (MEMORY STICK); MMC (MULTIMEDIA Card); XD Bottom card slot: MS (MEMORY STICK) Pro/Pro Duo Operating: 32 to 122° F (0 to 50° C) Storage: -4 to 140° F (-20 to 60° C) www.kodak.com/go /digitalframesupport. KODAK EASYSHARE D830/D1030 Digital Frames Color display D830 20.3 cm (8 in.) diagonal digital LCD, 800 x 600 pixels, 4:3 aspect ratio, 16...
6 Appendix Digital frame specifications For more specifications, visit www.kodak.com/go /support 39 MS (MEMORY STICK); MMC (MULTIMEDIA Card); XD Bottom card slot: MS (MEMORY STICK) Pro/Pro Duo Operating: 32 to 122° F (0 to 50° C) Storage: -4 to 140° F (-20 to 60° C) www.kodak.com/go /digitalframesupport. KODAK EASYSHARE D830/D1030 Digital Frames Color display D830 20.3 cm (8 in.) diagonal digital LCD, 800 x 600 pixels, 4:3 aspect ratio, 16...

User Manual
Page 46
... D830: 843 gm (1.9 lb.) includes frame, stand, and AC adapter (w/o faceplate) D1030: 1227 gm (2.6 lb.) includes frame, stand, and AC adapter Important safety instructions CAUTION: Do not disassemble this product to shock and/or electrical or mechanical hazards. KODAK AC Adapters and Battery Chargers are no user-serviceable parts inside. See page 32 for indoor use of the KODAK EASYSHARE Software and the frame firmware- Appendix KODAK EASYSHARE D830/D1030 Digital Frames Size D830: 25.3 x 20.2 x 3.5 cm...
... D830: 843 gm (1.9 lb.) includes frame, stand, and AC adapter (w/o faceplate) D1030: 1227 gm (2.6 lb.) includes frame, stand, and AC adapter Important safety instructions CAUTION: Do not disassemble this product to shock and/or electrical or mechanical hazards. KODAK AC Adapters and Battery Chargers are no user-serviceable parts inside. See page 32 for indoor use of the KODAK EASYSHARE Software and the frame firmware- Appendix KODAK EASYSHARE D830/D1030 Digital Frames Size D830: 25.3 x 20.2 x 3.5 cm...
User Manual
Page 47
... www.kodak.com/go /support 41 You may contain remanufactured materials. Appendix Additional care and maintenance ■ To clean the frame or screen, use a soft, lint-free cloth dampened with lens cleaning solution or a water-based cleaning solution Use light pressure. ■ Do not allow chemicals, such as any necessary adjustments and/or replacement parts. In the US, visit the Electronics...
... www.kodak.com/go /support 41 You may contain remanufactured materials. Appendix Additional care and maintenance ■ To clean the frame or screen, use a soft, lint-free cloth dampened with lens cleaning solution or a water-based cleaning solution Use light pressure. ■ Do not allow chemicals, such as any necessary adjustments and/or replacement parts. In the US, visit the Electronics...
User Manual
Page 53
... mode, 13 www.kodak.com/go/support 1 copying automatic resizing, 19, 30 from computer, camera, 19 to frame's internal memory, 19 D default play location, saving, 15 delete pictures, 20 display picture order by, 31 display pictures, fit/fill, 31 disposal, recycling, 41 download, EASYSHARE Digital Display Software, 21 duration, picture display, 29 E EASYSHARE Digital Display Software create slide show, 21 download, install, 21 error messages, 37 F faceplate, attaching, 9 file formats, pictures, 39 firmware, upgrading, 29, 32, 40 fit or fill display, 31 flash drive, connecting, 8 format cards...
... mode, 13 www.kodak.com/go/support 1 copying automatic resizing, 19, 30 from computer, camera, 19 to frame's internal memory, 19 D default play location, saving, 15 delete pictures, 20 display picture order by, 31 display pictures, fit/fill, 31 disposal, recycling, 41 download, EASYSHARE Digital Display Software, 21 duration, picture display, 29 E EASYSHARE Digital Display Software create slide show, 21 download, install, 21 error messages, 37 F faceplate, attaching, 9 file formats, pictures, 39 firmware, upgrading, 29, 32, 40 fit or fill display, 31 flash drive, connecting, 8 format cards...
User Manual
Page 54
... www.kodak.com/go -to play location, 15 H help frame, 34 support URLs, 33 troubleshooting and support, 34 I installing EASYSHARE Digital Display Software, 21 included faceplate, 9 memory cards, 8 standard picture frame, 24 internal memory capacity, 39 copying to internal memory, 19 deleting, 20 display order, 11 location, viewing, 11 selecting more than one, 18 thumbnails, 14 viewing single, 15 pictures menu, 11, 16 play location, default, 15 portrait, set orientation, 23 language, setting, 6 locked screen, reset, 35 48 M memory card. Index specifications, 39 troubleshooting, 34 turn on/off...
... www.kodak.com/go -to play location, 15 H help frame, 34 support URLs, 33 troubleshooting and support, 34 I installing EASYSHARE Digital Display Software, 21 included faceplate, 9 memory cards, 8 standard picture frame, 24 internal memory capacity, 39 copying to internal memory, 19 deleting, 20 display order, 11 location, viewing, 11 selecting more than one, 18 thumbnails, 14 viewing single, 15 pictures menu, 11, 16 play location, default, 15 portrait, set orientation, 23 language, setting, 6 locked screen, reset, 35 48 M memory card. Index specifications, 39 troubleshooting, 34 turn on/off...

User Manual
Page 55
..., 21 starting point, 30 slide to select, 5 software, upgrading, 40 source, picture location, 11 specifications, frame, 39 stand, attaching, 1 stand, changing position, 23 standard picture frame, adding, 24 storage capacity, internal memory, 39 T tap to select, 5 thumb drive. power button, i, 3 connecting, 2 specifications, 39 Q quick touch border, 4 R recycling, disposal, 41 regulatory compliance, 43 reset frame, 35 S safety information, 40 screen cleaning, 33, 41 error messages, 37 selecting menus and pictures, 4 multiple pictures, 18 setting auto on frame, 3 U upgrading 49 See flash drive.
..., 21 starting point, 30 slide to select, 5 software, upgrading, 40 source, picture location, 11 specifications, frame, 39 stand, attaching, 1 stand, changing position, 23 standard picture frame, adding, 24 storage capacity, internal memory, 39 T tap to select, 5 thumb drive. power button, i, 3 connecting, 2 specifications, 39 Q quick touch border, 4 R recycling, disposal, 41 regulatory compliance, 43 reset frame, 35 S safety information, 40 screen cleaning, 33, 41 error messages, 37 selecting menus and pictures, 4 multiple pictures, 18 setting auto on frame, 3 U upgrading 49 See flash drive.


