Owner Manual North America
Page 5
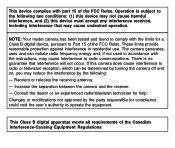
.... Changes or modifications not approved by the following two conditions: (1) this device may not cause harmful interference, and (2) this camera does cause interference to radio or television reception, which can radiate radio frequency energy and, if not used in residential use. Consult... FCC Rules. If this device must accept any interference received, including interference that interference will not occur. Increase the separation between the camera and the receiver. - There is subject to the following : - This device complies with the limits for a Class B digital device...
.... Changes or modifications not approved by the following two conditions: (1) this device may not cause harmful interference, and (2) this camera does cause interference to radio or television reception, which can radiate radio frequency energy and, if not used in residential use. Consult... FCC Rules. If this device must accept any interference received, including interference that interference will not occur. Increase the separation between the camera and the receiver. - There is subject to the following : - This device complies with the limits for a Class B digital device...

Owner Manual North America
Page 6
ENGLISH KODAK ADVANTIX C700 Zoom Camera Welcome to the innovative world of purchase. © Eastman Kodak Company, 1998 1 NEED HELP WITH YOUR CAMERA? And thank you call (416) 766-8233, ext. 36100. Kodak (Canada only) from 9:00 a.m. When you for the Toronto area, call , please have your ...Friday at 1 (800) 465-6325, ext. 36100; For warranty purposes, please keep your camera available. to our web site at http://www.kodak.com or call: Kodak (USA only) from 8:00 a.m. for buying this KODAK ADVANTIX Camera. Go to 7:00 p.m. (Eastern time) Monday through Friday at 1 (800) 242-2424...
ENGLISH KODAK ADVANTIX C700 Zoom Camera Welcome to the innovative world of purchase. © Eastman Kodak Company, 1998 1 NEED HELP WITH YOUR CAMERA? And thank you call (416) 766-8233, ext. 36100. Kodak (Canada only) from 9:00 a.m. When you for the Toronto area, call , please have your ...Friday at 1 (800) 465-6325, ext. 36100; For warranty purposes, please keep your camera available. to our web site at http://www.kodak.com or call: Kodak (USA only) from 8:00 a.m. for buying this KODAK ADVANTIX Camera. Go to 7:00 p.m. (Eastern time) Monday through Friday at 1 (800) 242-2424...

Owner Manual North America
Page 7
...the back of high-speed film for indoors verses low-speed film for outdoors. Picture quality information exchange (PQix) • Your camera features magnetic information exchange that records information about accidentally re-exposing your prints. When you with color correction and exposure adjustments, providing ...you reload the film cassette into the camera, the magnetic Information Exchange (ix) technology of the roll and reload it later to match each member uses their own film...
...the back of high-speed film for indoors verses low-speed film for outdoors. Picture quality information exchange (PQix) • Your camera features magnetic information exchange that records information about accidentally re-exposing your prints. When you with color correction and exposure adjustments, providing ...you reload the film cassette into the camera, the magnetic Information Exchange (ix) technology of the roll and reload it later to match each member uses their own film...
Owner Manual North America
Page 8
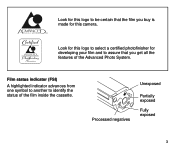
Look for developing your film and to assure that the film you get all the features of the film inside the cassette. Film status indicator (FSI) A highlighted indicator advances from one symbol to another to identify the status of the Advanced Photo System. Unexposed 12 4 3 Processed negatives Partially exposed Fully exposed 3 Look for this logo to be certain that you buy is made for this logo to select a certified photofinisher for this camera.
Look for developing your film and to assure that the film you get all the features of the film inside the cassette. Film status indicator (FSI) A highlighted indicator advances from one symbol to another to identify the status of the Advanced Photo System. Unexposed 12 4 3 Processed negatives Partially exposed Fully exposed 3 Look for this logo to be certain that you buy is made for this logo to select a certified photofinisher for this camera.

Owner Manual North America
Page 9
CONTENTS CAMERA IDENTIFICATION 5 ATTACHING THE STRAP 6 LOADING THE BATTERY 6 Low-battery indicator 7 Battery tips 7 Power shut-off 7 LOADING THE FILM 8 TAKING PICTURES 9 Typical print sizes (formats 10 Using the zoom lens 10 TAKING FLASH PICTURES 11 Flash-lamp signals 11 Flash-to-subject distance 12 SELECTING FLASH MODES AND INFINITY-FOCUS MODE 12... IMPRINTING 17 ROLL TITLE IMPRINTING 17 Title-select list 18 UNLOADING THE FILM 19 Automatic rewind 19 Mid-roll change (MRC 20 CARING FOR YOUR CAMERA 20 TROUBLESHOOTING 21 SPECIFICATIONS 23 4
CONTENTS CAMERA IDENTIFICATION 5 ATTACHING THE STRAP 6 LOADING THE BATTERY 6 Low-battery indicator 7 Battery tips 7 Power shut-off 7 LOADING THE FILM 8 TAKING PICTURES 9 Typical print sizes (formats 10 Using the zoom lens 10 TAKING FLASH PICTURES 11 Flash-lamp signals 11 Flash-to-subject distance 12 SELECTING FLASH MODES AND INFINITY-FOCUS MODE 12... IMPRINTING 17 ROLL TITLE IMPRINTING 17 Title-select list 18 UNLOADING THE FILM 19 Automatic rewind 19 Mid-roll change (MRC 20 CARING FOR YOUR CAMERA 20 TROUBLESHOOTING 21 SPECIFICATIONS 23 4

Owner Manual North America
Page 10
... the front and back cover flaps of manual for camera diagrams.) 1 ZOOM-DIAL LEVER 2 SHUTTER BUTTON 3 LENS COVER/FLASH 4 FORMAT-SELECTOR BUTTON 5 VIEWFINDER 6 LIGHT SENSOR 7 LENS 8 SELF-TIMER LAMP 9 AUTO-FOCUS SENSORS 10 STRAP POST 11 BATTERY DOOR 12 VIEWFINDER EYEPIECE 13 FLASH/CAMERA-READY LAMP 14 LCD PANEL 15 FILM DOOR 16...
... the front and back cover flaps of manual for camera diagrams.) 1 ZOOM-DIAL LEVER 2 SHUTTER BUTTON 3 LENS COVER/FLASH 4 FORMAT-SELECTOR BUTTON 5 VIEWFINDER 6 LIGHT SENSOR 7 LENS 8 SELF-TIMER LAMP 9 AUTO-FOCUS SENSORS 10 STRAP POST 11 BATTERY DOOR 12 VIEWFINDER EYEPIECE 13 FLASH/CAMERA-READY LAMP 14 LCD PANEL 15 FILM DOOR 16...
Owner Manual North America
Page 11
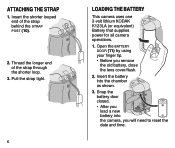
Pull the strap tight. 6 LOADING THE BATTERY This camera uses one 3-volt lithium KODAK K123LA (or equivalent) Battery that supplies power for all camera operations. 1. Thread the longer end of the strap behind the STRAP POST (10). 2. Insert the battery into the camera, you remove the old battery, close the lens cover/flash. 2. Open the...
Pull the strap tight. 6 LOADING THE BATTERY This camera uses one 3-volt lithium KODAK K123LA (or equivalent) Battery that supplies power for all camera operations. 1. Thread the longer end of the strap behind the STRAP POST (10). 2. Insert the battery into the camera, you remove the old battery, close the lens cover/flash. 2. Open the...

Owner Manual North America
Page 12
...; none of the indicators, except for more than 60 seconds. You can press the shutter button, zoom control, film-rewind, mode buttons or rewind button to use. Power shut-off To save battery power, the camera will automatically go into a sleep mode if it to high temperature or fire. • Store batteries...
...; none of the indicators, except for more than 60 seconds. You can press the shutter button, zoom control, film-rewind, mode buttons or rewind button to use. Power shut-off To save battery power, the camera will automatically go into a sleep mode if it to high temperature or fire. • Store batteries...
Owner Manual North America
Page 13
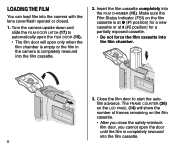
... cassette. • After you close the safety-interlock film door, you cannot open only when the film chamber is empty or the film in the camera is completely rewound into the film cassette. 2. The FRAME COUNTER (26) on the film cassette is completely rewound into the film chamber. 3. Make ... (#2 position) for a partially exposed cassette. • Do not force the film cassette into the film cassette. 8 Insert the film cassette completely into the camera with the lens cover/flash opened or closed. 1. LOADING THE FILM You can load film into the FILM CHAMBER (16). Turn the...
... cassette. • After you close the safety-interlock film door, you cannot open only when the film chamber is empty or the film in the camera is completely rewound into the film cassette. 2. The FRAME COUNTER (26) on the film cassette is completely rewound into the film chamber. 3. Make ... (#2 position) for a partially exposed cassette. • Do not force the film cassette into the film cassette. 8 Insert the film cassette completely into the camera with the lens cover/flash opened or closed. 1. LOADING THE FILM You can load film into the FILM CHAMBER (16). Turn the...
Owner Manual North America
Page 14
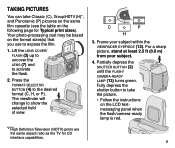
... (P) pictures on the same film cassette (see the table on the following page for CD interface capabilities. Partially depress the SHUTTER BUTTON (2) until the FLASH/ CAMERA-READY LAMP (13) turns green. TAKING PICTURES You can take the picture. • Follow the instructions on the format sizes(s) that you use to expose... aspect ratio as the TV for Typical print sizes). CH P C P H 3. Your photo-processing cost may be based on the LCD textmessaging panel when the flash/camera-ready lamp is red.
... (P) pictures on the same film cassette (see the table on the following page for CD interface capabilities. Partially depress the SHUTTER BUTTON (2) until the FLASH/ CAMERA-READY LAMP (13) turns green. TAKING PICTURES You can take the picture. • Follow the instructions on the format sizes(s) that you use to expose... aspect ratio as the TV for Typical print sizes). CH P C P H 3. Your photo-processing cost may be based on the LCD textmessaging panel when the flash/camera-ready lamp is red.
Owner Manual North America
Page 15
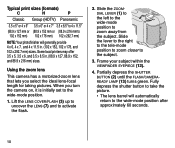
.... 10 When you select the ideal lens-focal length for taking pictures. Slide the lever to the right to the tele-mode position to zoom closer to zoom away from the subject. Fully depress the shutter button to take the picture. • The lens barrel will generally provide 4 x 6, 4 x 7 ...88.9 x 152, and 88.9 x 216 mm) sizes. Frame your subject within the VIEWFINDER EYEPIECE (12). 4. Using the zoom lens This camera has a motorized-zoom lens that lets you turn the camera on, it is initially set to activate the flash. 2. Lift the LENS COVER/FLASH (3) up to uncover the LENS (7)...
.... 10 When you select the ideal lens-focal length for taking pictures. Slide the lever to the right to the tele-mode position to zoom closer to zoom away from the subject. Fully depress the shutter button to take the picture. • The lens barrel will generally provide 4 x 6, 4 x 7 ...88.9 x 152, and 88.9 x 216 mm) sizes. Frame your subject within the VIEWFINDER EYEPIECE (12). 4. Using the zoom lens This camera has a motorized-zoom lens that lets you turn the camera on, it is initially set to activate the flash. 2. Lift the LENS COVER/FLASH (3) up to uncover the LENS (7)...
Owner Manual North America
Page 16
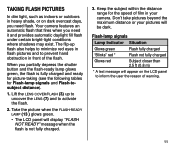
When you need flash. Don't take pictures beyond the maximum distance or your camera. Flash-lamp signals Lamp Indicator Situation Glows green Flash fully charged "Blinks" red * Flash not fully charged Glows red Subject closer than 2.5 ft (0.8 m) * A text message ..." message when the flash is fully charged and ready for picture-taking (see the following tables for Flash-lamp signals and Flash-tosubject distance). 1. Your camera features an automatic flash that fires when you partially depress the shutter button and the flash-ready lamp glows green, the flash is not fully...
When you need flash. Don't take pictures beyond the maximum distance or your camera. Flash-lamp signals Lamp Indicator Situation Glows green Flash fully charged "Blinks" red * Flash not fully charged Glows red Subject closer than 2.5 ft (0.8 m) * A text message ..." message when the flash is fully charged and ready for picture-taking (see the following tables for Flash-lamp signals and Flash-tosubject distance). 1. Your camera features an automatic flash that fires when you partially depress the shutter button and the flash-ready lamp glows green, the flash is not fully...

Owner Manual North America
Page 19
... a quartz clock and automatic calendar through the year 2099. Setting the date and time 1. The first two digits of the camera will "blink." Place the camera on the front of the date (indicating the month) will blink during the self-timer countdown. • To cancel the self-...lenscover flash. • The self-timer is automatically canceled after you press the shutter button. 1. Press the ZOOM-DIAL LEVER (1) to the right or left to select the date function. Traditional cameras print date and/or time information directly onto the film. The SELF-TIMER LAMP (8) on a tripod (...
... a quartz clock and automatic calendar through the year 2099. Setting the date and time 1. The first two digits of the camera will "blink." Place the camera on the front of the date (indicating the month) will blink during the self-timer countdown. • To cancel the self-...lenscover flash. • The self-timer is automatically canceled after you press the shutter button. 1. Press the ZOOM-DIAL LEVER (1) to the right or left to select the date function. Traditional cameras print date and/or time information directly onto the film. The SELF-TIMER LAMP (8) on a tripod (...
Owner Manual North America
Page 21
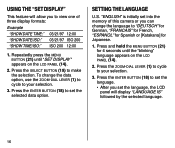
"ENGLISH" is initially set into the memory of this camera or you can change the data option, use the ZOOM-DIAL LEVER (1) to cycle to view one of three display formats: Example "SHOW DATE TIME:" "SHOW DATE/ISO:" "SHOW TIME/ISO:" 03/21/97 12:.... 1. Press the ENTER BUTTON (18) to set the language. • After you to your selection. 3. To change the language to make the selection. Press the ZOOM-DIAL LEVER (1) to cycle to set the language, the LCD panel will allow you set the selected data option. SETTING THE LANGUAGE U.S. Press the SELECT...
"ENGLISH" is initially set into the memory of this camera or you can change the data option, use the ZOOM-DIAL LEVER (1) to cycle to view one of three display formats: Example "SHOW DATE TIME:" "SHOW DATE/ISO:" "SHOW TIME/ISO:" 03/21/97 12:.... 1. Press the ENTER BUTTON (18) to set the language. • After you to your selection. 3. To change the language to make the selection. Press the ZOOM-DIAL LEVER (1) to cycle to set the language, the LCD panel will allow you set the selected data option. SETTING THE LANGUAGE U.S. Press the SELECT...

Owner Manual North America
Page 22
The title you set the title, the LCD panel will automatically cancel after 24 hours of camera inactivity. Press the SELECT BUTTON (19) to select "SET ROLL TITLE." Press the SELECT BUTTON (19) to select "SET PRINT TITLE." Press the ENTER BUTTON (...18) to another title selection. 3. At certified Advanced Photo System labs, the selected title will be imprinted on the back of the print. 1. Use the ZOOM-DIAL LEVER (1) to cycle from one title to store the selected title. • After you select will display "SET ROLL TITLE IS" followed by the...
The title you set the title, the LCD panel will automatically cancel after 24 hours of camera inactivity. Press the SELECT BUTTON (19) to select "SET ROLL TITLE." Press the SELECT BUTTON (19) to select "SET PRINT TITLE." Press the ENTER BUTTON (...18) to another title selection. 3. At certified Advanced Photo System labs, the selected title will be imprinted on the back of the print. 1. Use the ZOOM-DIAL LEVER (1) to cycle from one title to store the selected title. • After you select will display "SET ROLL TITLE IS" followed by the...
Owner Manual North America
Page 24
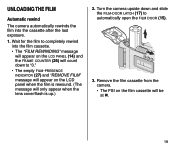
...; The FSI on the film cassette will only appear when the lens cover/flash is rewound. (The message will be at ". 19 Turn the camera upside down to "0." • The empty FILM-PRESENCE INDICATOR (27) and "REMOVE FILM" message will appear on the LCD panel when the film is up.) 2. ...UNLOADING THE FILM Automatic rewind The camera automatically rewinds the film into the film cassette. • The "FILM REWINDING" message will appear on the LCD PANEL (14) and the FRAME COUNTER (26...
...; The FSI on the film cassette will only appear when the lens cover/flash is rewound. (The message will be at ". 19 Turn the camera upside down to "0." • The empty FILM-PRESENCE INDICATOR (27) and "REMOVE FILM" message will appear on the LCD panel when the film is up.) 2. ...UNLOADING THE FILM Automatic rewind The camera automatically rewinds the film into the film cassette. • The "FILM REWINDING" message will appear on the LCD PANEL (14) and the FRAME COUNTER (26...

Owner Manual North America
Page 25
... to your photofinisher for cleaning eye glasses. 3. Never wipe a dry lens. When you store the camera for cleaning camera lenses. Remove the battery when you reload the film cassette into the camera for more picture-taking or take it to start the auto-film rewind. 2. Follow steps 1-3 from...gently with a soft, lintless cloth or lenscleaning tissue. Do not use solvents or harsh or abrasive cleaners on the LCD panel. The camera will automatically advance the film to the first unexposed frame and "FRESH FILM" will appear on a partially exposed film cassette will automatically ...
... to your photofinisher for cleaning eye glasses. 3. Never wipe a dry lens. When you store the camera for cleaning camera lenses. Remove the battery when you reload the film cassette into the camera for more picture-taking or take it to start the auto-film rewind. 2. Follow steps 1-3 from...gently with a soft, lintless cloth or lenscleaning tissue. Do not use solvents or harsh or abrasive cleaners on the LCD panel. The camera will automatically advance the film to the first unexposed frame and "FRESH FILM" will appear on a partially exposed film cassette will automatically ...

Owner Manual North America
Page 26
... operate Film does not advance or rewind LCD panel is blank LCD panel displays: "BATTERY LOW" "REPLACE BATTERY" "FLASH NOT READY" Flash/camera ready lamp "blinks" red Flash/camera ready lamp glows red Probable cause There are no more pictures remaining Battery weak, dead, missing, or improperly loaded Battery weak, dead, missing...
... operate Film does not advance or rewind LCD panel is blank LCD panel displays: "BATTERY LOW" "REPLACE BATTERY" "FLASH NOT READY" Flash/camera ready lamp "blinks" red Flash/camera ready lamp glows red Probable cause There are no more pictures remaining Battery weak, dead, missing, or improperly loaded Battery weak, dead, missing...

Owner Manual North America
Page 27
SPECIFICATIONS Film Type: KODAK ADVANTIX Film for color and black-and-white pictures Lens: Autofocusing 30-60 mm motorized zoom lens, 5-elements/2-group construction, glass aspheric Focus System: Passive multi-spot AF Focus Range: C, H, & P: Wide/Tele: 2.5 ft - ∞ (0.8 m - ∞) Viewfinder: Real image with C, H, & P format display LCD: Text display with camera-status information and warnings Film...
SPECIFICATIONS Film Type: KODAK ADVANTIX Film for color and black-and-white pictures Lens: Autofocusing 30-60 mm motorized zoom lens, 5-elements/2-group construction, glass aspheric Focus System: Passive multi-spot AF Focus Range: C, H, & P: Wide/Tele: 2.5 ft - ∞ (0.8 m - ∞) Viewfinder: Real image with C, H, & P format display LCD: Text display with camera-status information and warnings Film...
Owner Manual Latin America
Page 5
... any interference received, including interference that interference will not occur. NOTE: Your model camera has been tested and found to radio communications. Increase the separation between the camera and the receiver. - Changes or modifications not approved by the following two conditions:... (1) this device may not cause harmful interference, and (2) this camera does cause interference to radio or television reception, ...
... any interference received, including interference that interference will not occur. NOTE: Your model camera has been tested and found to radio communications. Increase the separation between the camera and the receiver. - Changes or modifications not approved by the following two conditions:... (1) this device may not cause harmful interference, and (2) this camera does cause interference to radio or television reception, ...

