
User Manual
Page 4
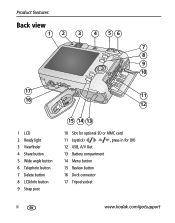
Product features Back view 12 3 4 56 7 8 9 10 17 11 16 12 1 LCD 2 Ready light 3 Viewfinder 4 Share button 5 Wide angle button 6 Telephoto button 7 Delete button 8 LCD/Info button 9 Strap post 15 14 13 10 Slot for optional SD or MMC card 11 Joystick ( , press in for OK) 12 USB, A/V Out 13 Battery compartment 14 Menu button 15 Review button 16 Dock connector 17 Tripod socket ii www.kodak.com/go/support
Product features Back view 12 3 4 56 7 8 9 10 17 11 16 12 1 LCD 2 Ready light 3 Viewfinder 4 Share button 5 Wide angle button 6 Telephoto button 7 Delete button 8 LCD/Info button 9 Strap post 15 14 13 10 Slot for optional SD or MMC card 11 Joystick ( , press in for OK) 12 USB, A/V Out 13 Battery compartment 14 Menu button 15 Review button 16 Dock connector 17 Tripod socket ii www.kodak.com/go/support

User Manual
Page 5
...card 5 2 Taking pictures and videos 6 Taking a picture 6 Reviewing pictures and videos on your camera 10 3 Transferring and printing pictures 13 Installing the software 13 Transferring pictures 14 Printing pictures 15 Dock compatibility for your camera 18 4 Doing more with your camera 19 Using optical zoom 19 Changing the flash settings 20... picture brightness 23 Using P/M modes 24 Using the self-timer 26 Using burst 27 Changing picture-taking settings 28 Customizing your camera 31 Running a slide show 34 Using Kodak Perfect Touch technology 35 Cropping pictures 36 www...
...card 5 2 Taking pictures and videos 6 Taking a picture 6 Reviewing pictures and videos on your camera 10 3 Transferring and printing pictures 13 Installing the software 13 Transferring pictures 14 Printing pictures 15 Dock compatibility for your camera 18 4 Doing more with your camera 19 Using optical zoom 19 Changing the flash settings 20... picture brightness 23 Using P/M modes 24 Using the self-timer 26 Using burst 27 Changing picture-taking settings 28 Customizing your camera 31 Running a slide show 34 Using Kodak Perfect Touch technology 35 Cropping pictures 36 www...

User Manual
Page 13
Red-Picture is displayed during quickview. www.kodak.com/go/support 7 Understanding quickview blur warning icons If the feature is turned on (see page 10. Tag a picture/video for email or as a favorite, ... (10 x 15 cm) print. White-Printability is not determined. Yellow-Picture may be sharp enough for approximately 5 seconds. Delete Play a video. ( to adjust volume.) To review pictures and videos anytime, see page 33), a picture blur warning icon is not sharp enough for an acceptable 4 x 6-inch print. If you take a picture or...
Red-Picture is displayed during quickview. www.kodak.com/go/support 7 Understanding quickview blur warning icons If the feature is turned on (see page 10. Tag a picture/video for email or as a favorite, ... (10 x 15 cm) print. White-Printability is not determined. Yellow-Picture may be sharp enough for approximately 5 seconds. Delete Play a video. ( to adjust volume.) To review pictures and videos anytime, see page 33), a picture blur warning icon is not sharp enough for an acceptable 4 x 6-inch print. If you take a picture or...

User Manual
Page 16
... optional Kodak EasyShare dock or Kodak 3-volt AC adapter. (See www.kodak.com/go /support Magnifying a picture during playback). view other parts of the LCD. OK return to 1X. Rewind to beginning (during review view multi-up (thumbnails) during playback). Taking pictures and videos Reviewing pictures ...exit.) 2 for previous/next. OK view single picture. 10 www.kodak.com/go /C663accessories.) NOTE: Pictures taken at the 5 MP (3:2) quality setting are displayed at a 3:2 aspect ratio with your camera Press the Review button to view and work with a black bar at the top...
... optional Kodak EasyShare dock or Kodak 3-volt AC adapter. (See www.kodak.com/go /support Magnifying a picture during playback). view other parts of the LCD. OK return to 1X. Rewind to beginning (during review view multi-up (thumbnails) during playback). Taking pictures and videos Reviewing pictures ...exit.) 2 for previous/next. OK view single picture. 10 www.kodak.com/go /C663accessories.) NOTE: Pictures taken at the 5 MP (3:2) quality setting are displayed at a 3:2 aspect ratio with your camera Press the Review button to view and work with a black bar at the top...

User Manual
Page 17
Understanding review icons Pictures Print tag/number of prints Favorite tag Email tag Album Scroll arrows Videos Video length Favorite tag Email tag Taking pictures and videos Blur warning Picture number Image storage location Protected Review mode Video number Image storage location Date/Time Scroll arrows Review mode www.kodak.com/go/support 11
Understanding review icons Pictures Print tag/number of prints Favorite tag Email tag Album Scroll arrows Videos Video length Favorite tag Email tag Taking pictures and videos Blur warning Picture number Image storage location Protected Review mode Video number Image storage location Date/Time Scroll arrows Review mode www.kodak.com/go/support 11

User Manual
Page 18
Taking pictures and videos Deleting pictures and videos during review 1 Press Review. 2 for previous/next. 3 Press Menu. 4 Press to retrieve it. The picture or video is only available immediately after you may be deleted. The Protect icon ..., then press OK. Using the undo delete feature If you accidentally delete a picture/video, you delete a picture/video. Protecting pictures and videos from deletion 1 Press Review. 2 for previous/next. 3 Press Delete. 4 Follow the screen prompts. appears with 12 www.kodak.com/go/support Press the Menu button to exit the menu.
Taking pictures and videos Deleting pictures and videos during review 1 Press Review. 2 for previous/next. 3 Press Menu. 4 Press to retrieve it. The picture or video is only available immediately after you may be deleted. The Protect icon ..., then press OK. Using the undo delete feature If you accidentally delete a picture/video, you delete a picture/video. Protecting pictures and videos from deletion 1 Press Review. 2 for previous/next. 3 Press Delete. 4 Follow the screen prompts. appears with 12 www.kodak.com/go/support Press the Menu button to exit the menu.

User Manual
Page 29
... +0.3 and the LCD gets brighter or dimmer. Doing more with your camera Using exposure compensation to adjust brightness In Auto, Landscape, Close-up , SCN, P/M, or Review, press the LCD/Info button until the histogram appears. NOTE: If a scene is dark. www.kodak.com/go/support 23 If the peak is to the right...
... +0.3 and the LCD gets brighter or dimmer. Doing more with your camera Using exposure compensation to adjust brightness In Auto, Landscape, Close-up , SCN, P/M, or Review, press the LCD/Info button until the histogram appears. NOTE: If a scene is dark. www.kodak.com/go/support 23 If the peak is to the right...

User Manual
Page 33
...Press the Shutter button completely down and hold it to take pictures. To delete selectively, do so in the burst series. www.kodak.com/go/support 27 Last Burst Camera takes up to 30 pictures (2 per second for up to 5 pictures (2 per second) while the Shutter button is no more... event. Doing more storage space. When the Shutter button is released, only the last 4 pictures are saved. The camera stops taking pictures when you can delete all pictures in Review (see page 12). First 4 pictures are taken, or when there is pressed. NOTE: During quickview, you release ...
...Press the Shutter button completely down and hold it to take pictures. To delete selectively, do so in the burst series. www.kodak.com/go/support 27 Last Burst Camera takes up to 30 pictures (2 per second for up to 5 pictures (2 per second) while the Shutter button is no more... event. Doing more storage space. When the Shutter button is released, only the last 4 pictures are saved. The camera stops taking pictures when you can delete all pictures in Review (see page 12). First 4 pictures are taken, or when there is pressed. NOTE: During quickview, you release ...
User Manual
Page 40
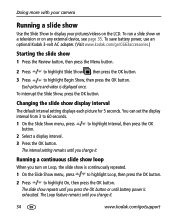
..., see page 35. Running a continuous slide show loop When you change it . 34 www.kodak.com/go /C663accessories.) Starting the slide show on a television or on the LCD. Doing more with your camera Running a slide show is continuously repeated. 1 On the Slide Show menu, press to highlight Loop... the OK button. The interval setting remains until you press the OK button or until you change it . To run a slide show 1 Press the Review button, then press the Menu button. 2 Press to highlight Slide Show , then press the OK button. 3 Press to highlight Begin Show, then press...
..., see page 35. Running a continuous slide show loop When you change it . 34 www.kodak.com/go /C663accessories.) Starting the slide show on a television or on the LCD. Doing more with your camera Running a slide show is continuously repeated. 1 On the Slide Show menu, press to highlight Loop... the OK button. The interval setting remains until you press the OK button or until you change it . To run a slide show 1 Press the Review button, then press the Menu button. 2 Press to highlight Slide Show , then press the OK button. 3 Press to highlight Begin Show, then press...
User Manual
Page 41
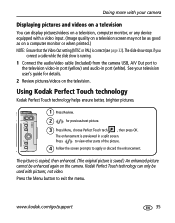
Using Kodak Perfect Touch technology Kodak Perfect Touch technology helps ensure better, brighter pictures. 1 Press Review. 2 for details. 2 Review pictures/videos on the camera. Doing more with your television user's guide for previous/next picture. 3 Press Menu, choose Perfect Touch tech. ,.... The enhancement is running. 1 Connect the audio/video cable (included) from the camera USB, A/V Out port to the television video-in port (yellow) and audio-in a split screen. Kodak Perfect Touch technology can display pictures/videos on a television, computer monitor, or any ...
Using Kodak Perfect Touch technology Kodak Perfect Touch technology helps ensure better, brighter pictures. 1 Press Review. 2 for details. 2 Review pictures/videos on the camera. Doing more with your television user's guide for previous/next picture. 3 Press Menu, choose Perfect Touch tech. ,.... The enhancement is running. 1 Connect the audio/video cable (included) from the camera USB, A/V Out port to the television video-in port (yellow) and audio-in a split screen. Kodak Perfect Touch technology can display pictures/videos on a television, computer monitor, or any ...

User Manual
Page 42
Press the Menu button to exit the menu. 36 www.kodak.com/go/support Making a video action print From a video, you can make a 4-, 9-, or 16-up picture. The camera chooses the first and last frames, then 2, 7, or 14 equally spaced frames from the video. A 4-, 9-, and 16-up picture is ... is saved.) ■ Press the Menu button to exit the menu. Doing more with your camera Cropping pictures 1 Press Review. 2 for a 4 x 6-inch Video 4-, 9-, or (10 x 15 cm) print. 16-up picture 1 Press the Review button, then press to zoom in, or then press OK. 5 Follow the screen prompts. ...
Press the Menu button to exit the menu. 36 www.kodak.com/go/support Making a video action print From a video, you can make a 4-, 9-, or 16-up picture. The camera chooses the first and last frames, then 2, 7, or 14 equally spaced frames from the video. A 4-, 9-, and 16-up picture is ... is saved.) ■ Press the Menu button to exit the menu. Doing more with your camera Cropping pictures 1 Press Review. 2 for a 4 x 6-inch Video 4-, 9-, or (10 x 15 cm) print. 16-up picture 1 Press the Review button, then press to zoom in, or then press OK. 5 Follow the screen prompts. ...

User Manual
Page 43
... protection to the location from which you applied for print, email, and favorites are copying. (See page 31.) Copy pictures or videos: 1 Press the Review button, then press the Menu button. 2 Press to highlight Copy , then press the OK button. 3 Press to highlight an option. 4 Press the OK... button. www.kodak.com/go/support 37 Tags that : ■ A card is inserted in the camera. ■ The camera's picture storage location is set to a picture or video, see page 12). NOTE: Pictures/videos are not ...
... protection to the location from which you applied for print, email, and favorites are copying. (See page 31.) Copy pictures or videos: 1 Press the Review button, then press the Menu button. 2 Press to highlight Copy , then press the OK button. 3 Press to highlight an option. 4 Press the OK... button. www.kodak.com/go/support 37 Tags that : ■ A card is inserted in the camera. ■ The camera's picture storage location is set to a picture or video, see page 12). NOTE: Pictures/videos are not ...
User Manual
Page 45
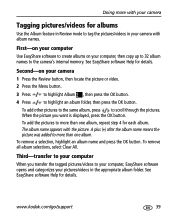
...Doing more than one album. See EasyShare software Help for details. A plus (+) after the album name means the picture was added to more with your camera with the picture. Second-on your camera 1 Press the Review button, then locate the picture or... video. 2 Press the Menu button. 3 Press to highlight Album , then press the OK button. 4 Press to the camera's internal memory. To remove a selection, highlight an album name and press the OK button. www.kodak.com/go/support 39 First-on your computer Use EasyShare...
...Doing more than one album. See EasyShare software Help for details. A plus (+) after the album name means the picture was added to more with your camera with the picture. Second-on your camera 1 Press the Review button, then locate the picture or... video. 2 Press the Menu button. 3 Press to highlight Album , then press the OK button. 4 Press to the camera's internal memory. To remove a selection, highlight an album name and press the OK button. www.kodak.com/go/support 39 First-on your computer Use EasyShare...

User Manual
Page 46
...Kodak EasyShare software print screen opens. See EasyShare software Help for printing 1 Press the Share button. Use the Share button: ■ Any time. (The most recent picture/video taken is not available in quickview. To remove print tagging for all pictures in . (10 x 15 cm) prints, set the camera...page 15. When they are transferred to "tag" your computer, you take a picture/video, during quickview. ■ After pressing the Review button. Print All is then displayed.) ■ Just after you can apply a print quantity to change the print quantity. Tagging pictures ...
...Kodak EasyShare software print screen opens. See EasyShare software Help for printing 1 Press the Share button. Use the Share button: ■ Any time. (The most recent picture/video taken is not available in quickview. To remove print tagging for all pictures in . (10 x 15 cm) prints, set the camera...page 15. When they are transferred to "tag" your computer, you take a picture/video, during quickview. ■ After pressing the Review button. Print All is then displayed.) ■ Just after you can apply a print quantity to change the print quantity. Tagging pictures ...
User Manual
Page 50
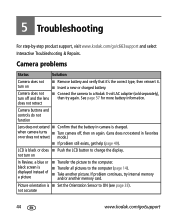
... the picture to the computer. ■ Transfer all pictures to change the display. Camera does not ■ Connect the camera to ON (see page 33). not turn on In Review, a blue or black screen is ■ Set the Orientation Sensor to a Kodak 3-volt AC adapter (sold separately), turn on ■ Remove battery and verify...
... the picture to the computer. ■ Transfer all pictures to change the display. Camera does not ■ Connect the camera to ON (see page 33). not turn on In Review, a blue or black screen is ■ Set the Orientation Sensor to a Kodak 3-volt AC adapter (sold separately), turn on ■ Remove battery and verify...
User Manual
Page 64
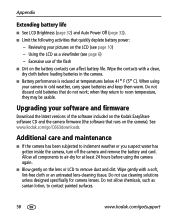
... quickly deplete battery power: - Do not use of the software included on the Kodak EasyShare software CD and the camera firmware (the software that runs on the LCD (see page 6) - When using the camera again. ■ Blow gently on the battery contacts can affect battery life. Excessive...spare batteries and keep them warm. See www.kodak.com/go /support Appendix Extending battery life ■ See LCD Brightness (page 32) and Auto Power Off (page 32). ■ Limit the following activities that do not work; Reviewing your software and firmware Download the latest versions...
... quickly deplete battery power: - Do not use of the software included on the Kodak EasyShare software CD and the camera firmware (the software that runs on the LCD (see page 6) - When using the camera again. ■ Blow gently on the battery contacts can affect battery life. Excessive...spare batteries and keep them warm. See www.kodak.com/go /support Appendix Extending battery life ■ See LCD Brightness (page 32) and Auto Power Off (page 32). ■ Limit the following activities that do not work; Reviewing your software and firmware Download the latest versions...
User Manual
Page 69
...mode, 21 B backlight, 22 battery compartment, ii expected life, 57 extending life, 58 life, 57 loading, 2 safety, 56 types, 57 beach, 22 blur, 7 www.kodak.com/go/support 1 blur warning, 33 burst button, i burst, using, 27 button burst, i, 27 delete, ii, 7 flash, 20 flash, flash button, i info, ...ii LCD/Info, ii menu, ii OK, ii review, ii, 10 self-timer, self-timer button, i Share, ii shutter, i telephoto, ii wide angle, ii zoom, 19 C cable audio/video, 35 USB, 14 camera screen reviewing videos, 10 camera sounds, 32 caring for your camera, 58 caution formatting, 12 children, 22 clock, setting,...
...mode, 21 B backlight, 22 battery compartment, ii expected life, 57 extending life, 58 life, 57 loading, 2 safety, 56 types, 57 beach, 22 blur, 7 www.kodak.com/go/support 1 blur warning, 33 burst button, i burst, using, 27 button burst, i, 27 delete, ii, 7 flash, 20 flash, flash button, i info, ...ii LCD/Info, ii menu, ii OK, ii review, ii, 10 self-timer, self-timer button, i Share, ii shutter, i telephoto, ii wide angle, ii zoom, 19 C cable audio/video, 35 USB, 14 camera screen reviewing videos, 10 camera sounds, 32 caring for your camera, 58 caution formatting, 12 children, 22 clock, setting,...

User Manual
Page 71
..., 8 reviewing pictures, 11 icons, mode dial, 21 image storage, 31 info button, ii information about pictures, videos, 37 installing battery, 2 SD/MMC card, 5 software, 13 internal memory storage capacity, 55 interval, slide show, 34 K Kodak EasyShare software upgrading, 58 Kodak Perfect Touch technology, 35 Kodak web sites..., 58 light sensor, i liveview, 32 loading batteries, 2 www.kodak.com/go/support Index SD/MMC card, 5 software, 13 loop, slide show, 34 M Macintosh, installing software on, 13 magnify picture, 10 maintenance, camera, 58 manner, 22 manual, 24 memory inserting card, 5 storage ...
..., 8 reviewing pictures, 11 icons, mode dial, 21 image storage, 31 info button, ii information about pictures, videos, 37 installing battery, 2 SD/MMC card, 5 software, 13 internal memory storage capacity, 55 interval, slide show, 34 K Kodak EasyShare software upgrading, 58 Kodak Perfect Touch technology, 35 Kodak web sites..., 58 light sensor, i liveview, 32 loading batteries, 2 www.kodak.com/go/support Index SD/MMC card, 5 software, 13 loop, slide show, 34 M Macintosh, installing software on, 13 magnify picture, 10 maintenance, camera, 58 manner, 22 manual, 24 memory inserting card, 5 storage ...
User Manual
Page 72
..., 12 emailing tagged, 41 Kodak Perfect Touch, 35 printing, 16 protecting, 12 reviewing, 10 storage capacity, 55 tagging, 38 taking, modes, 21 transfer, 13 picture-taking settings, 28 power 66 camera, 3 power light, i ...EasyShare printer dock, 15 problem-solving, 44 program, 24 protecting pictures, videos, 12 Q quickview using, 7 R ready light, ii recycling, disposal, 59, 62 red eye flash, 20 regulatory information, 61 removing favorites, 43 repair, 49 return, 31 review button, ii, 10 reviewing pictures as you take them, 7 camera screen, 10 reviewing pictures, videos slide show, 34 reviewing...
..., 12 emailing tagged, 41 Kodak Perfect Touch, 35 printing, 16 protecting, 12 reviewing, 10 storage capacity, 55 tagging, 38 taking, modes, 21 transfer, 13 picture-taking settings, 28 power 66 camera, 3 power light, i ...EasyShare printer dock, 15 problem-solving, 44 program, 24 protecting pictures, videos, 12 Q quickview using, 7 R ready light, ii recycling, disposal, 59, 62 red eye flash, 20 regulatory information, 61 removing favorites, 43 repair, 49 return, 31 review button, ii, 10 reviewing pictures as you take them, 7 camera screen, 10 reviewing pictures, videos slide show, 34 reviewing...

User Manual
Page 74
... timer, shutter delay, 26 transferring pictures, videos, 13 trash can, deleting, 7 tripod socket, ii troubleshooting, 44 turning camera on and off, 3 U undelete, 12 undo, 12 upgrading software, firmware, 58 URLs, Kodak web sites, 49 USB cable, 14 USB, A/V out, ii using, 19 68 V VCCI compliance, 62 video action ...print, 36 copying, 37 date display, 33 out, 32 protecting, 12 reviewing, 10 storage capacities, 55 viewing, 10 video size, 31 ...
... timer, shutter delay, 26 transferring pictures, videos, 13 trash can, deleting, 7 tripod socket, ii troubleshooting, 44 turning camera on and off, 3 U undelete, 12 undo, 12 upgrading software, firmware, 58 URLs, Kodak web sites, 49 USB cable, 14 USB, A/V out, ii using, 19 68 V VCCI compliance, 62 video action ...print, 36 copying, 37 date display, 33 out, 32 protecting, 12 reviewing, 10 storage capacities, 55 viewing, 10 video size, 31 ...


