
User Manual
Page 4
Product features Back view 1 2 345 6 78 9 10 11 12 19 18 1 LCD 2 Viewfinder 3 Ready light 4 Review button 5 LCD/Info button 6 Share button 7 Delete button 8 Wide angle button 9 Telephoto button 10 OK button ii 13 14 15 17 16 11 4-way arrows 12 Strap post 13 USB, A/V Out 14 Menu button 15 Battery compartment 16 Slot for optional SD or MMC card 17 SD or MMC card (sold separately) 18 Dock connector 19 Tripod socket www.kodak.com/go/support
Product features Back view 1 2 345 6 78 9 10 11 12 19 18 1 LCD 2 Viewfinder 3 Ready light 4 Review button 5 LCD/Info button 6 Share button 7 Delete button 8 Wide angle button 9 Telephoto button 10 OK button ii 13 14 15 17 16 11 4-way arrows 12 Strap post 13 USB, A/V Out 14 Menu button 15 Battery compartment 16 Slot for optional SD or MMC card 17 SD or MMC card (sold separately) 18 Dock connector 19 Tripod socket www.kodak.com/go/support

User Manual
Page 5
... Turning on the camera 2 Setting the language, date/time 2 Storing pictures on an SD or MMC card 3 2 Taking pictures/videos 4 Picture-taking modes 4 Taking a picture 7 Taking a video 8 Reviewing the picture/video just taken 8 Using optical zoom 10 Using the digital zoom 10 Using ... to adjust picture brightness 14 Using camera Help 14 Taking panoramic pictures 15 Understanding the picture-taking icons 16 3 Working with pictures/videos 17 Reviewing pictures/videos 17 Deleting pictures/videos 19 Cropping pictures 21 Using Kodak Perfect Touch technology 21 Editing videos ...
... Turning on the camera 2 Setting the language, date/time 2 Storing pictures on an SD or MMC card 3 2 Taking pictures/videos 4 Picture-taking modes 4 Taking a picture 7 Taking a video 8 Reviewing the picture/video just taken 8 Using optical zoom 10 Using the digital zoom 10 Using ... to adjust picture brightness 14 Using camera Help 14 Taking panoramic pictures 15 Understanding the picture-taking icons 16 3 Working with pictures/videos 17 Reviewing pictures/videos 17 Deleting pictures/videos 19 Cropping pictures 21 Using Kodak Perfect Touch technology 21 Editing videos ...
User Manual
Page 6
Table of contents Understanding the review icons 27 4 Transferring and printing pictures 28 Installing the software 28 Transferring pictures with the USB cable 29 Printing pictures 30 Dock compatibility for your camera 32 5 Doing more with your camera 33 Changing picture-taking settings 33 Customizing your camera 37 Pre-tagging for album names 40 Tagging...
Table of contents Understanding the review icons 27 4 Transferring and printing pictures 28 Installing the software 28 Transferring pictures with the USB cable 29 Printing pictures 30 Dock compatibility for your camera 32 5 Doing more with your camera 33 Changing picture-taking settings 33 Customizing your camera 37 Pre-tagging for album names 40 Tagging...

User Manual
Page 14
Taking pictures/videos Taking a video 1 2 Press the Shutter button completely down and release. Reviewing the picture/video just taken After you press no buttons, the picture or video is saved. If you take a picture or video, the LCD displays a ... a favorite, or tag a picture for approximately 10 seconds. To stop recording, press and release the Shutter button again. Delete Play a video. ( to adjust volume.) To review pictures/videos anytime, see page 17. 8 www.kodak.com/go/support
Taking pictures/videos Taking a video 1 2 Press the Shutter button completely down and release. Reviewing the picture/video just taken After you press no buttons, the picture or video is saved. If you take a picture or video, the LCD displays a ... a favorite, or tag a picture for approximately 10 seconds. To stop recording, press and release the Shutter button again. Delete Play a video. ( to adjust volume.) To review pictures/videos anytime, see page 17. 8 www.kodak.com/go/support

User Manual
Page 15
Yellow-Picture may be sharp enough for an acceptable 4 x 6-inch (10 x 15 cm) print. White-Printability is displayed during quickview and review. Red-Picture is not sharp enough for an acceptable 4 x 6-inch (10 x 15 cm) print or sharpness is sharp enough for an acceptable 4 x 6-inch (10 x 15 cm) print. Taking pictures/videos Understanding blur warning icons A picture blur warning icon is still being determined. www.kodak.com/go/support 9 Green-Picture is not determined.
Yellow-Picture may be sharp enough for an acceptable 4 x 6-inch (10 x 15 cm) print. White-Printability is displayed during quickview and review. Red-Picture is not sharp enough for an acceptable 4 x 6-inch (10 x 15 cm) print or sharpness is sharp enough for an acceptable 4 x 6-inch (10 x 15 cm) print. Taking pictures/videos Understanding blur warning icons A picture blur warning icon is still being determined. www.kodak.com/go/support 9 Green-Picture is not determined.

User Manual
Page 19
...completely down and hold it to balance a picture between water, earth, and sky. button until the grid www.kodak.com/go/support 13 Taking pictures/videos Using burst Option Description Purpose Camera takes up to compose a picture The framing grid divides the LCD into thirds-vertically and horizontally. NOTE: Burst... pictures. event. Burst All the pictures are taken, or when there is helpful if, for example, you can delete all pictures in Review (see page 11). The camera stops taking pictures when you release the Shutter button, when the pictures are saved.
...completely down and hold it to balance a picture between water, earth, and sky. button until the grid www.kodak.com/go/support 13 Taking pictures/videos Using burst Option Description Purpose Camera takes up to compose a picture The framing grid divides the LCD into thirds-vertically and horizontally. NOTE: Burst... pictures. event. Burst All the pictures are taken, or when there is helpful if, for example, you can delete all pictures in Review (see page 11). The camera stops taking pictures when you release the Shutter button, when the pictures are saved.

User Manual
Page 23
... pictures/videos Reviewing pictures/videos Press the Review button to magnify 2X-8X. 3 Press picture. Magnifying pictures 1 Press the Review button. 2 Press W/T to view and work with a black bar at the top and bottom of the LCD. Review To save battery power, use an optional Kodak EasyShare dock or Kodak 3-volt AC adapter. (See www.kodak.com/go...
... pictures/videos Reviewing pictures/videos Press the Review button to magnify 2X-8X. 3 Press picture. Magnifying pictures 1 Press the Review button. 2 Press W/T to view and work with a black bar at the top and bottom of the LCD. Review To save battery power, use an optional Kodak EasyShare dock or Kodak 3-volt AC adapter. (See www.kodak.com/go...

User Manual
Page 24
...Press OK to return to single-picture view. Viewing picture/video information 1 Press the Review button. 2 Repeatedly press the LCD/Info button to turn on/off status icons and picture/video info. 18 www.kodak.com/go/support Working with pictures/videos Playing a video Playback speed 4X 2X 1X 2X... 4X Reverse Forward 1 Press the Review button. 2 Press to locate previous/next video. 3 Press OK to play or pause ...
...Press OK to return to single-picture view. Viewing picture/video information 1 Press the Review button. 2 Repeatedly press the LCD/Info button to turn on/off status icons and picture/video info. 18 www.kodak.com/go/support Working with pictures/videos Playing a video Playback speed 4X 2X 1X 2X... 4X Reverse Forward 1 Press the Review button. 2 Press to locate previous/next video. 3 Press OK to play or pause ...

User Manual
Page 25
...See Using the undo delete feature for previous/next picture/video. 3 Press the Delete button. 4 Follow the screen prompts. www.kodak.com/go/support 19 The deleted picture/video (overlaid with the Undo Delete option) appears. Working with pictures/videos Deleting pictures/videos ...1 Press the Review button. 2 Press for more pictures/videos, the Delete menu on a blank screen appears. Using the undo delete feature If you delete a picture/video in Review mode and the Undo Delete option appears. 1 Press to...
...See Using the undo delete feature for previous/next picture/video. 3 Press the Delete button. 4 Follow the screen prompts. www.kodak.com/go/support 19 The deleted picture/video (overlaid with the Undo Delete option) appears. Working with pictures/videos Deleting pictures/videos ...1 Press the Review button. 2 Press for more pictures/videos, the Delete menu on a blank screen appears. Using the undo delete feature If you delete a picture/video in Review mode and the Undo Delete option appears. 1 Press to...
User Manual
Page 26
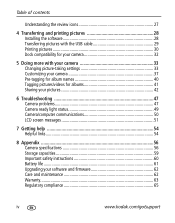
...) pictures/videos. (Formatting internal memory also deletes email addresses, album names, and favorites. To restore them, see EasyShare software Help.) 20 www.kodak.com/go/support The Protect icon appears with pictures/videos Protecting pictures/videos from the I Press the Menu button to... highlight Protect, then press OK. is protected and cannot be deleted. The picture/video is removed from deletion 1 Press the Review button...
...) pictures/videos. (Formatting internal memory also deletes email addresses, album names, and favorites. To restore them, see EasyShare software Help.) 20 www.kodak.com/go/support The Protect icon appears with pictures/videos Protecting pictures/videos from the I Press the Menu button to... highlight Protect, then press OK. is protected and cannot be deleted. The picture/video is removed from deletion 1 Press the Review button...

User Manual
Page 27
...picture is cropped. NOTE: You cannot enhance previously enhanced or panorama pictures, or videos. Using Kodak Perfect Touch technology Kodak Perfect Touch technology helps ensure better, brighter pictures. 1 Press the Review button, then for previous/next picture. 2 Press the Menu button, choose Perfect Touch tech.... www.kodak.com/go/support 21 Follow the screen prompts to replace the original picture or to exit the...
...picture is cropped. NOTE: You cannot enhance previously enhanced or panorama pictures, or videos. Using Kodak Perfect Touch technology Kodak Perfect Touch technology helps ensure better, brighter pictures. 1 Press the Review button, then for previous/next picture. 2 Press the Menu button, choose Perfect Touch tech.... www.kodak.com/go/support 21 Follow the screen prompts to replace the original picture or to exit the...

User Manual
Page 28
... then press . 4 Follow the screen prompts. Video Trimmed video The video is saved.) I Press the Menu button to exit the menu. 22 www.kodak.com/go/support A picture is created. (The original video is trimmed. (You can delete an unwanted portion from a video, then make a picture suitable... for printing. 1 Press the Review button, then to find a video. 2 Press the Menu button, choose Edit Video, then press the OK button. Trimming a video You can save it as...
... then press . 4 Follow the screen prompts. Video Trimmed video The video is saved.) I Press the Menu button to exit the menu. 22 www.kodak.com/go/support A picture is created. (The original video is trimmed. (You can delete an unwanted portion from a video, then make a picture suitable... for printing. 1 Press the Review button, then to find a video. 2 Press the Menu button, choose Edit Video, then press the OK button. Trimming a video You can save it as...

User Manual
Page 29
the camera chooses 2, 7, or 14 equally spaced frames. Running a slide show 1 Press the Review button, then the Menu button. 2 Press to highlight ... or 16-up picture 3 Choose an option, then press the OK button. to exit the menu. Auto options: The camera includes the first and last frames, then 2, 7, or 14 equally spaced frames. I Press the Menu button to find ...a 2 Press the Menu button, choose Edit Video, then press the OK button. www.kodak.com/go/support 23 Starting the slide show Use Slide Show to highlight Begin Show, then press the OK ...
the camera chooses 2, 7, or 14 equally spaced frames. Running a slide show 1 Press the Review button, then the Menu button. 2 Press to highlight ... or 16-up picture 3 Choose an option, then press the OK button. to exit the menu. Auto options: The camera includes the first and last frames, then 2, 7, or 14 equally spaced frames. I Press the Menu button to find ...a 2 Press the Menu button, choose Edit Video, then press the OK button. www.kodak.com/go/support 23 Starting the slide show Use Slide Show to highlight Begin Show, then press the OK ...

User Manual
Page 32
Copy pictures/videos: 1 Press the Review button, then the Menu button. 2 Press to highlight Copy , then press the OK button. 3 Press to highlight an option. 4 Press the OK button. Tags that : I The camera's image storage location is inserted in the camera. To apply protection to a picture/video, see... from internal memory to a card. NOTE: Pictures/videos are not copied. Protection settings are copying (see page 20. 26 www.kodak.com/go/support Working with pictures/videos Copying pictures/videos You can copy pictures/videos from a card to internal memory or from the...
Copy pictures/videos: 1 Press the Review button, then the Menu button. 2 Press to highlight Copy , then press the OK button. 3 Press to highlight an option. 4 Press the OK button. Tags that : I The camera's image storage location is inserted in the camera. To apply protection to a picture/video, see... from internal memory to a card. NOTE: Pictures/videos are not copied. Protection settings are copying (see page 20. 26 www.kodak.com/go/support Working with pictures/videos Copying pictures/videos You can copy pictures/videos from a card to internal memory or from the...

User Manual
Page 33
Working with pictures/videos Understanding the review icons Pictures Print tag/number of prints Protected Favorite tag Email tag Album Blur warning Kodak Perfect Touch Picture number Image storage location Scroll arrows Videos Video length Favorite tag Email tag Review mode Video number Image storage location Date/Time Scroll arrows Review mode www.kodak.com/go/support 27
Working with pictures/videos Understanding the review icons Pictures Print tag/number of prints Protected Favorite tag Email tag Album Blur warning Kodak Perfect Touch Picture number Image storage location Scroll arrows Videos Video length Favorite tag Email tag Review mode Video number Image storage location Date/Time Scroll arrows Review mode www.kodak.com/go/support 27

User Manual
Page 47
... the picture. To remove all album selections, select Clear All. See EasyShare software Help for details. First-on your computer Use EasyShare software to create albums on your camera 1 Press the Review button, then locate the picture or video. 2 Press the Menu button. 3 Press to highlight Album , ... then copy up to 32 album names to the camera's internal memory. www.kodak.com/go/support 41 See EasyShare software Help for details. Doing more with your camera Tagging pictures/videos for albums Use the Album feature in Review mode to tag the pictures/videos in the appropriate ...
... the picture. To remove all album selections, select Clear All. See EasyShare software Help for details. First-on your computer Use EasyShare software to create albums on your camera 1 Press the Review button, then locate the picture or video. 2 Press the Menu button. 3 Press to highlight Album , ... then copy up to 32 album names to the camera's internal memory. www.kodak.com/go/support 41 See EasyShare software Help for details. Doing more with your camera Tagging pictures/videos for albums Use the Album feature in Review mode to tag the pictures/videos in the appropriate ...

User Manual
Page 48
...Just after you take a picture/video, during quickview. Cancel Prints is then displayed.) I After pressing the Review button. Press to locate a picture. 2 Press to highlight Print , then press the OK button.* 3...number of copies (0-99). Press to change the print quantity. For more with your camera Sharing your pictures Press the Share button to tag your computer, you transfer the tagged...You can share them. Doing more information on printing from your computer, the Kodak EasyShare software print screen opens. Print All is applied to your computer, printer dock, PictBridge ...
...Just after you take a picture/video, during quickview. Cancel Prints is then displayed.) I After pressing the Review button. Press to locate a picture. 2 Press to highlight Print , then press the OK button.* 3...number of copies (0-99). Press to change the print quantity. For more with your camera Sharing your pictures Press the Share button to tag your computer, you transfer the tagged...You can share them. Doing more information on printing from your computer, the Kodak EasyShare software print screen opens. Print All is applied to your computer, printer dock, PictBridge ...
User Manual
Page 53
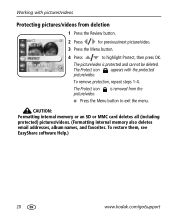
Try one or more the following activities that quickly deplete battery power: reviewing pictures/videos on the LCD; I Retake pictures. Pictures remaining I The camera is blinking. and excessive use of the flash. Stored pictures are I Remove the ...step-by-step product support, visit www.kodak.com/go/c653support or www.kodak.com/go/c623support and select Interactive Troubleshooting & Repairs. Camera problems If... turn off. number does not decrease after taking pictures. rechargeable digital camera I Limit the following Camera does not I Charge rechargeable batteries. ...
Try one or more the following activities that quickly deplete battery power: reviewing pictures/videos on the LCD; I Retake pictures. Pictures remaining I The camera is blinking. and excessive use of the flash. Stored pictures are I Remove the ...step-by-step product support, visit www.kodak.com/go/c653support or www.kodak.com/go/c623support and select Interactive Troubleshooting & Repairs. Camera problems If... turn off. number does not decrease after taking pictures. rechargeable digital camera I Limit the following Camera does not I Charge rechargeable batteries. ...

User Manual
Page 54
...(see page 38). Try one or more the following In Review mode, I Decrease Exposure Compensation (page 14). screen is not clear. Shutter button does not work. I Make sure your camera is at least 2 ft (0.6 m) between the camera and the subject. video device. Picture is displayed Caution: ...or the expected picture) on a flat, steady surface or use a tripod. 48 www.kodak.com/go/support Slide show does I See the external device's user's guide. including protected files. I Place the camera on the LCD screen. you do not see page 36), or insert a card with available...
...(see page 38). Try one or more the following In Review mode, I Decrease Exposure Compensation (page 14). screen is not clear. Shutter button does not work. I Make sure your camera is at least 2 ft (0.6 m) between the camera and the subject. video device. Picture is displayed Caution: ...or the expected picture) on a flat, steady surface or use a tripod. 48 www.kodak.com/go/support Slide show does I See the external device's user's guide. including protected files. I Place the camera on the LCD screen. you do not see page 36), or insert a card with available...

User Manual
Page 64
Appendix Kodak EasyShare C653/C623 zoom digital camera Internal storage capacity 32 MB internal memory/22 MB available for image storage (1 MB equals one million bytes) Review Quickview Yes Video output NTSC or PAL selectable Power 2 Kodak oxy-alkaline digital camera batteries AA ZR6 (non-rechargeable); 2-AA lithium digital camera batteries; 2-AA alkaline batteries; 2 Kodak Ni-MH rechargeable digital camera batteries AA; 1 Kodak lithium digital camera battery CRV3...
Appendix Kodak EasyShare C653/C623 zoom digital camera Internal storage capacity 32 MB internal memory/22 MB available for image storage (1 MB equals one million bytes) Review Quickview Yes Video output NTSC or PAL selectable Power 2 Kodak oxy-alkaline digital camera batteries AA ZR6 (non-rechargeable); 2-AA lithium digital camera batteries; 2-AA alkaline batteries; 2 Kodak Ni-MH rechargeable digital camera batteries AA; 1 Kodak lithium digital camera battery CRV3...


