

User Manual
Page 1
KODAK EASYSHARE Z915 Digital Camera Extended user guide www.kodak.com For interactive tutorials, visit www.kodak.com/go/howto For help with your camera, visit www.kodak.com/go/z915support
KODAK EASYSHARE Z915 Digital Camera Extended user guide www.kodak.com For interactive tutorials, visit www.kodak.com/go/howto For help with your camera, visit www.kodak.com/go/z915support
User Manual
Page 5
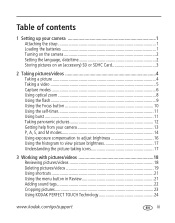
... the strap 1 Loading the batteries 1 Turning on the camera 2 Setting the language, date/time 2 Storing pictures on an (accessory) SD or SDHC Card 3 2 Taking pictures/videos 4 Taking a... 9 Using the Focus button 10 Using the self-timer 11 Using burst 11 Taking panoramic pictures 12 Getting help from your camera 13 P, A, S, and M modes 14 Using exposure compensation to adjust brightness 16 Using the histogram to view picture brightness ...the menu button in Review 21 Adding sound tags 22 Cropping pictures 23 Using KODAK PERFECT TOUCH Technology 24 www.kodak.com/go/support iii
... the strap 1 Loading the batteries 1 Turning on the camera 2 Setting the language, date/time 2 Storing pictures on an (accessory) SD or SDHC Card 3 2 Taking pictures/videos 4 Taking a... 9 Using the Focus button 10 Using the self-timer 11 Using burst 11 Taking panoramic pictures 12 Getting help from your camera 13 P, A, S, and M modes 14 Using exposure compensation to adjust brightness 16 Using the histogram to view picture brightness ...the menu button in Review 21 Adding sound tags 22 Cropping pictures 23 Using KODAK PERFECT TOUCH Technology 24 www.kodak.com/go/support iii
User Manual
Page 6
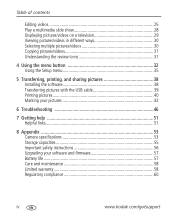
... 38 Transferring pictures with the USB cable 39 Printing pictures 40 Marking your pictures 42 6 Troubleshooting 46 7 Getting help 51 Helpful links 51 8 Appendix 53 Camera specifications 53 Storage capacities 55 Important safety instructions 56 Upgrading your software and firmware 57 Battery life 57 Care and maintenance 58 Limited warranty 58...
... 38 Transferring pictures with the USB cable 39 Printing pictures 40 Marking your pictures 42 6 Troubleshooting 46 7 Getting help 51 Helpful links 51 8 Appendix 53 Camera specifications 53 Storage capacities 55 Important safety instructions 56 Upgrading your software and firmware 57 Battery life 57 Care and maintenance 58 Limited warranty 58...
User Manual
Page 7
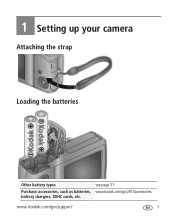
www.kodak.com/go /z915accessories battery chargers, SDHC cards, etc. 1 Setting up your camera Attaching the strap Loading the batteries Other battery types see page 57 Purchase accessories, such as batteries, www.kodak.com/go /support 1
www.kodak.com/go /z915accessories battery chargers, SDHC cards, etc. 1 Setting up your camera Attaching the strap Loading the batteries Other battery types see page 57 Purchase accessories, such as batteries, www.kodak.com/go /support 1
User Manual
Page 8
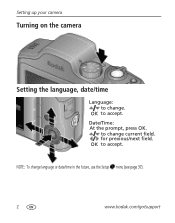
Setting up your camera Turning on the camera Setting the language, date/time Language: to change language or date/time in the future, use the Setup menu (see page 37). 2 www.kodak.com/go/support Date/Time: At the prompt, press OK. NOTE: To change . for previous/next field. OK to accept. OK to accept. to change current field.
Setting up your camera Turning on the camera Setting the language, date/time Language: to change language or date/time in the future, use the Setup menu (see page 37). 2 www.kodak.com/go/support Date/Time: At the prompt, press OK. NOTE: To change . for previous/next field. OK to accept. OK to accept. to change current field.
User Manual
Page 9
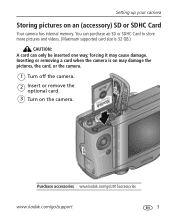
Inserting or removing a card when the camera is 32 GB.) CAUTION: A card can only be inserted one way; Purchase accessories www.kodak.com/go/z915accessories www.kodak.com/go/support 3 forcing it may damage the pictures, the card, or the camera. 1 Turn off the camera. 2 Insert or remove the optional card. 3 Turn on an (accessory) SD or SDHC Card Your camera has internal memory. Setting up your camera Storing pictures on the camera. You can purchase an SD or SDHC Card to store more pictures and videos. (Maximum supported card size is on may cause damage.
Inserting or removing a card when the camera is 32 GB.) CAUTION: A card can only be inserted one way; Purchase accessories www.kodak.com/go/z915accessories www.kodak.com/go/support 3 forcing it may damage the pictures, the card, or the camera. 1 Turn off the camera. 2 Insert or remove the optional card. 3 Turn on an (accessory) SD or SDHC Card Your camera has internal memory. Setting up your camera Storing pictures on the camera. You can purchase an SD or SDHC Card to store more pictures and videos. (Maximum supported card size is on may cause damage.

User Manual
Page 10
Using the framing marks Framing marks Framing marks indicate the camera focus area. 1 Press the Shutter button halfway. NOTE: Framing marks do not appear in all modes. 2 Taking pictures/... Framing marks do not appear in some SCN (scene) and Video modes. NOTE: For more information on the subject. If the camera is not focusing on the desired subject, release the Shutter button and recompose the scene. 2 Press the Shutter button completely down ....Smart Capture and other modes, see page 6. Multiple framing marks may appear when faces are detected. 4 www.kodak.com/go/support
Using the framing marks Framing marks Framing marks indicate the camera focus area. 1 Press the Shutter button halfway. NOTE: Framing marks do not appear in all modes. 2 Taking pictures/... Framing marks do not appear in some SCN (scene) and Video modes. NOTE: For more information on the subject. If the camera is not focusing on the desired subject, release the Shutter button and recompose the scene. 2 Press the Shutter button completely down ....Smart Capture and other modes, see page 6. Multiple framing marks may appear when faces are detected. 4 www.kodak.com/go/support

User Manual
Page 13
...children in bright light. Framing marks are off. (Flash setting can be changed.) Fireworks Bright, colorful light displays. Place the camera on a lit stage. NOTE: If the mode description turns off . Night Portrait Reducing red eye of yourself. Flash is...camera on a flat, steady Landscape surface or use a tripod. SCN mode For Portrait Full-frame portraits of people. Night Distant scenery at sunset. Flash does not fire. Manner/ Museum Quiet occasions, like a wedding or lecture. High ISO People indoors, in night scenes or low-light conditions. www.kodak...
...children in bright light. Framing marks are off. (Flash setting can be changed.) Fireworks Bright, colorful light displays. Place the camera on a lit stage. NOTE: If the mode description turns off . Night Portrait Reducing red eye of yourself. Flash is...camera on a flat, steady Landscape surface or use a tripod. SCN mode For Portrait Full-frame portraits of people. Night Distant scenery at sunset. Flash does not fire. Manner/ Museum Quiet occasions, like a wedding or lecture. High ISO People indoors, in night scenes or low-light conditions. www.kodak...
User Manual
Page 14
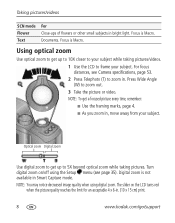
... taking pictures/videos. 1 Use the LCD to zoom in . (10 x 15 cm) print. 8 www.kodak.com/go/support For focus distances, see page 35). NOTE: You may notice decreased image quality when using the Setup menu (see Camera specifications, page 53. 2 Press Telephoto (T) to frame your subject while taking pictures. Documents. Focus...
... taking pictures/videos. 1 Use the LCD to zoom in . (10 x 15 cm) print. 8 www.kodak.com/go/support For focus distances, see page 35). NOTE: You may notice decreased image quality when using the Setup menu (see Camera specifications, page 53. 2 Press Telephoto (T) to frame your subject while taking pictures. Documents. Focus...
User Manual
Page 15
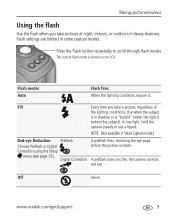
... Every time you take a picture, regardless of the lighting conditions. NOTE: (Not available in heavy shadows. A preflash does not fire; www.kodak.com/go/support 9 Taking pictures/videos Using the flash Use the flash when you take pictures at night, indoors, or outdoors in Smart Capture mode...is behind the subject). Flash settings are limited in shadow or is "backlit" (when the light is taken. In low light, hold the camera steady or use a tripod. Off Never. Press the Flash button repeatedly to scroll through flash modes The current flash mode is shown on ...
... Every time you take a picture, regardless of the lighting conditions. NOTE: (Not available in heavy shadows. A preflash does not fire; www.kodak.com/go/support 9 Taking pictures/videos Using the flash Use the flash when you take pictures at night, indoors, or outdoors in Smart Capture mode...is behind the subject). Flash settings are limited in shadow or is "backlit" (when the light is taken. In low light, hold the camera steady or use a tripod. Off Never. Press the Flash button repeatedly to scroll through flash modes The current flash mode is shown on ...
User Manual
Page 17
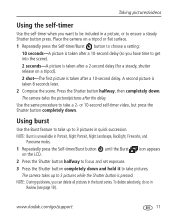
...-timer/Burst button until the Burst on a tripod). 2 shot-The first picture is taken after a 10-second delay. The camera takes the picture/pictures after a 2-second delay (for a steady, shutter release on the LCD. Use the same procedure to ...Shutter button press. NOTE: During quickview, you want to be included in a picture, or to take pictures. The camera takes up to 3 pictures while the Shutter button is taken after the delay. Press the Shutter button halfway, then completely...timer when you can delete all pictures in the burst series. www.kodak.com/go/support 11
...-timer/Burst button until the Burst on a tripod). 2 shot-The first picture is taken after a 10-second delay. The camera takes the picture/pictures after a 2-second delay (for a steady, shutter release on the LCD. Use the same procedure to ...Shutter button press. NOTE: During quickview, you want to be included in a picture, or to take pictures. The camera takes up to 3 pictures while the Shutter button is taken after the delay. Press the Shutter button halfway, then completely...timer when you can delete all pictures in the burst series. www.kodak.com/go/support 11
User Manual
Page 19
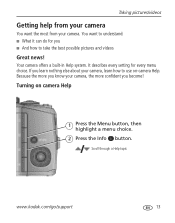
... to use on camera Help 1 Press the Menu button, then highlight a menu choice. 2 Press the Info button. If you become! Taking pictures/videos Getting help from your camera You want to take the best possible pictures and videos Great news! Turning on -camera Help. Your camera offers a built...-in Help system. You want the most from your camera, learn nothing else about your camera. It describes every setting for you ■ And how to understand: ■ What ...
... to use on camera Help 1 Press the Menu button, then highlight a menu choice. 2 Press the Info button. If you become! Taking pictures/videos Getting help from your camera You want to take the best possible pictures and videos Great news! Turning on -camera Help. Your camera offers a built...-in Help system. You want the most from your camera, learn nothing else about your camera. It describes every setting for you ■ And how to understand: ■ What ...

User Manual
Page 20
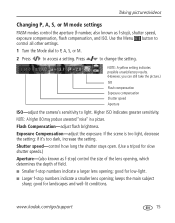
... Aperture Priority mode controls depth of field (the Aperture, exposure range of auto shooting with full access to its default setting. 14 www.kodak.com/go/support Use Reset Camera (see page 37) to reset P, A, S, or M mode to all menu options. Taking pictures/videos P, A, S, and M ...modes Use these modes when you want more control over your Shutter speed and flash subject is moving. The camera automatically sets the compensation aperture for proper exposure. (To prevent blur, use a tripod for slow shutter compensation, and ISO speed speeds.) NOTE: ...
... Aperture Priority mode controls depth of field (the Aperture, exposure range of auto shooting with full access to its default setting. 14 www.kodak.com/go/support Use Reset Camera (see page 37) to reset P, A, S, or M mode to all menu options. Taking pictures/videos P, A, S, and M ...modes Use these modes when you want more control over your Shutter speed and flash subject is moving. The camera automatically sets the compensation aperture for proper exposure. (To prevent blur, use a tripod for slow shutter compensation, and ISO speed speeds.) NOTE: ...
User Manual
Page 21
.... If the scene is too light, decrease the setting; NOTE: A higher ISO may produce unwanted "noise" in a picture. www.kodak.com/go/support 15 keeps the main subject sharp; NOTE: A yellow setting indicates possible unsatisfactory results. (However, you can still take ...the picture.) ISO Flash compensation Exposure compensation Shutter speed Aperture ISO-adjust the camera's sensitivity to change the setting. if it's too dark, increase the setting. good for low-light. ■ Larger f-stop ), shutter...
.... If the scene is too light, decrease the setting; NOTE: A higher ISO may produce unwanted "noise" in a picture. www.kodak.com/go/support 15 keeps the main subject sharp; NOTE: A yellow setting indicates possible unsatisfactory results. (However, you can still take ...the picture.) ISO Flash compensation Exposure compensation Shutter speed Aperture ISO-adjust the camera's sensitivity to change the setting. if it's too dark, increase the setting. good for low-light. ■ Larger f-stop ), shutter...
User Manual
Page 26
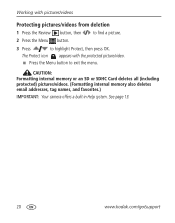
... or an SD or SDHC Card deletes all (including protected) pictures/videos. (Formatting internal memory also deletes email addresses, tag names, and favorites.) IMPORTANT: Your camera offers a built-in Help system. See page 13. 20 www...
... or an SD or SDHC Card deletes all (including protected) pictures/videos. (Formatting internal memory also deletes email addresses, tag names, and favorites.) IMPORTANT: Your camera offers a built-in Help system. See page 13. 20 www...
User Manual
Page 27
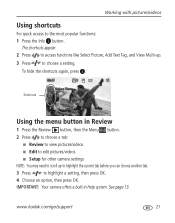
... 13. www.kodak.com/go/support 21 Shortcuts Using the menu button in Help system. IMPORTANT: Your camera offers a built-in Review 1 Press the Review button, then the Menu button. 2 Press to choose a tab: ■ Review to view pictures/videos ■ Edit to edit pictures/videos ■ Setup for other camera settings NOTE...
... 13. www.kodak.com/go/support 21 Shortcuts Using the menu button in Help system. IMPORTANT: Your camera offers a built-in Review 1 Press the Review button, then the Menu button. 2 Press to choose a tab: ■ Review to view pictures/videos ■ Edit to edit pictures/videos ■ Setup for other camera settings NOTE...
User Manual
Page 28
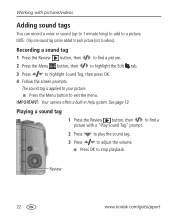
See page 13. IMPORTANT: Your camera offers a built-in Help system. NOTE: Only one sound tag can record a voice or sound (up to 1 minute long) to add to a picture. Recording a sound ... tag is applied to your picture. ■ Press the Menu button to highlight Sound Tag, then press OK. 4 Follow the screen prompts. Review 22 www.kodak.com/go/support Working with a "Play Sound Tag" prompt. 2 Press to play the sound tag. 3 Press to adjust the volume. ■ Press OK to stop...
See page 13. IMPORTANT: Your camera offers a built-in Help system. NOTE: Only one sound tag can record a voice or sound (up to 1 minute long) to add to a picture. Recording a sound ... tag is applied to your picture. ■ Press the Menu button to highlight Sound Tag, then press OK. 4 Follow the screen prompts. Review 22 www.kodak.com/go/support Working with a "Play Sound Tag" prompt. 2 Press to play the sound tag. 3 Press to adjust the volume. ■ Press OK to stop...

User Manual
Page 29
... cropped, the original saved. (Cropped pictures cannot be cropped again.) ■ Press the Menu button to move the crop 5 Follow the screen prompts. IMPORTANT: Your camera offers a built-in /out. Then press OK. Working with pictures/videos Cropping pictures You can crop a picture so that only the desired portion of the... Menu button, then to highlight the Edit tab. 3 Press to highlight Crop, then press OK. 4 Press the Zoom lever (T/W) to zoom in Help system. www.kodak.com/go/support 23 See page 13.
... cropped, the original saved. (Cropped pictures cannot be cropped again.) ■ Press the Menu button to move the crop 5 Follow the screen prompts. IMPORTANT: Your camera offers a built-in /out. Then press OK. Working with pictures/videos Cropping pictures You can crop a picture so that only the desired portion of the... Menu button, then to highlight the Edit tab. 3 Press to highlight Crop, then press OK. 4 Press the Zoom lever (T/W) to zoom in Help system. www.kodak.com/go/support 23 See page 13.
User Manual
Page 30
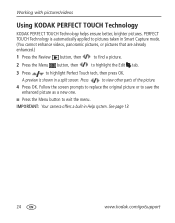
Working with pictures/videos Using KODAK PERFECT TOUCH Technology KODAK PERFECT TOUCH Technology helps ensure better, brighter pictures. IMPORTANT: Your camera offers a built-in Smart Capture mode. (You cannot enhance videos, panoramic pictures, or pictures that are already enhanced.) 1 Press the Review button, then to find a ... other parts of the picture. 4 Press OK. Press to exit the menu. PERFECT TOUCH Technology is shown in a split screen. See page 13. 24 www.kodak.com/go/support A preview is automatically applied to highlight Perfect Touch tech, then press OK.
Working with pictures/videos Using KODAK PERFECT TOUCH Technology KODAK PERFECT TOUCH Technology helps ensure better, brighter pictures. IMPORTANT: Your camera offers a built-in Smart Capture mode. (You cannot enhance videos, panoramic pictures, or pictures that are already enhanced.) 1 Press the Review button, then to find a ... other parts of the picture. 4 Press OK. Press to exit the menu. PERFECT TOUCH Technology is shown in a split screen. See page 13. 24 www.kodak.com/go/support A preview is automatically applied to highlight Perfect Touch tech, then press OK.
User Manual
Page 31
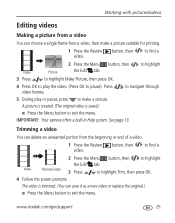
... a new video or replace the original.) ■ Press the Menu button to make a picture suitable for printing. 1 Press the Review video. www.kodak.com/go/support 25 button, then to find a Video 3 Press Picture 2 Press the Menu button, then the Edit tab. to highlight 4 Press ...press to exit the menu. See page 13. The video is saved.) ■ Press the Menu button to pause). Press video frames. IMPORTANT: Your camera offers a built-in Help system. Video Trimmed video 3 Press to find a 2 Press the Menu button, then to highlight Make Picture, then press...
... a new video or replace the original.) ■ Press the Menu button to make a picture suitable for printing. 1 Press the Review video. www.kodak.com/go/support 25 button, then to find a Video 3 Press Picture 2 Press the Menu button, then the Edit tab. to highlight 4 Press ...press to exit the menu. See page 13. The video is saved.) ■ Press the Menu button to pause). Press video frames. IMPORTANT: Your camera offers a built-in Help system. Video Trimmed video 3 Press to find a 2 Press the Menu button, then to highlight Make Picture, then press...


