
User Guide
Page 4
Stripper plate 3 4 5 3. Platen roller 5. Product Overview Internal View with Ribbon Installed 1 2 Internal View with Ribbon Removed ii 1. Thermal head 2. Cleaning roller, rear 4. Cleaning roller, front May 4, 2005
Stripper plate 3 4 5 3. Platen roller 5. Product Overview Internal View with Ribbon Installed 1 2 Internal View with Ribbon Removed ii 1. Thermal head 2. Cleaning roller, rear 4. Cleaning roller, front May 4, 2005
User Guide
Page 7
... the Printer Package Contents ...1-1 Before You Begin ...1-2 Recommended Air Flow Clearances ...1-2 Removing the Packing Material ...1-3 Installing the Trim Tray...1-4 Installing the Print Catcher...1-4 Loading the Ribbon...1-5 Connecting the Cables ...1-7 Connecting the Power Cable...1-7 Connecting the USB Cable ...1-8 Turning On the Printer...1-8 Loading the Paper ...1-9 Making a Test Print ...1-11 Online User Guide...
... the Printer Package Contents ...1-1 Before You Begin ...1-2 Recommended Air Flow Clearances ...1-2 Removing the Packing Material ...1-3 Installing the Trim Tray...1-4 Installing the Print Catcher...1-4 Loading the Ribbon...1-5 Connecting the Cables ...1-7 Connecting the Power Cable...1-7 Connecting the USB Cable ...1-8 Turning On the Printer...1-8 Loading the Paper ...1-9 Making a Test Print ...1-11 Online User Guide...

User Guide
Page 8
... Messages...6-2 Clearing a Paper Jam...6-3 Method 1 ...6-3 Method 2 ...6-3 Recovering from a Power Interruption...6-4 Appendix A: Important Printer Information System Requirements ...A-1 Printer Specifications ...A-1 Printer Supplies ...A-2 Paper and Ribbon ...A-2 Handling and Storing the Paper and Ribbon A-2 Thermal Printer Cleaning Kit ...A-3 Packing and Transporting the Printer...A-3 ENERGY STAR Partner...A-3 Getting Help ...A-3 Appendix B: Safety and Regulatory Information Important Safety Information...
... Messages...6-2 Clearing a Paper Jam...6-3 Method 1 ...6-3 Method 2 ...6-3 Recovering from a Power Interruption...6-4 Appendix A: Important Printer Information System Requirements ...A-1 Printer Specifications ...A-1 Printer Supplies ...A-2 Paper and Ribbon ...A-2 Handling and Storing the Paper and Ribbon A-2 Thermal Printer Cleaning Kit ...A-3 Packing and Transporting the Printer...A-3 ENERGY STAR Partner...A-3 Getting Help ...A-3 Appendix B: Safety and Regulatory Information Important Safety Information...
User Guide
Page 10
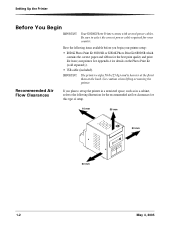
... cable required for details on the Photo Print Kit (sold separately). • USB cable (included). Setting Up the Printer Before You Begin IMPORTANT: Your KODAK Photo Printer comes with several power cables. Use caution when lifting or moving the printer. See Appendix A for your printer setup: •...; KODAK Photo Print Kit 6800/4R or KODAK Photo Print Kit 6800/6R which contains the correct paper and ribbon for this type of setup. 10 mm 50 mm 50 mm 50 mm 1-2 May 4, 2005 Be sure...
... cable required for details on the Photo Print Kit (sold separately). • USB cable (included). Setting Up the Printer Before You Begin IMPORTANT: Your KODAK Photo Printer comes with several power cables. Use caution when lifting or moving the printer. See Appendix A for your printer setup: •...; KODAK Photo Print Kit 6800/4R or KODAK Photo Print Kit 6800/6R which contains the correct paper and ribbon for this type of setup. 10 mm 50 mm 50 mm 50 mm 1-2 May 4, 2005 Be sure...
User Guide
Page 13
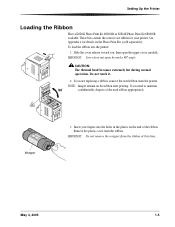
Setting Up the Printer Loading the Ribbon Have a KODAK Photo Print Kit 6800/4R or KODAK Photo Print Kit 6800/6R available. To load the ribbon into the holes in the plastic on the end of the used ribbon from the printer. CAUTION: The thermal head becomes extremely hot during ... 3. May 4, 2005 1-5 IMPORTANT: Cover does not open the upper cover carefully. If you need to maintain 90˚ confidentiality, dispose of the ribbon. See Appendix A for your fingers into the printer: 1. If you , then open beyond a 90° angle. IMPORTANT: Do not remove the wrapper...
Setting Up the Printer Loading the Ribbon Have a KODAK Photo Print Kit 6800/4R or KODAK Photo Print Kit 6800/6R available. To load the ribbon into the holes in the plastic on the end of the used ribbon from the printer. CAUTION: The thermal head becomes extremely hot during ... 3. May 4, 2005 1-5 IMPORTANT: Cover does not open the upper cover carefully. If you need to maintain 90˚ confidentiality, dispose of the ribbon. See Appendix A for your fingers into the printer: 1. If you , then open beyond a 90° angle. IMPORTANT: Do not remove the wrapper...

User Guide
Page 14
Remove the label and wrapper from the ribbon. If there is any slack in the ribbon can cause a paper jam when making prints. Place the left side of the take -up spool into the notches on the left. 10. Adjust the ... lugs on the spool holder lock into the spool holder on the take -up spool. 11. Lugs Notches Thumb wheel Label 7. IMPORTANT: Slack in the ribbon, remove it by turning the supply spool. Push the bar code end of the supply spool into the spool holder on the left side of...
Remove the label and wrapper from the ribbon. If there is any slack in the ribbon can cause a paper jam when making prints. Place the left side of the take -up spool into the notches on the left. 10. Adjust the ... lugs on the spool holder lock into the spool holder on the take -up spool. 11. Lugs Notches Thumb wheel Label 7. IMPORTANT: Slack in the ribbon, remove it by turning the supply spool. Push the bar code end of the supply spool into the spool holder on the left side of...

User Guide
Page 32
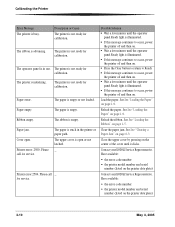
...in two ways: • Select Start > Programs > KODAK Calibration Utility > Uninstall KODAK Calibration Utility and follow the directions to uninstall the software. • Select Start > Settings > Control Panel > Add/Remove Programs > KODAK Calibration Utility and follow the directions to locate the media.... Calibrating the Printer Uninstalling the Calibration Software You can remove the calibration software from your KODAK Service Representative. The media file, which identifies the ribbon and paper characteristics of the media you are secure. • Check that the printer ...
...in two ways: • Select Start > Programs > KODAK Calibration Utility > Uninstall KODAK Calibration Utility and follow the directions to uninstall the software. • Select Start > Settings > Control Panel > Add/Remove Programs > KODAK Calibration Utility and follow the directions to locate the media.... Calibrating the Printer Uninstalling the Calibration Software You can remove the calibration software from your KODAK Service Representative. The media file, which identifies the ribbon and paper characteristics of the media you are secure. • Check that the printer ...
User Guide
Page 34
... off and then on . • Wait a few minutes until the operator panel Ready light is not ready for calibration. See See "Loading the Ribbon" on page 1-9. The printer is illuminated. • If this message continues to occur, power the printer off and then on. • Press ...power the printer off and then on . • Wait a few minutes until it clicks. The upper cover is not ready for calibration. Contact your KODAK Service Representative. The printer is advancing. Paper jam. Description or Cause The printer is open . Have available: • the error code number •...
... off and then on . • Wait a few minutes until the operator panel Ready light is not ready for calibration. See See "Loading the Ribbon" on page 1-9. The printer is illuminated. • If this message continues to occur, power the printer off and then on. • Press ...power the printer off and then on . • Wait a few minutes until it clicks. The upper cover is not ready for calibration. Contact your KODAK Service Representative. The printer is advancing. Paper jam. Description or Cause The printer is open . Have available: • the error code number •...
User Guide
Page 38
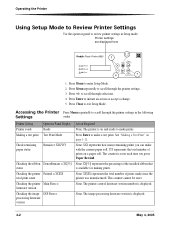
...Printer ready Making a test print Operator Panel Display Ready Test Print Mode Check remaining paper status Remain = XXX/YYY Checking the ribbon DonorRemain = XX[%] status Checking the printer Printed = XXXXX total print count Action Required None. Press Enter to review printer ...The image processing firmware version is displayed. 4-2 May 4, 2005 Press Menu repeatedly to exit Setup Mode. Printer settings are displayed here Kodak Photo Printer 6850 Power Ready Error 1,2 3 Paper Menu Advance 4 Enter Paper Rewind/Clear 5 1. Press Clear to scroll through the printer settings. ...
...Printer ready Making a test print Operator Panel Display Ready Test Print Mode Check remaining paper status Remain = XXX/YYY Checking the ribbon DonorRemain = XX[%] status Checking the printer Printed = XXXXX total print count Action Required None. Press Enter to review printer ...The image processing firmware version is displayed. 4-2 May 4, 2005 Press Menu repeatedly to exit Setup Mode. Printer settings are displayed here Kodak Photo Printer 6850 Power Ready Error 1,2 3 Paper Menu Advance 4 Enter Paper Rewind/Clear 5 1. Press Clear to scroll through the printer settings. ...

User Guide
Page 39
... printer. Only clean the thermal head if directed to prevent dirt from entering the printer. CAUTION: Alcohol is paper or ribbon loaded in the KODAK Thermal Printer Cleaning Kit. 2. 5 Maintaining the Printer To ensure good printer performance and high-quality prints, keep the printer...before performing maintenance procedures. CAUTION: Never use alcohol pads. Fire or electric shock could result. Do not include the thermal head in your KODAK Service Representative. 1. Wash your hands with a damp, lint-free cloth. 2. Vacuum the filter openings to fall or spill inside the printer...
... printer. Only clean the thermal head if directed to prevent dirt from entering the printer. CAUTION: Alcohol is paper or ribbon loaded in the KODAK Thermal Printer Cleaning Kit. 2. 5 Maintaining the Printer To ensure good printer performance and high-quality prints, keep the printer...before performing maintenance procedures. CAUTION: Never use alcohol pads. Fire or electric shock could result. Do not include the thermal head in your KODAK Service Representative. 1. Wash your hands with a damp, lint-free cloth. 2. Vacuum the filter openings to fall or spill inside the printer...
User Guide
Page 44
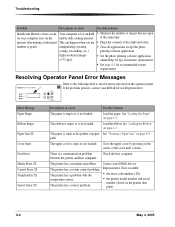
...the cover until it clicks. Load the paper. See "Loading the Ribbon" on the operator panel. There is open on your computer (not on page 6-3. Resolving Operator Panel Error Messages Kodak Photo Printer 6850 Power Ready Error Paper Menu Advance Enter Paper Rewind/Clear Refer to the.... at the same time. If the problem persists, contact your KODAK Service The printer has a system control problem. Close the upper cover by pressing on page 1-9. The ribbon is empty or is not loaded. Contact your KODAK Service Representative. online Help for tips on the printer data plate)...
...the cover until it clicks. Load the paper. See "Loading the Ribbon" on the operator panel. There is open on your computer (not on page 6-3. Resolving Operator Panel Error Messages Kodak Photo Printer 6850 Power Ready Error Paper Menu Advance Enter Paper Rewind/Clear Refer to the.... at the same time. If the problem persists, contact your KODAK Service The printer has a system control problem. Close the upper cover by pressing on page 1-9. The ribbon is empty or is not loaded. Contact your KODAK Service Representative. online Help for tips on the printer data plate)...
User Guide
Page 45
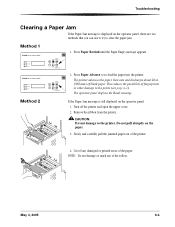
... message is still displayed on the operator panel: 1. The operator panel displays the Ready message. Turn off any of the paper. Kodak Photo Printer 6850 Power Ready Error Paper Menu Advance Enter Paper Rewind/Clear 2. Slowly and carefully pull the jammed paper out of blank paper. Cut ...off the printer and open the upper cover. 2. Remove the ribbon from the printer. Method 2 If the Paper Jam message is displayed on the ...
... message is still displayed on the operator panel: 1. The operator panel displays the Ready message. Turn off any of the paper. Kodak Photo Printer 6850 Power Ready Error Paper Menu Advance Enter Paper Rewind/Clear 2. Slowly and carefully pull the jammed paper out of blank paper. Cut ...off the printer and open the upper cover. 2. Remove the ribbon from the printer. Method 2 If the Paper Jam message is displayed on the ...
User Guide
Page 46
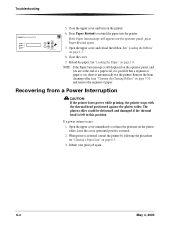
... paper. NOTE: If the Paper Jam message is still displayed on the platen roller. If a power outage occurs: 1. Reload the paper. See "Loading the Ribbon" on page 5-3) and remove the segment of paper is restored. 2. Recovering from a Power Interruption CAUTION: If the printer loses power while printing, the printer... See "Loading the Paper" on page 6-3. 3. Open the upper cover immediately to rewind the paper into the printer. Open the upper cover and reload the ribbon. Troubleshooting Kodak Photo Printer 6850 Power Ready Error Paper Menu Advance Enter Paper Rewind/Clear 5.
... paper. NOTE: If the Paper Jam message is still displayed on the platen roller. If a power outage occurs: 1. Reload the paper. See "Loading the Ribbon" on page 5-3) and remove the segment of paper is restored. 2. Recovering from a Power Interruption CAUTION: If the printer loses power while printing, the printer... See "Loading the Paper" on page 6-3. 3. Open the upper cover immediately to rewind the paper into the printer. Open the upper cover and reload the ribbon. Troubleshooting Kodak Photo Printer 6850 Power Ready Error Paper Menu Advance Enter Paper Rewind/Clear 5.
User Guide
Page 47
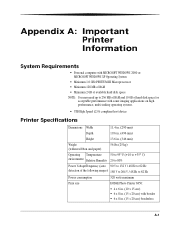
...Speed (2.0) compliant host device Printer Specifications Dimensions Width 11.4 in. (290 mm) Depth 19.6 in. (496 mm) Height 13.6 in. (346 mm) Weight (without ribbon and paper) 56 lbs (25 kg) Operating Temperature 50 to 95° F (+10 to +35° C) environment Relative Humidity 20 to 80% Power Voltage/Frequency...V / 48 Hz to 62 Hz detection of the following ranges) 180 V to 264 V / 48 Hz to 62 Hz Power consumption 320 watts maximum Print size KODAK Photo Printer 6850: • 4 x 6 in. (10 x 15 cm) • 6 x 8 in. (15 x 20 cm) with border • 6 x 8 in. (15 x 20 cm)...
...Speed (2.0) compliant host device Printer Specifications Dimensions Width 11.4 in. (290 mm) Depth 19.6 in. (496 mm) Height 13.6 in. (346 mm) Weight (without ribbon and paper) 56 lbs (25 kg) Operating Temperature 50 to 95° F (+10 to +35° C) environment Relative Humidity 20 to 80% Power Voltage/Frequency...V / 48 Hz to 62 Hz detection of the following ranges) 180 V to 264 V / 48 Hz to 62 Hz Power consumption 320 watts maximum Print size KODAK Photo Printer 6850: • 4 x 6 in. (10 x 15 cm) • 6 x 8 in. (15 x 20 cm) with border • 6 x 8 in. (15 x 20 cm)...

User Guide
Page 48
... / 4R Specifications Storage specifications 86° F (30° C) or lower 60% relative humidity or lower Capacity 750 prints, paper and ribbon* Paper and ribbon width 6 in. (15 cm) Ribbon patch length 4 in. (10 cm) KODAK Photo Print Kit 6800 / 6R Specifications Storage specifications 86° F (30° C) or lower 60% relative humidity or lower...
... / 4R Specifications Storage specifications 86° F (30° C) or lower 60% relative humidity or lower Capacity 750 prints, paper and ribbon* Paper and ribbon width 6 in. (15 cm) Ribbon patch length 4 in. (10 cm) KODAK Photo Print Kit 6800 / 6R Specifications Storage specifications 86° F (30° C) or lower 60% relative humidity or lower...

User Guide
Page 49
...ENERGY STAR Partner As an ENERGY STAR Partner, Eastman Kodak Company has determined that this manual, Chapter 6. • Your KODAK Service Representative. It can cause eye irritation and dry skin. Remove the paper and ribbon from the following any maintenance procedures where you use... alcohol pads. May 4, 2005 A-3 Important Printer Information Thermal Printer Cleaning Kit Use the KODAK Thermal Printer Cleaning Kit when performing routine maintenance on the...
...ENERGY STAR Partner As an ENERGY STAR Partner, Eastman Kodak Company has determined that this manual, Chapter 6. • Your KODAK Service Representative. It can cause eye irritation and dry skin. Remove the paper and ribbon from the following any maintenance procedures where you use... alcohol pads. May 4, 2005 A-3 Important Printer Information Thermal Printer Cleaning Kit Use the KODAK Thermal Printer Cleaning Kit when performing routine maintenance on the...
User Guide
Page 55
... software installing, 3-1 uninstalling, 3-8 calibration utility, 3-1 checking paper status, 4-2 ribbon status, 4-2 cleaning cabinet, 5-1 cleaning rollers, 5-3 platen roller, 5-3 stripper plate...ribbon, A-2 help with your printer, A-3 humidity paper and ribbon specifications, A-2 printer specifications, A-1 I installing calibration software, 3-1 paper, 1-9 print catcher, 1-4 printer driver, 2-1 ribbon, 1-5 trim tray, 1-4 K KODAK Photo Print Kit, A-2 KODAK Thermal Printer Cleaning Kit, A-3 L labels, safety, B-2 loading paper, 1-9 ribbon, 1-5 M maintenance cabinet, 5-1 cleaning rollers, 5-3 KODAK...
... software installing, 3-1 uninstalling, 3-8 calibration utility, 3-1 checking paper status, 4-2 ribbon status, 4-2 cleaning cabinet, 5-1 cleaning rollers, 5-3 platen roller, 5-3 stripper plate...ribbon, A-2 help with your printer, A-3 humidity paper and ribbon specifications, A-2 printer specifications, A-1 I installing calibration software, 3-1 paper, 1-9 print catcher, 1-4 printer driver, 2-1 ribbon, 1-5 trim tray, 1-4 K KODAK Photo Print Kit, A-2 KODAK Thermal Printer Cleaning Kit, A-3 L labels, safety, B-2 loading paper, 1-9 ribbon, 1-5 M maintenance cabinet, 5-1 cleaning rollers, 5-3 KODAK...
User Guide
Page 56
..., resolving, 6-1 printing making prints, 4-1 test print, 4-2 I-2 prints handling and storing, 4-1 making, 4-1 problems, 6-1 R radio frequency compliance, B-3 Ready message, operator panel, 4-2 recycling, B-4 reordering supplies, A-2 ribbon handling and storing, A-2 loading, 1-5 reordering, A-2 specifications, A-2 ribbon status, checking, 4-2 S safety compliance, B-3 tips, B-1 warning labels, B-2 setting up the printer, 1-1 setup mode, 4-2 software installing calibration software, 3-1 printer driver, 2-1 uninstalling calibration software...
..., resolving, 6-1 printing making prints, 4-1 test print, 4-2 I-2 prints handling and storing, 4-1 making, 4-1 problems, 6-1 R radio frequency compliance, B-3 Ready message, operator panel, 4-2 recycling, B-4 reordering supplies, A-2 ribbon handling and storing, A-2 loading, 1-5 reordering, A-2 specifications, A-2 ribbon status, checking, 4-2 S safety compliance, B-3 tips, B-1 warning labels, B-2 setting up the printer, 1-1 setup mode, 4-2 software installing calibration software, 3-1 printer driver, 2-1 uninstalling calibration software...

User Manual
Page 8
Stripper plate 3 4 5 3. Platen roller 5. Cleaning roller, front November 2011 Cleaning roller, rear 4. Thermal head 2. Product Overview Internal View with Ribbon Installed 1 2 Internal View with Ribbon Removed ii 1.
Stripper plate 3 4 5 3. Platen roller 5. Cleaning roller, front November 2011 Cleaning roller, rear 4. Thermal head 2. Product Overview Internal View with Ribbon Installed 1 2 Internal View with Ribbon Removed ii 1.
User Manual
Page 11
... the Printer Package Contents...1-1 Before You Begin ...1-2 Recommended Air Flow Clearances ...1-2 Removing the Packing Material ...1-2 Installing the Trim Tray...1-4 Installing the Print Catcher...1-4 Loading the Ribbon...1-5 Connecting the Cables ...1-7 Connecting the Power Cable...1-7 Connecting the USB Cable...1-8 Turning On the Printer ...1-8 Loading the Paper...1-8 Making a Test Print ...1-10 Online User Guide...
... the Printer Package Contents...1-1 Before You Begin ...1-2 Recommended Air Flow Clearances ...1-2 Removing the Packing Material ...1-2 Installing the Trim Tray...1-4 Installing the Print Catcher...1-4 Loading the Ribbon...1-5 Connecting the Cables ...1-7 Connecting the Power Cable...1-7 Connecting the USB Cable...1-8 Turning On the Printer ...1-8 Loading the Paper...1-8 Making a Test Print ...1-10 Online User Guide...

