

Brochure
Page 2
... sheets of driver, application software, operating system and PC.) i1210: Single CCD; x 2.5 in . Kodak Capture Software, Lite; aggressive cropping; Kodak A4 Flatbed Accessory with 1.8-meter (6 ft.) cable; Printed using Kodak technology. x 34 in.)/50 mm x 63.5 mm (2.0 in .) 34-413 g/m2 (9-110 lb.) paper; deskew; relative cropping; dual stream scanning; background color smoothing Single and multi-page TIFF, JPEG, RTF, PDF, searchable PDF One-year warranty Kodak white imaging background accessory (front); auto...
... sheets of driver, application software, operating system and PC.) i1210: Single CCD; x 2.5 in . Kodak Capture Software, Lite; aggressive cropping; Kodak A4 Flatbed Accessory with 1.8-meter (6 ft.) cable; Printed using Kodak technology. x 34 in.)/50 mm x 63.5 mm (2.0 in .) 34-413 g/m2 (9-110 lb.) paper; deskew; relative cropping; dual stream scanning; background color smoothing Single and multi-page TIFF, JPEG, RTF, PDF, searchable PDF One-year warranty Kodak white imaging background accessory (front); auto...

User Manual
Page 2
... 7 Installing the scanner 7 Installing the Kodak Driver Software 7 Connecting the power cord to the scanner 10 Connecting the USB cable 11 Attaching the output tray 11 Turning on the scanner and finalizing Kodak Driver Software installation 12 Installing application software 13 Scanner components 14 Locking the scanner 16 3 Using the Scanner 17 Turning the scanner on and off 17 Scanner positions 17 Tilting the scanner body 18 Adjusting the output tray 19 Adjusting the input tray 21 Adjusting the side guides 22 Start and stop scanning 22 Document preparation...
... 7 Installing the scanner 7 Installing the Kodak Driver Software 7 Connecting the power cord to the scanner 10 Connecting the USB cable 11 Attaching the output tray 11 Turning on the scanner and finalizing Kodak Driver Software installation 12 Installing application software 13 Scanner components 14 Locking the scanner 16 3 Using the Scanner 17 Turning the scanner on and off 17 Scanner positions 17 Tilting the scanner body 18 Adjusting the output tray 19 Adjusting the input tray 21 Adjusting the side guides 22 Start and stop scanning 22 Document preparation...

User Manual
Page 3
... different settings for each side of your documents - 4 Image Processing 39 Overview 39 Starting the Scan Validation Tool 39 Scan Validation Tool dialog box 40 Using the TWAIN datasource 41 Terminology and features 41 How do I begin 42 Selecting Image settings 43 Selecting Device settings 45 The main Kodak Scanner window 46 The Image Settings window 49 Preview area 50 General tab 51 Size tab 53 Adjustments tab: black and white 56 Adjustments tab: color...
... different settings for each side of your documents - 4 Image Processing 39 Overview 39 Starting the Scan Validation Tool 39 Scan Validation Tool dialog box 40 Using the TWAIN datasource 41 Terminology and features 41 How do I begin 42 Selecting Image settings 43 Selecting Device settings 45 The main Kodak Scanner window 46 The Image Settings window 49 Preview area 50 General tab 51 Size tab 53 Adjustments tab: black and white 56 Adjustments tab: color...

User Manual
Page 4
... warranty on the feed module 110 Vacuuming the scanner 111 Cleaning the imaging area 111 Supplies and consumables 112 Accessories 112 6 Troubleshooting 113 Indicator lights and error codes 113 Clearing a document jam 114 Problem solving 115 Error code listing 116 Appendix A Specifications 117 Appendix B TWAIN Image Processing Terminology 118 Appendix C Warranty - 5 Maintenance 101 Cleaning the scanner 101 Replacing parts 101 Opening the scanner cover 102 Cleaning the rollers and transport 102 Cleaning or replacing the separation module 103 Replacing the separation module...
... warranty on the feed module 110 Vacuuming the scanner 111 Cleaning the imaging area 111 Supplies and consumables 112 Accessories 112 6 Troubleshooting 113 Indicator lights and error codes 113 Clearing a document jam 114 Problem solving 115 Error code listing 116 Appendix A Specifications 117 Appendix B TWAIN Image Processing Terminology 118 Appendix C Warranty - 5 Maintenance 101 Cleaning the scanner 101 Replacing parts 101 Opening the scanner cover 102 Cleaning the rollers and transport 102 Cleaning or replacing the separation module 103 Replacing the separation module...

User Manual
Page 10
... - Printed User's Guide, English - Quick Installation Guide - End the frustration of productivity by searching for maximum performance. Robust new tools enable you begin open the box and check the contents: • Kodak i1210 or i1220 Scanner or Kodak i1310 or i1320 Scanner • Output tray • Output tray extender and exit deflector • USB 2.0 cable • Power supply • AC power cord bundles • Sample Cleaning Kit • Welcome Folio which includes: - PaperPort is perfect...
... - Printed User's Guide, English - Quick Installation Guide - End the frustration of productivity by searching for maximum performance. Robust new tools enable you begin open the box and check the contents: • Kodak i1210 or i1220 Scanner or Kodak i1310 or i1320 Scanner • Output tray • Output tray extender and exit deflector • USB 2.0 cable • Power supply • AC power cord bundles • Sample Cleaning Kit • Welcome Folio which includes: - PaperPort is perfect...
User Manual
Page 11
... free hard disk space • CD-ROM drive Installing the scanner Install the scanner in the CD-ROM drive. The installation program starts automatically. If you have separate installation CDs. For longer documents/higher resolutions: Pentium IV, 3.2 GHz processor, 3 GB RAM • USB port 2.0 (compatible with USB 1.1 but at slower speeds) • Microsoft Windows XP SP2, (supports USB 2.0); Install the Kodak Driver Software on scanner power and finalize the Kodak Driver Software installation. 6. Select Install Scanner Software. Installing the Kodak Driver Software Install...
... free hard disk space • CD-ROM drive Installing the scanner Install the scanner in the CD-ROM drive. The installation program starts automatically. If you have separate installation CDs. For longer documents/higher resolutions: Pentium IV, 3.2 GHz processor, 3 GB RAM • USB port 2.0 (compatible with USB 1.1 but at slower speeds) • Microsoft Windows XP SP2, (supports USB 2.0); Install the Kodak Driver Software on scanner power and finalize the Kodak Driver Software installation. 6. Select Install Scanner Software. Installing the Kodak Driver Software Install...

User Manual
Page 18
... view Scanner cover Input tray Function window Scroll button Start button LED indicator Tilt release button Output tray Scanner cover - press this button to scan • Flashing green: waiting/Energy Star; Output tray - Input tray - allows you to 50 documents (20 lb./75 g/m2) in the function window. LED Indicator - holds up to select or scroll through 9. scanning/busy NOTE: The Start button, Scroll button and Function window are used with the displayed number in...
... view Scanner cover Input tray Function window Scroll button Start button LED indicator Tilt release button Output tray Scanner cover - press this button to scan • Flashing green: waiting/Energy Star; Output tray - Input tray - allows you to 50 documents (20 lb./75 g/m2) in the function window. LED Indicator - holds up to select or scroll through 9. scanning/busy NOTE: The Start button, Scroll button and Function window are used with the displayed number in...
User Manual
Page 29
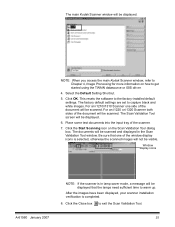
... scanned and displayed in the Scan Validation Tool window. Click the Close box to capture black and white images. Select the Default Setting Shortcut. 5. Click OK. Place some test documents into the input tray of the document will be scanned. For an i1220 or i1320 Scanner both sides of the window display icons is completed. 8. Be sure that the lamps need sufficient time to get started using the TWAIN datasource or ISIS driver. 4. The Scan Validation Tool screen...
... scanned and displayed in the Scan Validation Tool window. Click the Close box to capture black and white images. Select the Default Setting Shortcut. 5. Click OK. Place some test documents into the input tray of the document will be scanned. For an i1220 or i1320 Scanner both sides of the window display icons is completed. 8. Be sure that the lamps need sufficient time to get started using the TWAIN datasource or ISIS driver. 4. The Scan Validation Tool screen...
User Manual
Page 30
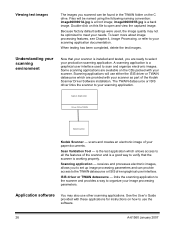
... 2007 Files will use either the ISIS driver or TWAIN datasource which allows access to all the features of the Kodak Scanner Driver Software installation. Capture Application Driver: ISIS or TWAIN Kodak Scanner Kodak Scanner - receives and processes electronic images, allows you to set up image processing parameters and can be optimized to scan and organize electronic images. See the User's Guide provided with these applications for instructions on how to your paper documents. Viewing test images The images you...
... 2007 Files will use either the ISIS driver or TWAIN datasource which allows access to all the features of the Kodak Scanner Driver Software installation. Capture Application Driver: ISIS or TWAIN Kodak Scanner Kodak Scanner - receives and processes electronic images, allows you to set up image processing parameters and can be optimized to scan and organize electronic images. See the User's Guide provided with these applications for instructions on how to your paper documents. Viewing test images The images you...

User Manual
Page 34
... images are scanned, they are scanning documents with multiple pages or sides, each image: 2006-04-27(1).pdf (for the first PDF file created), 2006-04-27(2) for each page or side is saved as a separate JPEG or TIFF file. • TIFF - Folder: enter the folder name where you want to add a prefix to locate the folder. if you are automatically assigned a unique file name. Settings button - Searchable or RTF as PDF files, the software automatically assigns...
... images are scanned, they are scanning documents with multiple pages or sides, each image: 2006-04-27(1).pdf (for the first PDF file created), 2006-04-27(2) for each page or side is saved as a separate JPEG or TIFF file. • TIFF - Folder: enter the folder name where you want to add a prefix to locate the folder. if you are automatically assigned a unique file name. Settings button - Searchable or RTF as PDF files, the software automatically assigns...

User Manual
Page 45
... of images scanned during the current Scan Validation Tool session. • To access the TWAIN datasource (or ISIS driver), double-click the Setup icon on the Kodak i1220 or i1320 Scanner (duplex scanner). Refer to display while scanning. If none of the image processing features already. With the new graphical user interface in this manual, all options are using the TWAIN datasource, the main Kodak Scanner window will save the images to one-sided scanning only...
... of images scanned during the current Scan Validation Tool session. • To access the TWAIN datasource (or ISIS driver), double-click the Setup icon on the Kodak i1220 or i1320 Scanner (duplex scanner). Refer to display while scanning. If none of the image processing features already. With the new graphical user interface in this manual, all options are using the TWAIN datasource, the main Kodak Scanner window will save the images to one-sided scanning only...

User Manual
Page 46
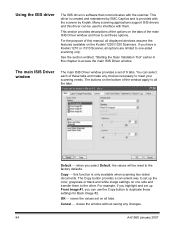
... are available on these shortcuts are found in italics with some Setting Shortcuts already defined. This is accomplished by clicking the Advanced Image Setup icon. • Device Settings: the Device button is to the list of the features and options on the main Kodak Scanner window and tabs are all future scanning. Your shortcut will be added to make scanning as simple as possible.
... are available on these shortcuts are found in italics with some Setting Shortcuts already defined. This is accomplished by clicking the Advanced Image Setup icon. • Device Settings: the Device button is to the list of the features and options on the main Kodak Scanner window and tabs are all future scanning. Your shortcut will be added to make scanning as simple as possible.

User Manual
Page 48
... you get the desired results. 6. The Save As dialog box will be used for your document if necessary and click OK/Scan. • If the images are acceptable, the image processing settings are fine and you do not need to click the Settings button to alter any changes to work with your selected image processing options, reload your scanning operations. 44 A-61560 January 2007 When you make any changes...
... you get the desired results. 6. The Save As dialog box will be used for your document if necessary and click OK/Scan. • If the images are acceptable, the image processing settings are fine and you do not need to click the Settings button to alter any changes to work with your selected image processing options, reload your scanning operations. 44 A-61560 January 2007 When you make any changes...
User Manual
Page 53
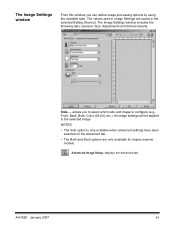
Side - Advanced Image Setup: displays the Advanced tab. The Image Settings window includes the following tabs: General, Size, Adjustments and Enhancements. The values used in Image Settings are only available for duplex scanner models. NOTES: • The Side option is only available when advanced settings have been selected on the Advanced tab. • The Both and Back options are saved in the selected Setting Shortcut. allows you can...
Side - Advanced Image Setup: displays the Advanced tab. The Image Settings window includes the following tabs: General, Size, Adjustments and Enhancements. The values used in Image Settings are only available for duplex scanner models. NOTES: • The Side option is only available when advanced settings have been selected on the Advanced tab. • The Both and Back options are saved in the selected Setting Shortcut. allows you can...

User Manual
Page 68
... the scanner to Configure - returns you need to change the currently selected image type. NOTE: This is only available if you to configure. Toolbar buttons: Add: adds an image type to configure advanced options, see the sections that follow, entitled: • Creating color/grayscale or black and white images based on the content of your documents, Example 1. • Creating multiple images for each side of a document, Example...
... the scanner to Configure - returns you need to change the currently selected image type. NOTE: This is only available if you to configure. Toolbar buttons: Add: adds an image type to configure advanced options, see the sections that follow, entitled: • Creating color/grayscale or black and white images based on the content of your documents, Example 1. • Creating multiple images for each side of a document, Example...

User Manual
Page 71
... of your desired output. 2. In addition, you want the scanner to configure a scan session that . 1. Select a Setting Shortcut from the main Kodak Scanner window that closely describes your documents, Example 1 In this example, let's assume you want to detect whether the page is : Two Sided. 5. Select Settings to Configure area will contain a color image item and a black and white image item. NOTE: The Images to display the Image Settings window. 3.
... of your desired output. 2. In addition, you want the scanner to configure a scan session that . 1. Select a Setting Shortcut from the main Kodak Scanner window that closely describes your documents, Example 1 In this example, let's assume you want to detect whether the page is : Two Sided. 5. Select Settings to Configure area will contain a color image item and a black and white image item. NOTE: The Images to display the Image Settings window. 3.
User Manual
Page 88
... displayed windows assume the features available on one -sided scanning only. The buttons on the bottom of these options. Copy this chapter to set on the tabs of 9 tabs. See the section entitled, "Starting the Scan Validation Tool" earlier in this function is only available when scanning two-sided documents. Many scanning applications support ISIS drivers and this manual, all the tabs. OK saves the values set...
... displayed windows assume the features available on one -sided scanning only. The buttons on the bottom of these options. Copy this chapter to set on the tabs of 9 tabs. See the section entitled, "Starting the Scan Validation Tool" earlier in this function is only available when scanning two-sided documents. Many scanning applications support ISIS drivers and this manual, all the tabs. OK saves the values set...

User Manual
Page 119
... with USB 2.0, but will not scan/feed documents Make sure that: • the power cord is plugged securely into the back of scanner and the wall outlet. • the power supply, green LED is lit. • the power switch is running too slow The Kodak i1200 and i1300 Series Scanners are using the Kodak i1200/i1300 Series Scanner. See the procedures in Chapter 5, Maintenance. after installing the software. • document(s) is facing the input tray...
... with USB 2.0, but will not scan/feed documents Make sure that: • the power cord is plugged securely into the back of scanner and the wall outlet. • the power supply, green LED is lit. • the power switch is running too slow The Kodak i1200 and i1300 Series Scanners are using the Kodak i1200/i1300 Series Scanner. See the procedures in Chapter 5, Maintenance. after installing the software. • document(s) is facing the input tray...

User Manual
Page 120
...how your images to a length checking condition or multi-feed condition. Informational message. Informational message. A calibration was detected due to be sure no images were created. The scanner detected an error that the scanner cannot resolve without recycling the power to restart the scanner. Error 2 3 Message Scanner failed initialization Multi-feed detected 4 Multi-feed detected, transport stopped 5 Jam in the scanner. Clear the paper path by opening the scanner cover, removing the lodged document, closing the scanner cover. Refeed all documents for which images were...
...how your images to a length checking condition or multi-feed condition. Informational message. Informational message. A calibration was detected due to be sure no images were created. The scanner detected an error that the scanner cannot resolve without recycling the power to restart the scanner. Error 2 3 Message Scanner failed initialization Multi-feed detected 4 Multi-feed detected, transport stopped 5 Jam in the scanner. Clear the paper path by opening the scanner cover, removing the lodged document, closing the scanner cover. Refeed all documents for which images were...
User Manual
Page 127
... responsibility for issues related to keep the original box and packing materials for part numbers and replacement packaging ordering information. When the original packaging is not responsible for these problems, Kodak may use and care of the Kodak Scanner ("Service Methods"). PRIOR TO SEEKING SERVICE, THE END USER MUST BACK-UP ANY DATA OR FILES THAT MAY BECOME DAMAGED OR LOST. Kodak Scanners provide the productivity needed to...
... responsibility for issues related to keep the original box and packing materials for part numbers and replacement packaging ordering information. When the original packaging is not responsible for these problems, Kodak may use and care of the Kodak Scanner ("Service Methods"). PRIOR TO SEEKING SERVICE, THE END USER MUST BACK-UP ANY DATA OR FILES THAT MAY BECOME DAMAGED OR LOST. Kodak Scanners provide the productivity needed to...


