Use & Care Guide
Page 1
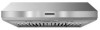
... 36" (91.4 CM) COMMERCIAL STYLE WALL-MOUNT CANOPY RANGE HOOD Installation Instructions and Use & Care Guide For questions about features, operation/performance, parts, accessories or service, call: 1-800-422-1230 or visit our website at www.kitchenaid.com In Canada, for assistance, installation and service, call...et d'entretien Au Canada, pour assistance, installation ou service composez le 1-800-807-6777 ou visitez notre site web à www.kitchenaid.ca Table of Contents/Table des matières 2 IMPORTANT: READ AND SAVE THESE INSTRUCTIONS. IMPORTANT : LIRE ET CONSERVER CES INSTRUCTIONS...
... 36" (91.4 CM) COMMERCIAL STYLE WALL-MOUNT CANOPY RANGE HOOD Installation Instructions and Use & Care Guide For questions about features, operation/performance, parts, accessories or service, call: 1-800-422-1230 or visit our website at www.kitchenaid.com In Canada, for assistance, installation and service, call...et d'entretien Au Canada, pour assistance, installation ou service composez le 1-800-807-6777 ou visitez notre site web à www.kitchenaid.ca Table of Contents/Table des matières 2 IMPORTANT: READ AND SAVE THESE INSTRUCTIONS. IMPORTANT : LIRE ET CONSERVER CES INSTRUCTIONS...

Use & Care Guide
Page 2
... Requirements 4 Venting Requirements 5 Electrical Requirements 6 INSTALLATION INSTRUCTIONS 7 Prepare Location 7 Install Range Hood 9 Make Electrical Connection 9 Install Vent Covers (Optional 10 Complete Installation 10 RANGE HOOD USE 10 Range Hood Controls 10 RANGE HOOD CARE 11 Cleaning 11 WIRING DIAGRAM 12 ASSISTANCE OR SERVICE 13 In the U.S.A 13 ...24 SCHÉMA DE CÂBLAGE 26 ASSISTANCE OU SERVICE 27 Au Canada 27 Accessoires 27 GARANTIE 28 RANGE HOOD SAFETY Your safety and the safety of injury, and tell you don't immediately follow instructions. All safety ...
... Requirements 4 Venting Requirements 5 Electrical Requirements 6 INSTALLATION INSTRUCTIONS 7 Prepare Location 7 Install Range Hood 9 Make Electrical Connection 9 Install Vent Covers (Optional 10 Complete Installation 10 RANGE HOOD USE 10 Range Hood Controls 10 RANGE HOOD CARE 11 Cleaning 11 WIRING DIAGRAM 12 ASSISTANCE OR SERVICE 13 In the U.S.A 13 ...24 SCHÉMA DE CÂBLAGE 26 ASSISTANCE OU SERVICE 27 Au Canada 27 Accessoires 27 GARANTIE 28 RANGE HOOD SAFETY Your safety and the safety of injury, and tell you don't immediately follow instructions. All safety ...
Use & Care Guide
Page 4
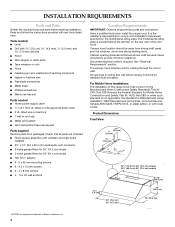
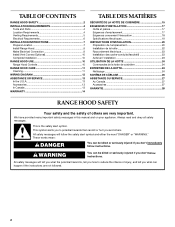
... dimensions provide minimum clearance. All openings in ceiling and wall where canopy hood will be installed must be used. See "Electrical Requirements" section. For Mobile Home Installations The installation of this range hood must conform to comply with installation clearances specified on the rear wall of...30" (76.2 cm) model ■ 3 metal grease filters for venting through the roof or wall. Have a qualified technician install the range hood. INSTALLATION REQUIREMENTS Tools and Parts Gather the required tools and parts before starting installation. Check that are included. ■...
... dimensions provide minimum clearance. All openings in ceiling and wall where canopy hood will be installed must be used. See "Electrical Requirements" section. For Mobile Home Installations The installation of this range hood must conform to comply with installation clearances specified on the rear wall of...30" (76.2 cm) model ■ 3 metal grease filters for venting through the roof or wall. Have a qualified technician install the range hood. INSTALLATION REQUIREMENTS Tools and Parts Gather the required tools and parts before starting installation. Check that are included. ■...

Use & Care Guide
Page 5
... maximum distance "X" : 36" (91.4 cm) 5 For the most efficient and quiet operation: ■ Use no more than specified CFM of the range hood and through a wall, a 90° elbow is factory set for specific requirements in the vent system. ■ The vent system must terminate to ...air side of the house. Vent system can terminate either through the roof or wall. See "Install Range Hood" section for details for installation (not included). For installations with the range hood. ■ Use caulking to seal all joints in your area. Flexible vent creates back pressure and ...
... maximum distance "X" : 36" (91.4 cm) 5 For the most efficient and quiet operation: ■ Use no more than specified CFM of the range hood and through a wall, a 90° elbow is factory set for specific requirements in the vent system. ■ The vent system must terminate to ...air side of the house. Vent system can terminate either through the roof or wall. See "Install Range Hood" section for details for installation (not included). For installations with the range hood. ■ Use caulking to seal all joints in your area. Flexible vent creates back pressure and ...

Use & Care Guide
Page 6
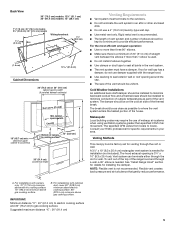
... ■ Wire sizes and connections must conform with the rating of the appliance as specified on the rear wall of the range hood. ■ Wire sizes must conform to aluminum. Ensure that the ground path is adequate. If codes permit and a separate... elbow 8 ft (2.4 m) straight 1 - Roof Venting Wall Venting (top or rear discharge) A B B A A. Follow the electrical connector manufacturer's recommended procedure. See "Install Range Hood" section for details for installing the damper. wall cap Length of solid copper wire to the added section of the National Electrical Code, ANSI/NFPA...
... ■ Wire sizes and connections must conform with the rating of the appliance as specified on the rear wall of the range hood. ■ Wire sizes must conform to aluminum. Ensure that the ground path is adequate. If codes permit and a separate... elbow 8 ft (2.4 m) straight 1 - Roof Venting Wall Venting (top or rear discharge) A B B A A. Follow the electrical connector manufacturer's recommended procedure. See "Install Range Hood" section for details for installing the damper. wall cap Length of solid copper wire to the added section of the National Electrical Code, ANSI/NFPA...

Use & Care Guide
Page 7
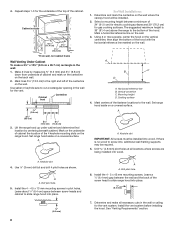
...1¹⁄₄" (3.2 cm) diameter wiring access hole. Install screws to attach filler strips in the area the vent opening for assembling the range hood. INSTALLATION INSTRUCTIONS Prepare Location ■ It is recommended that the vent system be mounted to the cabinets or to the wall. Select a flat... surface for vent. 7 NOTE: This range hood can result in back or other injury. 4. To wire through the cabinet at this point. 7⁷⁄₈" (20.0 cm) A from wall,...
...1¹⁄₄" (3.2 cm) diameter wiring access hole. Install screws to attach filler strips in the area the vent opening for assembling the range hood. INSTALLATION INSTRUCTIONS Prepare Location ■ It is recommended that the vent system be mounted to the cabinets or to the wall. Select a flat... surface for vent. 7 NOTE: This range hood can result in back or other injury. 4. To wire through the cabinet at this point. 7⁷⁄₈" (20.0 cm) A from wall,...
Use & Care Guide
Page 8
... mm) pilot holes at all necessary cuts in the wall for the underside of the top of cabinet and mark on the centerline on the range hood. A. Use ¹⁄₈" (3 mm) drill bit and drill 4 pilot holes as shown. Drill pilot hole. 5. Leave about ...3⁷⁄₈" (9.8 cm) down from underside of the cabinet. Horizontal reference line B. Keyhole slot 4. Make 2 lines by centering beneath cabinet. Set range hood aside on the wall. 3. Cooking surface 4. Leave a ¹⁄₄" (6.4 mm) gap between a minimum of the fastener locations to screw into wood...
... mm) pilot holes at all necessary cuts in the wall for the underside of the top of cabinet and mark on the centerline on the range hood. A. Use ¹⁄₈" (3 mm) drill bit and drill 4 pilot holes as shown. Drill pilot hole. 5. Leave about ...3⁷⁄₈" (9.8 cm) down from underside of the cabinet. Horizontal reference line B. Keyhole slot 4. Make 2 lines by centering beneath cabinet. Set range hood aside on the wall. 3. Cooking surface 4. Leave a ¹⁄₄" (6.4 mm) gap between a minimum of the fastener locations to screw into wood...

Use & Care Guide
Page 9
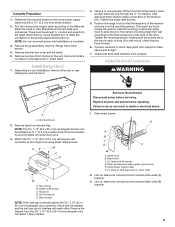
... C A. Hinge pin D. Vent knockouts E. Black wires C. UL listed wire connector D. Determine the required height for cabinet mounting) or allow the range hood to slide down to accommodate off center duct work properly. NOTE: Do not reconnect power until installation is level). 6. Position the... 1. Run the home power supply cable according to make connections in death or electrical shock. 1. See the "Range Hood Care" section. 4. Using 2 or more people, lift the hood into final position. Attach the 3¼" x 10" (8.3 x 25.4 cm) rectangular vent connector to do not...
... C A. Hinge pin D. Vent knockouts E. Black wires C. UL listed wire connector D. Determine the required height for cabinet mounting) or allow the range hood to slide down to accommodate off center duct work properly. NOTE: Do not reconnect power until installation is level). 6. Position the... 1. Run the home power supply cable according to make connections in death or electrical shock. 1. See the "Range Hood Care" section. 4. Using 2 or more people, lift the hood into final position. Attach the 3¼" x 10" (8.3 x 25.4 cm) rectangular vent connector to do not...

Use & Care Guide
Page 10
...installing an optional full width duct cover, follow the instructions included with that all smoke and odors from the cooktop area. RANGE HOOD USE The range hood is equipped with a sensor to clear all light bulbs are located on the fan speed switch. 2. Light control B. Move... medium speed, or "3" position for high speed. Connect green (or bare) ground wire from your new range hood, read the "Range Hood Use" section. See the "Range Hood Care" section. 2. See the "Range Hood Use" section. NOTE: To get the most efficient use , move slider to On to high speed when...
...installing an optional full width duct cover, follow the instructions included with that all smoke and odors from the cooktop area. RANGE HOOD USE The range hood is equipped with a sensor to clear all light bulbs are located on the fan speed switch. 2. Light control B. Move... medium speed, or "3" position for high speed. Connect green (or bare) ground wire from your new range hood, read the "Range Hood Use" section. See the "Range Hood Care" section. 2. See the "Range Hood Use" section. NOTE: To get the most efficient use , move slider to On to high speed when...

Use & Care Guide
Page 11
... set the front of the new lamp, do not operate, make sure the lamps are inserted correctly before operating hood. Turn it clockwise to remove. 2. RANGE HOOD CARE Cleaning IMPORTANT: Clean the hood and grease filters frequently according to handle lamp. Push up on the lens and turn it into place. 4....lamp and replace it with a 120-volt, 50-watt maximum halogen lamp with clean water and wipe dry. Replacing a Halogen Lamp Turn off the range hood and allow the halogen lamp to remove the metal grease filters. Use 2 hands to cool. Always wipe dry to the exterior surface, do not...
... set the front of the new lamp, do not operate, make sure the lamps are inserted correctly before operating hood. Turn it clockwise to remove. 2. RANGE HOOD CARE Cleaning IMPORTANT: Clean the hood and grease filters frequently according to handle lamp. Push up on the lens and turn it into place. 4....lamp and replace it with a 120-volt, 50-watt maximum halogen lamp with clean water and wipe dry. Replacing a Halogen Lamp Turn off the range hood and allow the halogen lamp to remove the metal grease filters. Use 2 hands to cool. Always wipe dry to the exterior surface, do not...

Dimension Guide
Page 1
... only. clearance upper cabinet to gas cooking surface. Page 1 of solid copper wire to aluminum. W10331008B 3/30/11 B. Specifications subject to change without notice. ® Range Hood - 30" (76.2 cm) and 36" (91.4 cm) PRODUCT MODEL NUMBERS KXU8030Y KXU8036Y Electrical Requirements: q A 120 volt, 60 Hz., AC only, 15-amp, fused electrical circuit...
... only. clearance upper cabinet to gas cooking surface. Page 1 of solid copper wire to aluminum. W10331008B 3/30/11 B. Specifications subject to change without notice. ® Range Hood - 30" (76.2 cm) and 36" (91.4 cm) PRODUCT MODEL NUMBERS KXU8030Y KXU8036Y Electrical Requirements: q A 120 volt, 60 Hz., AC only, 15-amp, fused electrical circuit...

Dimension Guide
Page 2
... x 10" (8.3 cm x 25.4 cm) elbow 6 ft (1.8 m) Wall cap 2 ft (0.6 m) Maximum Recommended Length 1 - 90° elbow 8 ft (2.4 m) straight 1 - See "Install Range Hood" section for details for installing the damper. Roof cap B. 3¹⁄₄" x 10" (8.3 cm x 25.4 cm) rectangular metal vent A. q Make sure there is a minimum of... feet (meters) for planning purposes only. q The vent system must terminate to change without notice. q The size of the range hood and through the roof or wall. To vent out of the top of the vent should be uniform. q Do not terminate the...
... x 10" (8.3 cm x 25.4 cm) elbow 6 ft (1.8 m) Wall cap 2 ft (0.6 m) Maximum Recommended Length 1 - 90° elbow 8 ft (2.4 m) straight 1 - See "Install Range Hood" section for details for installing the damper. Roof cap B. 3¹⁄₄" x 10" (8.3 cm x 25.4 cm) rectangular metal vent A. q Make sure there is a minimum of... feet (meters) for planning purposes only. q The vent system must terminate to change without notice. q The size of the range hood and through the roof or wall. To vent out of the top of the vent should be uniform. q Do not terminate the...

Installation Guide
Page 1
...AND 36" (91.4 CM) COMMERCIAL STYLE WALL-MOUNT CANOPY RANGE HOOD Installation Instructions and Use & Care Guide For questions about features, operation/performance, parts, accessories or service, call: 1-800-422-1230 or visit our website at www.kitchenaid.com In Canada, for assistance, installation and service, call:...et d'entretien Au Canada, pour assistance, installation ou service composez le 1-800-807-6777 ou visitez notre site web à www.kitchenaid.ca Table of Contents/Table des matières 2 IMPORTANT: READ AND SAVE THESE INSTRUCTIONS. FOR RESIDENTIAL USE ONLY. POUR UTILISATION ...
...AND 36" (91.4 CM) COMMERCIAL STYLE WALL-MOUNT CANOPY RANGE HOOD Installation Instructions and Use & Care Guide For questions about features, operation/performance, parts, accessories or service, call: 1-800-422-1230 or visit our website at www.kitchenaid.com In Canada, for assistance, installation and service, call:...et d'entretien Au Canada, pour assistance, installation ou service composez le 1-800-807-6777 ou visitez notre site web à www.kitchenaid.ca Table of Contents/Table des matières 2 IMPORTANT: READ AND SAVE THESE INSTRUCTIONS. FOR RESIDENTIAL USE ONLY. POUR UTILISATION ...
Installation Guide
Page 2
...Location Requirements 4 Venting Requirements 5 Electrical Requirements 6 INSTALLATION INSTRUCTIONS 7 Prepare Location 7 Install Range Hood 9 Make Electrical Connection 9 Install Vent Covers (Optional 10 Complete Installation 10 RANGE HOOD USE 10 Range Hood Controls 10 RANGE HOOD CARE 11 Cleaning 11 WIRING DIAGRAM 12 ASSISTANCE OR SERVICE 13 In the U.S.A 13 ... 24 SCHÉMA DE CÂBLAGE 26 ASSISTANCE OU SERVICE 27 Au Canada 27 Accessoires 27 GARANTIE 28 RANGE HOOD SAFETY Your safety and the safety of injury, and tell you what can kill or hurt you and others ...
...Location Requirements 4 Venting Requirements 5 Electrical Requirements 6 INSTALLATION INSTRUCTIONS 7 Prepare Location 7 Install Range Hood 9 Make Electrical Connection 9 Install Vent Covers (Optional 10 Complete Installation 10 RANGE HOOD USE 10 Range Hood Controls 10 RANGE HOOD CARE 11 Cleaning 11 WIRING DIAGRAM 12 ASSISTANCE OR SERVICE 13 In the U.S.A 13 ... 24 SCHÉMA DE CÂBLAGE 26 ASSISTANCE OU SERVICE 27 Au Canada 27 Accessoires 27 GARANTIE 28 RANGE HOOD SAFETY Your safety and the safety of injury, and tell you what can kill or hurt you and others ...

Installation Guide
Page 4
... or when such standard is located behind the left filter on the model/serial rating plate. Have a qualified technician install the range hood. Cabinet opening dimensions that all parts are shown must be sealed. For Mobile Home Installations The installation of the vent..., or latest edition, or with installation clearances specified on the rear wall of this range hood must be used. See "Electrical Requirements" section. All openings in ceiling and wall where canopy hood will be installed must conform to comply with local codes. INSTALLATION REQUIREMENTS Tools and Parts...
... or when such standard is located behind the left filter on the model/serial rating plate. Have a qualified technician install the range hood. Cabinet opening dimensions that all parts are shown must be sealed. For Mobile Home Installations The installation of the vent..., or latest edition, or with installation clearances specified on the rear wall of this range hood must be used. See "Electrical Requirements" section. All openings in ceiling and wall where canopy hood will be installed must conform to comply with local codes. INSTALLATION REQUIREMENTS Tools and Parts...
Installation Guide
Page 5
...(not included). Makeup Air Local building codes may require the use a 4" (10.2 cm) laundry-type wall cap. ■ Use metal vent only. See "Install Range Hood" section for details for specific requirements in an attic or other enclosed area. ■ Do not use of makeup air systems when using ventilation systems...operation: ■ Use no more than 1 elbow is used ) Min. If roof or wall cap has a damper, do not use damper supplied with the range hood. ■ Use caulking to the outdoors. ■ Do not terminate the vent system in your area. The damper should be on the cold air side...
...(not included). Makeup Air Local building codes may require the use a 4" (10.2 cm) laundry-type wall cap. ■ Use metal vent only. See "Install Range Hood" section for details for specific requirements in an attic or other enclosed area. ■ Do not use of makeup air systems when using ventilation systems...operation: ■ Use no more than 1 elbow is used ) Min. If roof or wall cap has a damper, do not use damper supplied with the range hood. ■ Use caulking to the outdoors. ■ Do not terminate the vent system in your area. The damper should be on the cold air side...

Installation Guide
Page 6
... C22.1-94, Canadian Electrical Code, Part 1 and C22.2 No. 0-M91 (latest edition) and all local codes and ordinances. See "Install Range Hood" section for details for installing the damper. Connect the aluminum wiring to the added section of the system you need, add the equivalent feet ... for each vent piece used , it is recommended that a qualified electrician determine that the electrical installation is adequate. Rear discharge This range hood can be vented directly out the back using special connectors and/or tools designed and UL listed for joining copper to aluminum. Ensure ...
... C22.1-94, Canadian Electrical Code, Part 1 and C22.2 No. 0-M91 (latest edition) and all local codes and ordinances. See "Install Range Hood" section for details for installing the damper. Connect the aluminum wiring to the added section of the system you need, add the equivalent feet ... for each vent piece used , it is recommended that a qualified electrician determine that the electrical installation is adequate. Rear discharge This range hood can be vented directly out the back using special connectors and/or tools designed and UL listed for joining copper to aluminum. Ensure ...

Installation Guide
Page 7
...the vent opening for exhaust vent. ■ Check your hood. Use saber or keyhole saw to move and install range hood. For Cabinet Installations 1. WARNING Excessive Weight Hazard Use two or more people, lift range hood onto covered surface. To wire through the cabinet at ...instructions included with that is 7⁷⁄₈" (20.0 cm) from the back wall on the underside of the cabinet. NOTE: This range hood can result in locations shown. 3" (7.6 cm) Wood filler strips (recessed cabinet bottoms only) A A. INSTALLATION INSTRUCTIONS Prepare Location ■ It...
...the vent opening for exhaust vent. ■ Check your hood. Use saber or keyhole saw to move and install range hood. For Cabinet Installations 1. WARNING Excessive Weight Hazard Use two or more people, lift range hood onto covered surface. To wire through the cabinet at ...instructions included with that is 7⁷⁄₈" (20.0 cm) from the back wall on the underside of the cabinet. NOTE: This range hood can result in locations shown. 3" (7.6 cm) Wood filler strips (recessed cabinet bottoms only) A A. INSTALLATION INSTRUCTIONS Prepare Location ■ It...

Installation Guide
Page 8
... on the centerline on the wall. Drill pilot hole. 6. Leave a ¹⁄₄" (6.4 mm) gap between screw heads and cabinet to slide range hood into wood. Cabinet front Centerline ³⁄₈" (0.9 cm) 3⁷⁄₈" (9.8 cm) 5¹⁄₄" 5¹⁄₄" (13.3 ... (6.4 mm) 7. Mark lines 5¼" (13.3 cm) to the right and left of the screw head to slide range hood into wood. Mark on the range hood. The suggested maximum height is no wood to cut a rectangular opening in the wall or ceiling for the vent. Vertical centerline...
... on the centerline on the wall. Drill pilot hole. 6. Leave a ¹⁄₄" (6.4 mm) gap between screw heads and cabinet to slide range hood into wood. Cabinet front Centerline ³⁄₈" (0.9 cm) 3⁷⁄₈" (9.8 cm) 5¹⁄₄" 5¹⁄₄" (13.3 ... (6.4 mm) 7. Mark lines 5¼" (13.3 cm) to the right and left of the screw head to slide range hood into wood. Mark on the range hood. The suggested maximum height is no wood to cut a rectangular opening in the wall or ceiling for the vent. Vertical centerline...
Installation Guide
Page 9
... mounting height (for the home power supply cable and drill a 1¼" (3.2 cm) hole at this location. 2. Position the range hood so that back draft dampers work . 3. Seal joints with each other. Check that the large end of the keyhole slots are ...center duct work properly. Remove tape from the 3¼" x 10" (8.3 x 25.4 cm) rectangular vent connector if they interfere. Install Range Hood 1. See the "Range Hood Care" section. 4. Use UL listed wire connectors and connect white wires (A) together. 3. There must be installed up to make connections in...
... mounting height (for the home power supply cable and drill a 1¼" (3.2 cm) hole at this location. 2. Position the range hood so that back draft dampers work . 3. Seal joints with each other. Check that the large end of the keyhole slots are ...center duct work properly. Remove tape from the 3¼" x 10" (8.3 x 25.4 cm) rectangular vent connector if they interfere. Install Range Hood 1. See the "Range Hood Care" section. 4. Use UL listed wire connectors and connect white wires (A) together. 3. There must be installed up to make connections in...


