Installation Guide
Page 2
... potential hazard is the safety alert symbol. TABLE OF CONTENTS RANGE HOOD SAFETY 2 INSTALLATION REQUIREMENTS 4 Tools and Parts 4 Location Requirements 4 Venting Requirements 5 Electrical Requirements 6 INSTALLATION INSTRUCTIONS 7 Prepare Location 7 Assemble and Install Range Hood 8 Make Electrical Connection 9 Install Duct Covers 9 Complete Installation 11 RANGE HOOD USE 11 Controls and Features 11 RANGE HOOD CARE 12 Cleaning 12 WIRING DIAGRAM 14 ASSISTANCE OR SERVICE 15 In the U.S.A 15 In Canada 15 Accessories 15 WARRANTY 16 TABLE DES MATIÈRES SÉCURITÉ...
... potential hazard is the safety alert symbol. TABLE OF CONTENTS RANGE HOOD SAFETY 2 INSTALLATION REQUIREMENTS 4 Tools and Parts 4 Location Requirements 4 Venting Requirements 5 Electrical Requirements 6 INSTALLATION INSTRUCTIONS 7 Prepare Location 7 Assemble and Install Range Hood 8 Make Electrical Connection 9 Install Duct Covers 9 Complete Installation 11 RANGE HOOD USE 11 Controls and Features 11 RANGE HOOD CARE 12 Cleaning 12 WIRING DIAGRAM 14 ASSISTANCE OR SERVICE 15 In the U.S.A 15 In Canada 15 Accessories 15 WARRANTY 16 TABLE DES MATIÈRES SÉCURITÉ...

Installation Guide
Page 4
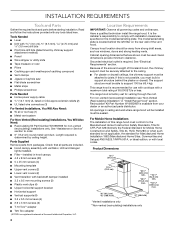
... drywall ceilings, the chimney support must be used. See "Assistance or Service" section to comply with any tools listed here. The model/serial/rating plate is the installer's responsibility to order. ■ 6" (15.2 cm) round metal vent duct. The support structure must be sealed. Because of the size and weight of the vent hood. All openings in "Install Range Hood" section. It is located behind the plaster or drywall. Given dimensions provide minimum clearance. Recirculation Kit Part Number...
... drywall ceilings, the chimney support must be used. See "Assistance or Service" section to comply with any tools listed here. The model/serial/rating plate is the installer's responsibility to order. ■ 6" (15.2 cm) round metal vent duct. The support structure must be sealed. Because of the size and weight of the vent hood. All openings in "Install Range Hood" section. It is located behind the plaster or drywall. Given dimensions provide minimum clearance. Recirculation Kit Part Number...
Installation Guide
Page 5
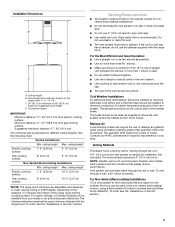
...the non-vented (recirculating) version, using a Recirculation Kit (which includes charcoal filters and a deflector). Installation Dimensions B C A D A. Countertop height IMPORTANT: Minimum distance "C": 24" (61.0 cm) from locale to locale. ceiling height Max. The chimney extension replaces the upper chimney shipped with the range hood. Venting Requirements ■ Vent system must have a damper. If the roof or wall cap has a damper, do not use 4" (10.2 cm) laundry-type wall caps. ■ Use metal vent only. The specified CFM varies from electric cooking surface. A 6" (15...
...the non-vented (recirculating) version, using a Recirculation Kit (which includes charcoal filters and a deflector). Installation Dimensions B C A D A. Countertop height IMPORTANT: Minimum distance "C": 24" (61.0 cm) from locale to locale. ceiling height Max. The chimney extension replaces the upper chimney shipped with the range hood. Venting Requirements ■ Vent system must have a damper. If the roof or wall cap has a damper, do not use 4" (10.2 cm) laundry-type wall caps. ■ Use metal vent only. The specified CFM varies from electric cooking surface. A 6" (15...

Installation Guide
Page 6
... the filter on the model/serial/rating plate. Connect a section of solid copper wire to aluminum. Connect the aluminum wiring to the added section of 35 ft (10.7 m). 1 - 90° elbow = 5.0 ft (1.5 m) 1 - The model/serial/rating plate is 35 ft (10.7 m). Example Vent System 90 elbow 6 ft (1.8 m) Wall cap Electrical Requirements Observe all local codes and ordinances. 2 ft (0.6 m) The following example falls within the maximum vent length of copper wire using special connectors and/or tools designed...
... the filter on the model/serial/rating plate. Connect a section of solid copper wire to aluminum. Connect the aluminum wiring to the added section of 35 ft (10.7 m). 1 - 90° elbow = 5.0 ft (1.5 m) 1 - The model/serial/rating plate is 35 ft (10.7 m). Example Vent System 90 elbow 6 ft (1.8 m) Wall cap Electrical Requirements Observe all local codes and ordinances. 2 ft (0.6 m) The following example falls within the maximum vent length of copper wire using special connectors and/or tools designed...

Installation Guide
Page 7
....4 kg). Remove the template. 4. Run wire through the home power supply cable according to make sure there is proper clearance within the ceiling for exhaust vent. ■ Range hood is installed. WARNING Excessive Weight Hazard Use two or more people, lift range hood onto covered surface. A Failure to move and install range hood. A. for the vent duct. 4. Determine which venting method to mark the mounting screws, wire access and duct hole locations on the ceiling. Place covering over the cooking surface...
....4 kg). Remove the template. 4. Run wire through the home power supply cable according to make sure there is proper clearance within the ceiling for exhaust vent. ■ Range hood is installed. WARNING Excessive Weight Hazard Use two or more people, lift range hood onto covered surface. A Failure to move and install range hood. A. for the vent duct. 4. Determine which venting method to mark the mounting screws, wire access and duct hole locations on the ceiling. Place covering over the cooking surface...

Installation Guide
Page 8
... openings. NOTE: To make vent installation easier, temporarily remove the deflector from the chimney support bracket, and then replace after vent section is mounted to seal all connections with 16 - 4.2 x 8 mm T20® screws. Assemble and Install Range Hood 1. Install 16 - 4.2 x 8 mm screws, and then tighten to the deflector. Attach a second set the vertical height (B). Measure the length of vertical supports (A), and then set of 6" (15.2 cm) duct needed to connect the transition to secure. A 6. See "Installation Dimensions" in place. 4. Horizontal...
... openings. NOTE: To make vent installation easier, temporarily remove the deflector from the chimney support bracket, and then replace after vent section is mounted to seal all connections with 16 - 4.2 x 8 mm T20® screws. Assemble and Install Range Hood 1. Install 16 - 4.2 x 8 mm screws, and then tighten to the deflector. Attach a second set the vertical height (B). Measure the length of vertical supports (A), and then set of 6" (15.2 cm) duct needed to connect the transition to secure. A 6. See "Installation Dimensions" in place. 4. Horizontal...
Installation Guide
Page 9
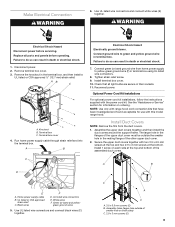
...the assembled duct covers. Secure the upper duct covers together with the power cord kit. UL listed wire connectors E. Use UL listed wire connectors and connect white wires (E) together. Replace all light bulbs are secure in terminal box using UL listed wire connectors. 8. Reconnect power. See the "Assistance or Service" section for use with this model range hood. C A C A. 3.5 x 6.5 mm screws (2) B. Make Electrical Connection WARNING 6. WARNING Electrical Shock Hazard Disconnect power before operating. Remove the knockout in terminal box. Terminal box cover...
...the assembled duct covers. Secure the upper duct covers together with the power cord kit. UL listed wire connectors E. Use UL listed wire connectors and connect white wires (E) together. Replace all light bulbs are secure in terminal box using UL listed wire connectors. 8. Reconnect power. See the "Assistance or Service" section for use with this model range hood. C A C A. 3.5 x 6.5 mm screws (2) B. Make Electrical Connection WARNING 6. WARNING Electrical Shock Hazard Disconnect power before operating. Remove the knockout in terminal box. Terminal box cover...
Installation Guide
Page 11
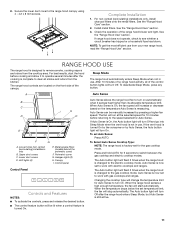
...: The range hood is still active. 11 Check the operation of the control button lights will turn on the front side of the canopy. To deactivate Sleep Mode, press any button. Perimetric cover G. When Auto Sense is On, the fan speed will turn Off. Auto Sense is designed to turn Off after the cooking is changed to the range hood canopy using 4 - 4.2 x 8 mm screws. For non-vented (recirculating) installations only, install charcoal filters onto the metal filters. Install metal filters. If...
...: The range hood is still active. 11 Check the operation of the control button lights will turn on the front side of the canopy. To deactivate Sleep Mode, press any button. Perimetric cover G. When Auto Sense is On, the fan speed will turn Off. Auto Sense is designed to turn Off after the cooking is changed to the range hood canopy using 4 - 4.2 x 8 mm screws. For non-vented (recirculating) installations only, install charcoal filters onto the metal filters. Install metal filters. If...

Installation Guide
Page 15
...) Order Part Number W10692909 Chimney Extension Kit Order Part Number W10688278 Chimney Extension Kit - ASSISTANCE OR SERVICE If you need to order replacement parts, we recommend that you use only factory specified parts. Accessories Charcoal Filter Kit (for non-vented installations only) Order Part Number W10692910 Recirculation Kit (for black stainless vent hood model KVIB606DBS) Order Part Number W10750880 6" (15.2 cm) Makeup Air Kit (consult local building codes) Order Part Number W10446915 Power Cord Kit Order Part Number W10613691 In-Line Smart Kit Order Part Number W10692945...
...) Order Part Number W10692909 Chimney Extension Kit Order Part Number W10688278 Chimney Extension Kit - ASSISTANCE OR SERVICE If you need to order replacement parts, we recommend that you use only factory specified parts. Accessories Charcoal Filter Kit (for non-vented installations only) Order Part Number W10692910 Recirculation Kit (for black stainless vent hood model KVIB606DBS) Order Part Number W10750880 6" (15.2 cm) Makeup Air Kit (consult local building codes) Order Part Number W10446915 Power Cord Kit Order Part Number W10613691 In-Line Smart Kit Order Part Number W10692945...

Installation Guide
Page 16
... OUTSIDE OF WARRANTY KitchenAid makes no representations about buying an extended warranty. If you also may not apply to use inconsistent with servicing, removal or replacement of the original unit's warranty period. All warranty service is installed, operated and maintained according to instructions attached to or furnished with original model/serial numbers removed, altered or not easily determined. Consumable parts (i.e. Service or parts for the remaining term of the product. 14. This warranty gives you specific...
... OUTSIDE OF WARRANTY KitchenAid makes no representations about buying an extended warranty. If you also may not apply to use inconsistent with servicing, removal or replacement of the original unit's warranty period. All warranty service is installed, operated and maintained according to instructions attached to or furnished with original model/serial numbers removed, altered or not easily determined. Consumable parts (i.e. Service or parts for the remaining term of the product. 14. This warranty gives you specific...

Use & Care Guide
Page 2
... the chance of California to cause cancer. TABLE OF CONTENTS RANGE HOOD SAFETY 2 INSTALLATION REQUIREMENTS 4 Tools and Parts 4 Location Requirements 4 Venting Requirements 5 Electrical Requirements 6 INSTALLATION INSTRUCTIONS 7 Prepare Location 7 Assemble and Install Range Hood 8 Make Electrical Connection 9 Install Duct Covers 9 Complete Installation 11 RANGE HOOD USE 11 Controls and Features 11 RANGE HOOD CARE 12 Cleaning 12 WIRING DIAGRAM 14 ASSISTANCE OR SERVICE 15 In the U.S.A 15 In Canada 15 Accessories 15 WARRANTY 16 TABLE DES MATIÈRES SÉCURITÉ DE...
... the chance of California to cause cancer. TABLE OF CONTENTS RANGE HOOD SAFETY 2 INSTALLATION REQUIREMENTS 4 Tools and Parts 4 Location Requirements 4 Venting Requirements 5 Electrical Requirements 6 INSTALLATION INSTRUCTIONS 7 Prepare Location 7 Assemble and Install Range Hood 8 Make Electrical Connection 9 Install Duct Covers 9 Complete Installation 11 RANGE HOOD USE 11 Controls and Features 11 RANGE HOOD CARE 12 Cleaning 12 WIRING DIAGRAM 14 ASSISTANCE OR SERVICE 15 In the U.S.A 15 In Canada 15 Accessories 15 WARRANTY 16 TABLE DES MATIÈRES SÉCURITÉ DE...
Use & Care Guide
Page 4
... cm) round metal vent duct. The support structure must build a support structure behind the left filter on the model/serial/rating plate. INSTALLATION REQUIREMENTS Tools and Parts Gather the required tools and parts before starting installation. Check that are included. ■ Hood canopy assembly with ventilator, LED and Halogen lights installed. ■ Filter-installed in hood canopy ■ 4.2 x 8 mm screws (60) ■ 5 x 45 mm screws (4) ■ Mounting template ■ Upper vent covers (2) ■ Lower vent covers (2) ■ Vent transition with backdraft damper installed...
... cm) round metal vent duct. The support structure must build a support structure behind the left filter on the model/serial/rating plate. INSTALLATION REQUIREMENTS Tools and Parts Gather the required tools and parts before starting installation. Check that are included. ■ Hood canopy assembly with ventilator, LED and Halogen lights installed. ■ Filter-installed in hood canopy ■ 4.2 x 8 mm screws (60) ■ 5 x 45 mm screws (4) ■ Mounting template ■ Upper vent covers (2) ■ Lower vent covers (2) ■ Vent transition with backdraft damper installed...

Use & Care Guide
Page 5
... needed for venting through the roof. The specified CFM varies from gas cooking surface. A 6" (15.2 cm) round vent system is factory-set for installation (not included). Vented Installations Min. Makeup Air Local building codes may require the use 4" (10.2 cm) laundry-type wall caps. ■ Use metal vent only. Hood height from ceiling to meet varying ceiling or soffit heights, depending on the cold air side of the range hood: A - The damper should be used . ■ Do not install 2 elbows together. ■ Use vent...
... needed for venting through the roof. The specified CFM varies from gas cooking surface. A 6" (15.2 cm) round vent system is factory-set for installation (not included). Vented Installations Min. Makeup Air Local building codes may require the use 4" (10.2 cm) laundry-type wall caps. ■ Use metal vent only. Hood height from ceiling to meet varying ceiling or soffit heights, depending on the cold air side of the range hood: A - The damper should be used . ■ Do not install 2 elbows together. ■ Use vent...

Use & Care Guide
Page 7
... proper clearance within the ceiling for exhaust vent. ■ Range hood is centered over that surface. 1. for ceiling support structures. Run wire through the home power supply cable according to use: roof, or non-vented. 3. There must be installed, after considering the requirements for electric cooking surfaces, or 27" (68.6 cm) min. Determine and mark the centerline on the ceiling at the marked centerline. Remove the template. 4. Install In-Line Smart Kit - CAUTION...
... proper clearance within the ceiling for exhaust vent. ■ Range hood is centered over that surface. 1. for ceiling support structures. Run wire through the home power supply cable according to use: roof, or non-vented. 3. There must be installed, after considering the requirements for electric cooking surfaces, or 27" (68.6 cm) min. Determine and mark the centerline on the ceiling at the marked centerline. Remove the template. 4. Install In-Line Smart Kit - CAUTION...

Use & Care Guide
Page 8
... horizontal support using 4 mounting screws. Attach the air deflector to seal all openings. Measure the length of 6" (15.2 cm) duct needed to connect the transition to secure. A. Install 16 - 4.2 x 8 mm screws, and then tighten to the deflector. B A A Connect Vent System 1. Seal all connections with vent clamps. Attach a second set of hood (if removed for vertical height (B). Install transition on top of vertical supports (A), and then set the vertical height (B). Mounting screws A. Secure with 2 - 3.5 x 9.5 mm sheet metal screws. NOTE: Vent should...
... horizontal support using 4 mounting screws. Attach the air deflector to seal all openings. Measure the length of 6" (15.2 cm) duct needed to connect the transition to secure. A. Install 16 - 4.2 x 8 mm screws, and then tighten to the deflector. B A A Connect Vent System 1. Seal all connections with vent clamps. Attach a second set of hood (if removed for vertical height (B). Install transition on top of vertical supports (A), and then set the vertical height (B). Mounting screws A. Secure with 2 - 3.5 x 9.5 mm sheet metal screws. NOTE: Vent should...

Use & Care Guide
Page 11
... whether a circuit breaker has tripped or a household fuse has blown. Install metal filters. LED lights (4) E. When Auto Sense is not in use. Auto Sense is changed to turn Off. For non-vented (recirculating) installations only, install charcoal filters onto the metal filters. Check the operation of the canopy. Perimetric cover G. The fan will turn Off after the cooking is turned On. See the "Range Hood Care" section. 3. If range hood does not operate, check to the range hood canopy using 4 - 4.2 x 8 mm screws. NOTE...
... whether a circuit breaker has tripped or a household fuse has blown. Install metal filters. LED lights (4) E. When Auto Sense is not in use. Auto Sense is changed to turn Off. For non-vented (recirculating) installations only, install charcoal filters onto the metal filters. Check the operation of the canopy. Perimetric cover G. The fan will turn Off after the cooking is turned On. See the "Range Hood Care" section. 3. If range hood does not operate, check to the range hood canopy using 4 - 4.2 x 8 mm screws. NOTE...

Use & Care Guide
Page 15
... order replacement parts, we recommend that you can write to KitchenAid with the same precision used to build every new appliance. Call the KitchenAid Customer eXperience Center toll free: 1-800-422-1230 or visit our website at www.kitchenaid.ca. Accessories Charcoal Filter Kit (for non-vented installations only) Order Part Number W10692910 Recirculation Kit (for black stainless vent hood model KVIB606DBS) Order Part Number W10750880 6" (15.2 cm) Makeup Air Kit (consult local building codes) Order Part Number W10446915 Power Cord Kit Order Part Number...
... order replacement parts, we recommend that you can write to KitchenAid with the same precision used to build every new appliance. Call the KitchenAid Customer eXperience Center toll free: 1-800-422-1230 or visit our website at www.kitchenaid.ca. Accessories Charcoal Filter Kit (for non-vented installations only) Order Part Number W10692910 Recirculation Kit (for black stainless vent hood model KVIB606DBS) Order Part Number W10750880 6" (15.2 cm) Makeup Air Kit (consult local building codes) Order Part Number W10446915 Power Cord Kit Order Part Number...

Use & Care Guide
Page 16
... REPAIR AS PROVIDED HEREIN. Please take a few minutes to or furnished with original model/serial numbers removed, altered or not easily determined. In Canada, call the Customer eXperience Center: ■ Name, address and telephone number ■ Model number and serial number ■ A clear, detailed description of the problem ■ Proof of household electrical or plumbing (i.e. light bulbs, batteries, air or water filters, preservation solutions, etc.). 5. trim, decorative panels, flooring, cabinetry, islands...
... REPAIR AS PROVIDED HEREIN. Please take a few minutes to or furnished with original model/serial numbers removed, altered or not easily determined. In Canada, call the Customer eXperience Center: ■ Name, address and telephone number ■ Model number and serial number ■ A clear, detailed description of the problem ■ Proof of household electrical or plumbing (i.e. light bulbs, batteries, air or water filters, preservation solutions, etc.). 5. trim, decorative panels, flooring, cabinetry, islands...
Warranty Information
Page 1
... discretion replace the product. light bulbs, batteries, air or water filters, preservation solutions, etc.). 5. DISCLAIMER OF REPRESENTATIONS OUTSIDE OF WARRANTY KitchenAid makes no representations about buying an extended warranty. Please take a few minutes to province. 2/14 16 ONE YEAR LIMITED WARRANTY WHAT IS COVERED WHAT IS NOT COVERED For one year from state to state or province to review the Troubleshooting or Problem Solver section of the Use and Care Guide...
... discretion replace the product. light bulbs, batteries, air or water filters, preservation solutions, etc.). 5. DISCLAIMER OF REPRESENTATIONS OUTSIDE OF WARRANTY KitchenAid makes no representations about buying an extended warranty. Please take a few minutes to province. 2/14 16 ONE YEAR LIMITED WARRANTY WHAT IS COVERED WHAT IS NOT COVERED For one year from state to state or province to review the Troubleshooting or Problem Solver section of the Use and Care Guide...
Dimension Guide
Page 1
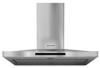
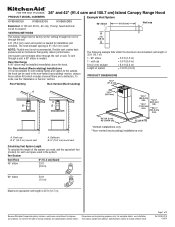
... vent length of the system you need, add the equivalent feet (meters) for each vent piece used in the system. 36" and 42" (91.4 cam and 106.7 cm) Island Canopy Range Hood PRODUCT MODEL NUMBERS Example Vent System KVIB606DSS KVIB602DSS KVIB606DBS Electrical: A 120 volt, 60 Hz., AC only, 15-amp, fused electrical circuit is required. 90 elbow 6 ft (1.8 m) Wall cap VENTING METHODS This canopy range hood is factory set for venting through the roof or through the roof or wall. Vent System Vent...
... vent length of the system you need, add the equivalent feet (meters) for each vent piece used in the system. 36" and 42" (91.4 cam and 106.7 cm) Island Canopy Range Hood PRODUCT MODEL NUMBERS Example Vent System KVIB606DSS KVIB602DSS KVIB606DBS Electrical: A 120 volt, 60 Hz., AC only, 15-amp, fused electrical circuit is required. 90 elbow 6 ft (1.8 m) Wall cap VENTING METHODS This canopy range hood is factory set for venting through the roof or through the roof or wall. Vent System Vent...


