KitchenAid KVUB406GSS Support and Manuals
Get Help and Manuals for this KitchenAid item

View All Support Options Below
Free KitchenAid KVUB406GSS manuals!
Problems with KitchenAid KVUB406GSS?
Ask a Question
Free KitchenAid KVUB406GSS manuals!
Problems with KitchenAid KVUB406GSS?
Ask a Question
Popular KitchenAid KVUB406GSS Manual Pages
Installation Guide - Page 2

...HOOD SAFETY 2
INSTALLATION REQUIREMENTS 4 Tools and Parts 4 Location Requirements 4 Venting Requirements 5 Electrical Requirements 6
INSTALLATION INSTRUCTIONS 7 Prepare Location 7 Install Hood Liner Internal Blower Motor 8 Install Hood Liner In...32 Nettoyage 32
SCHÉMA DE CÂBLAGE 33
ASSISTANCE OU SERVICE 34 Au Canada 34 Accessoires 34
GARANTIE 35
RANGE HOOD SAFETY
Your ...
Installation Guide - Page 3

... the local code authorities.
&#...settings.
IMPORTANT SAFETY INSTRUCTIONS
WARNING: TO REDUCE THE RISK OF FIRE, ELECTRIC
SHOCK, OR INJURY TO PERSONS, OBSERVE THE FOLLOWING:
■ Use this fan with a damaged cord or plug. Heat oils slowly on accidentally. Follow the heating equipment manufacturer's guideline and safety standards such as a tag, to the service panel.
■ Installation...
Installation Guide - Page 4

..." section. Cabinet Dimensions
36" (91.4 cm) for 36" models 48" (121.9 cm) for Manufactured Home Installation 1982 (Manufactured Home Sites, Communities and Setups) ANSI A225.1/NFPA 501A, or latest edition, or with installation clearances specified on the rear wall of Saturn Fasteners, Inc.
4 Read and follow the instructions provided with damper. ■ 4 - 5 x 45 mm mounting...
Installation Guide - Page 7
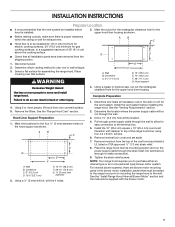
...Complete Preparation
1. Install the vent system before hood is installed.
3. Remove terminal box cover and set aside.
7....support as shown.
■ Before making cutouts, make all installation parts have been removed from the top of the vent hood and install...Wall B.
See the "Install Range Hood Internal Blower Motor" section and the instructions supplied with damper to top...
Installation Guide - Page 8
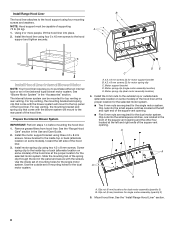
... and Care Guide.
2. Prepare the Internal Blower System
IMPORTANT: Perform steps 1-4 before mounting the hood liner.
1. Install the motor support bracket using two 4.2 x 8 mm screws. Install motor spring clip using three 4.2 x 8 mm screws. Use the inside set of mounting holes for the single motor system. Use the outside back (alternate location on some models) of the...
Installation Guide - Page 10

...strong enough to support the weight of the blower must be mounted using a 5 mm) drill bit.
3. This structure must span the studs. Spring clip D. Motor electrical plug
Install In-line Blower... blower motor system to release the blower motor assembly. If you to "Install In-line Blower System" in -line blower motor housing and set them aside.
3. 6. A B
5. A
BC
A. See "Blower Motor...
Installation Guide - Page 11
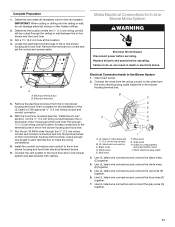
...or electrical shock. Install the conduit connectors and conduit to prepare for the installation of the UL...line blower system and seal all parts and panels before servicing.
Connect the wires from
the ...3.
Remove the terminal box covers and set the covers and screws aside. Make ... blower housing terminal box.
. Replace all joints with clamps. Green (or yellow/green)...
Installation Guide - Page 15
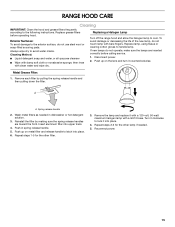
...filters frequently according to avoid water marks. Always wipe dry to the following instructions. If new lamps do not operate, make sure the lamps are toward ...Insert aluminum filter into place.
4. Reconnect power.
15 Replace grease filters before calling service. 1.
Exterior Surfaces: To avoid damage to cool. Replacing a Halogen Lamp
Turn off the range hood and allow ...
Installation Guide - Page 17
... service, please know the purchase date and the complete model and serial number of appliances.
■ Installation information.
■ Use and maintenance procedures.
■ Accessory and repair parts sales.
■ Specialized customer assistance (Spanish speaking, hearing impaired, limited vision, etc.).
■ Referrals to Whirlpool Corporation with : ■ Features and specifications...
Installation Guide - Page 18

... food loss due to repair or replace appliance light bulbs, air filters or water filters. Repairs to parts or systems resulting from warranty coverage.
3.
Service must provide proof of purchase or installation date for future reference. Service calls to correct the installation of your major appliance, to instruct you ever need to know your complete model number and serial number...
Dimension Guide - Page 1
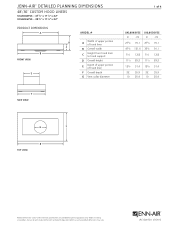
Before installing any product, be sure to hood support
D Overall height... x 111⁄2" x 22"
A PRODUCT ADIMENSIONS
A
B B
B FRONT VIEW
D D
C
C
D
C
E E
E
MODEL #
A
Width of upper portion of 4
UXL6048YSs UXL6036YSs
in
cm
in
cm
275⁄8 70.1 275⁄8 70.1
477⁄8...
B
F F
F
Product dimension, cutout and installation specifications are provided for planning purposes only.
Dimension Guide - Page 2

....0
Product dimension, cutout and installation specifications are provided for planning purposes only.
wall option (min.)
Hood Support
E Height from vent entry ...set for venting through the roof or wall. LOCATION REQUIREMENTS Custom built enclosure with hood liner support. MODEL #
A Width of vent entry location - The hood is required. Before installing any product, be able to support...
Dimension Guide - Page 3

... with any of 4
Ventilation Selection Chart - Key
★ Style and Performance Pair
n
Performance Pair
-
Not Recommended
Product dimension, cutout and installation specifications are provided for planning purposes only.
cooktops
MODEL #
PRO-STYLE™ Hoods
JXW9036WP JXW9030WP JXW9048WP JXU9136WP JXU9130WP
Euro-Style Island-Mount Hoods
JXI8042WS JXI8036WS
Euro-Style Wall-Mount...
Dimension Guide - Page 4
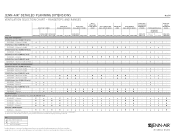
...Systems
Custom Hood Liners
Over-TheRange
Microwave Ovens
UXL6048YSS UXL6036YSS
MODEL # Pro-Style® RangeTops
JXW9036WP JXW9030WP
JXW8036WS
JXW9048WP ... Key
★ Style and Performance Pair
n
Performance Pair
- Not Recommended
Product dimension, cutout and installation specifications are provided for up to 65,000 BTUs and can be used with any product, be used with the ...
Warranty Information - Page 1
... installed in accordance with published installation instructions.
11. Any food loss due to the appliance.
9.
After checking "Troubleshooting," you on the product. You will pay for repairs.
Costs associated with the product, Whirlpool Corporation or Whirlpool Canada LP (hereafter "Whirlpool") will need service, first see the "Troubleshooting" section of your complete model...
KitchenAid KVUB406GSS Reviews
We have not received any reviews for KitchenAid yet.