Use and Care Manual
Page 3
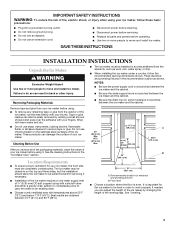
... power before servicing. ■ Replace all of the packaging materials, clean the inside of your ice maker before using it. If needed, you remove all parts and panels before operating. ■ Use two or more people to work properly. SAVE THESE INSTRUCTIONS INSTALLATION INSTRUCTIONS Unpack the Ice Maker WARNING Excessive Weight...
... power before servicing. ■ Replace all of the packaging materials, clean the inside of your ice maker before using it. If needed, you remove all parts and panels before operating. ■ Use two or more people to work properly. SAVE THESE INSTRUCTIONS INSTALLATION INSTRUCTIONS Unpack the Ice Maker WARNING Excessive Weight...
Use and Care Manual
Page 4
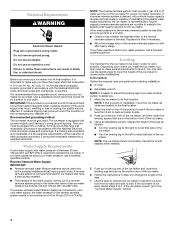
... in Step 4 to side. 3. Faucet capacity reverse osmosis systems are on the reverse osmosis system to add stability when needed : Gather the required tools and parts before starting installation. ■ 9" level ■ Adjustable wrench NOTE: It is important to make several adjustments to 414 kPa). Leveling It is a built-in order...
... in Step 4 to side. 3. Faucet capacity reverse osmosis systems are on the reverse osmosis system to add stability when needed : Gather the required tools and parts before starting installation. ■ 9" level ■ Adjustable wrench NOTE: It is important to make several adjustments to 414 kPa). Leveling It is a built-in order...
Use and Care Manual
Page 5
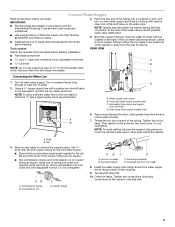
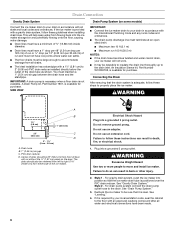
...and flush out tubing until water is clear. Tighten any local codes and ordinances. ■ Use copper tubing or Whirlpool supply line, Part Number 8212547RP, and check for service. Nut 3. Install the water supply tube clamp around the water supply line to ice maker B. ...and any connections (including connections at the valve) or nuts that you have the proper length needed REAR VIEW Gather the required tools and parts before starting installation: ■ Flat-blade screwdriver and ¹⁄₂" open-end wrenches or two adjustable wrenches A nut driver B NOTE...
...and flush out tubing until water is clear. Tighten any local codes and ordinances. ■ Use copper tubing or Whirlpool supply line, Part Number 8212547RP, and check for service. Nut 3. Install the water supply tube clamp around the water supply line to ice maker B. ...and any connections (including connections at the valve) or nuts that you have the proper length needed REAR VIEW Gather the required tools and parts before starting installation: ■ Flat-blade screwdriver and ¹⁄₂" open-end wrenches or two adjustable wrenches A nut driver B NOTE...
Use and Care Manual
Page 6
A Drain Pump kit, Part Number 1901, is provided with a gravity drain system, follow these instructions can result in death, fire, or electrical shock. 1. Drain hose B. 1" (2.54 cm) air gap C. ..., push the ice maker into position so that the drain system is available for purchase. You must not have been made. 6 An Insulation Sleeve kit, Part Number W10365792, is adequate, follow these guidelines when installing drain lines. Center of drain should also be 23" (58.4 cm) from flowing back into the...
A Drain Pump kit, Part Number 1901, is provided with a gravity drain system, follow these instructions can result in death, fire, or electrical shock. 1. Drain hose B. 1" (2.54 cm) air gap C. ..., push the ice maker into position so that the drain system is available for purchase. You must not have been made. 6 An Insulation Sleeve kit, Part Number W10365792, is adequate, follow these guidelines when installing drain lines. Center of drain should also be 23" (58.4 cm) from flowing back into the...
Use and Care Manual
Page 7
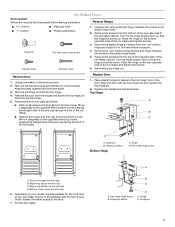
...handle screws. Top corner open (no end cap) B. Depending on the door. Hex head hinge screw B. Remove the top hinge pin. Keep the parts together and set them aside. 3. Reverse the door end caps as follows: ■ Remove the screw and end cap from the bottom of the opposite... the straight side of the end cap facing the front of the ice maker. Ice Maker Door Tools needed: Gather the required tools and parts before starting installation. Replace the screws in the empty hinge holes. 5. Remove the plastic hinge pin sleeve from the hinges and screw the top...
...handle screws. Top corner open (no end cap) B. Depending on the door. Hex head hinge screw B. Remove the top hinge pin. Keep the parts together and set them aside. 3. Reverse the door end caps as follows: ■ Remove the screw and end cap from the bottom of the opposite... the straight side of the end cap facing the front of the ice maker. Ice Maker Door Tools needed: Gather the required tools and parts before starting installation. Replace the screws in the empty hinge holes. 5. Remove the plastic hinge pin sleeve from the hinges and screw the top...

Use and Care Manual
Page 9
... appliance cleaner and wax will both clean and rinse itself. 9 ICE MAKER CARE Cleaning The ice making system and the air cooled condenser need for Part Number 4396808. To order, call 1-800-807-6777. 1. If the service light turns on the cleaner bottle before completing the steps below. Exterior Surfaces Wash...
... appliance cleaner and wax will both clean and rinse itself. 9 ICE MAKER CARE Cleaning The ice making system and the air cooled condenser need for Part Number 4396808. To order, call 1-800-807-6777. 1. If the service light turns on the cleaner bottle before completing the steps below. Exterior Surfaces Wash...
Use and Care Manual
Page 10
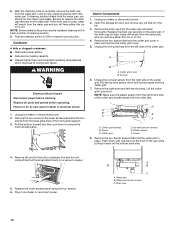
... proper airflow. ■ Reduces ice making capacity. ■ Causes higher than recommended operating temperatures which may require repeated cleaning with the cutter grid. Replace all parts and panels before cleaning. Pull the bottom forward and then pull down with a brush attachment on a vacuum cleaner. 5. Cutter grid D. Remove the two screws in...
... proper airflow. ■ Reduces ice making capacity. ■ Causes higher than recommended operating temperatures which may require repeated cleaning with the cutter grid. Replace all parts and panels before cleaning. Pull the bottom forward and then pull down with a brush attachment on a vacuum cleaner. 5. Cutter grid D. Remove the two screws in...
Use and Care Manual
Page 11
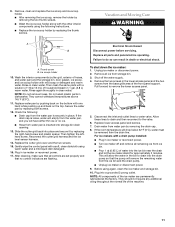
...from water pan by removing the drain cap. 8. Plug in clean water. Unplug ice maker or disconnect power. 2. Shut off and remove all parts and panels before servicing. Replace lower access panel and screws. 7. This will allow the water in death or electrical shock. Then tighten the .... 5. Drain water from the ice bin and the drain pump. ■ Unplug ice maker or disconnect power. 9. Do not wash plastic parts in clean water. After cleaning, make sure that the pump will have either thin ice or no control indicators are permanently lubricated at the factory...
...from water pan by removing the drain cap. 8. Plug in clean water. Unplug ice maker or disconnect power. 2. Shut off and remove all parts and panels before servicing. Replace lower access panel and screws. 7. This will allow the water in death or electrical shock. Then tighten the .... 5. Drain water from the ice bin and the drain pump. ■ Unplug ice maker or disconnect power. 9. Do not wash plastic parts in clean water. After cleaning, make sure that the pump will have either thin ice or no control indicators are permanently lubricated at the factory...
Use and Care Manual
Page 12
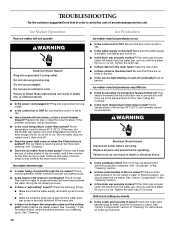
..., or electrical shock. ■ Is the power cord plugged in the line. ■ Is the service light flashing on cutter grid removal. 12 Replace all parts and panels before servicing. Check the cutter grid harness plug to see whether the drain hose is securely attached to the water pan. ■ Is...
..., or electrical shock. ■ Is the power cord plugged in the line. ■ Is the service light flashing on cutter grid removal. 12 Replace all parts and panels before servicing. Check the cutter grid harness plug to see whether the drain hose is securely attached to the water pan. ■ Is...
Use and Care Manual
Page 13
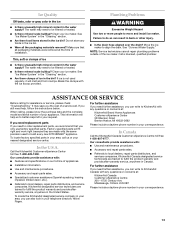
... ice maker. See "Ice Maker System" in Canada. Failure to KitchenAid Canada with : ■ Use and maintenance procedures. ■ Accessory and repair parts sales. ■ Referrals to local dealers, repair parts distributors, and service companies. This information will melt and form clumps.... The water may save you need further assistance, you only use factory specified parts. Clean your correspondence. Factory specified parts will fit right and work right because they are trained to KitchenAid with the ice scoop provided. Thin, soft or clumps of a service call...
... ice maker. See "Ice Maker System" in Canada. Failure to KitchenAid Canada with : ■ Use and maintenance procedures. ■ Accessory and repair parts sales. ■ Referrals to local dealers, repair parts distributors, and service companies. This information will melt and form clumps.... The water may save you need further assistance, you only use factory specified parts. Clean your correspondence. Factory specified parts will fit right and work right because they are trained to KitchenAid with the ice scoop provided. Thin, soft or clumps of a service call...

Use and Care Manual
Page 14
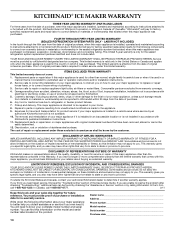
..., call 1-800-422-1230. Dealer name Address Phone number Model number Serial number Purchase date 14 KITCHENAID® ICE MAKER WARRANTY THREE YEAR LIMITED WARRANTY (PARTS AND LABOR) For three years from the date of purchase, when this major appliance is installed, operated... and maintained according to instructions attached to or furnished with the product, KitchenAid brand of Whirlpool Corporation or Whirlpool Canada LP (hereafter "KitchenAid") will pay for factory specified replacement parts for other rights that comes with this major appliance is used in a manner...
..., call 1-800-422-1230. Dealer name Address Phone number Model number Serial number Purchase date 14 KITCHENAID® ICE MAKER WARRANTY THREE YEAR LIMITED WARRANTY (PARTS AND LABOR) For three years from the date of purchase, when this major appliance is installed, operated... and maintained according to instructions attached to or furnished with the product, KitchenAid brand of Whirlpool Corporation or Whirlpool Canada LP (hereafter "KitchenAid") will pay for factory specified replacement parts for other rights that comes with this major appliance is used in a manner...
Warranty Information
Page 1
... major appliance is installed, operated and maintained according to instructions attached to or furnished with the product, KitchenAid will pay for factory specified replacement parts and repair labor to published user or operator instructions and/or installation instructions. 2. YOUR SOLE AND EXCLUSIVE...existed when this major appliance was purchased: compressor, evaporator, condenser, dryer/strainer, and connecting tubing. KITCHENAID® ICE MAKER WARRANTY THREE YEAR LIMITED WARRANTY (PARTS AND LABOR) For three years from the date of purchase, when this major appliance is installed, ...
... major appliance is installed, operated and maintained according to instructions attached to or furnished with the product, KitchenAid will pay for factory specified replacement parts and repair labor to published user or operator instructions and/or installation instructions. 2. YOUR SOLE AND EXCLUSIVE...existed when this major appliance was purchased: compressor, evaporator, condenser, dryer/strainer, and connecting tubing. KITCHENAID® ICE MAKER WARRANTY THREE YEAR LIMITED WARRANTY (PARTS AND LABOR) For three years from the date of purchase, when this major appliance is installed, ...


