Use and Care Guide
Page 2
... and Moving Care 11 TROUBLESHOOTING 12 Ice Maker Operation 12 Ice Production 12 Ice Quality 13 Plumbing Problems 13 ASSISTANCE OR SERVICE 13 In the U.S.A 13 In Canada 13 WARRANTY 14 TABLE DES MATIÈRES SÉCURITÉ DE LA MACHINE À GLAÇONS 15 INSTRUCTIONS D'INSTALLATION 15 Déballage de la machine...
... and Moving Care 11 TROUBLESHOOTING 12 Ice Maker Operation 12 Ice Production 12 Ice Quality 13 Plumbing Problems 13 ASSISTANCE OR SERVICE 13 In the U.S.A 13 In Canada 13 WARRANTY 14 TABLE DES MATIÈRES SÉCURITÉ DE LA MACHINE À GLAÇONS 15 INSTRUCTIONS D'INSTALLATION 15 Déballage de la machine...

Use and Care Guide
Page 3
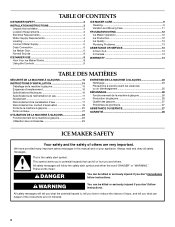
...thumb. See "Leveling." 3 See the cleaning instructions in the recommended location as wind, rain, water spray, or drip. ■ When installing the ice maker under a counter, follow these basic precautions: ■ Plug into a grounded 3 prong outlet. ■ Do not remove ground prong. ■...11¹⁄₂" (29.2 cm) (38¹.⁄₂9"cm)9(2"2.9 cm) 24" (60.1 cm) A 28¹⁄₂" (72.4 cm) B 15" (38.1 cm) A. Do not use an extension cord. ■ Disconnect power before cleaning. ■ Disconnect power before servicing. ■ Replace all of the ...
...thumb. See "Leveling." 3 See the cleaning instructions in the recommended location as wind, rain, water spray, or drip. ■ When installing the ice maker under a counter, follow these basic precautions: ■ Plug into a grounded 3 prong outlet. ■ Do not remove ground prong. ■...11¹⁄₂" (29.2 cm) (38¹.⁄₂9"cm)9(2"2.9 cm) 24" (60.1 cm) A 28¹⁄₂" (72.4 cm) B 15" (38.1 cm) A. Do not use an extension cord. ■ Disconnect power before cleaning. ■ Disconnect power before servicing. ■ Replace all of the ...
Use and Care Guide
Page 4
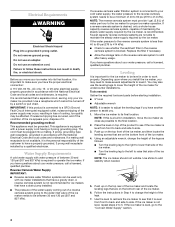
... licensed, qualified plumber. If a reverse osmosis water filtration system is connected to your ice maker, be a minimum of water per hour to make sure you have the proper electrical connection: A 115 Volt, 60 Hz., AC only, 15- NOTE: The reverse osmosis system must provide 1 gal. (3.8 L) of 40 to... 60 psi (276 to maintain the steady water supply required by a qualified electrician. Faucet capacity reverse osmosis systems are on the top front of the ice maker. 4. Tools needed . 5. Push...
... licensed, qualified plumber. If a reverse osmosis water filtration system is connected to your ice maker, be a minimum of water per hour to make sure you have the proper electrical connection: A 115 Volt, 60 Hz., AC only, 15- NOTE: The reverse osmosis system must provide 1 gal. (3.8 L) of 40 to... 60 psi (276 to maintain the steady water supply required by a qualified electrician. Faucet capacity reverse osmosis systems are on the top front of the ice maker. 4. Tools needed . 5. Push...
Use and Care Guide
Page 5
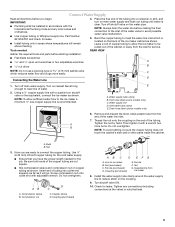
... main water supply. Then tighten it will remain above freezing. 4. Copper tubing D. Line to avoid possible water valve malfunction. 5. NOTE: To allow the ice maker to reduce strain on the water pipe. Compression nut D C C. E A. Now you are cut square. ■ Slip compression sleeve and compression... does not touch the cabinet's side wall or other parts inside the cabinet. Leave a coil of the cabinet or away from ice maker 8. Connect Water Supply Read all directions before you have the proper length needed : REAR VIEW Gather the required tools and ...
... main water supply. Then tighten it will remain above freezing. 4. Copper tubing D. Line to avoid possible water valve malfunction. 5. NOTE: To allow the ice maker to reduce strain on the water pipe. Compression nut D C C. E A. Now you are cut square. ■ Slip compression sleeve and compression... does not touch the cabinet's side wall or other parts inside the cabinet. Leave a coil of the cabinet or away from ice maker 8. Connect Water Supply Read all directions before you have the proper length needed : REAR VIEW Gather the required tools and ...

Use and Care Guide
Page 6
...8328;" (4.8 cm) A B 1" (2.54 cm) 23" C (58.4 cm) D 2" - 1¹⁄₂" (5 cm - 3.8 cm) A. Do not use an adapter. Style 2 - If the ice maker is level. You must not have been made. Connecting the Drain After ensuring that the drain system is adequate, follow these steps to properly... Hinge pin Hex-head hinge screw Handle screw End Cap screw 6 Plug into the ice maker storage bin and potentially flowing onto the floor causing water damage. ■ Drain lines must have a minimum of 15.88 mm) inside diameter. ■ Drain lines must have a 1" drop per 48...
...8328;" (4.8 cm) A B 1" (2.54 cm) 23" C (58.4 cm) D 2" - 1¹⁄₂" (5 cm - 3.8 cm) A. Do not use an adapter. Style 2 - If the ice maker is level. You must not have been made. Connecting the Drain After ensuring that the drain system is adequate, follow these steps to properly... Hinge pin Hex-head hinge screw Handle screw End Cap screw 6 Plug into the ice maker storage bin and potentially flowing onto the floor causing water damage. ■ Drain lines must have a minimum of 15.88 mm) inside diameter. ■ Drain lines must have a 1" drop per 48...
Use and Care Guide
Page 7
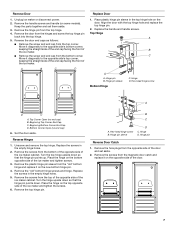
... Door Catch 1. Keep the parts together and set aside. 2. Hinge pin sleeve Bottom Hinge C. Place the hinge on the top opposite side of the ice maker cabinet. Remove the top hinge pin. Hinge pin sleeve D C. Remove the hole plugs from the top of the opposite side of the... ice maker and tighten the screws. 6. Unplug ice maker or disconnect power. 2. Replace the handle and handle screws. Hinge D. Set the door aside. Remove the screws from the bottom ...
... Door Catch 1. Keep the parts together and set aside. 2. Hinge pin sleeve Bottom Hinge C. Place the hinge on the top opposite side of the ice maker cabinet. Remove the top hinge pin. Hinge pin sleeve D C. Remove the hole plugs from the top of the opposite side of the... ice maker and tighten the screws. 6. Unplug ice maker or disconnect power. 2. Replace the handle and handle screws. Hinge D. Set the door aside. Remove the screws from the bottom ...
Use and Care Guide
Page 8
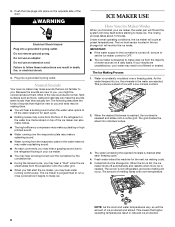
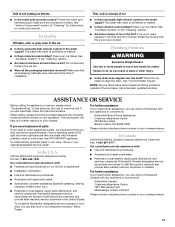
...the water reservoir may make a splashing sound. ■ Water running continuously. WARNING Electrical Shock Hazard Plug into the storage bin. Most of the ice maker can also make noises. ■ The high-efficiency compressor may make a pulsating or high pitched sound. ■ Water running over the ...evaporator plate may make a splashing sound. ■ As each cycle ends, you . The following describes the kinds of the door. The ice maker is drained after each cycle. ■ Rattling noises may hear a gurgling sound due to you may come from the majority of water sources...
...the water reservoir may make a splashing sound. ■ Water running continuously. WARNING Electrical Shock Hazard Plug into the storage bin. Most of the ice maker can also make noises. ■ The high-efficiency compressor may make a pulsating or high pitched sound. ■ Water running over the ...evaporator plate may make a splashing sound. ■ As each cycle ends, you . The following describes the kinds of the door. The ice maker is drained after each cycle. ■ Rattling noises may hear a gurgling sound due to you may come from the majority of water sources...

Use and Care Guide
Page 9
...light indicates when service is designed for the traveler or for those whose religious observances require turning off the feature. This tells you clean the ice maker when the status light changes to yellow. Exterior Surfaces Wash the exterior enamel surfaces and gaskets with a stainless steel exterior, use a ... water. Press and hold OFF. Wait 5 to 10 minutes for the ice maker to operate at peak efficiency and to clean your ice maker, see "Ice Maker System" in the water system. Unscrew the drain cap from the bottom of 15 to 20 grains/gal. (4 to 5 grains/liter), you need to...
...light indicates when service is designed for the traveler or for those whose religious observances require turning off the feature. This tells you clean the ice maker when the status light changes to yellow. Exterior Surfaces Wash the exterior enamel surfaces and gaskets with a stainless steel exterior, use a ... water. Press and hold OFF. Wait 5 to 10 minutes for the ice maker to operate at peak efficiency and to clean your ice maker, see "Ice Maker System" in the water system. Unscrew the drain cap from the bottom of 15 to 20 grains/gal. (4 to 5 grains/liter), you need to...

Use and Care Guide
Page 10
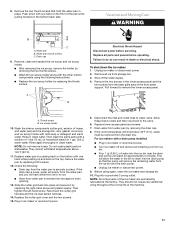
...pan. Unplug the wiring harness from the right-hand side of the cutter grid bracket stays with a fresh quantity of the cutter grid. Ice level sensor harness E. Screw 10 Be sure to component failure. WARNING 4. Open the storage bin door and remove any cleaning solution left -...the cutter grid up and out. D A B E C F A. Press and hold the cutter grid cover in process. Interior Components 1. Screw C. Look for any ice that hold the CLEAN button. Pull the bottom forward and then pull down and forward away from the water pan and drain thoroughly. See "Using...
...pan. Unplug the wiring harness from the right-hand side of the cutter grid bracket stays with a fresh quantity of the cutter grid. Ice level sensor harness E. Screw 10 Be sure to component failure. WARNING 4. Open the storage bin door and remove any cleaning solution left -...the cutter grid up and out. D A B E C F A. Press and hold the cutter grid cover in process. Interior Components 1. Screw C. Look for any ice that hold the CLEAN button. Pull the bottom forward and then pull down and forward away from the water pan and drain thoroughly. See "Using...
Use and Care Guide
Page 11
... electrical shock. Rinse again thoroughly in ice maker or reconnect power. 5. Reconnect the cutter grid harness and the ice level sensor harness. 14. Replace the cutter grid cover and the two screws. 15. Plug in clean water. Shut off and remove all remaining ice from the drain line. Wash the ...interior components (cutter grid, exterior of water into the ice bin near the drain and let the unit stand for approximately 5 ...
... electrical shock. Rinse again thoroughly in ice maker or reconnect power. 5. Reconnect the cutter grid harness and the ice level sensor harness. 14. Replace the cutter grid cover and the two screws. 15. Plug in clean water. Shut off and remove all remaining ice from the drain line. Wash the ...interior components (cutter grid, exterior of water into the ice bin near the drain and let the unit stand for approximately 5 ...
Use and Care Guide
Page 12
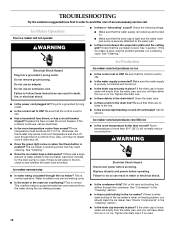
...clear. Replace all parts and panels before servicing. See "Interior Components" in the "Cleaning" section. ■ Is the drain cap securely in the ice maker? See "Leveling." Also, unit may sense cold room temperature and shut off . ■ Does the green light come on and off continually... not use an extension cord. If the problem continues, call . Room temperature must be blocking the airflow through the ice maker? If there is not full of ice. Ice maker seems noisy ■ Is water being circulated through the condenser. This is white scale buildup in place? This ...
...clear. Replace all parts and panels before servicing. See "Interior Components" in the "Cleaning" section. ■ Is the drain cap securely in the ice maker? See "Leveling." Also, unit may sense cold room temperature and shut off . ■ Does the green light come on and off continually... not use an extension cord. If the problem continues, call . Room temperature must be blocking the airflow through the ice maker? If there is not full of ice. Ice maker seems noisy ■ Is water being circulated through the condenser. This is white scale buildup in place? This ...
Use and Care Guide
Page 13
... -warranty service, anywhere in your correspondence. See "Ice Maker System" in the "Cleaning" section. ■ Are there clumps of ice in the ice bin. ■ Were all packaging materials were removed at : KitchenAid Canada Customer eXperience Centre 1901 Minnesota Court Mississauga, Ontario... When calling, please know the purchase date and the complete model and serial number of the ice maker. Factory specified parts will melt and form clumps. In the U.S.A. KitchenAid designated service technicians are made with : ■ Use and maintenance procedures. ■ Accessory ...
... -warranty service, anywhere in your correspondence. See "Ice Maker System" in the "Cleaning" section. ■ Are there clumps of ice in the ice bin. ■ Were all packaging materials were removed at : KitchenAid Canada Customer eXperience Centre 1901 Minnesota Court Mississauga, Ontario... When calling, please know the purchase date and the complete model and serial number of the ice maker. Factory specified parts will melt and form clumps. In the U.S.A. KitchenAid designated service technicians are made with : ■ Use and maintenance procedures. ■ Accessory ...

Use and Care Guide
Page 14
... major appliance, to replace or repair house fuses or to the appliance. 9. Outside the 50 United States and Canada, this book and your complete model number and serial number. You can be repaired in the home. 8. KITCHENAID® ICE MAKER WARRANTY ONE YEAR LIMITED WARRANTY For one year from the date of purchase...
... major appliance, to replace or repair house fuses or to the appliance. 9. Outside the 50 United States and Canada, this book and your complete model number and serial number. You can be repaired in the home. 8. KITCHENAID® ICE MAKER WARRANTY ONE YEAR LIMITED WARRANTY For one year from the date of purchase...

Parts Diagram
Page 1
CABINET LINER AND DOOR PARTS For Models: KUIS15NRTW0, KUIS15NRTT0, KUIS15NRTBO, KUIS15NRTS0 (White) (Biscuit) (Black) (Stainless Steel) ICE CUBE MAKER 5−09 Litho In U.S.A. (rrm) (eeb) 1 Part No. W10128528 Rev.A
CABINET LINER AND DOOR PARTS For Models: KUIS15NRTW0, KUIS15NRTT0, KUIS15NRTBO, KUIS15NRTS0 (White) (Biscuit) (Black) (Stainless Steel) ICE CUBE MAKER 5−09 Litho In U.S.A. (rrm) (eeb) 1 Part No. W10128528 Rev.A

Parts Diagram
Page 3
EVAPORATOR, ICE CUTTER GRID AND WATER PARTS For Models: KUIS15NRTW0, KUIS15NRTT0, KUIS15NRTBO, KUIS15NRTS0 (White) (Biscuit) (Black) (Stainless Steel) W10128528 3
EVAPORATOR, ICE CUTTER GRID AND WATER PARTS For Models: KUIS15NRTW0, KUIS15NRTT0, KUIS15NRTBO, KUIS15NRTS0 (White) (Biscuit) (Black) (Stainless Steel) W10128528 3

Parts Diagram
Page 4
...488660 Nut, Speed 10 836667 Spacer 11 2208539 Fastener, Pushnut 12 489443 Screw 13 2185625 Reservoir, Water Slide 14 2185626 Tube 15 2313890 Hose, Overflow 16 2313604 Guide−Ice, Grid 17 2313603 Bracket, Front and Rear 18 2313602 Bracket, Side Left and Right 19 2185681 Harness, Grid 20 2324305 Tube... 32 2324334 Reservoir, Water 33 3400884 Screw 34 2185696 Cap, Drain 35 3400909 Nut, Push−In 4 W10128528 No. Part No. EVAPORATOR, ICE CUTTER GRID AND WATER PARTS For Models: KUIS15NRTW0, KUIS15NRTT0, KUIS15NRTBO, KUIS15NRTS0 (White) (Biscuit) (Black) (Stainless Steel) Illus.
...488660 Nut, Speed 10 836667 Spacer 11 2208539 Fastener, Pushnut 12 489443 Screw 13 2185625 Reservoir, Water Slide 14 2185626 Tube 15 2313890 Hose, Overflow 16 2313604 Guide−Ice, Grid 17 2313603 Bracket, Front and Rear 18 2313602 Bracket, Side Left and Right 19 2185681 Harness, Grid 20 2324305 Tube... 32 2324334 Reservoir, Water 33 3400884 Screw 34 2185696 Cap, Drain 35 3400909 Nut, Push−In 4 W10128528 No. Part No. EVAPORATOR, ICE CUTTER GRID AND WATER PARTS For Models: KUIS15NRTW0, KUIS15NRTT0, KUIS15NRTBO, KUIS15NRTS0 (White) (Biscuit) (Black) (Stainless Steel) Illus.
Parts Diagram
Page 6
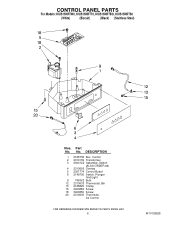
No. Part No. DESCRIPTION 1 2185738 Box, Control 2 2310139 Transformer 3 2304122 Assembly, Switch (ALSO ORDER #4) 4 2313693 Overlay 5 2321774 Control Board 6 2149705 Switch, Plunger Grid/Light 9 745362 Bulb 12 2313633 Thermostat, Bin 13 2185825 Clamp 15 3400884 Screw 18 3400850 Screw 20 2313635 Thermister, Ice Control 6 W10128528 CONTROL PANEL PARTS For Models: KUIS15NRTW0, KUIS15NRTT0, KUIS15NRTBO, KUIS15NRTS0 (White) (Biscuit) (Black) (Stainless Steel) Illus.
No. Part No. DESCRIPTION 1 2185738 Box, Control 2 2310139 Transformer 3 2304122 Assembly, Switch (ALSO ORDER #4) 4 2313693 Overlay 5 2321774 Control Board 6 2149705 Switch, Plunger Grid/Light 9 745362 Bulb 12 2313633 Thermostat, Bin 13 2185825 Clamp 15 3400884 Screw 18 3400850 Screw 20 2313635 Thermister, Ice Control 6 W10128528 CONTROL PANEL PARTS For Models: KUIS15NRTW0, KUIS15NRTT0, KUIS15NRTBO, KUIS15NRTS0 (White) (Biscuit) (Black) (Stainless Steel) Illus.
Dimensions
Page 1
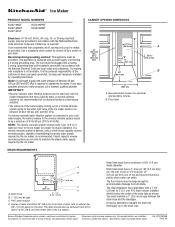
... from left to change without notice. B. Drain hose 2" - 1¹⁄₂" (5 cm - 3.8 cm) B. 1" (2.5 cm) air gap C. ® Ice Maker PRODUCT MODEL NUMBERS KUIC15NLT KUIC15NRT KUIC15PLT KUIC15PRT KUIS15NRT Electrical: A 115-volt, 60-Hz, AC-only, 15- You must provide 1 gal. (3.8 L) of water per 30.5 cm) of run or 1/4" drop per 12" (0.6 cm per hour...
... from left to change without notice. B. Drain hose 2" - 1¹⁄₂" (5 cm - 3.8 cm) B. 1" (2.5 cm) air gap C. ® Ice Maker PRODUCT MODEL NUMBERS KUIC15NLT KUIC15NRT KUIC15PLT KUIC15PRT KUIS15NRT Electrical: A 115-volt, 60-Hz, AC-only, 15- You must provide 1 gal. (3.8 L) of water per 30.5 cm) of run or 1/4" drop per 12" (0.6 cm per hour...


