Use and Care Guide
Page 2
... 4 Water Supply Requirements 4 Leveling 4 Connect Water Supply 5 Drain Connection 6 Ice Maker Door 6 Normal Sounds 8 ICE MAKER USE 8 How Your Ice Maker Works 8 Using the Controls 9 ICE MAKER CARE 9 Cleaning 9 Vacation and Moving Care 11 TROUBLESHOOTING 12 Ice Maker Operation 12 Ice Production 12 Ice Quality 13 Plumbing Problems 13 ASSISTANCE OR SERVICE 13 In the U.S.A 13 In Canada 13 WARRANTY 14 TABLE DES MATIÈRES SÉCURITÉ DE LA MACHINE À GLAÇONS 15 INSTRUCTIONS D'INSTALLATION 15 Dé...
... 4 Water Supply Requirements 4 Leveling 4 Connect Water Supply 5 Drain Connection 6 Ice Maker Door 6 Normal Sounds 8 ICE MAKER USE 8 How Your Ice Maker Works 8 Using the Controls 9 ICE MAKER CARE 9 Cleaning 9 Vacation and Moving Care 11 TROUBLESHOOTING 12 Ice Maker Operation 12 Ice Production 12 Ice Quality 13 Plumbing Problems 13 ASSISTANCE OR SERVICE 13 In the U.S.A 13 In Canada 13 WARRANTY 14 TABLE DES MATIÈRES SÉCURITÉ DE LA MACHINE À GLAÇONS 15 INSTRUCTIONS D'INSTALLATION 15 Dé...

Use and Care Guide
Page 3
... condensate pump to carry the water to an existing drain. ■ Choose a well ventilated area with warm water and dry. ■ This unit must be closed-in order to do so can also be installed in the "Ice Maker Care" section. If needed, you remove all parts and panels before servicing. ■ Replace all of the packaging materials, clean the inside of your ice maker...
... condensate pump to carry the water to an existing drain. ■ Choose a well ventilated area with warm water and dry. ■ This unit must be closed-in order to do so can also be installed in the "Ice Maker Care" section. If needed, you remove all parts and panels before servicing. ■ Replace all of the packaging materials, clean the inside of your ice maker...
Use and Care Guide
Page 4
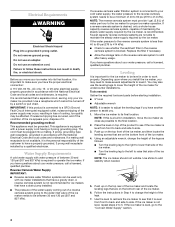
... is easier to adjust the leveling legs if you have a drain pump installed. ■ The pressure of the water supply coming out of a reverse osmosis system going to the water inlet valve of the ice maker. 4. Leveling It is important for ice makers that it is even from front to back and side to have another person to operate the ice maker. Using an adjustable wrench, change...
... is easier to adjust the leveling legs if you have a drain pump installed. ■ The pressure of the water supply coming out of a reverse osmosis system going to the water inlet valve of the ice maker. 4. Leveling It is important for ice makers that it is even from front to back and side to have another person to operate the ice maker. Using an adjustable wrench, change...
Use and Care Guide
Page 5
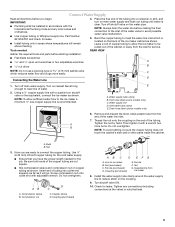
... tubing. Tools needed for service. Then tighten it will remain above freezing. 4. Coupling (purchased) AB C D EF G A. Tighten any local codes and ordinances. ■ Use copper tubing or Whirlpool supply line, Part Number 8212547RP, and check for leaks. Turn off shutoff valve on main water supply and flush out tubing until water is clear. Vent hose (drain pump models only) C. Do not overtighten. Do not overtighten. Copper tubing D. Turn off main water supply. Using...
... tubing. Tools needed for service. Then tighten it will remain above freezing. 4. Coupling (purchased) AB C D EF G A. Tighten any local codes and ordinances. ■ Use copper tubing or Whirlpool supply line, Part Number 8212547RP, and check for leaks. Turn off shutoff valve on main water supply and flush out tubing until water is clear. Vent hose (drain pump models only) C. Do not overtighten. Do not overtighten. Copper tubing D. Turn off main water supply. Using...

Use and Care Guide
Page 6
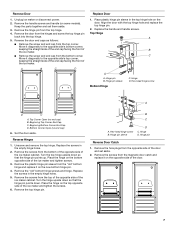
... been made. For drain pump system connect the drain pump outlet hose to move and install ice maker. If the ice maker is provided with the International Plumbing Code and any local codes and ordinances. Style 1 - Recheck the ice maker to properly place the ice maker: WARNING Electrical Shock Hazard Plug into a grounded 3 prong outlet. See "Leveling." 4. Tools needed: Ice Maker Door Gather the required tools and parts before starting installation. Drain hose B. 1" (2.54 cm...
... been made. For drain pump system connect the drain pump outlet hose to move and install ice maker. If the ice maker is provided with the International Plumbing Code and any local codes and ordinances. Style 1 - Recheck the ice maker to properly place the ice maker: WARNING Electrical Shock Hazard Plug into a grounded 3 prong outlet. See "Leveling." 4. Tools needed: Ice Maker Door Gather the required tools and parts before starting installation. Drain hose B. 1" (2.54 cm...
Use and Care Guide
Page 7
... screws and handle (on the door. Keep the parts together and set aside. 2. Reverse the door end caps as follows: ■ Remove the screw and end cap from the top hinge. 4. Place plastic hinge pin sleeve in the top hinge hole on some models). Top Hinge A B C ...replace it diagonally to the opposite side's top corner, keeping the straight side of the end cap facing the front of the door and set them aside. 3. Remove the plastic hinge pin sleeve from the opposite side of the ice maker. Unplug ice maker or disconnect power. 2. Move it on the opposite side of the ice maker...
... screws and handle (on the door. Keep the parts together and set aside. 2. Reverse the door end caps as follows: ■ Remove the screw and end cap from the top hinge. 4. Place plastic hinge pin sleeve in the top hinge hole on some models). Top Hinge A B C ...replace it diagonally to the opposite side's top corner, keeping the straight side of the end cap facing the front of the door and set them aside. 3. Remove the plastic hinge pin sleeve from the opposite side of the ice maker. Unplug ice maker or disconnect power. 2. Move it on the opposite side of the ice maker...
Use and Care Guide
Page 8
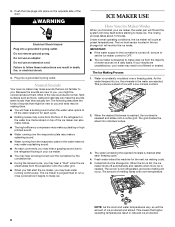
... temperature. ICE MAKER USE How Your Ice Maker Works When you first start the ice maker, you may hear water running continuously. The Ice Making Process 1. When the desired thickness is reached, the ice sheet is constantly circulated over the evaporator plate may need to follow these instructions can also make noises. ■ The high-efficiency compressor may make a splashing sound. ■ As each freezing cycle. 4. When the bin is...
... temperature. ICE MAKER USE How Your Ice Maker Works When you first start the ice maker, you may hear water running continuously. The Ice Making Process 1. When the desired thickness is reached, the ice sheet is constantly circulated over the evaporator plate may need to follow these instructions can also make noises. ■ The high-efficiency compressor may make a splashing sound. ■ As each freezing cycle. 4. When the bin is...

Use and Care Guide
Page 9
Using the Controls 1. If the service light turns on the cleaner bottle before completing the steps below. ICE MAKER CARE Cleaning The ice making cycle, select ON. 2. Wipe and dry. Replace the drain cap securely on the stainless steel surfaces. 1. With hard water of system components. NOTE: Use one 16 oz (473 mL) bottle of the water pan located inside the storage bin as they may need to...
Using the Controls 1. If the service light turns on the cleaner bottle before completing the steps below. ICE MAKER CARE Cleaning The ice making cycle, select ON. 2. Wipe and dry. Replace the drain cap securely on the stainless steel surfaces. 1. With hard water of system components. NOTE: Use one 16 oz (473 mL) bottle of the water pan located inside the storage bin as they may need to...

Use and Care Guide
Page 10
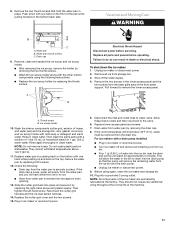
... ice maker or disconnect power. 2. If the drain cap is loose, water will both clean and rinse itself. 8. Remove the two screws that the cleaning cycle is complete. A Electrical Shock Hazard Disconnect power before operating. Unplug ice maker or disconnect power. 2. Screws 6. Pull the ice level sensor down to component failure. Remove the right-hand and left side of the cutter grid. Cutter grid harness B. Screw C. Cutter grid D. Ice level sensor harness...
... ice maker or disconnect power. 2. If the drain cap is loose, water will both clean and rinse itself. 8. Remove the two screws that the cleaning cycle is complete. A Electrical Shock Hazard Disconnect power before operating. Unplug ice maker or disconnect power. 2. Screws 6. Pull the ice level sensor down to component failure. Remove the right-hand and left side of the cutter grid. Cutter grid harness B. Screw C. Cutter grid D. Ice level sensor harness...
Use and Care Guide
Page 11
... clean the same parts with a drain pump installed: ■ Plug in place. Pull forward to the valve. 6. NOTE: Do not remove hoses. Check the following instructions. ■ Replace the ice scoop holder by removing the two thumb screws. ■ Wash the ice scoop holder along with mild soap or detergent and warm water. For ice makers with a solution of 1 tbs (15 mL) of water into the ice bin...
... clean the same parts with a drain pump installed: ■ Plug in place. Pull forward to the valve. 6. NOTE: Do not remove hoses. Check the following instructions. ■ Replace the ice scoop holder by removing the two thumb screws. ■ Wash the ice scoop holder along with mild soap or detergent and warm water. For ice makers with a solution of 1 tbs (15 mL) of water into the ice bin...
Use and Care Guide
Page 12
... outlet. ■ Is the control set to ON. ■ Is the water supply connected? Do not remove ground prong. See "Cleaning." ■ Does the ice maker have either thin ice or no kinks in the line. ■ Is the service light flashing on . ■ Is the drain cap securely in the bin, check to see whether the drain hose is set to clear. If there is...
... outlet. ■ Is the control set to ON. ■ Is the water supply connected? Do not remove ground prong. See "Cleaning." ■ Does the ice maker have either thin ice or no kinks in the line. ■ Is the service light flashing on . ■ Is the drain cap securely in the bin, check to see whether the drain hose is set to clear. If there is...
Use and Care Guide
Page 13
... include a daytime phone number in back or other injury. ■ Is the drain hose aligned over the drain? ASSISTANCE OR SERVICE Before calling for instructions on our full line of ice in the water supply? KitchenAid Canada designated service technicians are trained to build every new KITCHENAID® appliance. Check the cutter grid harness plug to align the drain. Move the ice maker to make sure the connection...
... include a daytime phone number in back or other injury. ■ Is the drain hose aligned over the drain? ASSISTANCE OR SERVICE Before calling for instructions on our full line of ice in the water supply? KitchenAid Canada designated service technicians are trained to build every new KITCHENAID® appliance. Check the cutter grid harness plug to align the drain. Move the ice maker to make sure the connection...

Use and Care Guide
Page 14
... setting, and is maintained according to the instructions furnished with published installation instructions. Pickup and delivery. Dealer name Address Phone number Model number Serial number Purchase date 14 Service calls to refrigerator or freezer product failures. 6. Repairs when your sales slip together for future reference. In the U.S.A., call 1-800-807-6777. 9/05 Keep this book and your major appliance is used for replacement parts...
... setting, and is maintained according to the instructions furnished with published installation instructions. Pickup and delivery. Dealer name Address Phone number Model number Serial number Purchase date 14 Service calls to refrigerator or freezer product failures. 6. Repairs when your sales slip together for future reference. In the U.S.A., call 1-800-807-6777. 9/05 Keep this book and your major appliance is used for replacement parts...

Parts Diagram
Page 1
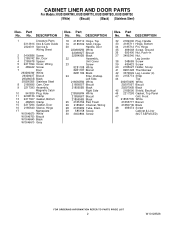
W10128528 Rev.A CABINET LINER AND DOOR PARTS For Models: KUIS15NRTW0, KUIS15NRTT0, KUIS15NRTBO, KUIS15NRTS0 (White) (Biscuit) (Black) (Stainless Steel) ICE CUBE MAKER 5−09 Litho In U.S.A. (rrm) (eeb) 1 Part No.
W10128528 Rev.A CABINET LINER AND DOOR PARTS For Models: KUIS15NRTW0, KUIS15NRTT0, KUIS15NRTBO, KUIS15NRTS0 (White) (Biscuit) (Black) (Stainless Steel) ICE CUBE MAKER 5−09 Litho In U.S.A. (rrm) (eeb) 1 Part No.
Parts Diagram
Page 2
...Panel 47 Grill, Front 2185571W White 2185571T Biscuit 2185571B Black 48 489474 Screw 49 Cabinet & Liner (NOT SERVICED) 2 W10128528 Part No. Part No. DESCRIPTION 1 Literature Parts 2313814 Use & Care Guide 2324311 Service & Wiring Sheet 2 3400886 Screw 3 2185742 Bin, Door 4 2185678 Spacer 5 2217394 Cover, Wiring 6 489442 Screw 7 Door...25 2185756 Pad, Foam 26 2185691 Channel, Wiring 28 2185989 Tube, Drain 29 585158 Scoop 30 3400884 Screw Illus. CABINET LINER AND DOOR PARTS For Models: KUIS15NRTW0, KUIS15NRTT0, KUIS15NRTBO, KUIS15NRTS0 (White) (Biscuit...
...Panel 47 Grill, Front 2185571W White 2185571T Biscuit 2185571B Black 48 489474 Screw 49 Cabinet & Liner (NOT SERVICED) 2 W10128528 Part No. Part No. DESCRIPTION 1 Literature Parts 2313814 Use & Care Guide 2324311 Service & Wiring Sheet 2 3400886 Screw 3 2185742 Bin, Door 4 2185678 Spacer 5 2217394 Cover, Wiring 6 489442 Screw 7 Door...25 2185756 Pad, Foam 26 2185691 Channel, Wiring 28 2185989 Tube, Drain 29 585158 Scoop 30 3400884 Screw Illus. CABINET LINER AND DOOR PARTS For Models: KUIS15NRTW0, KUIS15NRTT0, KUIS15NRTBO, KUIS15NRTS0 (White) (Biscuit...

Parts Diagram
Page 4
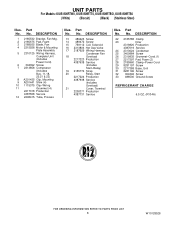
... Evaporator 6 2313705 Pump, Drain 7 2313851 Tube, Reservoir Pump 8 2172593 Tube, Water Fill 9 488660 Nut, Speed 10 836667 Spacer 11 2208539 Fastener, Pushnut 12 489443 Screw 13 2185625 Reservoir, Water Slide 14 2185626 Tube 15 2313890 Hose, Overflow 16 2313604 Guide−Ice, Grid 17 2313603 Bracket, Front and Rear 18 2313602 Bracket, Side Left and Right 19 2185681 Harness, Grid 20 2324305 Tube 21 2310169 Wire Assembly (Valve) 26 3400886...
... Evaporator 6 2313705 Pump, Drain 7 2313851 Tube, Reservoir Pump 8 2172593 Tube, Water Fill 9 488660 Nut, Speed 10 836667 Spacer 11 2208539 Fastener, Pushnut 12 489443 Screw 13 2185625 Reservoir, Water Slide 14 2185626 Tube 15 2313890 Hose, Overflow 16 2313604 Guide−Ice, Grid 17 2313603 Bracket, Front and Rear 18 2313602 Bracket, Side Left and Right 19 2185681 Harness, Grid 20 2324305 Tube 21 2310169 Wire Assembly (Valve) 26 3400886...
Parts Diagram
Page 6
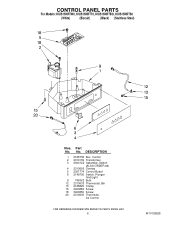
CONTROL PANEL PARTS For Models: KUIS15NRTW0, KUIS15NRTT0, KUIS15NRTBO, KUIS15NRTS0 (White) (Biscuit) (Black) (Stainless Steel) Illus. No. DESCRIPTION 1 2185738 Box, Control 2 2310139 Transformer 3 2304122 Assembly, Switch (ALSO ORDER #4) 4 2313693 Overlay 5 2321774 Control Board 6 2149705 Switch, Plunger Grid/Light 9 745362 Bulb 12 2313633 Thermostat, Bin 13 2185825 Clamp 15 3400884 Screw 18 3400850 Screw 20 2313635 Thermister, Ice Control 6 W10128528 Part No.
CONTROL PANEL PARTS For Models: KUIS15NRTW0, KUIS15NRTT0, KUIS15NRTBO, KUIS15NRTS0 (White) (Biscuit) (Black) (Stainless Steel) Illus. No. DESCRIPTION 1 2185738 Box, Control 2 2310139 Transformer 3 2304122 Assembly, Switch (ALSO ORDER #4) 4 2313693 Overlay 5 2321774 Control Board 6 2149705 Switch, Plunger Grid/Light 9 745362 Bulb 12 2313633 Thermostat, Bin 13 2185825 Clamp 15 3400884 Screw 18 3400850 Screw 20 2313635 Thermister, Ice Control 6 W10128528 Part No.
Parts Diagram
Page 8
... 3 2188935 Blade, Fan 4 2315558 Motor & Mounting Plate Assembly 5 2310125 Wiring Harness, Complete Unit (Includes Power Cord) 6 304392 Screw 7 2313858 Compressor (Includes Illus. 11,18, 20,21 & 23) 8 A201435 Clip, Mounting 9 A201441 Shim (4) 10 1115375 Clip−Wiring 11 Grommet (4) 2217318 Production 4387558 Service 12 2208415 Tube, Process Illus. Part No. DESCRIPTION 22 2185788 Clamp 23 Drier 2319826 Production...
... 3 2188935 Blade, Fan 4 2315558 Motor & Mounting Plate Assembly 5 2310125 Wiring Harness, Complete Unit (Includes Power Cord) 6 304392 Screw 7 2313858 Compressor (Includes Illus. 11,18, 20,21 & 23) 8 A201435 Clip, Mounting 9 A201441 Shim (4) 10 1115375 Clip−Wiring 11 Grommet (4) 2217318 Production 4387558 Service 12 2208415 Tube, Process Illus. Part No. DESCRIPTION 22 2185788 Clamp 23 Drier 2319826 Production...
Parts Diagram
Page 9
... Included) 8171307 Cleaner, Icemaker 503695 Sealer, Cork (1/4 Pound) 797403 Cement, Insulation (1 Oz.) 505587 Sealer, Mastic (1 Qt.) 212643 Sealer, Gum (22 Pcs. 3/16" x 7") 479976 Kit, Insulation (5 Pcs. 3" x 24" x 48") 8537055 Cleaner, Stainless Steel 978025 Valve, Access (1/4") 978026 Valve, Access (5/16") 978027 Valve, Access (3/8") 978028 Valve, Access (1/2") 978029 Valve, Access (5/8") 978030 Valve, Access (3/4") W10128528 9 OPTIONAL PARTS (NOT INCLUDED) For Models: KUIS15NRTW0, KUIS15NRTT0...
... Included) 8171307 Cleaner, Icemaker 503695 Sealer, Cork (1/4 Pound) 797403 Cement, Insulation (1 Oz.) 505587 Sealer, Mastic (1 Qt.) 212643 Sealer, Gum (22 Pcs. 3/16" x 7") 479976 Kit, Insulation (5 Pcs. 3" x 24" x 48") 8537055 Cleaner, Stainless Steel 978025 Valve, Access (1/4") 978026 Valve, Access (5/16") 978027 Valve, Access (3/8") 978028 Valve, Access (1/2") 978029 Valve, Access (5/8") 978030 Valve, Access (3/4") W10128528 9 OPTIONAL PARTS (NOT INCLUDED) For Models: KUIS15NRTW0, KUIS15NRTT0...
Dimensions
Page 1
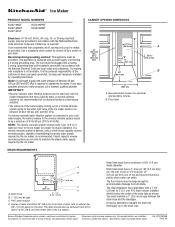
... be provided. Instructions packed with a power supply cord having a 3-prong grounding plug. The floor drains must have a drain pump installed. • The pressure of the water supply coming out of a reverse osmosis system going to the water inlet valve of run or 1/4" drop per 12" (0.6 cm per hour to improve Dimensions are not able to change without the 3/4" (1.9 cm) panel on the door. Because...
... be provided. Instructions packed with a power supply cord having a 3-prong grounding plug. The floor drains must have a drain pump installed. • The pressure of the water supply coming out of a reverse osmosis system going to the water inlet valve of run or 1/4" drop per 12" (0.6 cm per hour to improve Dimensions are not able to change without the 3/4" (1.9 cm) panel on the door. Because...


