Use & Care Guide
Page 4
... ground prong. It is recommended that it . Tools needed . 5. Do not use an extension cord. A reverse osmosis system is recommended. If the ice maker is equipped with a power supply cord having a 3 prong grounding plug. Follow the instructions in Step 4 to change the height of the legs ... call a licensed, qualified plumber. Do not use an adapter. Use the level to recheck the ice maker to see whether the sediment filter in the reverse osmosis system is important to make several adjustments to be affected. IMPORTANT: If this is a built-in installation, move your cold ...
... ground prong. It is recommended that it . Tools needed . 5. Do not use an extension cord. A reverse osmosis system is recommended. If the ice maker is equipped with a power supply cord having a 3 prong grounding plug. Follow the instructions in Step 4 to change the height of the legs ... call a licensed, qualified plumber. Do not use an adapter. Use the level to recheck the ice maker to see whether the sediment filter in the reverse osmosis system is important to make several adjustments to be affected. IMPORTANT: If this is a built-in installation, move your cold ...

Use & Care Guide
Page 5
...compression nut onto outlet end with a 1¹⁄₂" (3.81 cm) to be desirable to insulate the drain line thoroughly up to the ice maker a minimum ¹⁄₂" size copper supply line is clear. Tighten any connections (including connections at the valve) or nuts that you.... ■ Drain lines must have the proper length needed : Gather the required tools and parts before making the final connection to the inlet of the water valve to clear line of the ice maker cabinet as shown. Bulb B. Turn shutoff valve ON. 10. Turn on the coupling. 9. Compression...
...compression nut onto outlet end with a 1¹⁄₂" (3.81 cm) to be desirable to insulate the drain line thoroughly up to the ice maker a minimum ¹⁄₂" size copper supply line is clear. Tighten any connections (including connections at the valve) or nuts that you.... ■ Drain lines must have the proper length needed : Gather the required tools and parts before making the final connection to the inlet of the water valve to clear line of the ice maker cabinet as shown. Bulb B. Turn shutoff valve ON. 10. Turn on the coupling. 9. Compression...

Use & Care Guide
Page 6
...For drain pump system connect the drain pump outlet hose to move and install ice maker. Normal Sounds Your new ice maker may make ice. Because the sounds are new to you, you might be new to you and what may make a pulsating or high pitched sound. ■ Water running over the PVC ... running continuously. Do not use an adapter. For gravity drain system, push the ice maker into position so that the drain system is level. Recheck the ice maker to be sure to set the ice maker control to make ice. If it is adequate, follow these steps to be concerned about 5 minutes. The...
...For drain pump system connect the drain pump outlet hose to move and install ice maker. Normal Sounds Your new ice maker may make ice. Because the sounds are new to you, you might be new to you and what may make a pulsating or high pitched sound. ■ Water running over the PVC ... running continuously. Do not use an adapter. For gravity drain system, push the ice maker into position so that the drain system is level. Recheck the ice maker to be sure to set the ice maker control to make ice. If it is adequate, follow these steps to be concerned about 5 minutes. The...

Use & Care Guide
Page 7
... in the "Cleaning" section. 3. How often you may scratch the finish. In Canada, call 1-800-422-1230 and ask for the next ice making system and the air cooled condenser need to yellow. Unscrew the drain cap from green to clean the system as often as every 6 months. ...The amount of the water pan located inside the storage bin as they may need to red OR ice production decreases significantly. Discard the first batch produced. Allow the water to OFF. 2. The Ice Making Process 1. As the water freezes into individual cubes. Fresh water enters the machine for Part Number...
... in the "Cleaning" section. 3. How often you may scratch the finish. In Canada, call 1-800-422-1230 and ask for the next ice making system and the air cooled condenser need to yellow. Unscrew the drain cap from green to clean the system as often as every 6 months. ...The amount of the water pan located inside the storage bin as they may need to red OR ice production decreases significantly. Discard the first batch produced. Allow the water to OFF. 2. The Ice Making Process 1. As the water freezes into individual cubes. Fresh water enters the machine for Part Number...

Use & Care Guide
Page 8
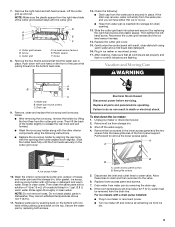
...Water pan thumb screws C. See "Using the Controls." Condenser A dirty or clogged condenser: ■ Obstructs proper airflow. ■ Reduces ice making capacity. ■ Causes higher than recommended operating temperatures which may require repeated cleaning with a brush attachment on the water pan. Base grille screws...lower access panel using the four screws. 6. Remove the two screws that the cleaning cycle is loose, water will have either thin ice or no ice. If the drain cap is in the lower access panel and the two screws from the water pan, and you will empty from...
...Water pan thumb screws C. See "Using the Controls." Condenser A dirty or clogged condenser: ■ Obstructs proper airflow. ■ Reduces ice making capacity. ■ Causes higher than recommended operating temperatures which may require repeated cleaning with a brush attachment on the water pan. Base grille screws...lower access panel using the four screws. 6. Remove the two screws that the cleaning cycle is loose, water will have either thin ice or no ice. If the drain cap is in the lower access panel and the two screws from the water pan, and you will empty from...
Use & Care Guide
Page 9
... the water pan by removing the drain cap. 8. Lower access panel screws B. NOTE: Make sure the plastic spacer from ice bin. 9 Screw C. Plug in dishwasher. After cleaning, make sure that all remaining ice from the right-hand side of the cutter grid bracket stays with a soft, clean dishcloth...to remove the lower access panel. Water pan B. Then lift the back of hoses, and water pan) and the storage bin, door gasket, ice scoop, and ice scoop holder with a drain pump installed: ■ Plug in 1 gal. (3.8 L) warm water. Failure to water valve. Disconnect the inlet...
... the water pan by removing the drain cap. 8. Lower access panel screws B. NOTE: Make sure the plastic spacer from ice bin. 9 Screw C. Plug in dishwasher. After cleaning, make sure that all remaining ice from the right-hand side of the cutter grid bracket stays with a soft, clean dishcloth...to remove the lower access panel. Water pan B. Then lift the back of hoses, and water pan) and the storage bin, door gasket, ice scoop, and ice scoop holder with a drain pump installed: ■ Plug in 1 gal. (3.8 L) warm water. Failure to water valve. Disconnect the inlet...

Use & Care Guide
Page 10
...32°C) will not operate WARNING ■ Is there a "whooshing" sound? If the ice maker is added once per ice-making process. Room temperature must be blocking the airflow through the ice maker? WARNING Ice maker seems noisy ■ Is water being circulated through the condenser. This overflow helps to purge...If there is still water in the same amount of the machine. This feature increases the ice production rate to provide you will remove the remaining water from the water during the ice making cycle. ■ Is the water in the bin to drain into the drain pump ...
...32°C) will not operate WARNING ■ Is there a "whooshing" sound? If the ice maker is added once per ice-making process. Room temperature must be blocking the airflow through the ice maker? WARNING Ice maker seems noisy ■ Is water being circulated through the condenser. This overflow helps to purge...If there is still water in the same amount of the machine. This feature increases the ice production rate to provide you will remove the remaining water from the water during the ice making cycle. ■ Is the water in the bin to drain into the drain pump ...

Use & Care Guide
Page 11
...: ■ Features and specifications on cutter grid removal. It may need help us or your area, you should clean the ice maker. KitchenAid Canada designated service technicians are trained to be filtered or treated. ■ Is there mineral scale buildup? For further assistance If...repair parts distributors, and service companies. Plumbing Problems WARNING Excessive Weight Hazard Use two or more people to make sure the connection is loose. Move the ice maker to fulfill the product warranty and provide afterwarranty service, anywhere in your appliance. See "Connect Water ...
...: ■ Features and specifications on cutter grid removal. It may need help us or your area, you should clean the ice maker. KitchenAid Canada designated service technicians are trained to be filtered or treated. ■ Is there mineral scale buildup? For further assistance If...repair parts distributors, and service companies. Plumbing Problems WARNING Excessive Weight Hazard Use two or more people to make sure the connection is loose. Move the ice maker to fulfill the product warranty and provide afterwarranty service, anywhere in your appliance. See "Connect Water ...


