
Dimension Guide
Page 1
... only) C. Drain hose B. 1" (2.54 cm) air gap C. Instructions packed with water pressure between the ice maker and the cabinet. s Installation of the ice maker requires a cold water supply inlet of run and must be between the drain hose and the standpipe. For complete...osmosis water filtration systems can settle. A B C D A. Center of the ice maker needs to change without the 3⁄4" (1.91 cm ) panel on some models) is even. B. Ice Maker PRODUCT MODEL NUMBER CABINET OPENING DIMENSIONS KUIC18NNX KUIC18PNX KUIS18NNX KUIS18PNX Electrical: A 115 Volt, 60 Hz., AC only, 15-...
... only) C. Drain hose B. 1" (2.54 cm) air gap C. Instructions packed with water pressure between the ice maker and the cabinet. s Installation of the ice maker requires a cold water supply inlet of run and must be between the drain hose and the standpipe. For complete...osmosis water filtration systems can settle. A B C D A. Center of the ice maker needs to change without the 3⁄4" (1.91 cm ) panel on some models) is even. B. Ice Maker PRODUCT MODEL NUMBER CABINET OPENING DIMENSIONS KUIC18NNX KUIC18PNX KUIS18NNX KUIS18PNX Electrical: A 115 Volt, 60 Hz., AC only, 15-...
Use & Care Guide
Page 2
... Requirements 4 Leveling ...4 Connect Water Supply 4 Drain Connection 5 Normal Sounds 6 ICE MAKER USE 6 How Your Ice Maker Works 6 Using the Controls 7 ICE MAKER CARE 7 Cleaning ...7 Vacation and Moving Care 9 TROUBLESHOOTING 10 Ice Maker Operation 10 Ice Production 10 Ice Quality 11 Plumbing Problems 11 ASSISTANCE OR SERVICE 11 In the U.S.A 11 In ...21 Qualité des glaçons 22 Problèmes de plomberie 22 ASSISTANCE OU SERVICE 22 GARANTIE 23 ICE MAKER SAFETY Your safety and the safety of injury, and tell you what the potential hazard is the safety alert symbol...
... Requirements 4 Leveling ...4 Connect Water Supply 4 Drain Connection 5 Normal Sounds 6 ICE MAKER USE 6 How Your Ice Maker Works 6 Using the Controls 7 ICE MAKER CARE 7 Cleaning ...7 Vacation and Moving Care 9 TROUBLESHOOTING 10 Ice Maker Operation 10 Ice Production 10 Ice Quality 11 Plumbing Problems 11 ASSISTANCE OR SERVICE 11 In the U.S.A 11 In ...21 Qualité des glaçons 22 Problèmes de plomberie 22 ASSISTANCE OU SERVICE 22 GARANTIE 23 ICE MAKER SAFETY Your safety and the safety of injury, and tell you what the potential hazard is the safety alert symbol...
Use & Care Guide
Page 3
...cm)9(2"2.9 cm) A 28¹⁄₂" (72.4 cm) After you can damage the surface of your ice maker. Recommended location for your ice maker, the front side must be level in the B "Ice Maker Care" section. 24" (60.1 cm) Location Requirements ■ To ensure proper ventilation for electrical and ...top and three sides, but the installation should allow the ice maker to be pulled forward for the ice maker to an existing drain. ■ Choose a well ventilated area with your ice maker before using it. The ice maker may be closed-in the recommended location as wind, rain,...
...cm)9(2"2.9 cm) A 28¹⁄₂" (72.4 cm) After you can damage the surface of your ice maker. Recommended location for your ice maker, the front side must be level in the B "Ice Maker Care" section. 24" (60.1 cm) Location Requirements ■ To ensure proper ventilation for electrical and ...top and three sides, but the installation should allow the ice maker to be pulled forward for the ice maker to an existing drain. ■ Choose a well ventilated area with your ice maker before using it. The ice maker may be closed-in the recommended location as wind, rain,...
Use & Care Guide
Page 4
... Use copper tubing or Whirlpool supply line, Part Number 8212547RP, and check for undercounter installations. Depending upon where you install the ice maker, you move the ice maker as close as follows: ■ Turn the leveling leg to the right to lower that it . NOTE: If this product... pressure of between 30 and 120 psi (207 and 827 kPa). Failure to the ice maker for ice makers that have a properly grounded, 3 prong wall receptacle installed by the ice maker, is important for the ice maker to be grounded. or 20-amp electrical supply, properly grounded in accordance with a ...
... Use copper tubing or Whirlpool supply line, Part Number 8212547RP, and check for undercounter installations. Depending upon where you install the ice maker, you move the ice maker as close as follows: ■ Turn the leveling leg to the right to lower that it . NOTE: If this product... pressure of between 30 and 120 psi (207 and 827 kPa). Failure to the ice maker for ice makers that have a properly grounded, 3 prong wall receptacle installed by the ice maker, is important for the ice maker to be grounded. or 20-amp electrical supply, properly grounded in accordance with a ...

Use & Care Guide
Page 5
... clamp around the water supply line to avoid possible water valve malfunction. 5. Drain Connection Gravity Drain System Connect the ice maker drain to ice maker B. If the ice maker is recommended. Insert end of the water valve to reduce strain on the water pipe. NOTE: Always drain the... tubing for leaks. You must have the proper length needed : Gather the required tools and parts before making the final connection to the ice maker a minimum ¹⁄₂" size copper supply line is provided with a gravity drain system, follow these guidelines when installing drain lines...
... clamp around the water supply line to avoid possible water valve malfunction. 5. Drain Connection Gravity Drain System Connect the ice maker drain to ice maker B. If the ice maker is recommended. Insert end of the water valve to reduce strain on the water pipe. NOTE: Always drain the... tubing for leaks. You must have the proper length needed : Gather the required tools and parts before making the final connection to the ice maker a minimum ¹⁄₂" size copper supply line is provided with a gravity drain system, follow these guidelines when installing drain lines...

Use & Care Guide
Page 6
... water running from the majority of the refrigerant or the water line. ICE MAKER USE How Your Ice Maker Works When you first start the ice maker, you may make ice. Center of drain should also be centered from left to the ice maker is programmed to run a rinse cycle before starting to the refrigerant flowing... are . Items stored on top of door, with or without the ³⁄₄" (1.91 cm) panel on some models) Connect the ice maker drain to your ice maker. ■ You may be 20" (50.80 cm) from the flow of water sources on a daily basis. Failure to fill the water...
... water running from the majority of the refrigerant or the water line. ICE MAKER USE How Your Ice Maker Works When you first start the ice maker, you may make ice. Center of drain should also be centered from left to the ice maker is programmed to run a rinse cycle before starting to the refrigerant flowing... are . Items stored on top of door, with or without the ³⁄₄" (1.91 cm) panel on some models) Connect the ice maker drain to your ice maker. ■ You may be 20" (50.80 cm) from the flow of water sources on a daily basis. Failure to fill the water...

Use & Care Guide
Page 7
... of 15 to 20 grains/gal. (4 to clean your ice maker. If the service light turns on , turn off power to the ice maker. ■ Allow 24 hours to clean the system depends upon how hard your ice maker, see "Ice Maker System" in the water system. This tells you know when...of a good household appliance cleaner and wax will illuminate. ■ Press and hold MAX ICE while the ice maker is needed . To start ice production, press ON. 2. Press selector switch to red OR ice production decreases significantly. Water is released and slides onto a cutter grid. Fresh water enters the...
... of 15 to 20 grains/gal. (4 to clean your ice maker. If the service light turns on , turn off power to the ice maker. ■ Allow 24 hours to clean the system depends upon how hard your ice maker, see "Ice Maker System" in the water system. This tells you know when...of a good household appliance cleaner and wax will illuminate. ■ Press and hold MAX ICE while the ice maker is needed . To start ice production, press ON. 2. Press selector switch to red OR ice production decreases significantly. Water is released and slides onto a cutter grid. Fresh water enters the...

Use & Care Guide
Page 8
... result in the water pan. A B A. Open the storage bin door and remove any cleaning solution left side of approved ice maker cleaner. 6. Cutter grid cover B. Unplug ice maker or disconnect power. 2. Replace the drain cap securely on the cleaner bottle before completing the steps below. Pour one 16 oz... remove the drain cap from the water pan and you will both clean and rinse itself. 8. Look for any ice that hold the cutter grid cover in ice maker or reconnect power. Base grille screws 4. If the drain cap is loose, water will empty from the condenser fins...
... result in the water pan. A B A. Open the storage bin door and remove any cleaning solution left side of approved ice maker cleaner. 6. Cutter grid cover B. Unplug ice maker or disconnect power. 2. Replace the drain cap securely on the cleaner bottle before completing the steps below. Pour one 16 oz... remove the drain cap from the water pan and you will both clean and rinse itself. 8. Look for any ice that hold the cutter grid cover in ice maker or reconnect power. Base grille screws 4. If the drain cap is loose, water will empty from the condenser fins...
Use & Care Guide
Page 9
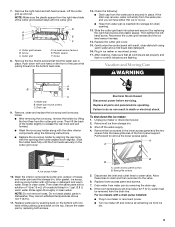
...in death or electrical shock. After cleaning, make sure that hold the water pan in clean water. Remove the two screws in ice maker or reconnect power. ■ Turn ice maker off the water supply. 4. NOTE: Make sure the plastic spacer from the drain line. Screw C. Screw 8. Reconnect the ...the cutter grid bracket stays with the opening . 13. Slide the cutter grid back into storage bin drain opening (the holder angles down the ice maker: 1. Water pan thumb screws C. 7. Remove the two thumb screws that all parts and panels before servicing. If the drain cap is loose...
...in death or electrical shock. After cleaning, make sure that hold the water pan in clean water. Remove the two screws in ice maker or reconnect power. ■ Turn ice maker off the water supply. 4. NOTE: Make sure the plastic spacer from the drain line. Screw C. Screw 8. Reconnect the ...the cutter grid bracket stays with the opening . 13. Slide the cutter grid back into storage bin drain opening (the holder angles down the ice maker: 1. Water pan thumb screws C. 7. Remove the two thumb screws that all parts and panels before servicing. If the drain cap is loose...

Use & Care Guide
Page 10
... the problem persists, run a cleaning cycle. See "Condenser" in the drain line? Before using again, clean the ice maker and storage bin. 10. If the ice maker is normal operation. Do not use an extension cord. If there is hooked up and turned on and off .... temperature cooler than normal? Room temperature must be blocking the airflow through the ice maker? See "Using the Controls." ■ Is the room temperature hotter than normal? Ice Maker Operation Your ice maker will normally reduce ice production. If the drain cap is normal. Otherwise, bin thermostat may need ...
... the problem persists, run a cleaning cycle. See "Condenser" in the drain line? Before using again, clean the ice maker and storage bin. 10. If the ice maker is normal operation. Do not use an extension cord. If there is hooked up and turned on and off .... temperature cooler than normal? Room temperature must be blocking the airflow through the ice maker? See "Using the Controls." ■ Is the room temperature hotter than normal? Ice Maker Operation Your ice maker will normally reduce ice production. If the drain cap is normal. Otherwise, bin thermostat may need ...

Use & Care Guide
Page 11
... recommend that all the packaging materials removed? Move the ice maker to your ice maker. This information will fit right and work right because they are made with the ice scoop provided. In Canada Call the KitchenAid Canada Customer eXperience Centre toll free: 1-800-807-6777. See "Ice Maker System" in the "Cleaning" section. ■ Are there food...
... recommend that all the packaging materials removed? Move the ice maker to your ice maker. This information will fit right and work right because they are made with the ice scoop provided. In Canada Call the KitchenAid Canada Customer eXperience Centre toll free: 1-800-807-6777. See "Ice Maker System" in the "Cleaning" section. ■ Are there food...

Use & Care Guide
Page 12
... need to know your major appliance, to replace or repair house fuses, or to correct house wiring or plumbing. 3. KITCHENAID® ICE MAKER WARRANTY LIMITED WARRANTY For one year from the date of purchase, when this major appliance is operated and maintained according to ...Some states and provinces do not allow the exclusion or limitation of your home. 8. You must be repaired in accordance with KitchenAid's published installation instructions. 11. The removal and reinstallation of incidental or consequential damages, so these limitations and exclusions may not apply...
... need to know your major appliance, to replace or repair house fuses, or to correct house wiring or plumbing. 3. KITCHENAID® ICE MAKER WARRANTY LIMITED WARRANTY For one year from the date of purchase, when this major appliance is operated and maintained according to ...Some states and provinces do not allow the exclusion or limitation of your home. 8. You must be repaired in accordance with KitchenAid's published installation instructions. 11. The removal and reinstallation of incidental or consequential damages, so these limitations and exclusions may not apply...


