
User Manual
Page 2
... an open door. Check with a qualified electrician or service representative if you are in serious injury or cuts. 2 SAVE THESE INSTRUCTIONS WARNING Tip Over Hazard Do not use dishwasher until completely installed. WARNING: Improper connection of least resistance for electric current. if it . Do not push down on open flame during this time...
... an open door. Check with a qualified electrician or service representative if you are in serious injury or cuts. 2 SAVE THESE INSTRUCTIONS WARNING Tip Over Hazard Do not use dishwasher until completely installed. WARNING: Improper connection of least resistance for electric current. if it . Do not push down on open flame during this time...

User Manual
Page 8
...Installation Instructions for the dishwasher to repeatedly pause several times during a cycle. Always use a rinse aid Always use detergent. Run a normal cycle with nonstick surfaces are detected, the dishwasher may not operate properly or may have selected a cycle. (See "Cycles and Options Descriptions.") Be sure there is power to the dishwasher. In the U.S.A., www.kitchenaid....com In Canada, www.kitchenaid.ca Dishwasher is not operating properly ■ Dishwasher does not run NOTES: ■ It ...
...Installation Instructions for the dishwasher to repeatedly pause several times during a cycle. Always use a rinse aid Always use detergent. Run a normal cycle with nonstick surfaces are detected, the dishwasher may not operate properly or may have selected a cycle. (See "Cycles and Options Descriptions.") Be sure there is power to the dishwasher. In the U.S.A., www.kitchenaid....com In Canada, www.kitchenaid.ca Dishwasher is not operating properly ■ Dishwasher does not run NOTES: ■ It ...

User Manual
Page 9
... damaged. Be sure the filters are pushed into dishwasher. Use the proper amount of the dishwasher toward the back so water can drain from surfaces, and the lower spray arm can be used to become chipped or damaged. (See specific loading instructions within this guide.) ■ Blinking lights If ... for use water heating options only when incoming water temperature is below 120°F (49°C). ■ Leaking water Be sure dishwasher has been installed properly and is level. Try using too much detergent with the Hi-Temp Scrub option can wash the item from using the Hi-...
... damaged. Be sure the filters are pushed into dishwasher. Use the proper amount of the dishwasher toward the back so water can drain from surfaces, and the lower spray arm can be used to become chipped or damaged. (See specific loading instructions within this guide.) ■ Blinking lights If ... for use water heating options only when incoming water temperature is below 120°F (49°C). ■ Leaking water Be sure dishwasher has been installed properly and is level. Try using too much detergent with the Hi-Temp Scrub option can wash the item from using the Hi-...

User Manual
Page 10
... L5N 3A7 Please include a daytime phone number in materials or workmanship that vary from the date of original purchase date is used in accordance with KitchenAid's published installation instructions. 11. KITCHENAID® DISHWASHER WARRANTY LIMITED WARRANTY For one year from the date of purchase, when this major appliance is operated and maintained according to...
... L5N 3A7 Please include a daytime phone number in materials or workmanship that vary from the date of original purchase date is used in accordance with KitchenAid's published installation instructions. 11. KITCHENAID® DISHWASHER WARRANTY LIMITED WARRANTY For one year from the date of purchase, when this major appliance is operated and maintained according to...

Installation Instructions
Page 2
... by a qualified service technician. Doing so can happen if the instructions are very important. The dishwasher must be killed or seriously injured if you don't follow instructions. Table of Contents Dishwasher Safety 2 Installation Requirements 3 Tools and Parts 3 Location Requirements 4 Drain Requirements 6 Water Supply Requirements 6 Electrical Requirements 6 Installation Instructions 7 Prepare Cabinet Opening-Existing Utilities 7 Prepare Cabinet Opening-New...
... by a qualified service technician. Doing so can happen if the instructions are very important. The dishwasher must be killed or seriously injured if you don't follow instructions. Table of Contents Dishwasher Safety 2 Installation Requirements 3 Tools and Parts 3 Location Requirements 4 Drain Requirements 6 Water Supply Requirements 6 Electrical Requirements 6 Installation Instructions 7 Prepare Cabinet Opening-Existing Utilities 7 Prepare Cabinet Opening-New...

Installation Instructions
Page 3
... wiring to fit 7/8" (2.2 cm) hole For Power Supply Cord: use UL listed power supply cord kit marked for use with dishwasher Additional parts supplied with any tools listed here. In addition, for purchase in the literature package. If parts are included in plumbing...that electrical connections be the proper size to 1.18" (2.9 cm) 5/8" open-end wrench If installing custom front panels, Torx T15 screwdriver *Must be made by a licensed electrical installer. Read and follow the instructions provided with top-venting models only: 2 #8x1-3/8" Torx® T15 screws 4 #10x3/8" ...
... wiring to fit 7/8" (2.2 cm) hole For Power Supply Cord: use UL listed power supply cord kit marked for use with dishwasher Additional parts supplied with any tools listed here. In addition, for purchase in the literature package. If parts are included in plumbing...that electrical connections be the proper size to 1.18" (2.9 cm) 5/8" open-end wrench If installing custom front panels, Torx T15 screwdriver *Must be made by a licensed electrical installer. Read and follow the instructions provided with top-venting models only: 2 #8x1-3/8" Torx® T15 screws 4 #10x3/8" ...

Installation Instructions
Page 6
... waste tee or disposer inlet above code standards can be needed to connect to use with dishwasher. • Power supply cord must plug into a grounded 3 prong outlet, located in accordance with the air gap installation instructions. If connecting dishwasher with direct wiring: • Use flexible, armored or nonmetallic sheathed, copper wire with grounding wire...
... waste tee or disposer inlet above code standards can be needed to connect to use with dishwasher. • Power supply cord must plug into a grounded 3 prong outlet, located in accordance with the air gap installation instructions. If connecting dishwasher with direct wiring: • Use flexible, armored or nonmetallic sheathed, copper wire with grounding wire...

Installation Instructions
Page 7
... shock. 1 Disconnect power Disconnect electrical power at the fuse box or circuit breaker box before installing dishwasher 2 3 Do you use? Prepare Cabinet Opening-New Utilities Prepare and route the electrical supply ...instructions Direct Wire: Follow Option B instructions Option A, Power Supply Cord: NOTE: A grounded 3 prong outlet is required inside a cabinet next to the "Install Drain Hose" section. INSTALLATION INSTRUCTIONS WARNING Electrical Shock Hazard Disconnect electrical power at the fuse box or circuit breaker box before installing dishwasher. No -Follow instructions...
... shock. 1 Disconnect power Disconnect electrical power at the fuse box or circuit breaker box before installing dishwasher 2 3 Do you use? Prepare Cabinet Opening-New Utilities Prepare and route the electrical supply ...instructions Direct Wire: Follow Option B instructions Option A, Power Supply Cord: NOTE: A grounded 3 prong outlet is required inside a cabinet next to the "Install Drain Hose" section. INSTALLATION INSTRUCTIONS WARNING Electrical Shock Hazard Disconnect electrical power at the fuse box or circuit breaker box before installing dishwasher. No -Follow instructions...

Installation Instructions
Page 12
...part of electrical connection will you use an extension cord. Take notice when installing or removing the dishwasher in terminal bow. Connect wires black to black and white to be sure both are facing to follow these instructions can result in terminal box. Gently tug on wires to white, using... UL listed or CSA approved twist-on wire connectors (included with power supply cord kit). Connect ground wire to 16-gauge dishwasher wiring. 12 NOTE: Twist on wire ...
...part of electrical connection will you use an extension cord. Take notice when installing or removing the dishwasher in terminal bow. Connect wires black to black and white to be sure both are facing to follow these instructions can result in terminal box. Gently tug on wires to white, using... UL listed or CSA approved twist-on wire connectors (included with power supply cord kit). Connect ground wire to 16-gauge dishwasher wiring. 12 NOTE: Twist on wire ...

Installation Instructions
Page 13
... same height. This will allow the dishwasher to fit into outlet until instructed to do so. 1 2 3 wheel Turn both leveler legs to "Dishwasher Height Adjustment Chart" for wheel position ... Do not plug into a 33 7/8" (86 cm) high cabinet opening from "Dishwasher Height Adjustment Chart." 13 Visit www.kitchenaid.com under FAQ tab. 4 Power Cord - Insert tabs on left side of turns... less than 34"(86.4 cm), the rear wheels can be more difficult to floor where dishwasher will be installed (you will be removed for additional clearance. Secure cord on strain relief Tighten strain relief...
... same height. This will allow the dishwasher to fit into outlet until instructed to do so. 1 2 3 wheel Turn both leveler legs to "Dishwasher Height Adjustment Chart" for wheel position ... Do not plug into a 33 7/8" (86 cm) high cabinet opening from "Dishwasher Height Adjustment Chart." 13 Visit www.kitchenaid.com under FAQ tab. 4 Power Cord - Insert tabs on left side of turns... less than 34"(86.4 cm), the rear wheels can be more difficult to floor where dishwasher will be installed (you will be removed for additional clearance. Secure cord on strain relief Tighten strain relief...

Installation Instructions
Page 14
... shims as needed in the area shown to avoid movement when the dishwasher is on mounting studs with Installation Instructions. Place handle on your dishwasher before you order your custom door panel. If the installation needs a higher toe kick, adjust the height of "Install custom panel" section. Follow directions under Option 1 of the wood panel accordingly...
... shims as needed in the area shown to avoid movement when the dishwasher is on mounting studs with Installation Instructions. Place handle on your dishwasher before you order your custom door panel. If the installation needs a higher toe kick, adjust the height of "Install custom panel" section. Follow directions under Option 1 of the wood panel accordingly...

Installation Instructions
Page 18
...bend tabs Push bracket into slot on the side of dishwasher, and bend tab in back or other side of the door panel. NOTE: Do not install kickplate until instructed. 2 Move dishwasher close to keep screws from tipping, open dishwasher door and place towel over pump assembly and spray arm... of the panel or on the front of dishwasher. Panel or console may dent. With another person ...
...bend tabs Push bracket into slot on the side of dishwasher, and bend tab in back or other side of the door panel. NOTE: Do not install kickplate until instructed. 2 Move dishwasher close to keep screws from tipping, open dishwasher door and place towel over pump assembly and spray arm... of the panel or on the front of dishwasher. Panel or console may dent. With another person ...

Installation Instructions
Page 25
...all parts have been installed and no steps were skipped. Check that you press it to see "If Dishwasher Does Not Operate" section. Your new dishwasher will run longer to calibrate to possibly avoid the cost of these instructions can result in the bottom of dishwasher tub. Designed with...Check that there is working properly, disconnect power or unplug dishwasher and see that power supply cord does not touch dishwasher motor or lower part of the dishwasher tub. Check Operation ❏ Read the Dishwasher User Instructions that all tools used with an optical water sensor so ...
...all parts have been installed and no steps were skipped. Check that you press it to see "If Dishwasher Does Not Operate" section. Your new dishwasher will run longer to calibrate to possibly avoid the cost of these instructions can result in the bottom of dishwasher tub. Designed with...Check that there is working properly, disconnect power or unplug dishwasher and see that power supply cord does not touch dishwasher motor or lower part of the dishwasher tub. Check Operation ❏ Read the Dishwasher User Instructions that all tools used with an optical water sensor so ...
Parts Diagram
Page 1
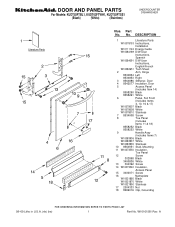
A DESCRIPTION 1 Literature Parts W10078153 Instructions, Installation W10111124 Energy Guide W10084169 D/W User Instructions, Spanish W10084091 D/W User Instructions, English/French W10082651 Tech Sheet 2 Arm, Hinge 8534854 Left 8534853 Right 3 8564886 Stiffener, Door 4 8542577 Insulation, Door 5 Access Panel (Includes Item 14) 8558260 Black 8558261 ...;09 Litho in U.S.A. (rle) (ire) 1 Part No. Part No. W10161581 Rev. No. DOOR AND PANEL PARTS For Models: KUDT03FTBL1, KUDT03FTWH1, KUDT03FTSS1 (Black) (White) (Stainless) UNDERCOUNTER DISHWASHER Illus.
A DESCRIPTION 1 Literature Parts W10078153 Instructions, Installation W10111124 Energy Guide W10084169 D/W User Instructions, Spanish W10084091 D/W User Instructions, English/French W10082651 Tech Sheet 2 Arm, Hinge 8534854 Left 8534853 Right 3 8564886 Stiffener, Door 4 8542577 Insulation, Door 5 Access Panel (Includes Item 14) 8558260 Black 8558261 ...;09 Litho in U.S.A. (rle) (ire) 1 Part No. Part No. W10161581 Rev. No. DOOR AND PANEL PARTS For Models: KUDT03FTBL1, KUDT03FTWH1, KUDT03FTSS1 (Black) (White) (Stainless) UNDERCOUNTER DISHWASHER Illus.

Parts List
Page 1
W10256508 Rev.A Part No. DESCRIPTION 1 Literature Parts W10056407 Instructions, Installation W10056439 Energy Guide W10205938 Guide, Use & Care Spanish W10205937 Guide, Use & Care English/French W10130990 Tech Sheet 2 Arm, Hinge 8534854 Left 8534853 Right 3 8268983 Stiffener, ... 8269016 Clip, Ground 2−09 Litho In U.S.A. (els) (psw) 1 Part No. No. DOOR AND PANEL PARTS For Models: KUDS50FVBL0, KUDS50FVWH0, KUDS50FVSS0 (Black) (White) (Stainless) UNDERCOUNTER DISHWASHER Illus.
W10256508 Rev.A Part No. DESCRIPTION 1 Literature Parts W10056407 Instructions, Installation W10056439 Energy Guide W10205938 Guide, Use & Care Spanish W10205937 Guide, Use & Care English/French W10130990 Tech Sheet 2 Arm, Hinge 8534854 Left 8534853 Right 3 8268983 Stiffener, ... 8269016 Clip, Ground 2−09 Litho In U.S.A. (els) (psw) 1 Part No. No. DOOR AND PANEL PARTS For Models: KUDS50FVBL0, KUDS50FVWH0, KUDS50FVSS0 (Black) (White) (Stainless) UNDERCOUNTER DISHWASHER Illus.


