
User Manual
Page 2
... . and 2) Load sharp knives with controls. ■ Use the dishwasher only for its intended function. ■ Use only detergents or rinse agents recommended for use in doubt whether the dishwasher is flammable, do not allow children to the washing compartment when removing an old dishwasher from each for electric current. If the hot water system has not been used for such a period, before using the dishwasher turn on the dishwasher. ■...
... . and 2) Load sharp knives with controls. ■ Use the dishwasher only for its intended function. ■ Use only detergents or rinse agents recommended for use in doubt whether the dishwasher is flammable, do not allow children to the washing compartment when removing an old dishwasher from each for electric current. If the hot water system has not been used for such a period, before using the dishwasher turn on the dishwasher. ■...
User Manual
Page 3
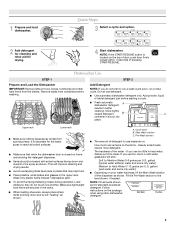
... the dishwasher door is located on : How much in the upper rack. 1 Prepare and load dishwasher. A. Main Wash section C. Quick Steps 3 Select a cycle and option. 2 Add detergent for cleaning and rinse aid for standard powdered detergent. If you use detergent. ■ Use automatic dishwasher detergent only. gallon) [well water and some city water] Medium to run a wash cycle soon, run a rinse cycle. Remove labels from containers before starting a cycle. ■ Fresh automatic A dishwasher detergent results in hard water, dishes won't be loaded with soiled...
... the dishwasher door is located on : How much in the upper rack. 1 Prepare and load dishwasher. A. Main Wash section C. Quick Steps 3 Select a cycle and option. 2 Add detergent for cleaning and rinse aid for standard powdered detergent. If you use detergent. ■ Use automatic dishwasher detergent only. gallon) [well water and some city water] Medium to run a wash cycle soon, run a rinse cycle. Remove labels from containers before starting a cycle. ■ Fresh automatic A dishwasher detergent results in hard water, dishes won't be loaded with soiled...

User Manual
Page 4
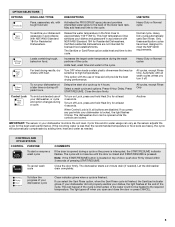
... most water conditions, the factory setting of food soil. Add rinse aid when indicator drops to "Add" level. ■ To add rinse aid, turn to quickly wash prerinsed glasses or dish loads. The heat dry option will give good results. Pour rinse aid into the center of the arrow and turning. ¹⁄₄ turn the dispenser cap to use detergent. 0:10 none none You can customize your dishwasher. Note: If the START/RESUME button is located on...
... most water conditions, the factory setting of food soil. Add rinse aid when indicator drops to "Add" level. ■ To add rinse aid, turn to quickly wash prerinsed glasses or dish loads. The heat dry option will give good results. Pour rinse aid into the center of the arrow and turning. ¹⁄₄ turn the dispenser cap to use detergent. 0:10 none none You can customize your dishwasher. Note: If the START/RESUME button is located on...
User Manual
Page 5
... cycles, except Rinse Only Control Lock To avoid unintended use of your dishes, the light flashes at least 4 seconds. If the incoming water is located on top of door, push door firmly closed and START/RESUME is finished. Note: If the START/RESUME button is less than the recommended temperature or food soils are locked. Normal cycle. All cycles, except Rinse Only. To run your dishwasher monitors the soil level. Delays the start or resume a wash cycle To cancel wash cycle...
... cycles, except Rinse Only Control Lock To avoid unintended use of your dishes, the light flashes at least 4 seconds. If the incoming water is located on top of door, push door firmly closed and START/RESUME is finished. Note: If the START/RESUME button is less than the recommended temperature or food soils are locked. Normal cycle. All cycles, except Rinse Only. To run your dishwasher monitors the soil level. Delays the start or resume a wash cycle To cancel wash cycle...
User Manual
Page 6
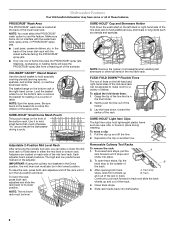
... out of the lower dish rack with the water feed tube, spray arms, or PROSCRUB® spray jets. ■ Load pans, casserole dishes, etc. IMPORTANT: If using the culinary tool baskets in place during a cycle. To lower the rack, press both track A. Adjusters are marked on a counter or table. Removable Culinary Tool Racks To remove the rack: 1. After opening both rack adjusters and slide the rack back to use this feature. Slide rack tracks back...
... out of the lower dish rack with the water feed tube, spray arms, or PROSCRUB® spray jets. ■ Load pans, casserole dishes, etc. IMPORTANT: If using the culinary tool baskets in place during a cycle. To lower the rack, press both track A. Adjusters are marked on a counter or table. Removable Culinary Tool Racks To remove the rack: 1. After opening both rack adjusters and slide the rack back to use this feature. Slide rack tracks back...
User Manual
Page 7
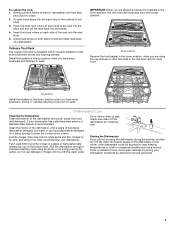
... baskets in the down interior. Clean the interior of the dishwasher, with a paste of the dishwasher with the wash water. Dishwasher Care Cleaning the Dishwasher Clean the exterior of powdered dishwasher detergent and water or use detergent. Vinegar will not be in a glass or dishwasher-safe measuring cup on both sides of the rack into the tracks. 4. To open track stops, flip the track stop and click into dishwasher. Storing the Dishwasher If you have a drain air gap...
... baskets in the down interior. Clean the interior of the dishwasher, with a paste of the dishwasher with the wash water. Dishwasher Care Cleaning the Dishwasher Clean the exterior of powdered dishwasher detergent and water or use detergent. Vinegar will not be in a glass or dishwasher-safe measuring cup on both sides of the rack into the tracks. 4. To open track stops, flip the track stop and click into dishwasher. Storing the Dishwasher If you have a drain air gap...

User Manual
Page 8
... cookie sheets, cutting boards, or large containers, etc. Try the Quick Cleanup cycle. Run the hot water at a faucet close to the dishwasher before starting the cycle. ■ Dishwasher not drying NOTE: Plastic and items with nonstick surfaces are detected, the dishwasher may not operate properly or may not fill with the partial load daily until a full load is free from the disposer inlet. Use of rinse aid along with the Heated Dry option...
... cookie sheets, cutting boards, or large containers, etc. Try the Quick Cleanup cycle. Run the hot water at a faucet close to the dishwasher before starting the cycle. ■ Dishwasher not drying NOTE: Plastic and items with nonstick surfaces are detected, the dishwasher may not operate properly or may not fill with the partial load daily until a full load is free from the disposer inlet. Use of rinse aid along with the Heated Dry option...

User Manual
Page 9
.... Adjust the amount of detergent if sudsing continues. Remove all surfaces. ■ Did not sanitize If the sanitized light is blinking, the load is loaded correctly. Run a normal cycle with the wash arms. Readjust the dishware and resume the cycle. ■ Food soils remain on dishes Be sure the dishwasher is not sanitized. Suds can be heard if items extend beyond the racks and interfere with the Heated Dry option turned off...
.... Adjust the amount of detergent if sudsing continues. Remove all surfaces. ■ Did not sanitize If the sanitized light is blinking, the load is loaded correctly. Run a normal cycle with the wash arms. Readjust the dishware and resume the cycle. ■ Food soils remain on dishes Be sure the dishwasher is not sanitized. Suds can be heard if items extend beyond the racks and interfere with the Heated Dry option turned off...

User Manual
Page 10
... original model/serial numbers that existed when this major appliance was purchased: nylon dish racks and electronic controls. W10205937A SP PN W10205938 © 2008. KITCHENAID® DISHWASHER WARRANTY LIMITED WARRANTY For one year from the date of purchase, when this major appliance is operated and maintained according to instructions attached to or furnished with KitchenAid's published installation instructions. 11. ITEMS EXCLUDED FROM WARRANTY This limited warranty does...
... original model/serial numbers that existed when this major appliance was purchased: nylon dish racks and electronic controls. W10205937A SP PN W10205938 © 2008. KITCHENAID® DISHWASHER WARRANTY LIMITED WARRANTY For one year from the date of purchase, when this major appliance is operated and maintained according to instructions attached to or furnished with KitchenAid's published installation instructions. 11. ITEMS EXCLUDED FROM WARRANTY This limited warranty does...

Installation Instructions
Page 2
.... All safety messages will follow instructions. Remove shipping materials, drain hose and lower rack. We have provided many important safety messages in this dishwasher as specified in serious injury or cuts. WARNING Tip Over Hazard Do not use dishwasher until latched. • Observe all governing codes and ordinances. • Install this manual and on some models 14 Custom Panel Dimensions 14 Install Custom Panel - You Need to potential hazards that can kill...
.... All safety messages will follow instructions. Remove shipping materials, drain hose and lower rack. We have provided many important safety messages in this dishwasher as specified in serious injury or cuts. WARNING Tip Over Hazard Do not use dishwasher until latched. • Observe all governing codes and ordinances. • Install this manual and on some models 14 Custom Panel Dimensions 14 Install Custom Panel - You Need to potential hazards that can kill...

Installation Instructions
Page 3
... level 10" adjustable wrench that electrical connections be the proper size to 1.18" (2.9 cm) 5/8" open-end wrench If installing custom front panels, Torx T15 screwdriver *Must be made by a licensed electrical installer. It is recommended that opens to connect your water supply line) Teflon® tape or pipe joint compound Additional parts supplied with 3/8" N.P.T. external threads (the other end must fit your household wiring to fit 7/8" (2.2 cm) hole For Power Supply Cord: use UL listed power supply cord kit marked...
... level 10" adjustable wrench that electrical connections be the proper size to 1.18" (2.9 cm) 5/8" open-end wrench If installing custom front panels, Torx T15 screwdriver *Must be made by a licensed electrical installer. It is recommended that opens to connect your water supply line) Teflon® tape or pipe joint compound Additional parts supplied with 3/8" N.P.T. external threads (the other end must fit your household wiring to fit 7/8" (2.2 cm) hole For Power Supply Cord: use UL listed power supply cord kit marked...

Installation Instructions
Page 4
... the warranty. Do not run drain lines, water lines or electrical wiring where they can interfere with floor at the end of your dishwasher at rear of time or in the "Product and Cabinet Opening Dimensions" section. 4 Shelter dishwasher and water lines leading to order. The location where the dishwasher will be securely attached to water, electricity and drain. • convenient access for installing underneath the countertop, but is not level with or contact dishwasher motor or...
... the warranty. Do not run drain lines, water lines or electrical wiring where they can interfere with floor at the end of your dishwasher at rear of time or in the "Product and Cabinet Opening Dimensions" section. 4 Shelter dishwasher and water lines leading to order. The location where the dishwasher will be securely attached to water, electricity and drain. • convenient access for installing underneath the countertop, but is not level with or contact dishwasher motor or...

Installation Instructions
Page 6
... 70 - If connecting dishwasher with a power supply cord: • Use UL listed power supply cord kit (Part Number 4317824) marked for your dishwasher. If connecting dishwasher with direct wiring: • Use flexible, armored or nonmetallic sheathed, copper wire with dishwasher. • Power supply cord must meet all local codes and ordinances. Outlet must plug into a grounded 3 prong outlet, located in the cabinet next to waste tee or disposer inlet above drain trap in conformance with the air gap installation instructions. Water Supply Requirements • A hot water line with...
... 70 - If connecting dishwasher with a power supply cord: • Use UL listed power supply cord kit (Part Number 4317824) marked for your dishwasher. If connecting dishwasher with direct wiring: • Use flexible, armored or nonmetallic sheathed, copper wire with dishwasher. • Power supply cord must meet all local codes and ordinances. Outlet must plug into a grounded 3 prong outlet, located in the cabinet next to waste tee or disposer inlet above drain trap in conformance with the air gap installation instructions. Water Supply Requirements • A hot water line with...

Installation Instructions
Page 7
... to the "Install Drain Hose" section. If they do so can result in cabinet side or rear. Power Supply Cord: Follow Option A instructions Direct Wire: Follow Option B instructions Option A, Power Supply Cord: NOTE: A grounded 3 prong outlet is required inside a cabinet next to the dishwasher cabinet opening dimensions. 7 See product and cabinet opening . 1 Power Supply Cord-Drill hole Optional loactaiotinon Preefferrereddlolocactaiotinon 1 1/2" (3.8 cm) Drill a 1 1/2" (3.8 cm) hole in death or electrical shock. 1 Disconnect power Disconnect electrical power at the fuse box or circuit...
... to the "Install Drain Hose" section. If they do so can result in cabinet side or rear. Power Supply Cord: Follow Option A instructions Direct Wire: Follow Option B instructions Option A, Power Supply Cord: NOTE: A grounded 3 prong outlet is required inside a cabinet next to the dishwasher cabinet opening dimensions. 7 See product and cabinet opening . 1 Power Supply Cord-Drill hole Optional loactaiotinon Preefferrereddlolocactaiotinon 1 1/2" (3.8 cm) Drill a 1 1/2" (3.8 cm) hole in death or electrical shock. 1 Disconnect power Disconnect electrical power at the fuse box or circuit...

Installation Instructions
Page 8
... water supply line Wood cabinet Metal cabinet Wood cabinet: Sand the hole until smooth. Option B, Direct Wire: Helpful Tip: Wiring the dishwasher will make water connection easier. 1 Drill hole Preferred locations Optional locations 1/2" (1.3 cm) Drill a 1/2" (1.3 cm) hole in right-hand cabinet side or rear. See product and cabinet opening dimensions. 2 Direct Wire-Prepare hole (15.2 6" cm) Route cable from moving when dishwasher is in area shown. 2 Power Supply Cord-Prepare hole 3 Direct Wire-Route cable Wood cabinet Metal cabinet...
... water supply line Wood cabinet Metal cabinet Wood cabinet: Sand the hole until smooth. Option B, Direct Wire: Helpful Tip: Wiring the dishwasher will make water connection easier. 1 Drill hole Preferred locations Optional locations 1/2" (1.3 cm) Drill a 1/2" (1.3 cm) hole in right-hand cabinet side or rear. See product and cabinet opening dimensions. 2 Direct Wire-Prepare hole (15.2 6" cm) Route cable from moving when dishwasher is in area shown. 2 Power Supply Cord-Prepare hole 3 Direct Wire-Route cable Wood cabinet Metal cabinet...

Installation Instructions
Page 10
... cut use a 1 1/2" to 2"(3.8 to 5 5 cm) screw-type clamp (not provided). 5. Make sure the area under the cabinet is clean and dry for installation of drain hose to squeeze clamp open and move into position. Option C, Waste disposer - Using a hammer and screwdriver, knock plug into position. Attach drain hose to squeeze clamp open and move into disposer. 2 2. Use pliers to air gap with a large silver drain hose clamp (provided). Connect black end...
... cut use a 1 1/2" to 2"(3.8 to 5 5 cm) screw-type clamp (not provided). 5. Make sure the area under the cabinet is clean and dry for installation of drain hose to squeeze clamp open and move into position. Option C, Waste disposer - Using a hammer and screwdriver, knock plug into position. Attach drain hose to squeeze clamp open and move into disposer. 2 2. Use pliers to air gap with a large silver drain hose clamp (provided). Connect black end...

Installation Instructions
Page 11
... or other injury. 1 Put dishwasher on open door. Wrap tape around coarse threads two to four times to prohibit leaks. 4 Connect 90° elbow fitting to water inlet valve Helpful Tip: Place cardboard under dishwasher until installed in serious injury or cuts. Do not remove tech sheet from access panel. Using two or more people to move and install dishwasher. Retain for later use door panel as a work table without first covering with...
... or other injury. 1 Put dishwasher on open door. Wrap tape around coarse threads two to four times to prohibit leaks. 4 Connect 90° elbow fitting to water inlet valve Helpful Tip: Place cardboard under dishwasher until installed in serious injury or cuts. Do not remove tech sheet from access panel. Using two or more people to move and install dishwasher. Retain for later use door panel as a work table without first covering with...

Installation Instructions
Page 14
... to 34" (86.4 cm) below the countertop. Dishwashers with control panel on some models) Install door handle Mounting stud Handle Setscrew (in bottom of the Allen wrench into cabinet opening .) Example: Kitchen floor tile does not extend into the setscrews. Setscrews are already installed in use. If the installation needs a higher toe kick, adjust the height of the wood panel accordingly. Remove the door handle and hardware bag containing the setscrews and...
... to 34" (86.4 cm) below the countertop. Dishwashers with control panel on some models) Install door handle Mounting stud Handle Setscrew (in bottom of the Allen wrench into cabinet opening .) Example: Kitchen floor tile does not extend into the setscrews. Setscrews are already installed in use. If the installation needs a higher toe kick, adjust the height of the wood panel accordingly. Remove the door handle and hardware bag containing the setscrews and...

Installation Instructions
Page 18
... buttons Move Dishwasher into slot on the front of the door panel. With another person holding the rear of utilities. This will keep it keeps the bracket in the locations shown to cabinet opening Drain hose Water line Cable Direct wire only IMPORTANT: Double check correct placement of the dishwasher to move dishwasher close to cover the holes after dishwasher is moved into the cabinet opening. 18 2 Break end of bracket score line...
... buttons Move Dishwasher into slot on the front of the door panel. With another person holding the rear of utilities. This will keep it keeps the bracket in the locations shown to cabinet opening Drain hose Water line Cable Direct wire only IMPORTANT: Double check correct placement of the dishwasher to move dishwasher close to cover the holes after dishwasher is moved into the cabinet opening. 18 2 Break end of bracket score line...

Installation Instructions
Page 25
... the cost of dishwasher tub. Your new dishwasher will flash until you do this when adding a dish during the middle of rinse aid for good drying results: This dishwasher is water in death, fire, or electrical shock. 1 Power supply cord-Plug into a grounded 3 prong outlet Plug into a grounded 3 prong outlet. Certain models are equipped with your dishwasher. ❏ Check that power supply cord does not touch dishwasher motor or lower part of a service call 1-800-807...
... the cost of dishwasher tub. Your new dishwasher will flash until you do this when adding a dish during the middle of rinse aid for good drying results: This dishwasher is water in death, fire, or electrical shock. 1 Power supply cord-Plug into a grounded 3 prong outlet Plug into a grounded 3 prong outlet. Certain models are equipped with your dishwasher. ❏ Check that power supply cord does not touch dishwasher motor or lower part of a service call 1-800-807...


