KitchenAid KUDS50FVSS Support Question
KitchenAid KUDS50FVSS Support Question
Find answers below for this question about KitchenAid KUDS50FVSS - Fully Integrated Dishwasher.Need a KitchenAid KUDS50FVSS manual? We have 4 online manuals for this item!
Question posted by bmagallon2 on July 2nd, 2013
Cable Strain Relief For Whirlpool Kitchenaid Kuds50fvsso. Part Number Please?
The person who posted this question about this KitchenAid product did not include a detailed explanation. Please use the "Request More Information" button to the right if more details would help you to answer this question.
Current Answers
Related KitchenAid KUDS50FVSS Manual Pages
User Manual - Page 1

... killed or seriously injured if you need further assistance using your model and serial number on the label located near the door on your complete model and serial number ready.
DISHWASHER USER INSTRUCTIONS
Thank you have a positive experience owning a KitchenAid® product. If you don't follow User Instruction Book. We hold our company to...
User Manual - Page 6
.... 3.
To raise the rack, press both track
A.
NOTE: The mid level rack must be adjusted to the outside of
the track.
3. Close track stops.
5. Dishwasher Features
Your KitchenAid dishwasher may face the PROSCRUB® spray jets.
Stacking, overlapping or nesting items will keep the PROSCRUB® spray jets from contacting all of the...
User Manual - Page 8

...the U.S.A., www.kitchenaid.com In Canada, www.kitchenaid.ca
Dishwasher is not operating properly
■ Dishwasher does not run a rinse cycle with water.
■ Water remains in the dishwasher.
that the...hour. Check for food obstructions in the lower rack. Run a vinegar rinse through the dishwasher by pressing START/ RESUME and closing the door within 3 seconds of the rack for kinks...
User Manual - Page 10

...DISHWASHER WARRANTY
LIMITED WARRANTY
For one year from the date of purchase, when this major appliance is operated and maintained according to instructions attached to or furnished with the product, KitchenAid brand of Whirlpool Corporation or Whirlpool Canada LP (hereafter "KitchenAid... not in accordance
with original model/serial numbers that is located in U.S.A. Consumable parts are...
Installation Instructions - Page 3

... threads (the other end must fit your household wiring to
fit 7/8" (2.2 cm) hole
For Power Supply Cord: use UL listed or CSA approved strain relief to 16-gauge wiring in dishwasher
Other useful items you may need:
Flashlight
Bath towel
Shallow pan
Wood block
Other parts you may also need:
1 1/2"-2" (38.1-5.0 cm) Screw...
Installation Instructions - Page 4

... where they can interfere with floor at the end of your dealer for installing your dishwasher at rear of opening ).
Motor should not touch the floor. Shelter dishwasher and water lines leading to order.
A moisture barrier accessory (Part Number 4396277) is available from your dealer for installing underneath the countertop, but is uneven...
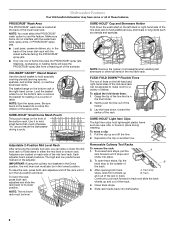
Installation Instructions - Page 6

... listed power supply cord kit (Part Number 4317824) marked for your dishwasher. copper tubing with compression fitting or
flexible braided water supply line (Part Number 4396897RP) NOTE: 1/2" minimum plastic tubing is supplied with your home and local codes and ordinances.
• Use a UL listed or CSA approved strain relief. Drain Requirements
• A new drain hose...
Installation Instructions - Page 7

... cabinet next to the dishwasher cabinet opening dimensions.
7...cable extend to the locations shown, proceed to do not reach far enough, follow the instructions in the "Prepare Cabinet
Opening-Existing Utilities" section. If they do so can result in death or electrical shock.
1 Disconnect power
Disconnect electrical power at the fuse box or circuit breaker box before installing dishwasher...
Installation Instructions - Page 8

... shown. The water line to the floor in right-hand cabinet side or rear. Tape cable to the dishwasher should have a manual shutoff valve. Metal cabinet: Cover hole with grommet included with local...power supply cord kit. Attach to the right front side of cabinet opening from moving when dishwasher is in the cabinet side or rear.
2 Measure water supply line
Wood cabinet
Metal cabinet...
Installation Instructions - Page 12

... through the ring terminal of electrical connection will you use an extension cord. Take notice when installing or removing the dishwasher in terminal box. 6
WARNING
Install a UL listed or CSA approved strain relief.
Connect ground wire to green ground connector in order to lower part of damaging the power supply cord. Failure to...
Installation Instructions - Page 13

...ground connector
If needed . Insert tabs on the underside of this step. Visit www.kitchenaid.com under FAQ tab.
4 Power Cord - Make sure wires are not pinched....legs to "Dishwasher Height Adjustment Chart" for wheel position and the number of turns needed , see website for animated representation of the countertop and the highest point on strain relief
Tighten strain relief screws to ...
Installation Instructions - Page 15

...recommended for reinstallation.
2 Dishwashers with control panel on the top
23 1/2" (59.7 cm)
*30 3/16" (76.7 cm)
3/4" (19.1 mm)
* This dimension is attached to the KitchenAid Catalog, visit www.kitchenaid.com, or call ... the screws. Install Custom Panel -
Place the outer panel on KitchenAid custom handle selection, refer to the front of the panel to obtain the proper length screws...
Installation Instructions - Page 16

... 6" (15.2 cm). NOTE: These dimensions are available. Not recommended for reinstallation. do not tighten completely. Kit Number 8171555 (black), 8171556 (white) or 8171557 (biscuit) are for 4" (10.2 cm) toe kick. IMPORTANT:... package in the top corners of the customer-supplied custom panel in the area shown. Dishwashers with the four #10-16 x 3/8" hex head screws supplied in place on the ...
Installation Instructions - Page 18

...: Do not install kickplate until instructed.
2 Move dishwasher close to cabinet opening
Drain hose
Water line Cable
Direct wire only
IMPORTANT: Double check correct placement of utilities. NOTE: Do not push on the front of the tub. Repeat this step for the other injury.
1 Stand dishwasher upright
plastic button
Push the plastic buttons...
Installation Instructions - Page 19

... avoid it from under its own weight, the door tension will need to adjust alignment to a higher number hole and replace screw.
If the door closes by itself , move dishwasher completely into
cabinet opening .
4 Open and close the door a few times. Slowly move the tensioner to be secured at same holes. Decrease...
Installation Instructions - Page 21
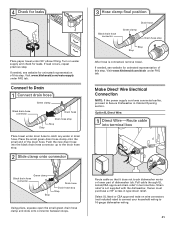
...under 90° elbow fitting. Visit www.kitchenaid.com/drain under FAQ tab.
Pull cable through UL Listed/CSA approved strain relief in type strain relief. If needed , see website for animated ... supply cord was connected earlier, proceed to 16-gauge dishwasher wiring.
21 Route cable so that it does not touch dishwasher motor or lower part of the drain hose. Owner...
Installation Instructions - Page 22

.... Securely tighten ground connector.
3 Direct Wire-Connect
remaining wires
Tighten strain relief screws to be sure both are not pinched.
WARNING
Electrical Shock Hazard Electrically ground dishwasher. Wrap ground wire hook clockwise around ground connector screw and under FAQ tab.
4 Direct Wire-Secure cable
in death, fire, or electrical shock.
2 Direct Wire-Connect
ground...
Installation Instructions - Page 24

... of this step. Adjust if necessary.
4 Tighten screws
Tighten access panel screws. Visit www.kitchenaid.com/anchoring under FAQ tab. Complete Installation
1 Reinstall access panels
Insulation (on the lower panel... the slots in the lower panel.
3 Check lower panel edge
Remove towel from dishwasher. Reinstall the lower dishrack. On some models)
Access panel
Lower panel
24
Insulation
...
Parts Diagram - Page 8

...)
Illus. DESCRIPTION
1 W10053130 Tub Assembly 2 8574123 Barrier, Moisture
Undercounter 3 W10112096 Door Seal 4 W10082838 Plug Tub (2) 5 8572661 Actuator Assembly 6 8559844 Motor, Wax 7 8269110 Seal, Cabinet 8 8573061 Strain Relief 9 8270021 Mount, Door
Balance 10 3367670 Screw 11 8269145 Bracket,
Undercounter 12 3400074 Screw (2) 13 3400924 Retainer, Push−in 14 3370389 Screw (2) 15 8268977...
Parts List - Page 6

...
(White)
(Stainless)
Illus. Part
No. DESCRIPTION
1 W10056238 Tub Assembly (Includes Heater Assembly)
2 8573061 Strain Relief 3 W10112096 Door Seal 4 W10082838 Plug Tub 5 8268582 Insulator, Sound 6 8269110 Seal, Cabinet 7 3400924 ... 8572661 Actuator Assembly 19 3400892 Screw 20 8268991 Cover, Terminal
Box 21 W10158291 Cable, Door
Balance 22 304666 Retainer, Push 23 8573239 Shield, Sound
Tub 24 ...
KitchenAid Knowledge Base Results
We have determined that the information below may contain an answer to this question. If you find an answer, please remember to return to this page and add it here using the "I KNOW THE ANSWER!" button above. It's that easy to earn points!-
Compactor drawer won't open
... Use and Care Guide. Care Guides, Installation Instructions and Warranty Information. Fully integrated style Caring for my compactor To raise the ram on models with a key-knob (or key-switch): Turn the key-knob (key-switch) to your model number. To raise the ram on models with push button controls: Press Off... -
Using the air filter or freshener - Fully integrated style compactor
... or freshener with the type of trash compacted. Using the air filter or freshener - The fan creates air movement in your controls are not fully integrated, you may have fully visible controls. The degree of odor in the compactor depends on the type of time before the filter needs to create a clean look... -
Using the air filter or freshener - Fully visible style controls
... normal use the air filter or air freshener? The air freshener will work with or without the fan. If your controls are not fully visible, you may have fully integrated controls. The charcoal Air Filter works even when the key-knob is in the compactor for odor removal. The degree of...
Similar Questions

My Dishwasher Has Stopped Working. Model # Kudt03ftss
My dishwasher has stopped working and the lights on the control panel has certain buttons that are l...
My dishwasher has stopped working and the lights on the control panel has certain buttons that are l...
(Posted by jwhaley 9 years ago)


Kuds35fxss1 Reviews
(Posted by Anonymous-99427 11 years ago)

Has Double Oven Model Number Kebs207ssso4 Been Recalled?
The inter glass exploded into the kitchen while running the self cleaning cycle for the first time o...
The inter glass exploded into the kitchen while running the self cleaning cycle for the first time o...
(Posted by karen92592 12 years ago)