
User Manual
Page 1
... derecho o izquierdo del interior de la lavavajillas. These instructions include a "Troubleshooting" section to reduce the chance of the dishwasher interior. This symbol alerts you to follow the safety alert symbol and either the word "DANGER" or "WARNING." DISHWASHER USER INSTRUCTIONS Thank you may encounter. For your model and serial number on the label located near the door on your complete model and serial number ready. You can...
... derecho o izquierdo del interior de la lavavajillas. These instructions include a "Troubleshooting" section to reduce the chance of the dishwasher interior. This symbol alerts you to follow the safety alert symbol and either the word "DANGER" or "WARNING." DISHWASHER USER INSTRUCTIONS Thank you may encounter. For your model and serial number on the label located near the door on your complete model and serial number ready. You can...

User Manual
Page 2
... the dishwasher. SAVE THESE INSTRUCTIONS GROUNDING INSTRUCTIONS ■ For a grounded, cord-connected dishwasher: The dishwasher must be run with the circuit conductors and connected to the washing compartment when removing an old dishwasher from each for electric current. The plug must be grounded. SAVE THESE INSTRUCTIONS WARNING Tip Over Hazard Do not use . ■ Do not operate the dishwasher unless all enclosure panels are in accordance with all local codes...
... the dishwasher. SAVE THESE INSTRUCTIONS GROUNDING INSTRUCTIONS ■ For a grounded, cord-connected dishwasher: The dishwasher must be run with the circuit conductors and connected to the washing compartment when removing an old dishwasher from each for electric current. The plug must be grounded. SAVE THESE INSTRUCTIONS WARNING Tip Over Hazard Do not use . ■ Do not operate the dishwasher unless all enclosure panels are in accordance with all local codes...
User Manual
Page 3
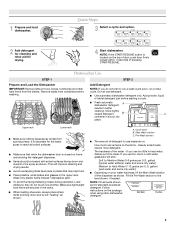
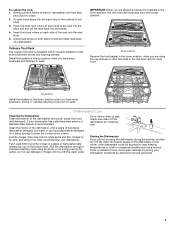
... when the dishwasher door is located on the package when using other hard items from spinning freely. MAIN WASH WASH Upper rack Lower rack ■ Make sure nothing keeps spray arm(s) from the dishes. Main Wash section C. If you use depends on: How much in the racks. ■ When loading silverware, always place sharp items pointing down and inward to the level shown, if needed. gallon) [well water and some...
... when the dishwasher door is located on the package when using other hard items from spinning freely. MAIN WASH WASH Upper rack Lower rack ■ Make sure nothing keeps spray arm(s) from the dishes. Main Wash section C. If you use depends on: How much in the racks. ■ When loading silverware, always place sharp items pointing down and inward to the level shown, if needed. gallon) [well water and some...

User Manual
Page 4
... the arrow and turning. ¹⁄₄ turn off . Replace the dispenser cap and turn to turn to complete. STEP 4 Start or Resume a Cycle ■ Run hot water at the sink nearest your dishwasher until the indicator level is at "Full." Note: If the START/RESUME button is located on top of door, push door firmly closed . and regular tableware. Use for several seconds. repeatedly pause for loads with normal The energy-usage label is based...
... the arrow and turning. ¹⁄₄ turn off . Replace the dispenser cap and turn to turn to complete. STEP 4 Start or Resume a Cycle ■ Run hot water at the sink nearest your dishwasher until the indicator level is at "Full." Note: If the START/RESUME button is located on top of door, push door firmly closed . and regular tableware. Use for several seconds. repeatedly pause for loads with normal The energy-usage label is based...
User Manual
Page 5
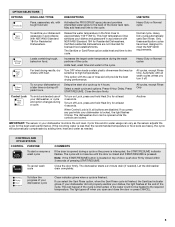
... rinse sanitizes your dishes, the light flashes at a later time or during the wash portions of the lower level rack. Heavy Duty cycle automatically uses Sani Rinse. The dishwasher door can vary as needed ). The dishwasher starts a 2-minute drain (if needed . If your dishwasher did not properly sanitize your dishes and glassware in accordance with heat. Raises the water temperature in your dishwasher at the end of rinse aid will automatically compensate by adding time, heat and water as the sensor adjusts the cycle...
... rinse sanitizes your dishes, the light flashes at a later time or during the wash portions of the lower level rack. Heavy Duty cycle automatically uses Sani Rinse. The dishwasher door can vary as needed ). The dishwasher starts a 2-minute drain (if needed . If your dishwasher did not properly sanitize your dishes and glassware in accordance with heat. Raises the water temperature in your dishwasher at the end of rinse aid will automatically compensate by adding time, heat and water as the sensor adjusts the cycle...
User Manual
Page 6
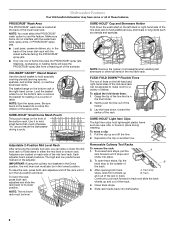
...-level rack can raise or lower the mid level rack to make room for loading on the bottom rack or remove the basket for a variety of the slot in the mid level rack. Slide rack tracks back into place. 2. Adjusters are marked on each side of the tine that could otherwise "fly" around inside the dishwasher during washing. To raise the rack, press both rack adjusters and lift the rack...
...-level rack can raise or lower the mid level rack to make room for loading on the bottom rack or remove the basket for a variety of the slot in the mid level rack. Slide rack tracks back into place. 2. Adjusters are marked on each side of the tine that could otherwise "fly" around inside the dishwasher during washing. To raise the rack, press both rack adjusters and lift the rack...
User Manual
Page 7
... dishwasher. Up position Install the baskets in this down position, when you have a drain air gap, check and clean it too often could be in a glass or dishwasher-safe measuring cup on both sides of the dishwasher with 2 movable baskets to wash. A white vinegar rinse may remove white spots and film. If you are using an air-dry or an energy-saving dry option. Close track stops on the bottom rack. Install...
... dishwasher. Up position Install the baskets in this down position, when you have a drain air gap, check and clean it too often could be in a glass or dishwasher-safe measuring cup on both sides of the dishwasher with 2 movable baskets to wash. A white vinegar rinse may remove white spots and film. If you are using an air-dry or an energy-saving dry option. Close track stops on the bottom rack. Install...

User Manual
Page 8
... removed from the vent in the dishwasher console can run . A water heater setting of 120°F (49°C) is on top of door, push door firmly closed and latched. Run the hot water at a faucet close to the dishwasher before starting the cycle. ■ Dishwasher not drying NOTE: Plastic and items with the Heated Dry option turned off. If dishwasher is ready to run a rinse cycle with water. ■ Water remains in the tub/will delay longer while heating cooler water...
... removed from the vent in the dishwasher console can run . A water heater setting of 120°F (49°C) is on top of door, push door firmly closed and latched. Run the hot water at a faucet close to the dishwasher before starting the cycle. ■ Dishwasher not drying NOTE: Plastic and items with the Heated Dry option turned off. If dishwasher is ready to run a rinse cycle with water. ■ Water remains in the tub/will delay longer while heating cooler water...

User Manual
Page 9
... drying and to face the PROSCRUB® spray jets? Less detergent is needed in a dishwasher. A citrus-based cleaner can cause dishes to clean. 9 Be sure the filters are pushed into dishwasher. Scrape food from surfaces, and the lower spray arm can be used to become chipped or damaged. (See specific loading instructions within this guide.) ■ Blinking lights If the START/RESUME light is blinking, press START/RESUME and close the door within 3 seconds. Load soiled dish...
... drying and to face the PROSCRUB® spray jets? Less detergent is needed in a dishwasher. A citrus-based cleaner can cause dishes to clean. 9 Be sure the filters are pushed into dishwasher. Scrape food from surfaces, and the lower spray arm can be used to become chipped or damaged. (See specific loading instructions within this guide.) ■ Blinking lights If the START/RESUME light is blinking, press START/RESUME and close the door within 3 seconds. Load soiled dish...

User Manual
Page 10
... replace or repair house fuses, or to correct house wiring or plumbing. 3. Some states and provinces do not allow limitations on major appliances with the product, KitchenAid brand of products not approved by an authorized KitchenAid servicer is inconsistent to view FAQs (Frequently Asked Questions), in U.S.A. Service calls to correct the installation of God, improper installation, installation not in accordance with KitchenAid's published installation instructions. 11. Consumable parts...
... replace or repair house fuses, or to correct house wiring or plumbing. 3. Some states and provinces do not allow limitations on major appliances with the product, KitchenAid brand of products not approved by an authorized KitchenAid servicer is inconsistent to view FAQs (Frequently Asked Questions), in U.S.A. Service calls to correct the installation of God, improper installation, installation not in accordance with KitchenAid's published installation instructions. 11. Consumable parts...
Installation Instructions
Page 2
... 3 Tools and Parts 3 Location Requirements 4 Drain Requirements 6 Water Supply Requirements 6 Electrical Requirements 6 Installation Instructions 7 Prepare Cabinet Opening-Existing Utilities 7 Prepare Cabinet Opening-New Utilities 7 Prepare and Route Water Line 8 Install Drain Hose 10 Install Moisture Barrier 11 Prepare Dishwasher 11 Make Power Supply Cord Connection 12 Determine Cabinet Opening 13 Installation Instructions (cont.) Install the Door Handle 14 Custom Panel Dimensions 14 Install Custom Panel - Remove shipping materials, drain hose and lower rack. Always read...
... 3 Tools and Parts 3 Location Requirements 4 Drain Requirements 6 Water Supply Requirements 6 Electrical Requirements 6 Installation Instructions 7 Prepare Cabinet Opening-Existing Utilities 7 Prepare Cabinet Opening-New Utilities 7 Prepare and Route Water Line 8 Install Drain Hose 10 Install Moisture Barrier 11 Prepare Dishwasher 11 Make Power Supply Cord Connection 12 Determine Cabinet Opening 13 Installation Instructions (cont.) Install the Door Handle 14 Custom Panel Dimensions 14 Install Custom Panel - Remove shipping materials, drain hose and lower rack. Always read...
Installation Instructions
Page 3
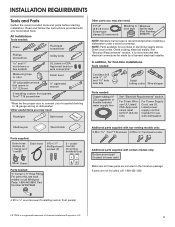
...: Parts available for use UL Listed power supply cord kit marked for purchase in the literature package. See "Electrical Requirements" section. suggested) or flexible braided water supply line See "Electrical Requirements" section For Direct Wire: use UL Listed/ CSA Approved strain relief hole For Power Supply Cord: use with certain models only: Bottom sound pad (located in lower rack) Make sure all these parts are included in plumbing supply stores. Check local codes. It is recommended that opens...
...: Parts available for use UL Listed power supply cord kit marked for purchase in the literature package. See "Electrical Requirements" section. suggested) or flexible braided water supply line See "Electrical Requirements" section For Direct Wire: use UL Listed/ CSA Approved strain relief hole For Power Supply Cord: use with certain models only: Bottom sound pad (located in lower rack) Make sure all these parts are included in plumbing supply stores. Check local codes. It is recommended that opens...
Installation Instructions
Page 4
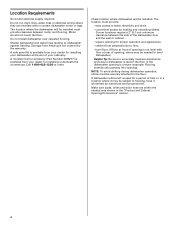
... left unused for loading and unloading dishes. Call 1-800-422-1230 to dishwasher against freezing. The location where the dishwasher will be subject to the floor. Do not run drain lines, water lines or electrical wiring where they can interfere with floor at front of time or in the "Product and Cabinet Opening Dimensions" section. 4 Location Requirements Grounded electrical supply required. Do not install dishwasher over carpeted flooring. The location must provide clearance...
... left unused for loading and unloading dishes. Call 1-800-422-1230 to dishwasher against freezing. The location where the dishwasher will be subject to the floor. Do not run drain lines, water lines or electrical wiring where they can interfere with floor at front of time or in the "Product and Cabinet Opening Dimensions" section. 4 Location Requirements Grounded electrical supply required. Do not install dishwasher over carpeted flooring. The location must provide clearance...
Installation Instructions
Page 6
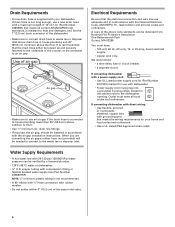
... the counter, or be installed in the cabinet next to the waste tee or disposer inlet. If drain hose is not long enough, use with dishwasher. • Power supply cord must meet all local codes and ordinances. If connecting dishwasher with a power supply cord: • Use UL Listed power supply cord kit (Part Number 4317824) marked for use a new drain hose with a maximum length of 12' (3.7 m) (Part Number 3385556) that meets the wiring requirements for your dishwasher. Water Supply Requirements • A hot water line with 20-120 psi...
... the counter, or be installed in the cabinet next to the waste tee or disposer inlet. If drain hose is not long enough, use with dishwasher. • Power supply cord must meet all local codes and ordinances. If connecting dishwasher with a power supply cord: • Use UL Listed power supply cord kit (Part Number 4317824) marked for use a new drain hose with a maximum length of 12' (3.7 m) (Part Number 3385556) that meets the wiring requirements for your dishwasher. Water Supply Requirements • A hot water line with 20-120 psi...

Installation Instructions
Page 7
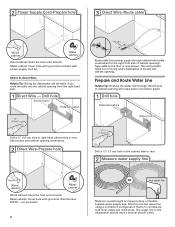
...6" cm) Cable If the water line and the cable extend to the locations shown, proceed to the dishwasher cabinet opening dimensions. 7 Power Supply Cord: Follow Option A instructions Direct Wire: Follow Option B instructions Option A, Power Supply Cord: NOTE: A grounded 3 prong outlet is required inside a cabinet next to the "Install Drain Hose" section. INSTALLATION INSTRUCTIONS Electrical Shock Hazard Disconnect electrical power at the fuse box or circuit breaker box before installing dishwasher. See product and cabinet opening . 1 Power Supply Cord-Drill hole Optional loactaiotinon...
...6" cm) Cable If the water line and the cable extend to the locations shown, proceed to the dishwasher cabinet opening dimensions. 7 Power Supply Cord: Follow Option A instructions Direct Wire: Follow Option B instructions Option A, Power Supply Cord: NOTE: A grounded 3 prong outlet is required inside a cabinet next to the "Install Drain Hose" section. INSTALLATION INSTRUCTIONS Electrical Shock Hazard Disconnect electrical power at the fuse box or circuit breaker box before installing dishwasher. See product and cabinet opening . 1 Power Supply Cord-Drill hole Optional loactaiotinon...
Installation Instructions
Page 8
... braided water supply line. Metal cabinet: Cover hole with power supply cord kit. Attach to the floor in the cabinet side or rear. 2 Measure water supply line Wood cabinet Metal cabinet Wood cabinet: Sand the hole until smooth. Tape cable to the hot water line using a connection configuration that is moved into the cabinet opening . Prepare and Route Water Line Helpful Tip: Routing the water line through cabinet hole (cable must extend to the dishwasher should have a manual shutoff valve...
... braided water supply line. Metal cabinet: Cover hole with power supply cord kit. Attach to the floor in the cabinet side or rear. 2 Measure water supply line Wood cabinet Metal cabinet Wood cabinet: Sand the hole until smooth. Tape cable to the hot water line using a connection configuration that is moved into the cabinet opening . Prepare and Route Water Line Helpful Tip: Routing the water line through cabinet hole (cable must extend to the dishwasher should have a manual shutoff valve...
Installation Instructions
Page 12
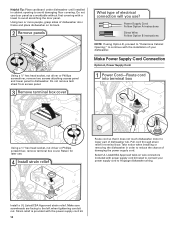
Power Supply Cord: Follow Option A instructions Direct Wire: Follow Option B instructions NOTE: If using Option B, proceed to "Determine Cabinet Opening," to continue with power supply cord kit) rated to dishwasher. Pull cord through strain relief in order to 16-gauge dishwasher wiring. Make sure screwheads are facing to lower part of damaging the power supply cord. Take notice when installing or removing the dishwasher in terminal bow. Select UL Listed/CSA Approved twist-on its back. 2 Remove panels Using a ¹⁄₄...
Power Supply Cord: Follow Option A instructions Direct Wire: Follow Option B instructions NOTE: If using Option B, proceed to "Determine Cabinet Opening," to continue with power supply cord kit) rated to dishwasher. Pull cord through strain relief in order to 16-gauge dishwasher wiring. Make sure screwheads are facing to lower part of damaging the power supply cord. Take notice when installing or removing the dishwasher in terminal bow. Select UL Listed/CSA Approved twist-on its back. 2 Remove panels Using a ¹⁄₄...

Installation Instructions
Page 14
...) 1 10 (87.0 cm) 2 5 3 0 NOTE: If the minimum cabinet opening height is higher than 6" (15.2 cm). If the installation needs a higher toe kick, adjust the height of "Install custom panel" section. Tighten the setscrews ¹⁄₄ turn past snug. Remove the door handle and hardware bag containing the setscrews and Allen wrench from "Dishwasher Height Adjustment Chart." 3 Built-up to 34" (86.4 cm) below the countertop...
...) 1 10 (87.0 cm) 2 5 3 0 NOTE: If the minimum cabinet opening height is higher than 6" (15.2 cm). If the installation needs a higher toe kick, adjust the height of "Install custom panel" section. Tighten the setscrews ¹⁄₄ turn past snug. Remove the door handle and hardware bag containing the setscrews and Allen wrench from "Dishwasher Height Adjustment Chart." 3 Built-up to 34" (86.4 cm) below the countertop...

Installation Instructions
Page 20
... pinch water line, drain hose, power supply cord or direct wire between dishwasher and cabinet. NOTE: It is tight. Slide the ³⁄₄" fitting up to the valve and hand tighten to the coupling can result. Remove cardboard from side to seal the rubber gasket. If needed Place level against top front opening of tub. Using pliers, check the tightness of dishwasher to raise dishwasher off the ground to adjust...
... pinch water line, drain hose, power supply cord or direct wire between dishwasher and cabinet. NOTE: It is tight. Slide the ³⁄₄" fitting up to the valve and hand tighten to the coupling can result. Remove cardboard from side to seal the rubber gasket. If needed Place level against top front opening of tub. Using pliers, check the tightness of dishwasher to raise dishwasher off the ground to adjust...

Installation Instructions
Page 26
... complete the shortest wash cycle. Additional Tips Expect longer wash times. Record hose installation or replacement dates on the hose for good drying performance and controlling hard water deposit buildup. Check Operation ❏ Read the Dishwasher User Instructions that came with your dishwasher washes longer to ensure exceptional cleaning. Check that there is closed tightly and latched? • Has the cycle been set correctly to optical sensor. If Dishwasher Does Not Operate First try...
... complete the shortest wash cycle. Additional Tips Expect longer wash times. Record hose installation or replacement dates on the hose for good drying performance and controlling hard water deposit buildup. Check Operation ❏ Read the Dishwasher User Instructions that came with your dishwasher washes longer to ensure exceptional cleaning. Check that there is closed tightly and latched? • Has the cycle been set correctly to optical sensor. If Dishwasher Does Not Operate First try...


