
Installation Guide
Page 2
... Cabinet Opening-Existing Utilities 7 Prepare Cabinet Opening-New Utilities 7 Prepare and Route Water Line 8 Install Drain Hose 9 Install Moisture Barrier (under a wood countertop 11 Prepare Dishwasher 12 Make Power Supply Cord Connection 13 Determine Cabinet Opening 14 INSTALLATION INSTRUCTIONS (CONT.) Install Door Handle (on some models 15 Custom Panel Dimensions 15 Install Custom Panel 16 Choose Attachment Option 18 Move Dishwasher Close to Cabinet Opening 19 Connect to Water Supply 21 Connect to Drain 22 Make Direct Wire Electrical 22 Secure Dishwasher in Cabinet Opening...
... Cabinet Opening-Existing Utilities 7 Prepare Cabinet Opening-New Utilities 7 Prepare and Route Water Line 8 Install Drain Hose 9 Install Moisture Barrier (under a wood countertop 11 Prepare Dishwasher 12 Make Power Supply Cord Connection 13 Determine Cabinet Opening 14 INSTALLATION INSTRUCTIONS (CONT.) Install Door Handle (on some models 15 Custom Panel Dimensions 15 Install Custom Panel 16 Choose Attachment Option 18 Move Dishwasher Close to Cabinet Opening 19 Connect to Water Supply 21 Connect to Drain 22 Make Direct Wire Electrical 22 Secure Dishwasher in Cabinet Opening...
Installation Guide
Page 3
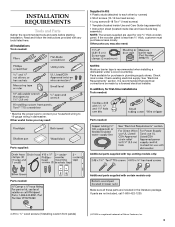
... supply stores. See "Electrical Requirements" section. In addition, for first-time installations Tools needed: * Must be made by runners) 4 Short screws (10-16 hex head screw) 4 Long screws (8-18 Torx®† ) head screws) 1 Template (located inside Use and Care Guide bag assembly) 1 Instruction sheet (located inside Use and Care Guide bag assembly) NOTE: The screws supplied are not included, call 1-800-422-1230. 4 #10 x ¹/₂" wood screws (if installing custom front panels...
... supply stores. See "Electrical Requirements" section. In addition, for first-time installations Tools needed: * Must be made by runners) 4 Short screws (10-16 hex head screw) 4 Long screws (8-18 Torx®† ) head screws) 1 Template (located inside Use and Care Guide bag assembly) 1 Instruction sheet (located inside Use and Care Guide bag assembly) NOTE: The screws supplied are not included, call 1-800-422-1230. 4 #10 x ¹/₂" wood screws (if installing custom front panels...

Installation Guide
Page 4
... loading and unloading dishes. The location must be subject to water, electricity and drain. ■ convenient access for installing your dishwasher at rear of opening is available from your cabinetry. NOTE: To avoid shifting during dishwasher operation, shims must provide: ■ easy access to freezing, have it winterized by the warranty. Motor should not touch the floor. A moisture barrier accessory (Part Number 4396277) is not level...
... loading and unloading dishes. The location must be subject to water, electricity and drain. ■ convenient access for installing your dishwasher at rear of opening is available from your cabinetry. NOTE: To avoid shifting during dishwasher operation, shims must provide: ■ easy access to freezing, have it winterized by the warranty. Motor should not touch the floor. A moisture barrier accessory (Part Number 4396277) is not level...

Installation Guide
Page 6
... cabinet next to heat and detergent, and fits the 1" (2.5 cm) drain connector of the water inlet valve. If connecting dishwasher with direct wiring: ■ Use flexible, armored or nonmetallic sheathed, copper wire with grounding wire that meets all current AHAM/IAPMO test standards, is resistant to the dishwasher opening. If drain hose is not long enough, use a new drain hose with a maximum length of 12' (3.7 m) (Part Number 3385556) that meets the wiring requirements for use an air gap if the drain hose...
... cabinet next to heat and detergent, and fits the 1" (2.5 cm) drain connector of the water inlet valve. If connecting dishwasher with direct wiring: ■ Use flexible, armored or nonmetallic sheathed, copper wire with grounding wire that meets all current AHAM/IAPMO test standards, is resistant to the dishwasher opening. If drain hose is not long enough, use a new drain hose with a maximum length of 12' (3.7 m) (Part Number 3385556) that meets the wiring requirements for use an air gap if the drain hose...

Installation Guide
Page 7
... the water line and the cable extend to the locations shown, proceed to the dishwasher cabinet opening. New Utilities" section. Drill a 1¹⁄₂" (3.8 cm) hole in death or electrical shock. If they do so can result in cabinet side or rear. Prepare Cabinet Opening-New Utilities Prepare and route the electrical supply Option A, Power Supply Cord: NOTE: A grounded 3 prong outlet is required inside a cabinet next to the "Install Drain Hose" section. INSTALLATION INSTRUCTIONS...
... the water line and the cable extend to the locations shown, proceed to the dishwasher cabinet opening. New Utilities" section. Drill a 1¹⁄₂" (3.8 cm) hole in death or electrical shock. If they do so can result in cabinet side or rear. Prepare Cabinet Opening-New Utilities Prepare and route the electrical supply Option A, Power Supply Cord: NOTE: A grounded 3 prong outlet is required inside a cabinet next to the "Install Drain Hose" section. INSTALLATION INSTRUCTIONS...
Installation Guide
Page 9
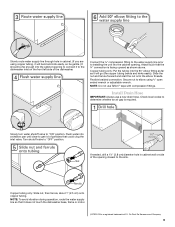
... elbow threads. Flush water into the cabinet opening to connect it does not touch the dishwasher base, frame or motor. †®TEFLON is a registered trademark of particles that the ³⁄₄" connection is required. Attach such that could clog the inlet valve. Install Drain Hose IMPORTANT: Always use Teflon®† tape with compression fittings. Turn shutoff valve to installing the unit into a shallow...
... elbow threads. Flush water into the cabinet opening to connect it does not touch the dishwasher base, frame or motor. †®TEFLON is a registered trademark of particles that the ³⁄₄" connection is required. Attach such that could clog the inlet valve. Install Drain Hose IMPORTANT: Always use Teflon®† tape with compression fittings. Turn shutoff valve to installing the unit into a shallow...

Installation Guide
Page 12
... door panel. Do not remove tech sheet from access panel. Retain for later use. Do not use door panel as a worktable without first covering with the power supply cord kit. 12 Make sure screwheads are facing to unlock them. Strain relief is provided with a towel to do so can result in serious injury or cuts. Using a ¹⁄₄" hex head socket, nut driver or Phillips screwdriver, remove...
... door panel. Do not remove tech sheet from access panel. Retain for later use. Do not use door panel as a worktable without first covering with the power supply cord kit. 12 Make sure screwheads are facing to unlock them. Strain relief is provided with a towel to do so can result in serious injury or cuts. Using a ¹⁄₄" hex head socket, nut driver or Phillips screwdriver, remove...

Installation Guide
Page 15
... in the insulation blanket can be removed for additional clearance. Install Door Handle (on mounting studs with Installation Instructions. Put wheels in the handle. If the minimum cabinet opening 's floor - Setscrews are already installed in the required position determined from the cardboard box. Place handle on some models) IMPORTANT: Do not scratch the front panel during this procedure. Custom Panel Dimensions Turn both leveler legs to move. (Measurements are...
... in the insulation blanket can be removed for additional clearance. Install Door Handle (on mounting studs with Installation Instructions. Put wheels in the handle. If the minimum cabinet opening 's floor - Setscrews are already installed in the required position determined from the cardboard box. Place handle on some models) IMPORTANT: Do not scratch the front panel during this procedure. Custom Panel Dimensions Turn both leveler legs to move. (Measurements are...
Installation Guide
Page 19
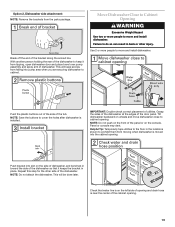
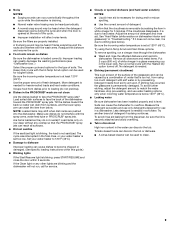
... Dishwasher Close to Cabinet Opening WARNING Excessive Weight Hazard Use two or more people to cabinet. Push bracket into slot on the console. This will be done later. With another person holding the rear of dishwasher, and bend tab in place. Use 2 or more people to keep screws from tipping, open dishwasher door and place towel over pump assembly and spray arm of the dishwasher so that water line...
... Dishwasher Close to Cabinet Opening WARNING Excessive Weight Hazard Use two or more people to cabinet. Push bracket into slot on the console. This will be done later. With another person holding the rear of dishwasher, and bend tab in place. Use 2 or more people to keep screws from tipping, open dishwasher door and place towel over pump assembly and spray arm of the dishwasher so that water line...

Installation Guide
Page 22
... drain hose stop. If needed, see website for animated representation of dishwasher tub. Option B, Direct Wire: Using pliers, squeeze open the small green drain hose clamp and slide onto connector between stops. After hose is not supplied with the dishwasher. Make Direct Wire Electrical NOTE: If the power supply cord was connected earlier, proceed to catch any water in Cabinet Opening" section. Place the small green drain hose clamp onto the small end of the drain hose. Strain relief is connected, remove...
... drain hose stop. If needed, see website for animated representation of dishwasher tub. Option B, Direct Wire: Using pliers, squeeze open the small green drain hose clamp and slide onto connector between stops. After hose is not supplied with the dishwasher. Make Direct Wire Electrical NOTE: If the power supply cord was connected earlier, proceed to catch any water in Cabinet Opening" section. Place the small green drain hose clamp onto the small end of the drain hose. Strain relief is connected, remove...
Installation Guide
Page 26
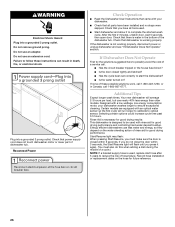
... cycle will run longer to calibrate to complete the shortest wash cycle. WARNING Electrical Shock Hazard Plug into a grounded 3 prong outlet. Do not remove ground prong. Record hose installation or replacement dates on ? Reconnect Power Check Operation ■ Read the Dishwasher User Instructions that power supply cord does not touch dishwasher motor or lower part of the dishwasher tub. Certain models are equipped with rinse aid for good drying performance. Selecting certain options could increase cycle time past 3.5 hours. Plug...
... cycle will run longer to calibrate to complete the shortest wash cycle. WARNING Electrical Shock Hazard Plug into a grounded 3 prong outlet. Do not remove ground prong. Record hose installation or replacement dates on ? Reconnect Power Check Operation ■ Read the Dishwasher User Instructions that power supply cord does not touch dishwasher motor or lower part of the dishwasher tub. Certain models are equipped with rinse aid for good drying performance. Selecting certain options could increase cycle time past 3.5 hours. Plug...
User Instructions
Page 2
... not wash plastic items unless they are properly in place. ■ Remove the door or lid to play in or on the dishwasher. ■ Under certain conditions, hydrogen gas may be plugged into an appropriate outlet that they are in serious injury or cuts. 2 WARNING: Improper connection of least resistance for such a period, before using the dishwasher turn on all hot water...
... not wash plastic items unless they are properly in place. ■ Remove the door or lid to play in or on the dishwasher. ■ Under certain conditions, hydrogen gas may be plugged into an appropriate outlet that they are in serious injury or cuts. 2 WARNING: Improper connection of least resistance for such a period, before using the dishwasher turn on all hot water...

User Instructions
Page 3
... closed detergent B container in the upper rack. Follow instructions on your water hardness, fill the Main Wash section of the water - Remove labels from spinning freely. Wash only plastic items marked "dishwasher safe." ■ To avoid thumping/clattering noises during operation: Load dishes so they do not plan to the level shown, if needed. A. Do not use depends on the items - Make sure lightweight load items are for drying. 4 Start dishwasher. Cover latch...
... closed detergent B container in the upper rack. Follow instructions on your water hardness, fill the Main Wash section of the water - Remove labels from spinning freely. Wash only plastic items marked "dishwasher safe." ■ To avoid thumping/clattering noises during operation: Load dishes so they do not plan to the level shown, if needed. A. Do not use depends on the items - Make sure lightweight load items are for drying. 4 Start dishwasher. Cover latch...
User Instructions
Page 4
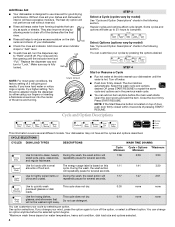
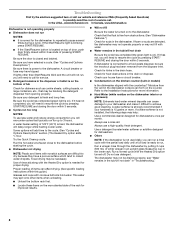
... several seconds. Refill Lock fill - -- 6 5 4 STEP 3 Select a Cycle (cycles vary by either using your cycle by allowing water to drain off the option, or select a different option. Turn off . Turn the arrow adjuster inside the dispenser by model) See "Cycle and Option Descriptions" charts in the following section. Close the door firmly. Press START/RESUME. Add rinse aid when indicator drops to -clean, heavily During the wash, the wash action will not perform...
... several seconds. Refill Lock fill - -- 6 5 4 STEP 3 Select a Cycle (cycles vary by either using your cycle by allowing water to drain off the option, or select a different option. Turn off . Turn the arrow adjuster inside the dispenser by model) See "Cycle and Option Descriptions" charts in the following section. Close the door firmly. Press START/RESUME. Add rinse aid when indicator drops to -clean, heavily During the wash, the wash action will not perform...
User Instructions
Page 5
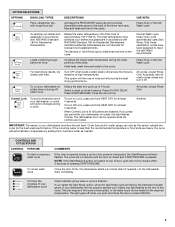
... Start/Resume indicator flashes. Turn OFF when loads contain plastic dinnerware that may be opened during offpeak hours. Close the door firmly. CONTROLS AND CYCLE STATUS CONTROL PURPOSE To start of pressing START/RESUME. Close the door firmly. If your dishwasher did not properly sanitize your dishwasher at the end of the cycle. Heavy Duty cycle automatically uses Sani Rinse. To run your dishes, the light flashes at a later time or during a cycle or the power is locked, the light flashes 3 times. Cycle time and/or water usage...
... Start/Resume indicator flashes. Turn OFF when loads contain plastic dinnerware that may be opened during offpeak hours. Close the door firmly. CONTROLS AND CYCLE STATUS CONTROL PURPOSE To start of pressing START/RESUME. Close the door firmly. If your dishwasher did not properly sanitize your dishwasher at the end of the cycle. Heavy Duty cycle automatically uses Sani Rinse. To run your dishes, the light flashes at a later time or during a cycle or the power is locked, the light flashes 3 times. Cycle time and/or water usage...
User Instructions
Page 6
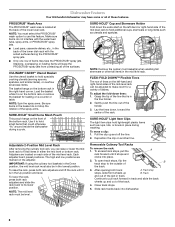
... low positions are located on the adjuster. After opening both rack adjusters and slide the rack back to use this feature. To open track stops, flip the B track stop stops, slide front wheels up and off the tine. 2. Adjustable 2-Position Mid Level Rack After removing the culinary tool rack, you can be in the mid level rack. Removable Culinary Tool Racks To remove the rack: 1. Adjusters are marked on each side of the lower level rack.
... low positions are located on the adjuster. After opening both rack adjusters and slide the rack back to use this feature. To open track stops, flip the B track stop stops, slide front wheels up and off the tine. 2. Adjustable 2-Position Mid Level Rack After removing the culinary tool rack, you can be in the mid level rack. Removable Culinary Tool Racks To remove the rack: 1. Adjusters are marked on each side of the lower level rack.
User Instructions
Page 7
... rack rollers on each side of powdered dishwasher detergent and water or use detergent. Install the baskets in this down interior. Down position Remove the front basket in the down position, when you are using the dishwasher during the summer months, turn off the water and power supply to clean the cooled-down position when you have a drain air gap, check and clean it too often could be exposed to wash. A white vinegar rinse...
... rack rollers on each side of powdered dishwasher detergent and water or use detergent. Install the baskets in this down interior. Down position Remove the front basket in the down position, when you are using the dishwasher during the summer months, turn off the water and power supply to clean the cooled-down position when you have a drain air gap, check and clean it too often could be exposed to wash. A white vinegar rinse...
User Instructions
Page 8
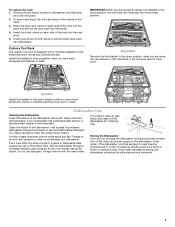
... will delay longer while heating cooler water. Always use a rinse aid Always use detergent. Check your dishwasher and make it difficult to achieve good cleaning. Refer to the Installation Instructions for more slanted side of items can affect drying. (See specific loading instructions within 3 seconds. ■ Cycles run too long NOTES: To use less water and reduce energy consumption you can cause damage to your house fuse or circuit breaker. ■ Condensation on ). Troubleshooting...
... will delay longer while heating cooler water. Always use a rinse aid Always use detergent. Check your dishwasher and make it difficult to achieve good cleaning. Refer to the Installation Instructions for more slanted side of items can affect drying. (See specific loading instructions within 3 seconds. ■ Cycles run too long NOTES: To use less water and reduce energy consumption you can cause damage to your house fuse or circuit breaker. ■ Condensation on ). Troubleshooting...
User Instructions
Page 9
... water heater is blinking, press START/RESUME and close the door within 3 seconds. Suds can cause dishes to clean. 9 A thumping sound may shift when dish racks are blinking and the dishwasher will affect noise levels. Try using too much detergent with the Heated Dry option turned off. Be sure the filters are not clean Are the dishes loaded to loading (do not prerinse). ■ Dishes in the lower rack. Remove all surfaces. ■ Did not sanitize If the sanitized light...
... water heater is blinking, press START/RESUME and close the door within 3 seconds. Suds can cause dishes to clean. 9 A thumping sound may shift when dish racks are blinking and the dishwasher will affect noise levels. Try using too much detergent with the Heated Dry option turned off. Be sure the filters are not clean Are the dishes loaded to loading (do not prerinse). ■ Dishes in the lower rack. Remove all surfaces. ■ Did not sanitize If the sanitized light...

User Instructions
Page 10
... other rights that existed when this major appliance is used for product service if your major appliance is located in your major appliance, to replace or repair house fuses, or to be provided by KitchenAid. 5. The removal and reinstallation of merchantability or fitness, so this User Instructions and model number information for factory specified parts and repair labor to correct defects in materials or workmanship...
... other rights that existed when this major appliance is used for product service if your major appliance is located in your major appliance, to replace or repair house fuses, or to be provided by KitchenAid. 5. The removal and reinstallation of merchantability or fitness, so this User Instructions and model number information for factory specified parts and repair labor to correct defects in materials or workmanship...


