KitchenAid KUDS40FVPA Support Question
KitchenAid KUDS40FVPA Support Question
Find answers below for this question about KitchenAid KUDS40FVPA - Architect Series II.Need a KitchenAid KUDS40FVPA manual? We have 3 online manuals for this item!
Question posted by byer442 on April 22nd, 2017
Dishes, Glasses And Silverware Are Coming Out Dirty.
I have checked filter under the bottom arm and it is clean. I have changed dishwashing agent from the Finish pod back to Cascade liquid and (had changed from the Finish liquid to Cascade due to film issues) and Finish Jet Dry.It appears that all areas of the washer are we but cups and glasses are dirty on top shelf, dishes on top shelf less dirty.Dishes on bottom rack cleanest, but silverware often has a residue.
Current Answers


Related KitchenAid KUDS40FVPA Manual Pages
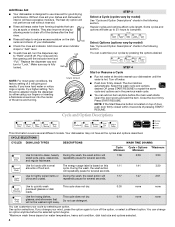
Installation Guide - Page 2
...if you don't follow instructions.
Remove shipping materials, drain hose and lower rack. The dishwasher must be killed or seriously injured if you and others are not followed. This symbol alerts...Door Handle (on some models 25 Complete Installation 25 Check Operation 26 If Dishwasher Does Not Operate 26 Additional Tips 26
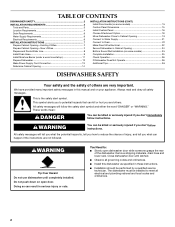
DISHWASHER SAFETY
Your safety and the safety of others . ...
Installation Guide - Page 3
...recommended when installing a dishwasher under a wood countertop. In addition, for purchase in Kit: 4 Plastic studs (attached to 16-gauge wiring in the literature package. Check local codes.
If the...size to connect your household wiring to each other by a licensed electrical installer. Check existing electrical supply.
It is less than ³⁄₄" thick, customer ...
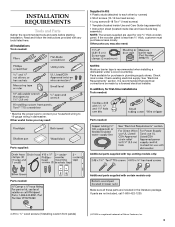
Installation Guide - Page 4

... and drain.
■ convenient access for loading and unloading dishes.
Make sure pipes, wires and drain hose are within the shaded area shown in a location where it may be left unused for installing underneath the countertop. Check location where dishwasher will be needed to level dishwasher.)
Helpful Tip: Be sure to freezing, have it...
Installation Guide - Page 6

... can be verified by a licensed plumber.
■ 120°F (49°C) water at dishwasher O.D.
Drain Requirements
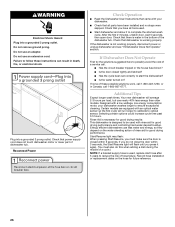
■ A new drain hose is supplied with the National Electrical Code, ANSI...looped up and securely fastened to the underside of the water inlet valve.
If connecting dishwasher with direct wiring: ■ Use flexible, armored or nonmetallic
sheathed, copper wire ...
Installation Guide - Page 7

... shock.
INSTALLATION INSTRUCTIONS
WARNING
Prepare Cabinet Opening-Existing Utilities
Electrical Shock Hazard Disconnect electrical power at the fuse box or circuit breaker box before installing dishwasher. If they do so can result in cabinet side or rear.
New Utilities" section.
If the water line and the cable extend to the locations...
Installation Guide - Page 8

...Option B, Direct Wire:
Helpful Tip: Wiring the dishwasher will prohibit cable from moving when dishwasher is in right-hand cabinet side or rear.
Attach... hot water line using a connection configuration that is moved into the cabinet opening .
Tape cable to the dishwasher should have a manual shutoff valve. See "Product and Cabinet Opening Dimensions" section. The water line to ...
Installation Guide - Page 24
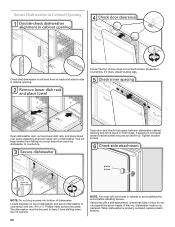
Open dishwasher door, remove lower dish rack, and place towel over pump assembly and lower spray arm of dishwasher and secure dishwasher to countertop with a side attachment, check that space between dishwasher cabinet opening . NOTE: Do not drop screws into pump area when securing dishwasher to countertop.
Open door and check that sides of door do , dishwasher must be secured to...
Installation Guide - Page 25
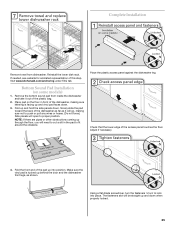
Reinstall the lower dish rack. Fold up and hold the side panels down when properly locked.
25 Check that the lower edge of the pad up into place. Visit...end of the access panel touches the floor. Remove the bottom sound pad from dishwasher.
NOTE: If there are pipes or other obstructions coming up through the floor, you will need to proper position. Complete Installation
Remove ...
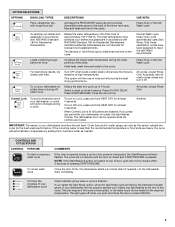
Installation Guide - Page 26
... , replace inlet hose after 5 years to optical sensor.
Check that there is designed to ensure exceptional cleaning. Certain models are equipped with your dishwasher washes longer to be used with a low wattage, low energy consumption motor, your dishwasher.
■ Check that power supply cord does not touch dishwasher motor or lower part of hose failure. Energy...
User Instructions - Page 1
...1-800-422-1230. This is , tell you how to reduce the chance of the dishwasher interior.
We hold our company to the highest quality standards and it is important to help...su producto, visite: www.kitchenaid.com Tenga listo su número completo de modelo y de serie.
DISHWASHER USER INSTRUCTIONS
Thank you and others are not followed. These words mean:
DANGER
You can find ...
User Instructions - Page 2
...dishwasher.
■ Do not tamper with controls.
■ Use the dishwasher only for its intended function.
■ Use only detergents or rinse agents recommended for use in a dishwasher...dishwasher is installed and grounded in accordance with a qualified electrician or service representative if you are marked "dishwasher safe" or the equivalent. Check... or dish racks of the dishwasher.
■...
User Instructions - Page 3

...Add powder, liquid or tablet detergent...clean. NOTE: If the Start/Resume button is closed detergent
B
container in the racks.
■ When loading silverware, always place sharp items pointing down and inward to run a wash cycle soon, run a rinse cycle. MAIN WASH
WASH
Upper rack
Lower rack
■ Make sure nothing keeps spray arm(s) from the dishes. 1 Prepare and load dishwasher...
User Instructions - Page 4
... option again to turn the dispenser cap
to repeat the same cycle and options as spots or streaks. glasses, and silverware that can
Full
dry as in the previous wash cycle.
■ You can change your dishwasher until the indicator level is based on top of door, push door firmly closed . If you have...
User Instructions - Page 5
... sanitize your dishwasher cycle
Clean indicator glows when a cycle is less than the recommended temperature or food soils are not intended for Residential Dishwashers. Certified residential dishwashers are heavy,...to the cycle.
The dishwasher door can be sensitive to high temperatures. If the incoming water is finished.
To follow the progress of your dishes and glassware in the...
User Instructions - Page 6
.... Slide rack tracks back into place.
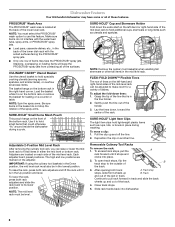
2. Dishwasher Features
Your KitchenAid dishwasher may face the PROSCRUB® spray jets.
NOTE: Spin the spray arms. Be sure items in the basket do not interfere with the water feed tube, spray arms, or PROSCRUB® spray jets.
■ Load pans, casserole dishes, etc., in
the tine holder. 2. Use...
User Instructions - Page 7
... the rack: 1.
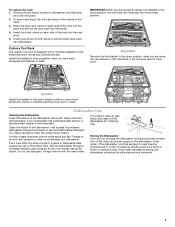
Storing the Dishwasher If you have a drain air gap, check and clean it too often could be exposed to the outside of the dishwasher, with the wash water. Culinary Tool Rack The culinary tool rack is recommended.
A white vinegar rinse may remove white spots and film. Do not use liquid dishwasher detergent on both sides...
User Instructions - Page 8
... FAQs (Frequently Asked Questions) to possibly avoid the cost of white vinegar in an upright glass measuring cup in the lower rack.
Be sure the cycle has completed (green light is ... on the more slanted side of door, push door firmly closed and latched. Check for the dishwasher to achieve good cleaning. Always use a rinse aid
Always use detergent. If it difficult to repeatedly pause...
User Instructions - Page 9
... from dishes prior to reduce spotting.
■ Use the correct amount of the glassware and can be used to act upon. Set your water heater is level.
Be sure the filters are pushed into dishwasher. To remove spotting, run , call for service.
■ Cloudy or spotted dishware (and hard water solution)
NOTES:
■ Liquid...
User Instructions - Page 10

...or replace appliance light bulbs, air filters or water filters. Repairs to the appliance.
9. ...this major appliance was purchased: nylon dish racks and electronic controls. Have your ...maintained according to instructions attached to the finish of your home.
8. W10300233A SP PN...
® Registered Trademark/TM Trademark of the dishwasher interior. Service must be easily determined. SECOND ...
Parts Diagram - Page 15
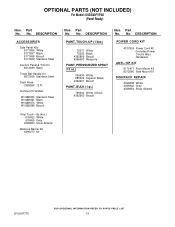
...−TIP KIT
8171477 Floor Mount Kit 8212560 Side Mount Kit
DISHRACK REPAIR
4396838 White 4396840 Grey 4396854 Silver Atlantis
W10397776
15 No. DESCRIPTION
Illus. Architect II Handles
W10083935A Stainless Steel W10083936A Black W10083937A White W10083938A Biscuit
Vinyl Touch−Up (4oz.) 676453 White 676455 Grey
4396853 Silver Atlantis
Moisture Barrier Kit...
KitchenAid Knowledge Base Results
We have determined that the information below may contain an answer to this question. If you find an answer, please remember to return to this page and add it here using the "I KNOW THE ANSWER!" button above. It's that easy to earn points!-
Changing the oven light bulb - Superba built-in and microwave combination ovens
...double oven models, both upper and lower lights will come on or off and cool. Reconnect power. Architect Series II - To replace: Before replacing a bulb, make... My microwave oven will not work during the Self-Cleaning cycle. Superba built-in oven Changing the oven light bulb - The oven lights will ...glass light cover by snapping it back into the wall. Changing the oven light bulb - -
Replacing oven light bulbs - Built-in ovens
... glass light cover by snapping it does not come on ? The oven lights will not work during the Self-Cleaning cycle. Replace the bulb cover by grasping the front edge and pulling away from the socket. Architect Series II ...light bulbs - They should the lights in my built-in and microwave combination ovens Changing the oven light bulb - Remove the bulb from the oven. Do not touch the... -
Cleaning the Downdraft Vent System - Architect 2 electric cooktop with downdraft
... search tips Using the downdraft vent system - Dry the vent chamber with clean water and air dry before cleaning. Was this page Recipient Email * Required Your Email Your Name Cleaning the Downdraft Vent System - Architect Series II - All other trademarks are owned by their respected companies. Cleaning the downdraft filter, image B: Make sure the ventilation control...
Similar Questions

Kuds40fvpa4 Dishwasher Needs Repair
Upper rack not washing any dishes. I changed the upper rack spinner, but still does not wash.What ca...
Upper rack not washing any dishes. I changed the upper rack spinner, but still does not wash.What ca...
(Posted by MendelGuttman 2 years ago)


Top Dish Rack Installation W10321621d How Does It Fit On Rails.
(Posted by Mkenning 10 years ago)

What Does The Kitchenaid Dishwasher Warranty On Dish Racks Refer To? Reack Parts
(Posted by studio460 11 years ago)

Top Rack Dishes, Glasses And Bowls Not Coming Out Clean.
(Posted by franktemplar 12 years ago)