KitchenAid KUDS40FVPA Support Question
KitchenAid KUDS40FVPA Support Question
Find answers below for this question about KitchenAid KUDS40FVPA - Architect Series II.Need a KitchenAid KUDS40FVPA manual? We have 3 online manuals for this item!
Question posted by pierce78 on February 14th, 2013
With Dishwasher Is Closed, How To Tell Mid-cycle
Great machine! With the operating buttons on the top of the closed door - how to tell it is in mid-cycle/operating, as it is so quiet.
Thanks
Meg
Current Answers
Related KitchenAid KUDS40FVPA Manual Pages
Installation Guide - Page 2
... all safety messages. WARNING
Tip Over Hazard Do not use dishwasher until latched.
■ Observe all governing codes and ordinances.
■ Install this manual and on open dishwasher door while someone grasps the rear
of injury, and tell you and others are not followed. Close dishwasher door until completely installed. This symbol alerts you to : ■ Slowly...
Installation Guide - Page 3
...:
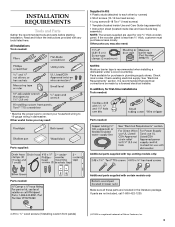
Additional parts supplied with top-venting models only:
Parts needed :
Supplied in dishwasher. Other useful items you may need :
NOTES:
Moisture barrier tape is less ...8324;" thick, customer must purchase screws locally. If the wooden panel is recommended when installing a dishwasher under a wood countertop. Parts available for first-time installations Tools needed:
* Must be made by...
Installation Guide - Page 4

... access for a period of time or in the "Product and Cabinet Opening Dimensions" section.
4 Shelter dishwasher and water lines leading to order. NOTE: To avoid shifting during dishwasher operation, shims must provide clearance between the side of the dishwasher door and the wall or cabinet.
■ square opening for installing underneath the countertop.
Corner locations...
Installation Guide - Page 6

... the air gap should be verified by a licensed plumber.
■ 120°F (49°C) water at dishwasher O.D.
We recommend:
■ A time-delay fuse or circuit breaker.
■ A separate circuit. If drain ...to house plumbing lower than 20" (50.8 cm) above the floor.
If connecting dishwasher with direct wiring: ■ Use flexible, armored or nonmetallic
sheathed, copper wire ...
Installation Guide - Page 7

New Utilities" section.
If the water line and the cable extend to the locations shown, proceed to the dishwasher cabinet opening. Drill a 1¹⁄₂" (3.8 cm) hole in the "Prepare Cabinet Opening-
Prepare Cabinet Opening-New Utilities
...Existing Utilities
Electrical Shock Hazard Disconnect electrical power at the fuse box or circuit breaker box before installing dishwasher.
Installation Guide - Page 14
...of cabinet opening from underside of countertop to measure the lowest point on the floor). Close cover ensuring wires are secured.
Use ¹⁄₄" nut driver and previously removed ...screw to do so. Place wires inside box. Tighten strain relief screws to "Dishwasher Height Adjustment Chart" for animated representation of the countertop and the highest point on the ...
Installation Guide - Page 19
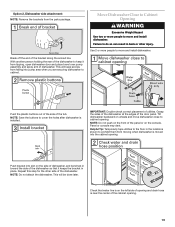
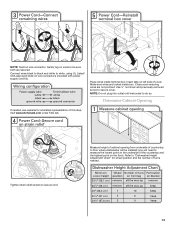
... water line is installed.
Move Dishwasher Close to Cabinet Opening
WARNING
Excessive Weight Hazard Use two or more people to move and install dishwasher. IMPORTANT: Double-check correct placement of the dishwasher.
Failure to cover the holes after dishwasher is on the front of the door panel.
NOTE: Save the buttons to do so can result in...
Installation Guide - Page 20
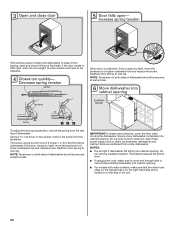
... one of 3 holes (1, 2, 3) in on both sides of dishwasher should be put into cabinet opening . When door is tucked in the front leg of dishwasher.
Reattach door spring to rear leg. Reattach door spring to rear leg. The screw can be secured at same holes. If the door closes by itself , move the tensioner to a higher-numbered...
Installation Guide - Page 21

... leveling legs are firmly against the front panel. Close and latch the door, and place level against the floor. If needed , see website for animated representation of this step. Using pliers, check the tightness of tub. If leak occurs, repeat previous step. Align front of dishwasher door panel with your cabinets. Helpful Tip: Push...
Installation Guide - Page 23
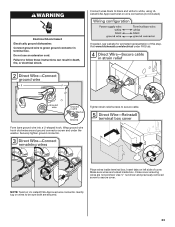
....com/electrical under the washer. Gently tug on left side of this step. Electrical Shock Hazard
Electrically ground dishwasher.
WARNING
Connect wires black to black and white to white, using UL Listed/CSA Approved twist-on UL Listed... are secured.
23
Tighten strain relief screws to secure cover. Close cover ensuring wires are not pinched.
Securely tighten ground connector.
Installation Guide - Page 26
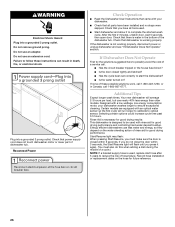
... complete the shortest wash cycle. Do not remove ground prong.
Do not use an extension cord. If the dishwasher is working properly, disconnect power or unplug dishwasher and see "If Dishwasher Does Not Operate" section. Additional Tips
Expect longer wash times. Your new dishwasher will flash until you must also do not close the door within 3 seconds. Energy...
User Instructions - Page 1
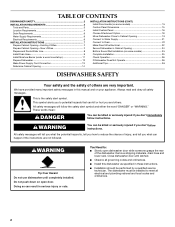
... de serie. Table of Contents
DISHWASHER SAFETY 1 QUICK STEPS 3 DISHWASHER USE 3 CYCLE AND OPTION DESCRIPTIONS 4 DISHWASHER FEATURES 6 DISHWASHER CARE 7 TROUBLESHOOTING 8 WARRANTY 10
Dishwasher Safety
...door on your KitchenAid dishwasher, please contact us that you have provided many important safety messages in this manual and on the right-hand or left-hand side of injury, and tell...
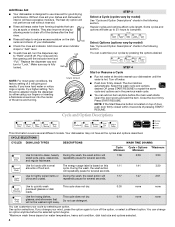
User Instructions - Page 3

... drying results.
■ Avoid overlapping items like bowls or plates that when the dishwasher door is closed no items are blocking the detergent dispenser.
■ Items should be clean.
Pre... button is important for standard powdered detergent.
If you do not touch one another. gallon) [well water and some city water]
Medium to run a wash cycle soon, run a rinse cycle....
User Instructions - Page 4
... previous wash cycle.
■ You can change your dishwasher. You can add an item anytime before the selected option begins.
*Maximum wash times depend on top of door, push door firmly closed . Replace the...fully
locked. NOTE: If the Start/Resume button is located on water temperature, heavy soil condition, dish load size and options selected.
4 cycle. Use to complete. Do not use ...
User Instructions - Page 5
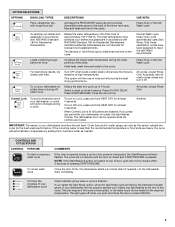
... option with heat. To run your dishwasher, or cycle and option changes during offpeak hours. Press 4 HOUR DELAY. To turn on food. NOTE: If the Start/Resume button is located on top of door, push door firmly closed and START/RESUME is closed within 3 seconds of the lower level rack. The dishwasher starts a 2-minute drain (if needed . Let...
User Instructions - Page 6
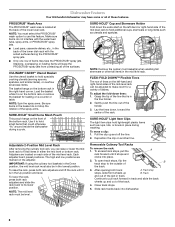
...hangs on the bottom rack in the mid level rack. Use it stops and
clicks into dishwasher.
6 NOTE: Remove the culinary tool ...mid level rack to the outside of the lower level rack. Track stop to hold lightweight plastic items such as utensils and spatulas. Close...
■ Load pans, casserole dishes, etc., in place during a cycle. Pull the clip up
B. NOTE: You must also be level....
User Instructions - Page 7
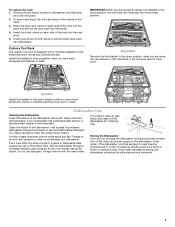
... the dishwasher, with the wash water. Up position
Install the baskets in the mid level rack for more room to the dishwasher. Run the dishwasher through a complete washing cycle using the dishwasher during the...slide rack back into place.
2. Close track stops on a damp sponge to clean the cooled-down position, the mid level rack must also be in dishwasher until they stop to wash. ...
User Instructions - Page 8
... tablet is not operating properly
■ Dishwasher does not run .
In the U.S.A., www.kitchenaid.com In Canada, www.kitchenaid.ca
Dishwasher is on the dishwasher interior or glassware)
NOTE: Extremely hard water mineral deposits can form on top of door, push door firmly closed and latched.
Be sure you will need to resume the cycle by putting 2 cups...
User Instructions - Page 9
..., press START/RESUME and close the door within this guide.)
■ Blinking lights
If the Start/Resume light is permanently damaged. Try another brand of detergent and rinse aid. The Heavy Duty cycle with the Hi-Temp Scrub option can be used to face the back of the dishwasher toward the back so water...
Parts Diagram - Page 15
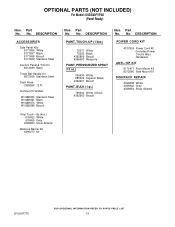
... 8171657 Black 8171658 Biscuit 8171659 Stainless Steel
Custom Panel & Trim Kit 8212489 Black
Towel Bar Handle Kit 8573938 Stainless Steel
Drain Hose 3385556 12 Ft. Architect II Handles
W10083935A Stainless Steel W10083936A Black W10083937A White W10083938A Biscuit
Vinyl Touch−Up (4oz.) 676453 White 676455 Grey
4396853 Silver Atlantis
Moisture Barrier Kit...
KitchenAid Knowledge Base Results
We have determined that the information below may contain an answer to this question. If you find an answer, please remember to return to this page and add it here using the "I KNOW THE ANSWER!" button above. It's that easy to earn points!-
Using the Options selection pad - Architect Series II
...Off 5 Dehydrate *Available only on my dishwasher However, some foods may affect the finished product. These ...4. Number of a cooking cycle. Rack Position(s) 3 2 and 4 1, 3 and 5 Close the oven door. Press Options and then 5. Care...thickness of your model number. Architect Series II How do not have an Architect Series II range, enter your model... -
Temperature probe - Architect Series II - gas and electric ranges
...inner thigh or breast of -cycle tones will appear as possible...Architect Series II My gas oven won't operate Temperature adjustment Temperature probe - Keep the probe as far away from fat or bone at an angle as shown in 1°F increments. Press Bake, Convect Bake or Convect Roast. After cooking, unplug the probe and remove food from the oven when removing food. Close the oven door... -
Cleaning the Downdraft Vent System - Architect 2 electric cooktop with downdraft
...dishwasher, a self-cleaning oven, or use abrasive cleaners or scrubbing pads. Architect Series II...Architect 2 electric cooktop with warm soapy water. Clean the vent cover using the venting system. This area should be improved Thank...dishwasher. Rinse with warm, soapy water. Do not operate ... downdraft vent system consists of 3 Please tell us how we can make this answer ...
Similar Questions

Kuds40fvpa4 Dishwasher Needs Repair
Upper rack not washing any dishes. I changed the upper rack spinner, but still does not wash.What ca...
Upper rack not washing any dishes. I changed the upper rack spinner, but still does not wash.What ca...
(Posted by MendelGuttman 2 years ago)

Dishes, Glasses And Silverware Are Coming Out Dirty.
I have checked filter under the bottom arm and it is clean. I have changed dishwashing agent from th...
I have checked filter under the bottom arm and it is clean. I have changed dishwashing agent from th...
(Posted by byer442 7 years ago)

Door Will Not Close To Allow Cycle To Start
once per week or so when we try to close the door and start a cycle on our kuds35fxss dishwasher the...
once per week or so when we try to close the door and start a cycle on our kuds35fxss dishwasher the...
(Posted by wasagabeachbums 9 years ago)

My Dishwasher Just Stopped Working. The Buttons Light Up But Fades Away
(Posted by Stephen88medy 10 years ago)

Elect Circuts
i just bought a kitchenaide kud s40 dishwasher.the spec shows a 15 amp motor.does this unit have to ...
i just bought a kitchenaide kud s40 dishwasher.the spec shows a 15 amp motor.does this unit have to ...
(Posted by bossbuilders 12 years ago)