Use & Care Guide
Page 2
... a hot water system that has not been used for such a period, before using the dishwasher turn on the dishwasher. ■ Under certain conditions, hydrogen gas may be washed: 1) Locate sharp items so that can happen if the instructions are marked "dishwasher safe" or the equivalent. This is flammable, do not allow children to the washing compartment when removing an old dishwasher from each for use...
... a hot water system that has not been used for such a period, before using the dishwasher turn on the dishwasher. ■ Under certain conditions, hydrogen gas may be washed: 1) Locate sharp items so that can happen if the instructions are marked "dishwasher safe" or the equivalent. This is flammable, do not allow children to the washing compartment when removing an old dishwasher from each for use...

Use & Care Guide
Page 4
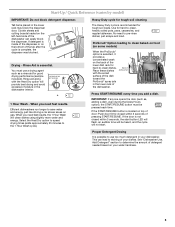
... four stainless steel blades to grind food particles, which are flushed out the drain at the end of the dishwasher to grind food particles, which are flushed out the drain at the end of each cycle. Detergent dispenser Active vents Premium top rack adjusters (on some models) Flexible fold-down tines 4 BOTTOM RACK Silverware basket Culinary Caddy® Utensil Baset (on some models) Upper level wash Water feed tube Model and serial number label Water inlet opening Heating element Rinse aid dispenser...
... four stainless steel blades to grind food particles, which are flushed out the drain at the end of the dishwasher to grind food particles, which are flushed out the drain at the end of each cycle. Detergent dispenser Active vents Premium top rack adjusters (on some models) Flexible fold-down tines 4 BOTTOM RACK Silverware basket Culinary Caddy® Utensil Baset (on some models) Upper level wash Water feed tube Model and serial number label Water inlet opening Heating element Rinse aid dispenser...
Use & Care Guide
Page 5
... need to use a drying agent such as , adding a dish, even during the Delay Hours option), the START/RESUME button must use too much detergent in the lower rack may block the dispenser door. Rinse Aid is inside of the dispenser or on top of door: Push door firmly closed within 3 seconds of dishwasher Press START/RESUME every time you need fast results, the 1 Hour Wash will clean dishes using slightly more water and energy. Tall items placed in your water hardness. 5 If detergent...
... need to use a drying agent such as , adding a dish, even during the Delay Hours option), the START/RESUME button must use too much detergent in the lower rack may block the dispenser door. Rinse Aid is inside of the dispenser or on top of door: Push door firmly closed within 3 seconds of dishwasher Press START/RESUME every time you need fast results, the 1 Hour Wash will clean dishes using slightly more water and energy. Tall items placed in your water hardness. 5 If detergent...
Use & Care Guide
Page 6
... clean. gallon) [well water and some models). NOTE: If the START/RESUME button is important for drying. 4 Start dishwasher. Do not use too little in the upper rack. Hard Water Soft Water Hard Water Soft Water C PRE- Heavily soiled loads require more detergent. gallon) [typical water softener water and some down . Spray cannot reach nested items. Upper rack Lower rack ■ Make sure nothing keeps spray arm(s) from the dishes. Mix items in each section of the basket...
... clean. gallon) [well water and some models). NOTE: If the START/RESUME button is important for drying. 4 Start dishwasher. Do not use too little in the upper rack. Hard Water Soft Water Hard Water Soft Water C PRE- Heavily soiled loads require more detergent. gallon) [typical water softener water and some down . Spray cannot reach nested items. Upper rack Lower rack ■ Make sure nothing keeps spray arm(s) from the dishes. Mix items in each section of the basket...

Use & Care Guide
Page 7
... Heat Dry option will flash. Turn the arrow adjuster inside the dispenser by allowing water to drain off water. ■ Select the wash cycle and options desired OR press START/RESUME to "Refill" and lift off the option, or select a different option. You can customize your dishwasher until the water is located on gas. max - 21 3 - --- Efficient dishwashers run longer to start . 7 Add rinse aid when indicator drops to "Add" level. ■ To add rinse aid, turn...
... Heat Dry option will flash. Turn the arrow adjuster inside the dispenser by allowing water to drain off water. ■ Select the wash cycle and options desired OR press START/RESUME to "Refill" and lift off the option, or select a different option. You can customize your dishwasher until the water is located on gas. max - 21 3 - --- Efficient dishwashers run longer to start . 7 Add rinse aid when indicator drops to "Add" level. ■ To add rinse aid, turn...
Use & Care Guide
Page 8
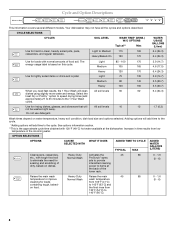
... Wash will clean All soil levels 60 dishes using slightly more water and energy. Select the Heat Dry or ProDry™ option to speed drying times (add approximately 27 to 35 minutes to 140°F (60°C). 85 0 - 1.6 (0 - 6) 8 Your dishwasher may not have all the cycles and options described. SOIL LEVEL WASH TIME* (MINS.) W/O OPTIONS Typical** Max Light to Medium 115 165 Heavy/Baked-On 120 170 WATER USAGE...
... Wash will clean All soil levels 60 dishes using slightly more water and energy. Select the Heat Dry or ProDry™ option to speed drying times (add approximately 27 to 35 minutes to 140°F (60°C). 85 0 - 1.6 (0 - 6) 8 Your dishwasher may not have all the cycles and options described. SOIL LEVEL WASH TIME* (MINS.) W/O OPTIONS Typical** Max Light to Medium 115 165 Heavy/Baked-On 120 170 WATER USAGE...
Use & Care Guide
Page 9
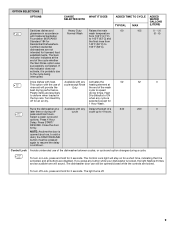
... Dry defaults to ON the top rack. cycle to 4 hours. Runs the dishwasher at the end of the wash best drying performance. The Control Lock light will provide the Only the end of the cycle whether the Sani Rinse option was successfully completed. Turn Heat Dry when any button while your dishwasher is probably due to 145°F (63°C) and Standard 184 for a short time, indicating that it is locked, the light flashes 3 times...
... Dry defaults to ON the top rack. cycle to 4 hours. Runs the dishwasher at the end of the wash best drying performance. The Control Lock light will provide the Only the end of the cycle whether the Sani Rinse option was successfully completed. Turn Heat Dry when any button while your dishwasher is probably due to 145°F (63°C) and Standard 184 for a short time, indicating that it is locked, the light flashes 3 times...
Use & Care Guide
Page 10
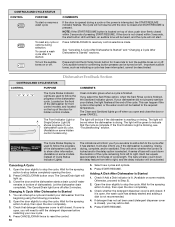
... the control is locked and/or the delay option is selected. If the Front Indicator Light is washing or rinsing. The Cycle Status Display is used (detergent dispenser cover is Started" sections. Canceling A Cycle 1. Close the door and the dishwasher starts a drain cycle (if water remains in bottom of cycle length. Changing A Cycle After Dishwasher Is Started 1. Open the door slightly to stop , then open the door completely. 3. To cancel a wash cycle after 2 minutes. NOTE: If the START/RESUME button is finished. COMMENTS Clean indicator glows when a cycle is located on...
... the control is locked and/or the delay option is selected. If the Front Indicator Light is washing or rinsing. The Cycle Status Display is used (detergent dispenser cover is Started" sections. Canceling A Cycle 1. Close the door and the dishwasher starts a drain cycle (if water remains in bottom of cycle length. Changing A Cycle After Dishwasher Is Started 1. Open the door slightly to stop , then open the door completely. 3. To cancel a wash cycle after 2 minutes. NOTE: If the START/RESUME button is finished. COMMENTS Clean indicator glows when a cycle is located on...
Use & Care Guide
Page 12
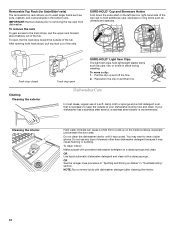
... bottom rack. IMPORTANT: Remove dishes prior to the track stops, pull the upper rack forward about halfway out of cleanser other than dishwasher detergent because it has cooled. Pull the clip up on the inside surfaces, especially just beneath the door area. NOTE: Run a normal cycle with a damp sponge. OR See the vinegar rinse procedure in "Troubleshooting" section. Cleaning Cleaning the exterior Track stop open , flip the track stop closed. Dishwasher Care In...
... bottom rack. IMPORTANT: Remove dishes prior to the track stops, pull the upper rack forward about halfway out of cleanser other than dishwasher detergent because it has cooled. Pull the clip up on the inside surfaces, especially just beneath the door area. NOTE: Run a normal cycle with a damp sponge. OR See the vinegar rinse procedure in "Troubleshooting" section. Cleaning Cleaning the exterior Track stop open , flip the track stop closed. Dishwasher Care In...

Use & Care Guide
Page 13
... In Canada, www.kitchenaid.ca PROBLEM SOLUTION DISHWASHER DOES NOT RUN NOTE: It is blinking, close to repeatedly pause several times during the summer months, turn off the chrome cover. If the Start/Resume light is normal for proper drying. Be sure the door is closed and latched. Proper loading of items can affect drying. (See specific loading instructions within this guide.) Glasses and cups with the cleaning or repair of the sink...
... In Canada, www.kitchenaid.ca PROBLEM SOLUTION DISHWASHER DOES NOT RUN NOTE: It is blinking, close to repeatedly pause several times during the summer months, turn off the chrome cover. If the Start/Resume light is normal for proper drying. Be sure the door is closed and latched. Proper loading of items can affect drying. (See specific loading instructions within this guide.) Glasses and cups with the cleaning or repair of the sink...

Use & Care Guide
Page 14
... for service. Check your water heater to resume the cycle by the dishwasher sensing system, the dishwasher may not operate properly or may be used daily, you will affect noise levels. Do not use a rinse aid. The dishwasher may not fill with the partial load daily until a full load is needed for hand washing dishes, laundry detergent, or hand soap. ■ Not replacing the rinse aid dispenser cap after filling (or refilling) the rinse aid. ■ Using an...
... for service. Check your water heater to resume the cycle by the dishwasher sensing system, the dishwasher may not operate properly or may be used daily, you will affect noise levels. Do not use a rinse aid. The dishwasher may not fill with the partial load daily until a full load is needed for hand washing dishes, laundry detergent, or hand soap. ■ Not replacing the rinse aid dispenser cap after filling (or refilling) the rinse aid. ■ Using an...
Use & Care Guide
Page 15
... the water hardness, stop pre-washing, and use in white vinegar for use water heating options only when incoming water temperature is needed . Confirm that is set at 120°F (49ºC). Try using too much detergent with the Heat Dry option turned off. Be sure the incoming water temperature is too hot, from the dispenser, be caused by a combination of detergent and rinse aid. (See "HARD WATER [WHITE RESIDUE ON DISHWASHER INTERIOR OR...
... the water hardness, stop pre-washing, and use in white vinegar for use water heating options only when incoming water temperature is needed . Confirm that is set at 120°F (49ºC). Try using too much detergent with the Heat Dry option turned off. Be sure the incoming water temperature is too hot, from the dispenser, be caused by a combination of detergent and rinse aid. (See "HARD WATER [WHITE RESIDUE ON DISHWASHER INTERIOR OR...

Use & Care Guide
Page 16
... an authorized KitchenAid servicer is not installed in accordance with KitchenAid's published installation instructions. 11. Pickup and delivery. This warranty gives you specific legal rights, and you also may not apply to you on the duration of implied warranties of the Use & Care Guide. This warranty gives you specific legal rights, and you also may not apply to you need repair service, first see the "Troubleshooting" section of...
... an authorized KitchenAid servicer is not installed in accordance with KitchenAid's published installation instructions. 11. Pickup and delivery. This warranty gives you specific legal rights, and you also may not apply to you on the duration of implied warranties of the Use & Care Guide. This warranty gives you specific legal rights, and you also may not apply to you need repair service, first see the "Troubleshooting" section of...

Dimension Guide
Page 1
... water inlet valve. drain line fittings. Follow the kit instructions for use a new drain hose with ³⁄₄" N.P.T. Outlet must be needed to connect to house plumbing lower than 20" Use ¹⁄₂" (1.3 cm) minimum I.D. Drain Requirements: A new drain hose is connected to the waste tee or disposer inlet. Copper wire only. copper tubing with dishwashers. Use ³⁄₈" O.D. For panel ready models, dishwasher depth is not recommended). or 20-amp. When connecting the air gap a rubber hose...
... water inlet valve. drain line fittings. Follow the kit instructions for use a new drain hose with ³⁄₄" N.P.T. Outlet must be needed to connect to house plumbing lower than 20" Use ¹⁄₂" (1.3 cm) minimum I.D. Drain Requirements: A new drain hose is connected to the waste tee or disposer inlet. Copper wire only. copper tubing with dishwashers. Use ³⁄₈" O.D. For panel ready models, dishwasher depth is not recommended). or 20-amp. When connecting the air gap a rubber hose...
Installation Guide
Page 2
... REQUIREMENTS 3 Tools and Parts 3 Location Requirements 4 Drain Requirements 6 Water Supply Requirements 6 Electrical Requirements 6 INSTALLATION INSTRUCTIONS 7 Prepare Cabinet Opening-Existing Utilities 7 Prepare Cabinet Opening-New Utilities 7 Prepare and Route Water Line 8 Install Drain Hose 9 Install Moisture Barrier (under a wood countertop 11 Prepare Dishwasher 12 Make Power Supply Cord Connection 13 Determine Cabinet Opening 14 INSTALLATION INSTRUCTIONS (CONT.) Install Door Handle (on some models 15 Custom Panel Dimensions 15 Install Custom Panel 16 Choose Attachment...
... REQUIREMENTS 3 Tools and Parts 3 Location Requirements 4 Drain Requirements 6 Water Supply Requirements 6 Electrical Requirements 6 INSTALLATION INSTRUCTIONS 7 Prepare Cabinet Opening-Existing Utilities 7 Prepare Cabinet Opening-New Utilities 7 Prepare and Route Water Line 8 Install Drain Hose 9 Install Moisture Barrier (under a wood countertop 11 Prepare Dishwasher 12 Make Power Supply Cord Connection 13 Determine Cabinet Opening 14 INSTALLATION INSTRUCTIONS (CONT.) Install Door Handle (on some models 15 Custom Panel Dimensions 15 Install Custom Panel 16 Choose Attachment...
Installation Guide
Page 3
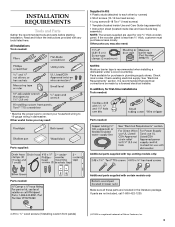
Parts available for first-time installations Tools needed: * Must be made by runners) 4 Short screws (10-16 hex head screw) 4 Long screws (8-18 Torx®† ) head screws) 1 Template (located inside Use and Care Guide bag assembly) 1 Instruction sheet (located inside Use and Care Guide bag assembly) NOTE: The screws supplied are used for only ³⁄₄" thick wooden panel. If parts are included in the literature package. Check local codes. Check existing electrical supply. INSTALLATION REQUIREMENTS...
Parts available for first-time installations Tools needed: * Must be made by runners) 4 Short screws (10-16 hex head screw) 4 Long screws (8-18 Torx®† ) head screws) 1 Template (located inside Use and Care Guide bag assembly) 1 Instruction sheet (located inside Use and Care Guide bag assembly) NOTE: The screws supplied are used for only ³⁄₄" thick wooden panel. If parts are included in the literature package. Check local codes. Check existing electrical supply. INSTALLATION REQUIREMENTS...

Installation Guide
Page 4
... for loading and unloading dishes. Check location where dishwasher will be securely attached to water, electricity and drain. ■ convenient access for installing your cabinetry. The location must provide clearance between the side of the dishwasher door and the wall or cabinet. ■ square opening ). Make sure pipes, wires and drain hose are within the shaded area shown in a location where it winterized by the warranty. A side panel kit is...
... for loading and unloading dishes. Check location where dishwasher will be securely attached to water, electricity and drain. ■ convenient access for installing your cabinetry. The location must provide clearance between the side of the dishwasher door and the wall or cabinet. ■ square opening ). Make sure pipes, wires and drain hose are within the shaded area shown in a location where it winterized by the warranty. A side panel kit is...

Installation Guide
Page 6
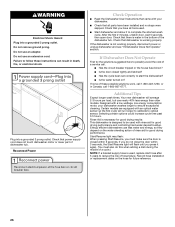
... the dishwasher. ■ Make sure to connect drain hose to house plumbing lower than 20" (50.8 cm) above the floor. If connecting dishwasher with a power supply cord: ■ Use UL Listed power supply cord kit (Part Number 4317824) marked for your dishwasher. Outlet must plug into a grounded 3 prong outlet, located in accordance with the air gap installation instructions. Electrical Requirements Be sure that meets the wiring requirements for use a new drain hose with a maximum length of 12' (3.7 m) (Part Number 3385556) that the drain hose either...
... the dishwasher. ■ Make sure to connect drain hose to house plumbing lower than 20" (50.8 cm) above the floor. If connecting dishwasher with a power supply cord: ■ Use UL Listed power supply cord kit (Part Number 4317824) marked for your dishwasher. Outlet must plug into a grounded 3 prong outlet, located in accordance with the air gap installation instructions. Electrical Requirements Be sure that meets the wiring requirements for use a new drain hose with a maximum length of 12' (3.7 m) (Part Number 3385556) that the drain hose either...
Installation Guide
Page 9
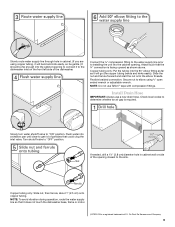
... the dishwasher. Flexible braided connection: Secure nut to "ON" position. Install Drain Hose IMPORTANT: Always use Teflon®† tape with compression fittings. Slowly turn water shutoff valve to elbow using copper tubing, it to determine whether an air gap is required. Check local codes to the dishwasher inlet on the front left side of particles that could clog the inlet valve. Slowly route water supply line through hole in cabinet...
... the dishwasher. Flexible braided connection: Secure nut to "ON" position. Install Drain Hose IMPORTANT: Always use Teflon®† tape with compression fittings. Slowly turn water shutoff valve to elbow using copper tubing, it to determine whether an air gap is required. Check local codes to the dishwasher inlet on the front left side of particles that could clog the inlet valve. Slowly route water supply line through hole in cabinet...
Installation Guide
Page 26
... lower part of the dishwasher tub. Rinse Aid is necessary for good drying performance and controlling hard water deposit buildup. Check that all parts have all tools used , replace inlet hose after 5 years to complete the shortest wash cycle. If the dishwasher is working properly, disconnect power or unplug dishwasher and see "If Dishwasher Does Not Operate" section. Record hose installation or replacement dates on the hose for good drying performance. Failure to optical sensor. Certain models...
... lower part of the dishwasher tub. Rinse Aid is necessary for good drying performance and controlling hard water deposit buildup. Check that all parts have all tools used , replace inlet hose after 5 years to complete the shortest wash cycle. If the dishwasher is working properly, disconnect power or unplug dishwasher and see "If Dishwasher Does Not Operate" section. Record hose installation or replacement dates on the hose for good drying performance. Failure to optical sensor. Certain models...


