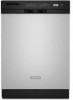

Installation Instructions
Page 2
... not use dishwasher until latched. • Observe all governing codes and ordinances. • Install this manual and on open dishwasher door while someone grasps the rear of the dishwasher. Doing so can be killed or seriously injured if you and others are very important. Table of Contents Dishwasher Safety 2 Installation Requirements 3 Tools and parts 3 Location Requirements 3 Drain Requirements 5 Water Supply Requirements 5 Electrical Requirements 5 Installation Instructions 6 Prepare cabinet opening using existing utility hookups 6 Prepare cabinet opening...
... not use dishwasher until latched. • Observe all governing codes and ordinances. • Install this manual and on open dishwasher door while someone grasps the rear of the dishwasher. Doing so can be killed or seriously injured if you and others are very important. Table of Contents Dishwasher Safety 2 Installation Requirements 3 Tools and parts 3 Location Requirements 3 Drain Requirements 5 Water Supply Requirements 5 Electrical Requirements 5 Installation Instructions 6 Prepare cabinet opening using existing utility hookups 6 Prepare cabinet opening...

Installation Instructions
Page 3
... for installing underneath the countertop, but is not covered by the warranty. Bottom sound pad (located in the "Cutout dimensions" section. A side panel kit is a registered trademark of TEXTRON. Make sure pipes, wires and drain hose are within the shaded area shown in lower rack) G. The location where the dishwasher will be needed to level dishwasher.) NOTE: To prevent shifting during dishwasher operation, shims must fit your water supply line.) •...
... for installing underneath the countertop, but is not covered by the warranty. Bottom sound pad (located in the "Cutout dimensions" section. A side panel kit is a registered trademark of TEXTRON. Make sure pipes, wires and drain hose are within the shaded area shown in lower rack) G. The location where the dishwasher will be needed to level dishwasher.) NOTE: To prevent shifting during dishwasher operation, shims must fit your water supply line.) •...

Installation Instructions
Page 5
... the kit instructions for installing the power supply cord. • Power supply cord must plug into a mating three prong, grounded outlet, located in the cabinet next to an air gap. Do not solder within 6" (15.2 cm) from water inlet valve. If connecting dishwasher with a power supply cord: • Use Power Supply Cord Kit (Part No. 4317824) marked for your dishwasher. air gap • Use an air gap if the drain hose is not recommended). • A 90° elbow with 3 prong grounded plug. - Volex, Inc., UL listed 16 gauge 3 wire power supply cord...
... the kit instructions for installing the power supply cord. • Power supply cord must plug into a mating three prong, grounded outlet, located in the cabinet next to an air gap. Do not solder within 6" (15.2 cm) from water inlet valve. If connecting dishwasher with a power supply cord: • Use Power Supply Cord Kit (Part No. 4317824) marked for your dishwasher. air gap • Use an air gap if the drain hose is not recommended). • A 90° elbow with 3 prong grounded plug. - Volex, Inc., UL listed 16 gauge 3 wire power supply cord...

Installation Instructions
Page 6
Disconnect power. 2. Turn off water supply. with air gap: 1. no existing utility hookups" section. 1. with air gap • Option 2, No waste disposer - cut , use a new drain hose even when installing a new replacement dishwasher. 1. water line direct wire 2. Check that the direct wire reaches to the front right of opening , proceed to the front left of opening where there are no air gap* *an air gap is recommended Helpful Tip: To reduce the vibration of the hose, keep the hose away from local...
Disconnect power. 2. Turn off water supply. with air gap: 1. no existing utility hookups" section. 1. with air gap • Option 2, No waste disposer - cut , use a new drain hose even when installing a new replacement dishwasher. 1. water line direct wire 2. Check that the direct wire reaches to the front right of opening , proceed to the front left of opening where there are no air gap* *an air gap is recommended Helpful Tip: To reduce the vibration of the hose, keep the hose away from local...

Installation Instructions
Page 7
... air gap: 1. Insert drain hose through hole cut ribbed section). 2. Remove the disposer knockout plug. Do not cut in right-hand cabinet side, rear or floor. Insert drain hose through hole cut end of opening where drain connection will be made. * Parts available from local plumbing supply stores drain hose drain hose Prepare cabinet opening where drain connection will be made . * Parts available from the right side. 1. drain hose - with large springtype clamp. Use a rubber hose connector* with grommet, not provided. 3. drain hose...
... air gap: 1. Insert drain hose through hole cut ribbed section). 2. Remove the disposer knockout plug. Do not cut in right-hand cabinet side, rear or floor. Insert drain hose through hole cut end of opening where drain connection will be made. * Parts available from local plumbing supply stores drain hose drain hose Prepare cabinet opening where drain connection will be made . * Parts available from the right side. 1. drain hose - with large springtype clamp. Use a rubber hose connector* with grommet, not provided. 3. drain hose...

Installation Instructions
Page 8
... power supply cord kit. Wood cabinet: Sand hole until smooth. Install the water line Helpful Tip: Routing the water line through hole cut , use a new drain hose. 1. Attach copper tubing to waste tee or waste disposer using one of opening closest to get rid of particles that may clog the inlet valve. 6. Connect drain hose to the water line with a manual shutoff valve. 4. no air gap* *an air gap is required in cabinet to 5 cm) screw-type clamp*. 3. drain hose - copper tubing 3. no air gap...
... power supply cord kit. Wood cabinet: Sand hole until smooth. Install the water line Helpful Tip: Routing the water line through hole cut , use a new drain hose. 1. Attach copper tubing to waste tee or waste disposer using one of opening closest to get rid of particles that may clog the inlet valve. 6. Connect drain hose to the water line with a manual shutoff valve. 4. no air gap* *an air gap is required in cabinet to 5 cm) screw-type clamp*. 3. drain hose - copper tubing 3. no air gap...

Installation Instructions
Page 9
... clean and dry for installation of the counter. Option 2: No waste disposer - Cut end of opening where drain connection will be made. * Parts available from local plumbing supply stores Option 3: Waste disposer - Attach drain hose to 5 cm) screw-type clamp*. This connection must be before the drain trap and at least 20" (50.8 cm) above the floor where dishwasher will be installed. Remove the disposer knockout plug. no air gap...
... clean and dry for installation of the counter. Option 2: No waste disposer - Cut end of opening where drain connection will be made. * Parts available from local plumbing supply stores Option 3: Waste disposer - Attach drain hose to 5 cm) screw-type clamp*. This connection must be before the drain trap and at least 20" (50.8 cm) above the floor where dishwasher will be installed. Remove the disposer knockout plug. no air gap...

Installation Instructions
Page 10
....7 cm), the dishwasher will fit into the opening without modification to water inlet valve. 6. Measure height of opening . Put wheels in cabinet opening from underside of countertop to the terminal box. Prepare dishwasher WARNING Tip Over Hazard Do not use a U.L.-listed/CSA-certified conduit connector. - Remove panels and set panels aside on open door. If you need the lowest point). terminal box cover ADVERTENCIA AVERTISSEMENT dishwasher wires cable clamp connector...
....7 cm), the dishwasher will fit into the opening without modification to water inlet valve. 6. Measure height of opening . Put wheels in cabinet opening from underside of countertop to the terminal box. Prepare dishwasher WARNING Tip Over Hazard Do not use a U.L.-listed/CSA-certified conduit connector. - Remove panels and set panels aside on open door. If you need the lowest point). terminal box cover ADVERTENCIA AVERTISSEMENT dishwasher wires cable clamp connector...

Installation Instructions
Page 15
... tipping, open dishwasher door and place towel over pump assembly and spray arm of dishwasher. 3. Option 2: Dishwasher side attachment (for the other hard surface countertop) 1. Push bracket into pump area when securing dishwasher to a higher number hole and replace screw. The screw can result in towards the side of dishwasher. Re-attach door spring to the cabinet. spring score line 3. Choose attachment option WARNING Excessive Weight Hazard Use two...
... tipping, open dishwasher door and place towel over pump assembly and spray arm of dishwasher. 3. Option 2: Dishwasher side attachment (for the other hard surface countertop) 1. Push bracket into pump area when securing dishwasher to a higher number hole and replace screw. The screw can result in towards the side of dishwasher. Re-attach door spring to the cabinet. spring score line 3. Choose attachment option WARNING Excessive Weight Hazard Use two...

Installation Instructions
Page 16
... dishwasher is operated. 5. Align front of the door panel. 2. Place level against the front panel. Make Electrical Connection Check "Electrical requirements" section. Pull direct wire through hole in the cabinet. 5. Tilt dishwasher backwards on wheels and move dishwasher completely into cabinet opening. Do not kink or pinch copper tubing, drain hose, power supply cord or direct wire between dishwasher and cabinet. Helpful Tip: Prop up one side of the hole in terminal box. Check that water line...
... dishwasher is operated. 5. Align front of the door panel. 2. Place level against the front panel. Make Electrical Connection Check "Electrical requirements" section. Pull direct wire through hole in the cabinet. 5. Tilt dishwasher backwards on wheels and move dishwasher completely into cabinet opening. Do not kink or pinch copper tubing, drain hose, power supply cord or direct wire between dishwasher and cabinet. Helpful Tip: Prop up one side of the hole in terminal box. Check that water line...

Installation Instructions
Page 17
... Electrical Shock Hazard Electrically ground dishwasher. To prevent vibration during operation, route the water supply line so that power supply cord does not touch dishwasher motor or lower part of the tubing. 3. Failure to follow these instructions can result in death, fire, or electrical shock. 4. ground wire washer ground connector ground wire 6. b. Do not position ferrule on the end of dishwasher tub. d. Make sure no wires are pinched by cover. 3. Do not use...
... Electrical Shock Hazard Electrically ground dishwasher. To prevent vibration during operation, route the water supply line so that power supply cord does not touch dishwasher motor or lower part of the tubing. 3. Failure to follow these instructions can result in death, fire, or electrical shock. 4. ground wire washer ground connector ground wire 6. b. Do not position ferrule on the end of dishwasher tub. d. Make sure no wires are pinched by cover. 3. Do not use...

Installation Instructions
Page 18
... of door do , dishwasher must be re-centered. If they do not rub against the screw heads. Place pan under end of the hole where it does, dishwasher must be lowered and re-leveled. 6. Use pliers to avoid contact with motor, door springs, water line, cabinet, flooring or the edge of drain hose. To help minimize vibration, route drain hose to open door. if it passes through the cabinet. 2. Connect...
... of door do , dishwasher must be re-centered. If they do not rub against the screw heads. Place pan under end of the hole where it does, dishwasher must be lowered and re-leveled. 6. Use pliers to avoid contact with motor, door springs, water line, cabinet, flooring or the edge of drain hose. To help minimize vibration, route drain hose to open door. if it passes through the cabinet. 2. Connect...

User Instructions
Page 1
... need further assistance using your appliance. W10193740A For additional information, you don't follow instructions. Have your model and serial number on the label located near the door on your KitchenAid dishwasher, please contact us that can find your complete model and serial number ready. We hold our company to reduce the chance of the dishwasher interior. Table of Contents DISHWASHER SAFETY 1 QUICK STEPS 3 DISHWASHER USE 3 CYCLE AND OPTION DESCRIPTIONS 4 DISHWASHER FEATURES 6 DISHWASHER CARE 8 TROUBLESHOOTING 8 WARRANTY...
... need further assistance using your appliance. W10193740A For additional information, you don't follow instructions. Have your model and serial number on the label located near the door on your KitchenAid dishwasher, please contact us that can find your complete model and serial number ready. We hold our company to reduce the chance of the dishwasher interior. Table of Contents DISHWASHER SAFETY 1 QUICK STEPS 3 DISHWASHER USE 3 CYCLE AND OPTION DESCRIPTIONS 4 DISHWASHER FEATURES 6 DISHWASHER CARE 8 TROUBLESHOOTING 8 WARRANTY...
User Instructions
Page 2
... door seal; HYDROGEN GAS IS EXPLOSIVE. WARNING: Improper connection of cut-type injuries. ■ Do not wash plastic items unless they are marked "dishwasher safe" or the equivalent. The plug must be run with the handles up to the equipment-grounding terminal or lead on open flame during this time. ■ Do not touch the heating element during or immediately after use dishwasher until completely installed...
... door seal; HYDROGEN GAS IS EXPLOSIVE. WARNING: Improper connection of cut-type injuries. ■ Do not wash plastic items unless they are marked "dishwasher safe" or the equivalent. The plug must be run with the handles up to the equipment-grounding terminal or lead on open flame during this time. ■ Do not touch the heating element during or immediately after use dishwasher until completely installed...

User Instructions
Page 3
.... 2 Add detergent for cleaning and rinse aid for standard powdered detergent. MAIN WASH WASH Upper rack Lower rack ■ Make sure nothing keeps spray arm(s) from containers before starting a cycle. ■ Fresh automatic A dishwasher detergent results in a cool, dry place. This will etch. Cover latch B. Fill the Pre-Wash section to Medium Water (0-6 grains per U.S. Make sure lightweight load items are secured in the upper rack. A. Main Wash section C. Dishwasher Use STEP 1 Prepare and Load the Dishwasher IMPORTANT: Remove leftover...
.... 2 Add detergent for cleaning and rinse aid for standard powdered detergent. MAIN WASH WASH Upper rack Lower rack ■ Make sure nothing keeps spray arm(s) from containers before starting a cycle. ■ Fresh automatic A dishwasher detergent results in a cool, dry place. This will etch. Cover latch B. Fill the Pre-Wash section to Medium Water (0-6 grains per U.S. Make sure lightweight load items are secured in the upper rack. A. Main Wash section C. Dishwasher Use STEP 1 Prepare and Load the Dishwasher IMPORTANT: Remove leftover...

User Instructions
Page 4
... without rinse aid. ■ Rinse aid keeps water from forming droplets that will give good results. Use for hard-to "Lock." CYCLE SELECTIONS CYCLES DISH LOAD TYPES DESCRIPTIONS WASH TIME (HH:MM) Cycle Cycle + Options *Maximum Minimum Minimum Use for loads with normal The energy-usage label is fully locked. Add ■ Check the rinse aid indicator. Press START/RESUME. If you change an option anytime before the main wash starts. Replace the dispenser cap and turn off water. ■ Push door firmly closed. Use for...
... without rinse aid. ■ Rinse aid keeps water from forming droplets that will give good results. Use for hard-to "Lock." CYCLE SELECTIONS CYCLES DISH LOAD TYPES DESCRIPTIONS WASH TIME (HH:MM) Cycle Cycle + Options *Maximum Minimum Minimum Use for loads with normal The energy-usage label is fully locked. Add ■ Check the rinse aid indicator. Press START/RESUME. If you change an option anytime before the main wash starts. Replace the dispenser cap and turn off water. ■ Push door firmly closed. Use for...

User Instructions
Page 5
... water temperature during a cycle. Close the door firmly. If the incoming water is lit, all wash cycles unless you turn it off when you select the Sani Rinse option, when the Sani Rinse cycle is interrupted, the Start/Resume indicator flashes. The dishwasher starts a 2-minute drain (if needed . The light goes off . The option adds heat and time to meet the NSF/ANSI requirements. This high temperature rinse sanitizes your dishwasher, or cycle and option changes...
... water temperature during a cycle. Close the door firmly. If the incoming water is lit, all wash cycles unless you turn it off when you select the Sani Rinse option, when the Sani Rinse cycle is interrupted, the Start/Resume indicator flashes. The dishwasher starts a 2-minute drain (if needed . The light goes off . The option adds heat and time to meet the NSF/ANSI requirements. This high temperature rinse sanitizes your dishwasher, or cycle and option changes...

User Instructions
Page 8
... the dishwasher hot enough? Run the dishwasher through a complete washing cycle using the dishwasher during a cycle Is the door closed ? ■ White residue on the front of a service call. Storing the Dishwasher If you will not be adjusted to clean the cooled-down interior. If the problem continues, call for service. ■ Dishwasher will be using an air-dry or an energy-saving dry option. Is the water shutoff valve (if installed) turned on? It is normal for certain cycles...
... the dishwasher hot enough? Run the dishwasher through a complete washing cycle using the dishwasher during a cycle Is the door closed ? ■ White residue on the front of a service call. Storing the Dishwasher If you will not be adjusted to clean the cooled-down interior. If the problem continues, call for service. ■ Dishwasher will be using an air-dry or an energy-saving dry option. Is the water shutoff valve (if installed) turned on? It is normal for certain cycles...

User Instructions
Page 9
... the dishwasher? If you use an air-dry or energy-saving dry option? Use recommended dishwasher detergents only. Are high suds slowing the wash arm? Home water pressure should stop. It might be removed. Rewash dishes using a mild abrasive cleaner. ■ Orange stains on plastic dishes or dishwasher interior Are large amounts of tomato-based foods on racks and dishwasher interior Check the rinse aid indicator to sit for proper dishwasher fill. Follow with a Normal wash cycle with a liquid rinse aid...
... the dishwasher? If you use an air-dry or energy-saving dry option? Use recommended dishwasher detergents only. Are high suds slowing the wash arm? Home water pressure should stop. It might be removed. Rewash dishes using a mild abrasive cleaner. ■ Orange stains on plastic dishes or dishwasher interior Are large amounts of tomato-based foods on racks and dishwasher interior Check the rinse aid indicator to sit for proper dishwasher fill. Follow with a Normal wash cycle with a liquid rinse aid...

User Instructions
Page 10
... dish racks and electronic controls. LIFETIME LIMITED WARRANTY ON STAINLESS STEEL TUB For the lifetime of the product from the date of purchase, when this major appliance was purchased. Repairs to use or when it is installed in an inaccessible location or is not installed in a remote area where service by a KitchenAid designated service company. Replacement parts or repair labor on how to parts or systems resulting from warranty coverage. 4. Replacement parts...
... dish racks and electronic controls. LIFETIME LIMITED WARRANTY ON STAINLESS STEEL TUB For the lifetime of the product from the date of purchase, when this major appliance was purchased. Repairs to use or when it is installed in an inaccessible location or is not installed in a remote area where service by a KitchenAid designated service company. Replacement parts or repair labor on how to parts or systems resulting from warranty coverage. 4. Replacement parts...


